


I am going to try to be as candid as possible on this thread. there are those out there who may have never touched a machine, or only used one a few times and yet want to try all this out. I will include price of entry, shipping, tax and tooling. And pictures of trials and errors (there will be plenty).
First of all, thanks to Penn tools for the great service. I emailed monday for information, and the tool was delivered thursday morning. That is how business is done!
This tool if huge, if you have seen pictures of an x2 or x3. This is, well, um a lot more. It was about 900 pounds on its invoice.
Liftgate service is a must for something like this, well unless you have a forklift in your garage.
notice the high tech well chocks in the above picture
you may want to remind the driver to grab a pallet jack on the way out, or get versed on your egyption block moving techniques (they actually work quite well)
You will soon see I do not have a huge amount of space, but a lot can be done if you pack and build smart.
most of my wood working tools are going very soon.
Throw together a cart or some method of storing and moving the macine ahead of time. You may be able to build great farkles, but the universe is held together with 2 by's and construction screws.
I made a 4x4 stand using 2x6's on the bottom and 2x4s on top with steel wheels I picked up at menards. You may notice later I added two more 2x4s to the bottom just in case. I sould have used 2x4s only and set the lower or middle level on its side instead of flat. Would have been stronger. This did work quite well, however. I only have about a quarter inch of slack in the middle where it sits. (with steel square stock beneath to lean on if it gets worse).
That makita drill set I picked up at home depot last year. I will never cheap out on these again, they are worth their weight in gold. 18 volt, each battery recharges in about 15 minutes-lasts a full job. The impact wrench will strip a half inch by 3 lag screw. I grab the hex to 1/4 inch socket adaptors up at the local big box hardware store. I bend/break/twist the adaptors all the time but the sockets and wrench come out unscated.

Results 1 to 20 of 73
-
03-05-2010, 05:26 AM #1
 Registered
- Join Date
- Feb 2010
- Posts
- 0
DM45 RF45 Build Thread - it begins
-
03-05-2010, 12:07 PM #2
Registered
- Join Date
- Jan 2006
- Posts
- 123
Looking good so far. I have those same drills just with the bigger batteries and you are more than right on them being worth there weight in gold. Are you building a base or did one come with it. I have an idea what I am doing with mine I just need to get a start on it.
-
03-05-2010, 05:31 PM #3
Registered
- Join Date
- Feb 2010
- Posts
- 0
Starting the base build tonight. Modeling after the IH base build. I finally have a break (the next 9 days) to work on this stuff. steppers, controller, monitor, joystick, drives, power supplys, tooling...all were waiting for this.
Oh yeah, dont expect any amazing machining here until much later. I am trying to add to the pool of collective experience to see if we can get more people to take the plunge. Will be boring for you old timers for a little bit. Originally Posted by sfrankland

-
03-07-2010, 05:38 AM #4
Registered
- Join Date
- Jan 2009
- Posts
- 265
I'll be watching, I'm starting one myself but progress is slow.
When I get momentum with design and build I'll start a thread.
You're going for large steppers? I've been thinking the same thing, unless comparable servo parts can be sourced for similar money.
-
03-07-2010, 05:38 AM #5
Registered
- Join Date
- Feb 2010
- Posts
- 0
 Table Specs - plans, cut sheet, sketchup model
Any feedback? I would have used all 2x6's but Home Depot had a full rack of pressure treated 2x4's at 85% off. The warp was quite minimal. Everything will be lag screwed together so I will glue/screw the arches into each other for the trusses and balance out the warp. I Dont think It should add too much tension to the structure.
Thoughts?
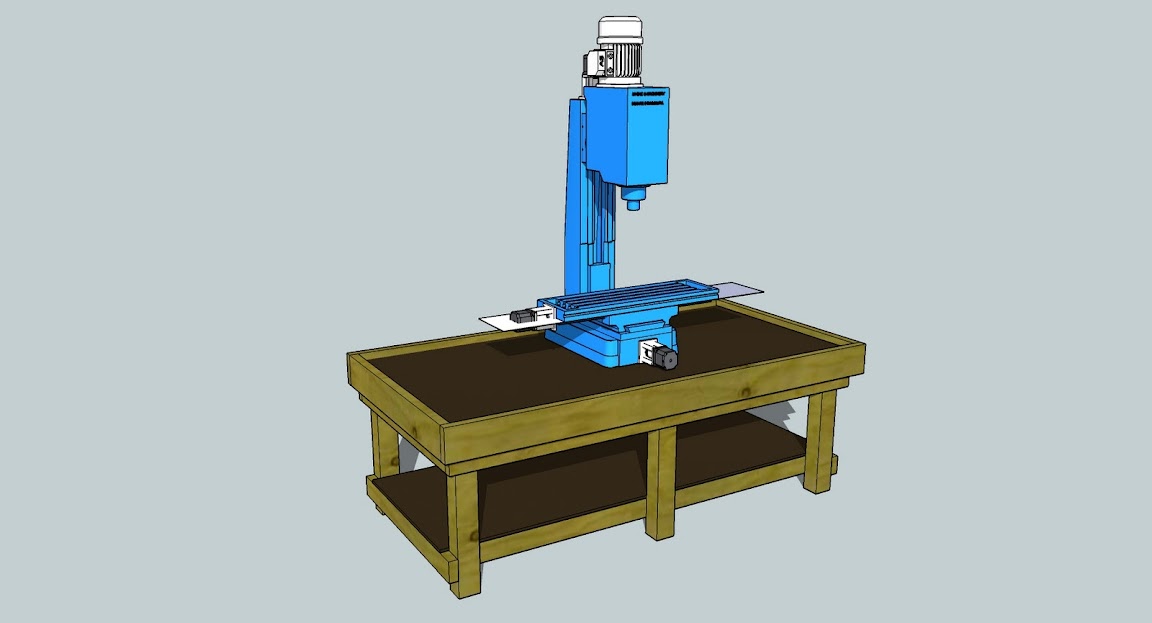
note: The mill in the above picture is an Industrial Hobbies model that had been compressed on x and y to fit into the dimensions of my model. It was a quick/dirty fix so I could plan my stand. It is NOT a correct drawing. Everything is miss sized, ratios and measurements are wrong. It is a good x,y representation of my DM45. The planes you see are the range of motion.
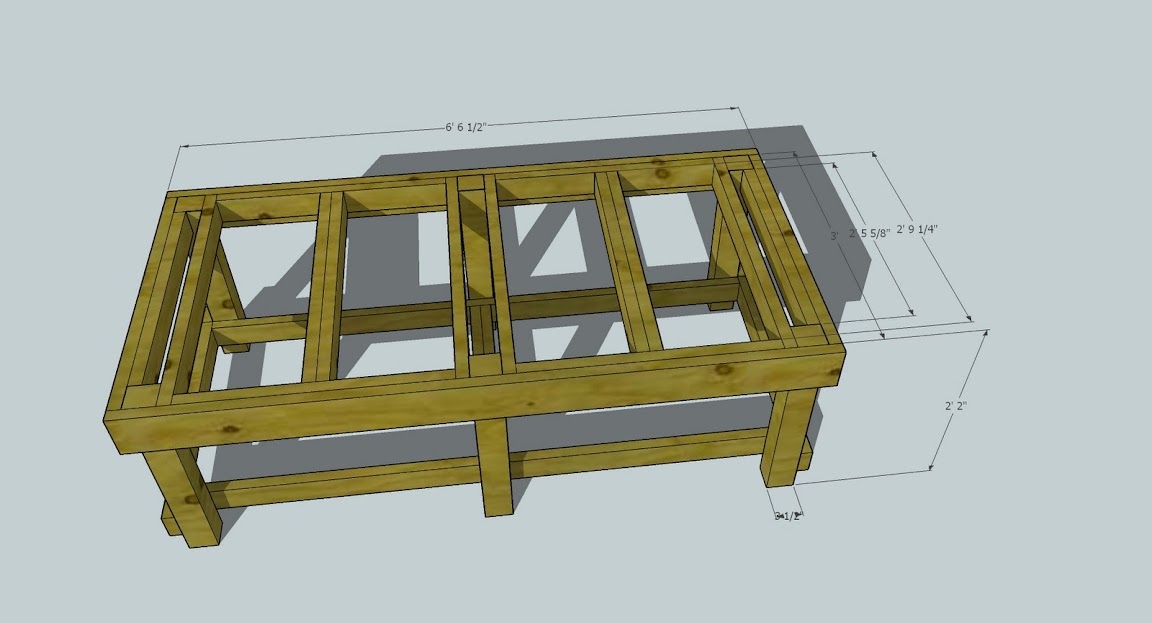
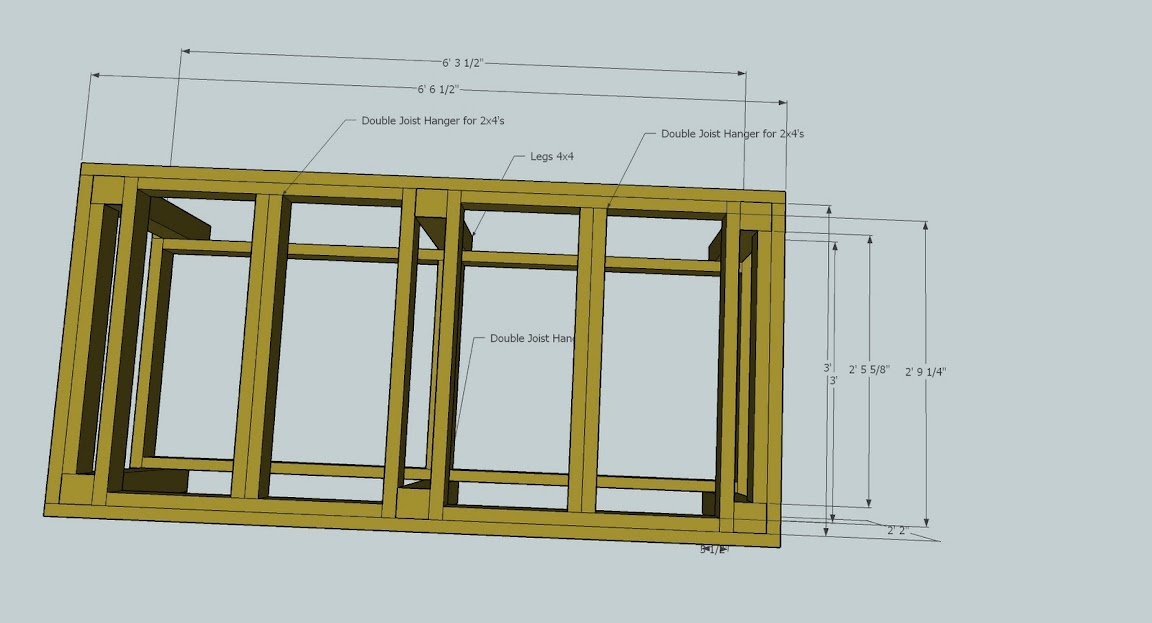
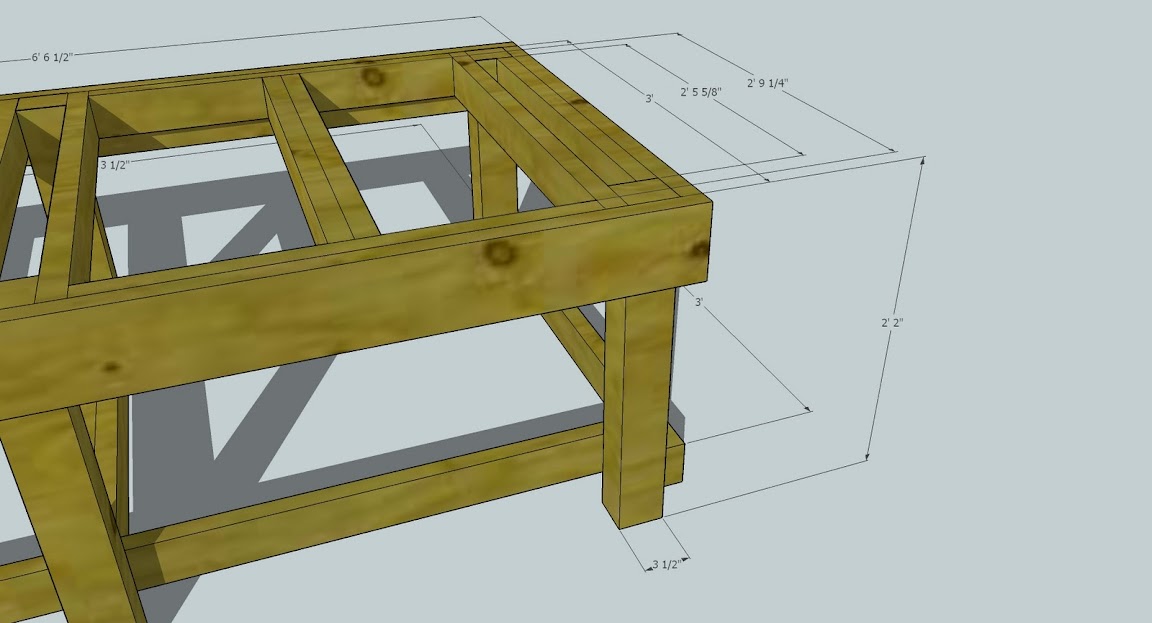
I finagled with the dimensions, I was able to cut 3 inches off of the depth, and any gained real estate in my shop is worth while. rather than re dimension every piece I used scale to go 95% Y. So if things look a tad oblique that is why.
Cut sheet:
https://spreadsheets.google.com/ccc?...fUFJycXc&hl=en
Sketchup Model:
sketchup is crashing. I will figure this out later.
-
03-07-2010, 05:42 AM #6
Registered
- Join Date
- Jan 2009
- Posts
- 265
More a fan of arc welding scrap steel myself.
But timber works just fine, many backyard engine swaps have being done with 4x2 pine structures.
-
03-07-2010, 05:43 AM #7
Registered
- Join Date
- Feb 2010
- Posts
- 0
Yes, I ordered the entire setup and tooling all at once. It was mildly overwhelming so I went the easy route. I am using Steppers and 203V's all from Keling. I am going to swap out my initial order for two 1200 oz/in nema 34's and an 1800 ozin nema 34. I may run up to 72 volts if my power is stable and the steppers dont cry/fry. Originally Posted by D.L
-
03-07-2010, 05:47 AM #8
Registered
- Join Date
- Feb 2010
- Posts
- 0
I would rather have used steel. But..for cost, and the fact that I have a little furniture shop, twelve inch compound sliding mitre, and the like. Wood is very quick to build and cheap-PT wood should withstand well even if the seal leaks. Originally Posted by D.L
Did I mention entire pile of wood was 85% off? (about 40 bucks in wood without the ply table tops....bang for buck quotient..)
-
03-07-2010, 07:37 AM #9
Gold Member
- Join Date
- Apr 2007
- Posts
- 2580
I made the table for my first machine......
Hey man I made the table for my first machine from heavy timber too.... lasted a very long time and worked just fine. I lag bolted everything together and used some dado joints here and there to make it more rigid. That looks like a nice machine. I think you will love it when you get it cnc'd.... Lots of beef on these mills..... I made my table top with two sheets of 3/4 ply laminated together and then I sheeted it with some stainless sheeting applied with contact cement..... That was for a manual machine tho and no thought of flood coolant.... you can make a nice enclosure for the mill from wood as well and fiberglass the seams then paint it with some quality industrial paint. That is what I did and it is holding up well.....
Looking forward to seeing what you do with your build and how you choose to do things.... lots of options and ideas. Good luck with it and peace...
Pete
-
03-07-2010, 08:43 AM #10
Member
- Join Date
- May 2008
- Posts
- 1185
Your drawing skills are quite good.
I made one mill stand out of wood and it works fine and it flexes less than the steel one I made for the IH mill. I made the wooden stand a bit larger than the mill to give me a place to set things.
After five minuets of milling it had 1" of chips on it which is just another surface to clean up. I kind of like the open steel frame stand better it just let the chips hit the floor so clean up is a bit faster.
Your mill looks a bit different than some of the other RF-45 clones I have seen. The column looks about the same size as a IH mill but the bolts are standard hex not SHCS. The Z collar looks longer than most of the clones, like the IH, but it does not have the 12" mounting ring.
Do you get 13" of Y travel?
-
03-07-2010, 02:52 PM #11
Registered
- Join Date
- Feb 2010
- Posts
- 0
 Originally Posted by pete from TN
Thank you both for the encouragement. And I completely forgot to mention the mill you see in that image is COMPLETELY skewed. Someone drew up an Industrial Hobbies mill and uploaded to google 3dwarehouse. I grabbed the model and compressed it using scale until the dimensions were correct for x,y, and z only. Then drew the planes for the travel so I could visualize how large it would be. I am a completely visual learner/builder, I need a picture in my head of scale before I start cutting wood or I have no confidence that it will be correct when finished. Originally Posted by arizonavideo
Originally Posted by pete from TN
Thank you both for the encouragement. And I completely forgot to mention the mill you see in that image is COMPLETELY skewed. Someone drew up an Industrial Hobbies mill and uploaded to google 3dwarehouse. I grabbed the model and compressed it using scale until the dimensions were correct for x,y, and z only. Then drew the planes for the travel so I could visualize how large it would be. I am a completely visual learner/builder, I need a picture in my head of scale before I start cutting wood or I have no confidence that it will be correct when finished. Originally Posted by arizonavideo
I will make a note by the drawings. So if yo are impressed by my 2x4 drawing 1337ness then thank you! :-) otherwise I give credit for the real piece in that image to its author.
-
03-07-2010, 03:19 PM #12
Registered
- Join Date
- Jan 2006
- Posts
- 123
The only thinking I would change would be to notch the 4x4 legs so that the table framing is sitting on the 4x4 and not hanging by leg screws. I
-
03-08-2010, 01:46 AM #13
Registered

- Join Date
- Dec 2005
- Posts
- 59
maybe it is better to make a stand with a steel? i have the same machine now and i have to mount it in a top floor. I decided to disassembly the machine because there is no way to lift it through a staircase...
-
03-08-2010, 07:17 AM #14
Registered
- Join Date
- Feb 2010
- Posts
- 0
I like that idea, but wouldnt that trade vertical support for torsional rigidity? (taking a 3.5 inch contact area down to 2 inches on outer four legs) I figured my lag screws and construction adhesive would do for vertical support. The shear strength of 5/8 steel is pretty decent, I will run the numbers before gluing her together. It rained all day today, lumber outside, no building. Sad sad day... Originally Posted by sfrankland
-
03-08-2010, 07:56 AM #15
Member
- Join Date
- May 2008
- Posts
- 1185
The trick to making a wood table total non wobbly is to use shear facing on three sides.
I faced the three sides of my work bench (The old one I called old shaky.) with 3/4" chip wood and the same with three sides of the mill stand and there is almost no flex at all. The mill stand could have used three layers of 3/4 for the top or better supports directly under where the mill sits. The wood does adsorb vibration better than steel.
The steel stand rings and does this strange shimmy thing even with a good amount of cross braes. I will have to rebuild the whole thing.
You didn't say if your mill comes with about 13" of Y travel? It sure looks like it is IH mill sized which is really the next size larger RF-45 mill with all the ways being wider and larger and longer than a RF-45. Do they call it a IH clone?
-
03-08-2010, 06:19 PM #16
Registered
- Join Date
- Jan 2006
- Posts
- 123
Here is what I am talking about.

The problem with the doubled up 2x6 hanging off the front and back 2x6 is that they are stronger than the 2x6 they are attached to. I would suggest just going with single 2x6 instead of the doubles and making sure that they are spaced so they aligned with the base of the mill. Also I would add a 4x4 to the rear to help carry the load and if at all possible one to the front as well. Also as mentioned I would sheet the rear and sides in with plywood to add strength to the table and to remove and side to side and front to back motion that will come when jogging the table.
My mill is a lot smaller then yours and this is what it does to a table.
http://www.youtube.com/user/erlendur.../2/BE7-whuYQiE
-
03-10-2010, 03:32 AM #17
Registered
- Join Date
- Feb 2010
- Posts
- 0
good info, it is a little late to cut the slots, but I will plywood the surrounds. That would be much simpler than cross braces and more effective (if I use glue and assure connection all the way around.)
Originally Posted by sfrankland
-
03-10-2010, 03:36 AM #18
Registered
- Join Date
- Feb 2010
- Posts
- 0
I didnt measure the Z travel, but x and y are RF45 for sure. It really is about 20% smaller than the IH. You would need to ask yourself if the extra 800-1000 dollars would be well spend for the larger table and travel. If you want a good comparison, get into sketchup and download the IH model, then copy it in your workspace and scale one down about 80%, or just resize the table and base. I was surprised at how they looked side by side-however what I have is still huge, and being my first mill I am not crying for more space...yet.. Originally Posted by arizonavideo
-
03-10-2010, 03:43 AM #19
Registered
- Join Date
- Feb 2010
- Posts
- 0
Well, this entry was supposed to be about dealing with warp. I was going to show images of the orientation of doubling up boards so they straighten each other out, and why it is not worth saving a few dollars on the long runs.
Then I was going to show how to crank the sub structure with cam straps while you attach joists to fixed a badly warped table.
But this happened:

(arent those the hottest pants ever? They are my hospital comfort pants)
The first cut is the deepest right? I cut all my parts ahead of time and labeled each. But while working I rolled my ankle on one of the boards. (nuts)
Spent last night in the ER, but luckily, ever ever ever so luckily it wasnt broken. But spraining an ankle that had previously been screwed back together isnt something I ever want to do again. Officially off the crutches and back enjoying life. So a day lost, but perspective gained.
Watch your step old timers-we dont fall as gracefully as we used to.
-
03-10-2010, 07:42 AM #20
Member
- Join Date
- May 2008
- Posts
- 1185
Sorry to see you hurt the ankle. It looks like you may have a few weeks to plan things.. Originally Posted by mattbesquare
I was not trying to do the "my mill is bigger thing" or anything but your mill looks like it is one of the larger RF-45 clones and its hard to tell by just a picture.
At least you didn't drop it on your foot


 Reply With Quote
Similar Threads
-
And So Build Number 3 begins......
By thkoutsidthebox in forum DIY CNC Router Table MachinesReplies: 276Last Post: 11-18-2009, 01:47 PM -
Retrofit CNC machine HBM DM45 (RF45, IH mill, Grizzly)
By OptiBF20 in forum Benchtop MachinesReplies: 0Last Post: 01-30-2009, 02:36 PM -
So the build begins.....
By Gallop in forum CNC Wood Router Project LogReplies: 3Last Post: 06-24-2007, 10:58 PM -
PennTool DM45 Dovetail Mill.....
By IntrepidSE in forum MetalWork DiscussionReplies: 12Last Post: 01-02-2007, 12:11 AM -
Ajax DM45
By lgreeves in forum Centroid CNC Control ProductsReplies: 2Last Post: 05-10-2006, 04:43 PM
