


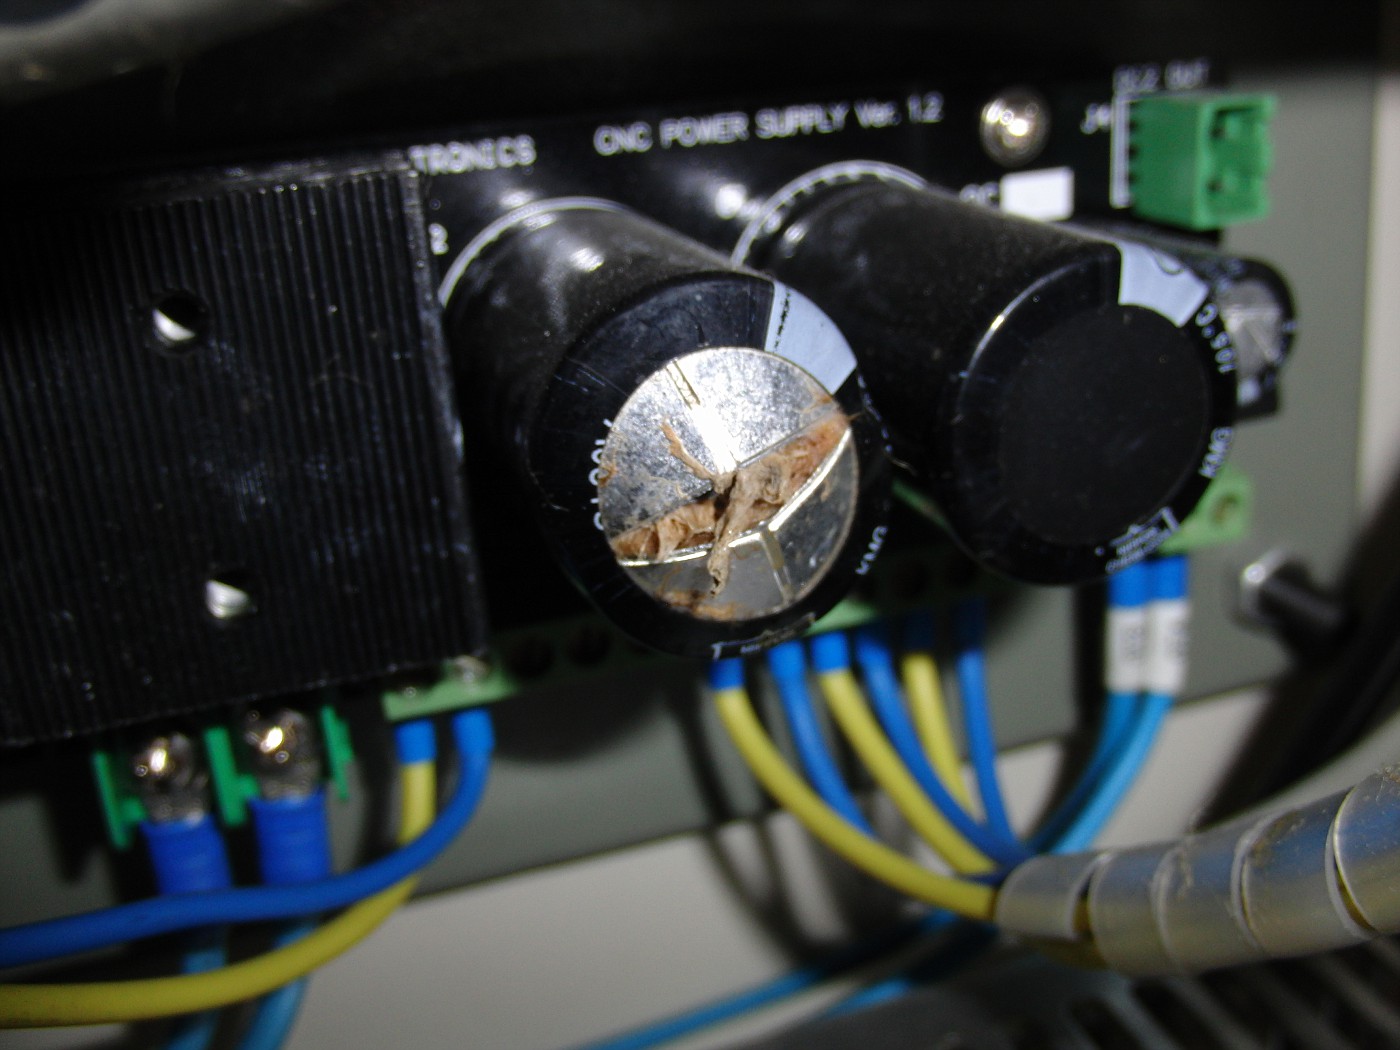
Had a couple issues with the Mikini. One is the DC power board blew. One of the capacitors popped:
Fortunately Phil had one sent out as a replacement, and I was going out of town, so I didn't have any real down time. Replacing was a bit of a PITA, as the board was quite difficult to mount back on. I am sure the boards are initially mounted with the panel out of the machine!
I have another issue with the MPG in manual mode, it acts "funny" on x10, but normal on both x1 and x100. I suspect a hardware issue, but I need to diagnose it a bit further.
I spent a fair amount of time today messing with the home switches, and configuring MACH3 a bit more. I didn't know that the machine even HAD homing switches - it is not mentioned anywhere on the website or in the manual that I recall. I was fretting how to get some mounted, and asked for a recommendation from Phil. He said they were already installed, and set up in the MACH3 XML file. So I hit "Ref All Home" and boom, 0,0,0 was set! Wow, that was easy!
Next I set up the soft limits in MACH3.
I am still confused on getting coordinates to re-align/set after powering down. When I power up again, and rehome, it goes to 0,0,0... Can someone explain how to set it up so that the fixture 0,0,0 is retained after a powerdown and powerup sequence?
That's it for now, just wanted to post an update...
Results 1 to 13 of 13
-
11-11-2010, 01:41 AM #1
 Gold Member
- Join Date
- Feb 2009
- Posts
- 2143
Couple startup issues, and some resolutions
-
11-11-2010, 05:06 AM #2
Gold Member
- Join Date
- Jul 2007
- Posts
- 1602
The machine will home to the machine zeros. You should be able to set up a work offset and save that. Call the work offset in your gcode and run from there. I am afraid I don't know the details of it all but that is how I understand it should work.
bob
-
11-11-2010, 06:50 PM #3
Gold Member
- Join Date
- Feb 2009
- Posts
- 2143
Thanks... The where and how to set those offsets is the question. I have been through the MACH3 manual many times, but it is not written "dumb enough" for me, I guess. They really need to put some real world examples in there... I have searched the forum to no avail as well. Several posts seem to be "about" the same topic, but not quite getting to the specific resolution I need...
I have a few other things to try from another post. Will update here if/when I find a solution that works for me...
-
11-13-2010, 02:07 AM #4
Registered
- Join Date
- Sep 2010
- Posts
- 529
First post on the Zone... but I have been lurking and following your progress with the Mikini with interest. As for homing and then establishing part position. Your home position is usually considered "machine 0,0,0", and from there you will indicate over to part 0,0 (X and Y). These values will be inserted into the program in a couple of different ways, and I used to program Fanuc controls, so Mach III might not be exactly the same, regardless, you insert a G92 X--- Y--- line and that shifts the work coordinate zero from the machine home position to the part zero position. Newer methods and one I didn't use as often, are to use G54 to G59 (Work Coordinate Systems), basically the same thing, but allows 6 different work coordinate values to be input, say for multiple vises or fixturing.
With all of this comes into play using G43 (tool length offsets) and G49 (cancel of tool length offset) usually using an H value for each tool. I assume Mach III has a tool length offset table and you then put a G0 G43 H01 Z.1 (for tool #1) on a line and this will rapid the tool to Z.1 above the zero level of your part... do you machining from there, then call up G0 G49 at the end and it will rapid up to the top (machine home on the Z axis). Considering this is a manual tool change machine, you might have to shift the part over, move X minus, to clear the parts to do tool change. With tool changer machines, we most of the time, had to go to the machine home position for tool changes, which is G28.
I hope some of that makes sense... again, I don't know Mach III at all, yet... but assume it's relatively the same. I'm definitely interested to see your progress with this machine. I find it odd that after several years of being sold, I can only find a few folks actually talking about them.... I like the looks of the machine, the design and the full enclosure.... just wish there were a hundred guys talking about all the parts they have made with them.....
Brian
-
11-13-2010, 03:50 AM #5
Registered
- Join Date
- Aug 2008
- Posts
- 386
WCS or work coordinate system (G54-G59 for instance) is an xyz coordinate relative to the MCS or machine coordinate system. When you call a tool offset active, it adds the TLO to the WCS Z coordinate.
So with no TLO active you move to X10Y10Z10 in Machine Coordinates (which would be right in the middle of the work envelope on my 20 x 20 x 20 machine) and set G54 X0Y0Z0. Behind the scenes, the machine is adding 10 to the machine coordinates for every commanded positioning move. If you were to program some moves and switch between machine and absolute coordinate displays, you would see the absolute coordinates are always 10 more than the machine coordinates. Simple addition.
When you activate a TLO, the machine adds the TLO to the existing difference between absolute (work) coordinate Z and machine coordinate Z.
Soooo
in the above scenario you activate G43H1 and T1 TLO=5.
Now when you switch between machine and absolute coodinates, you see a difference of 10 in X and Y but in Z the difference is 15 (10 for WCS and 5 for TLO), so the spindle is 5 inches higher with a 5 inch long tool than with a zero inch long tool (no TLO).
I know Mach supports G54-G59 (6 WCS). So you would align (home?) your machine, then set your G54 WCS X and Y zeros from your part. As for Z zero, it would behoove you to have some sort of tool presetting system. Set up a dowel pin in a toolholder (one that you can donate to this purpose, this will remain your reference tool) measure the length with your tool setter, and record the results, you will need this in the future. With this tool in the spindle, touch the top of the part and set your G54 Z equal to the measured tool length. Now G54 Z0 = the reference (zero length) of your tool presetter. When you put tool 1 in the spindle (remember, it's 5" long as in the example above, as measured on your presetter) and then in your program (or MDI) execute a G43 H1 (which means add the offset H1 to the z coordinate, and H1 is the tool length offset in the tool table for T1, you DID put 5 in the tool table for T1 TLO, right?), the tip of the tool will be resting on the part at Z0 (provided you have made G54 active by executing it in your program or MDI). Use the same presetter for measuring all of your tool lengths and you are in business. If your tool presetter uses a dial guage and you are afraid it has moved (lost its calibration) set it using the reference tool you made with the dowel pin.
Make sense?
Joe
-
11-14-2010, 12:11 AM #6
Gold Member
- Join Date
- Feb 2009
- Posts
- 2143
Thanks for the replies and suggestions. That all makes sense, but doesn't "quite" get me to my answer.
I would like for the homing operation to basically set G54 to a known absolute position every time I home (and ideally move to that position, as well). For instance, in absolute coordinates, I want to move from 0,0,0 to -12,-6,-9 every time after it homes, and set the G54 origin at that point. So I want G54 0,0,0 to be at absolute X-12, Y-6, Z-9.
I am sure this can be done, and it is a "MACH3 Thing". I will figure it out if I can't get my point across, or get an answer here. I see settings that appear to be just for that, but I have them set, and they are not working (yet).
For now, however, I am sidetracked having to battle computer problems :boxing: Everything was working great for weeks, and I was about to start cutting some aluminum, so I put coolant in to the machine. Now I can't get get the computer to say running for more than 5 minutes without spontaneously rebooting... I don't get it...
All I can think is that the top of the machine isn't grounded or something? I did also mount the motherboard in to the machine casing. So... I have ordered and ITX case so I can isolate it from the machine and I am trying to get the box back up and running so I can "start" learning again.
Of course, I am heading out of town again soon, so it will be sitting for a couple weeks whether I get the computer to run right again or not :tired:
-
11-14-2010, 12:33 AM #7
Registered
- Join Date
- Sep 2010
- Posts
- 529
Mike,
I think you are confusing the machine absolute position, i.e. "home", with one of the WCS positions, G54 in your example. They are two different things.... Machine home position is what you can get to every time you start up the machine and tell it to reference XYZ. Then to establish your "part"work coordinates at x-12, y-6 z-9 in your example, you would have a G54 call and a table in Mach 3 that has your G54 values in it (-12,-6, -9), although in practical use, you never put a z minus value in because you want that machine to pull up as high as possible for tool changes.
I found a pdf on the MAch 3 website that explains all of this relatively well.... you might want to check it out. It's called using Mach 3 mill:
ArtSoft USA - Documentation
-
11-14-2010, 05:38 AM #8
Gold Member
- Join Date
- Feb 2009
- Posts
- 2143
Thanks, Brian.
I understand where home is (Z way high, table far left and forward), no problem there.
I also have read that manual quite a few times. It "touches" on the subject, but it seems to me that it is still lacking a few of the details I need for it to click...
What I want to do is home, then basically move to the center of travel, and have THAT position be the new "relative home" of 0,0,0 (not the new machine home, I understand that cannot be changed) - I think that means that G54 would be at 0,0,0 when the machine is at absolute -12,-6,-9... Does that make any more sense?
I think I solved my computer issue (bad memory), but now I have to rebuild my system, as I nuked it during the troubleshooting (thought it was a corrupted XP install, which it may have been, but MemTest showed that the RAM was totally nuked, so I think that was the root cause).
Hope to get everything back together tomorrow, and if/when I figure out how to make it do what I want I will post how I got there...
-
11-14-2010, 06:09 AM #9
Gold Member
- Join Date
- Feb 2009
- Posts
- 2143
I think I found my answer here: Homing switches & 'methods of working' (Mach3)
Ok, this is one of those things that's just better to try out than explain! But the magic words in play were indeed offsets (I was looking for 'homing' related info earlier!)
Anyway, in Mach3 go to the 'offsets' screen & in the X & Y fields, enter the distance from 0,0 set by the homing switches (machine coord home) to the 'middle' of your table.
Now, when you click 'ref all home', your machine still returns to the homing switches, but now once the axis have homed rather than the DRO reading 0,0, they'll now read with whatever your entered offset is offset is (eg on mine when homed the DRO will read X -110, Y -60)
Now click on 'Goto Z' and your table will move rapidy to position 0,0 (which is the middle of your table)...you can load up your G-Code as normal knowing that you can get back to this point in an instant.
Lovely, I have exorcised the DIY CNC demons....no more worries about having to start from scratch if/when my steppers stall!
Thanks!
PS, Just one thing, apparently the offset settings are only a temp setting in Mach 3.....meaning they'll be lost each time you exit Mach3
To have your machines specific offsets load up everytime you start Mach3, a google search reveals the following workaround (& it might seem a load of old gobbledegook, but it's simple enough to follow with the screen in front of you - & it works)....
"On the offset screen, click "Save Offsets". Scroll down to the last one, G59P253. Set up your X & Y offsets there and save.
Open the General Configuration screen. At the bottom right side, check the box that says "copy G54 from G59.253 at startup". Restart Mach3 and you'll have your G54 offsets."
Will try this out tomorrow... I think it is the G59.25 part that wasn't set right for me...
-
11-14-2010, 04:05 PM #10
Registered
- Join Date
- Sep 2010
- Posts
- 529
If you read through all the answers to that thread, you'll find that like most things, there are numerous ways to get where you want to be. I used to own an Aerospace Machine shop and we had half a dozen or more CNC mills and lathes. Most had tool changers (on the mills, turrets on the lathes), so the machines had to go to a certain position for tool changes anyway, which was usually machine home in at least Y and Z.
You will find in practice that its probably easiest to not worry about getting to the middle of the strokes each time and go from there. What you will want to do is get to the parts 0,0,0 position in relation to the machine home, say you have a vise on the machine you want the left corner of the stationary jaw to be part 0,0,0 because your block of material is sitting in the jaws and you've lined it up flush to the edge of the vise jaw. Depending upon where you have put the vise, this could be a different number from job to job, so say for example this time it's X-10.502, Y-3.748... you got those values using a wiggler off the jaw.
So, simplest method and what we used all the time was to do this... write the program for the part based on 0,0 being the upper left corner of the block of material. This way the part program doesn't ever change.... but at the beginning of the program you put in a G92 X10.502 Y3.748 line, and while the machine doesn't move with the call of this line, it shifts the work coordinates to be 0,0,0 at the part home, rather than the machine home. Note that I have the values for X and Y positive, you will want to double check, but on machines I've fooled with recently and from past memory, the G92 values are from the new coordinate to the machine home, which in this case would be positive because your machine homes at the extreme positive sides of the work envelope... this varies from machine to machine, some home X-, Y+, Z+... so your value signs might change.
Now, say I want to run that part again a month later, but I don't get the vise back in exactly the same spot, all you do is wiggle it again, change the G92 line values to your new ones and off you go. This also takes care of your loss of steps concerns, as you can home and then just start your program from home position.
You can also, if you feel it necessary, call up a G28 after say a roughing pass where you have concerns about loss of steps and the machine should return to home position and you can verify.... not sure if it will reset the values and then continue on... we didn't have stepper driven machines, servos only and they had resolvers to know where they were, so no loss of steps.
I like using G92 because it's simple... G54 thru G59 can do the same thing with the addition of having multiple part 0,0,0 positions, say for example you had two vises up there on the table at the same time to run two parts at a time, or maybe first and second side of the same part. You just set one parts 0,0,0 position as G54 , the next as G55 and so on. Then you write a tool to do such and such at G54, then call G55 and do it again. This way vises don't have to be perfectly lined up, or even the same height.
-
11-14-2010, 04:26 PM #11
Community Moderator
- Join Date
- Mar 2003
- Posts
- 35538
In Mach, go to Config>Homing/Limits and set your Home Offsets to X=12, Y=6, and Z=9. Set your G54 offsets to X=12, Y= 6, and Z=9 and save them.I would like for the homing operation to basically set G54 to a known absolute position every time I home (and ideally move to that position, as well). For instance, in absolute coordinates, I want to move from 0,0,0 to -12,-6,-9 every time after it homes, and set the G543 origin at that point. So I want G54 0,0,0 to be at absolute X-12, Y-6, Z-9.
Home the machine and goto zero and you'll be at machine -12,-6,-9 and the DRO's should read 0,0,0. Be aware that zeroing the tool will change the Z offset.
Ideally, you should change the homing script to do the move to -12,-6,-9 and zero the Z axis at that point. That would give you a consistent Z position after homing.
Edit: I didn't read all the posts, and it looks like you figured this out last night. Gerry
Gerry
UCCNC 2017 Screenset
http://www.thecncwoodworker.com/2017.html
Mach3 2010 Screenset
http://www.thecncwoodworker.com/2010.html
JointCAM - CNC Dovetails & Box Joints
http://www.g-forcecnc.com/jointcam.html
(Note: The opinions expressed in this post are my own and are not necessarily those of CNCzone and its management)
-
11-15-2010, 12:05 AM #12
Gold Member
- Join Date
- Feb 2009
- Posts
- 2143
I think I am good now, Guys. Cut my first metal today:
http://www.cnczone.com/forums/mikini...its_alive.html
I also am planning to home back to the top left corner of the vise - was just using "mid travel" as an example of what I was doing. I think I get it now, though, and certainly will understand more fully in the coming days...
-
11-15-2010, 06:25 AM #13
Registered
- Join Date
- Aug 2008
- Posts
- 386
Sorry I guess I forgot to include in my lengthy response that the machine will retain the WCS offsets if you answer yes when prompted by Mach3 when you exit the program. I could turn the machine off overnight, home (align) it the next day and go right back to work on the same part.
The RF45 retrofit I had would repeat within an few ten thousandths of an inch when aligning it after being shutdown, and it just used inexpensive microswitches for homing. It was very impressive in that regard.
Joe

 Reply With Quote
Similar Threads
-
What encoder resolutions do you recommend for different applications?
By sunmix in forum Servo Motors / DrivesReplies: 37Last Post: 08-24-2009, 03:02 AM -
New VMC for New StartUp
By sdb3dnc in forum Want To Buy...Need help!Replies: 7Last Post: 04-11-2008, 02:44 PM -
no startup
By markjb in forum FadalReplies: 5Last Post: 03-12-2008, 06:26 PM -
mm on startup?
By bigz1 in forum Mach MillReplies: 2Last Post: 05-20-2007, 11:44 PM
