


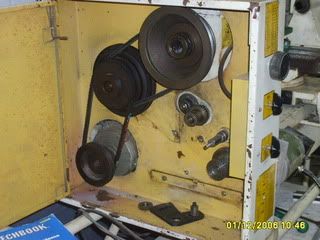
I have a 1993 Shoptask 17-20 XMTC that had been converted to CNC before I bought it. It came with a box of parts and am trying to decide what they might be for. The parts on the right are probably for the lead screw that had been removed when it was converted. The parts on the left are for "what" I have no idea. Can someone tell me what parts I might be missing should I want to remove the CNC mod and what the other parts might be for? Several pics below for your opinions. Thanks
THE ONLY PART REMOVED WAS THE LEAD SCREW TO FACILITATE PAINTING. APPEARS THERE IS NO FORWARD/REVERSE MECHANISM TO CONTROL THE LEAD SCREW DIRECTION. HMMMMM!
Results 1 to 20 of 20
-
02-06-2011, 06:18 PM #1
 Registered
- Join Date
- Dec 2010
- Posts
- 82
ShopTask 17-20 XMTC Parts ID Help (W/PICS)
-
02-07-2011, 02:34 PM #2
Registered
- Join Date
- Feb 2009
- Posts
- 281
LX, Originally Posted by LX Kid

It appears that some of the parts have been modified and some fabricated- If someone can help you, it would be easier if you re-shoot your pictures and label each part A, B, C etc.
Then someone can say A fits on B and so on.
-
02-07-2011, 02:47 PM #3
Registered
- Join Date
- Dec 2010
- Posts
- 82
Thanks "Instructor37" for the suggestion. I'll edit my photo's in a short while. Good idea and thanks!
-
02-07-2011, 03:06 PM #4
Registered
- Join Date
- Dec 2010
- Posts
- 82
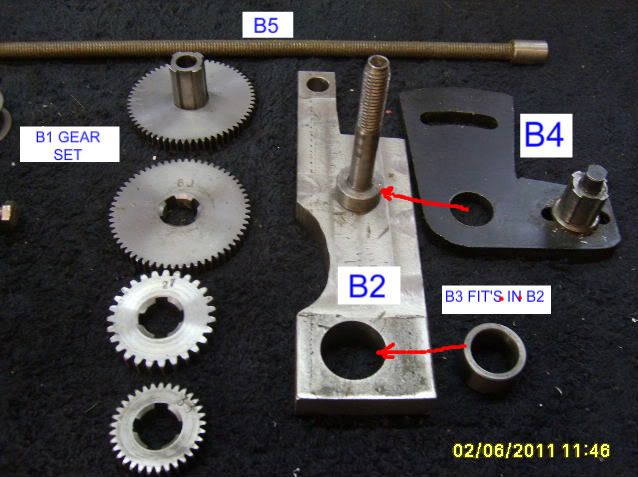
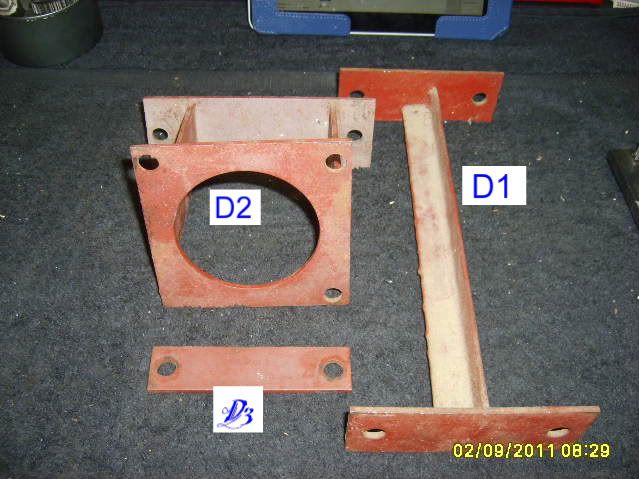
See the edited pics below for ID reference numbers. Thanks
-
02-10-2011, 10:53 PM #5
Registered
- Join Date
- Dec 2010
- Posts
- 82
Found some more parts, that I think go to the 3-In-One, and can't say what they are for either.
-
02-11-2011, 04:53 PM #6
Registered
- Join Date
- Jan 2008
- Posts
- 458
D-1,2,3 were all temporary supports for the machine when shipped in the crate- toss them Originally Posted by LX Kid
C1-6 don't look like anything for the machine-
-
02-11-2011, 05:17 PM #7
Registered
- Join Date
- Dec 2010
- Posts
- 82
Thanks SmallBlok. Yesterday I was able to track down the original owner who made the accessory parts for this machine. I sent him this link and asked if he will help ID some of the parts he made. Just have to wait until he gets time to reply. Thanks
-
02-11-2011, 05:26 PM #8
Registered
- Join Date
- Jan 2008
- Posts
- 458
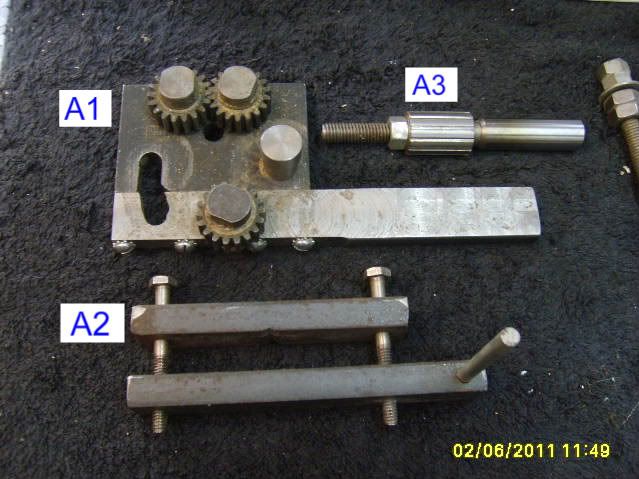
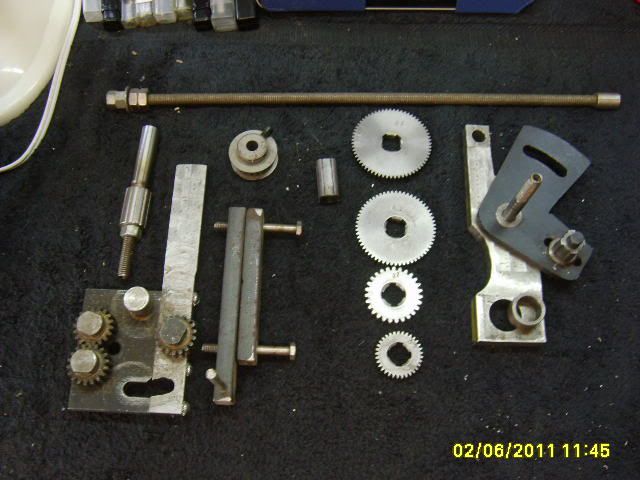
You've got a home-made forward shifter mechanism- Originally Posted by LX Kid
Start at the lead screw end and work your way up.
1. On the lead screw you should have a double unit- part of it is a tooth belt pulley for the cnc belt and the other part is a coarse tooth gear.
2.Shaft A3 should fit into a hole on the casting and is held with a set screw.
3. Part B2 with the bushing should fit over the spline part of this shaft
4. The coarse tooth gear marked # 27 should fit on this spine shaft.
5. The steel pin in part A1 should fit into the end of the double gear unit- you will see that the small gears on A1 will engage the gear on the double unit and can move freely about the diameter.
5. The gear marked # 27 will now engage either the single gear or the double gear when you move the part A1- this gives you the forward- reverse rotation of the lead screw.
Not sure if A2 is part of this assembly or not- it may be a shift lever-
try to assemble the components as I described and shoot a picture.
-
08-20-2011, 01:47 AM #9
Registered
- Join Date
- Aug 2011
- Posts
- 0
Thread is a little old but if you are still having any issues figuring out where all this stuff goes’ LMK. I have the exact same machine as you and I have all the gears set up on mine for the auto table movement. Although I may charge you a small fee, I have been having issues with the wiring on my machine... anyway I could get a couple of good pics of the switches and motors on yours.
-
08-20-2011, 01:17 PM #10
Registered
- Join Date
- Dec 2010
- Posts
- 82
For "No Fee" I'd be willing to help you or anyone else with a problem they may have. Thanks Originally Posted by mike96
-
08-20-2011, 06:58 PM #11
Registered
- Join Date
- Aug 2011
- Posts
- 0
My bad, I didn't mean to make that sound like I was actually gonna charge you something... sometimes it can be a bit tricky conveying what your intentions are on the net when you are tired. I will figure this Internet forum thing out eventually.
 what I meant by that last post was for the super low cost of a couple of pictures of your mill wiring I will be extra willing to help get your pile of parts figured out.
-
08-20-2011, 07:37 PM #12
Registered
- Join Date
- Dec 2010
- Posts
- 82
I understand. What pics can I provide you with of my wiring? With the heat out in my shop I haven't even been in there in about 3 months.
-
08-20-2011, 10:47 PM #13
Registered
- Join Date
- Aug 2011
- Posts
- 0
I need a pic of the wiring at the motor, so I can see what wires go to what terminal and a pic of the wiring at the switch for then same reason. I think the last time I hooked up the mill which is what I thought matched the manual but I may have accidentally wired something back wards because every time I started the mill it would run until I put a load on the motor by trying to cut something and then a capacitor would explode. I thought I had it wired as it was when I first picked the mill up but it had sense been disconnected and put in storage or the three years in spent in japan and now I am not so sure.
-
08-23-2011, 10:11 PM #14
Registered
- Join Date
- Jan 2008
- Posts
- 458
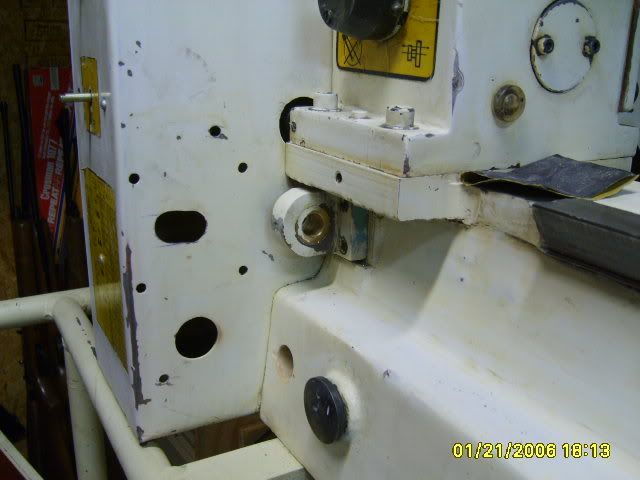
Be careful of those white nylon terminal blocks- they can be installed upside down, so your wires could be reversed- look closely at the block and you will see embossed markings- V1, U1, U2 etc. Use those markings for your correct wiring. Originally Posted by mike96
-
08-24-2011, 12:38 AM #15
Registered
- Join Date
- Aug 2011
- Posts
- 0
Yea I checked that over 3-4 times before I put power to it and there are still problems. But that story is probably best kept for my own seprate thread if I continue to have issues. Originally Posted by smallblock
-
08-25-2011, 09:32 AM #16
Registered
- Join Date
- Aug 2011
- Posts
- 0
Not sure if you ever got a chance to set up the auto feed on your mill, you never did say. If so then I guess this will be more of an informational post for others who may have purchased an older shoptask with a box of extra stuff to go with it. From start to finish with the install...
Here is where you started from. The mounting points for the gears are labeled 1-4 for ease of install explanation (for my ease anyway)

This is the first piece that needs to go on. It is a gear reduction/backlash/reduce movement in the gearing assembly piece. The hole I marked with the "X" slides over mount point #3 and the bolt threads into point #2. The pic underneath this one shows the thick spacer that goes under the bracket. I have also labeled the gears "B" and "C", this is for reference to the manual or the label on the front of the machine when changing the gears around to get a different thread pitch.


Next is gear "D" the and the drive spool it slides over, goes right on mount point 3. What I forgot to take a picture of however is the spacer that goes in between gear "D" and the gear that goes on top of it (I will get that later).

The drive gear, nut, and washers for the table movement. Goes right on top of the gear "D" spacer shaft. Notice that it is a much larger gear pitch than the teeth on the rest of the gears...

The drive gear and gear "A" installed there is suppose to be a C-clip on the gear however mine is missing... (good thing I don't use the threading gears much)

The final drive idler gear and backlash adjustment plate. The fat pin that I circled goes into the end of the gear (mount point 4) on the table movement screw. Then you just twist it up until you have the proper gear tooth mesh and tighten everything down.


The finished product... Minus the two flaws in how mine is setup (the missing C-clip and the fact that one of the washers on that final drive plate should be under the plate and not under the other washer) this is how yours should look, or something like it any way. The biggest difference that I can see on yours LX is that final drive plate was modified by the previous owner so that he didn't have to remove anything if he needed to go from a right hand thread to a left hand thread with that addition of the bar and extra gears (labeled A1 in your pic) which isn't a bad idea if you do a lot of threading of parts.

-
11-20-2011, 09:44 PM #17
Registered
- Join Date
- Dec 2010
- Posts
- 82
Very nice pics Mike96!!!!!! Looks like I'm missing a couple key parts to put it together. Can you show me what is on the left side of the lead screw at the front of the machine. I also need to see what's missing from the saddle to make it transverse left and right on the lead screw. Thanks again!
-
11-24-2011, 05:44 AM #18
Registered
- Join Date
- Aug 2011
- Posts
- 0
Not sure I follow you here, from the looks of your machine it looks like you have everything to make it work. Are you trying to use the machine in manual mode or CNC? If you could the next time you go out to your shop, could you take a picture of where you think you are missing parts so I can get an idea of what you are talking about?
-
11-24-2011, 01:57 PM #19
Registered
- Join Date
- Dec 2010
- Posts
- 82
Right now my machine is CNC. I have not been able to make the CNC work and have just been using it manually. I don't know anything about MACH III software and am tired, after a year, of trying to make it work. If I can't get the CNC working I won't be able to learn to use the machine to it's capabilities. I've been thinking about removing everything and going back to the basic machine. After being advised that even by removing everything that I won't be able to make the lead screw forward/reverse for screw making functions. My model did'nt have that capability when manufactured. Now I'm re-thinking that I should tough it out a little longer with the help of others here on the forum. I believe my problems are software setup problems and not electronic/electrical in nature. Hope this clears things up for you and is "clear as mud" for me. LoL Thanks Originally Posted by mike96
-
11-27-2011, 07:33 AM #20
Registered
- Join Date
- Aug 2011
- Posts
- 0
Well from the looks of your pictures you have the exact same machine and all the correct parts I have and mine is setup for being able to turn threads and what not. So I guess it is all a mater of setting yours up correctly. I did notice that you have a couple of custom parts that I don't have and I think I might know where and how they go on your machine I am just not sure why the previous owner made them..
 As for the CNC part
I am sorry I cant help you there. Mine had a stepper motor and a dedicated driver unit installed on it from its previous owner but it was never hooked up to a computer as far as I know. It was used in a paint ball shop and from what I know the previous owner used the motor for turning paint ball barrels (they could just turn the motor on and let the lathe tool run the full length of a 14" barrel without having to do it by hand). If I can get a current pic of how your machine is set up I could tell you what needs to go where to get the threading feature running.

 Reply With Quote
Similar Threads
-
Shoptask 1720 XMTC add CNC
By mustangdug in forum Shopmaster/ShoptaskReplies: 2Last Post: 11-30-2010, 12:07 AM -
Shoptask 1720 XMTC mill spindle runout?
By Knn in forum Shopmaster/ShoptaskReplies: 4Last Post: 10-12-2010, 06:50 PM -
17-20 XMTC -?
By GunPilot in forum Shopmaster/ShoptaskReplies: 10Last Post: 03-12-2010, 12:16 AM -
Shop Task Gunmaster 17-32 XMTC Worth getting?
By strykerakamack in forum Shopmaster/ShoptaskReplies: 13Last Post: 01-14-2010, 08:37 AM -
Specs for cnc small parts - Shoptask Eldorado
By pfarber in forum Shopmaster/ShoptaskReplies: 2Last Post: 12-09-2006, 06:13 PM
