


Hey guys. I figured I would post up some pictures and info on an experience I had using my CNC router. First off, its a FLA 200 model paired with a Hitachi M12vc router.
Today I was cutting aluminum very succesfully for the first time after a ton of trial and error. I spent days researching on how to cut aluminum best and go nowhere fast. I literally had 12+ hours reading forum posts and sadly got better information on cutting aluminum in 10 seconds from Ron Reed at Precise Bits when I called to ask about an issue I encountered. Ive cut over 40 items in aluminum just trying to find the right settings to use and the best results I have had included one major thing.
Cut depth. Cut multiple passes at a very shallow cut depth for a much cleaner and more effective cut. Chip clearance works much better and alot less heat is generated. I was cutting at .007" per pass. As mentioned above, Ron suggested a .010" cut depth or less. So, thats my advice for anyone looking to cut aluminum without flood coolant on a woodworking machine.
Anyways. On to the pics and learning curve.
What I learned: Always tighten your collet as tight as you can! Snug isnt good enough.
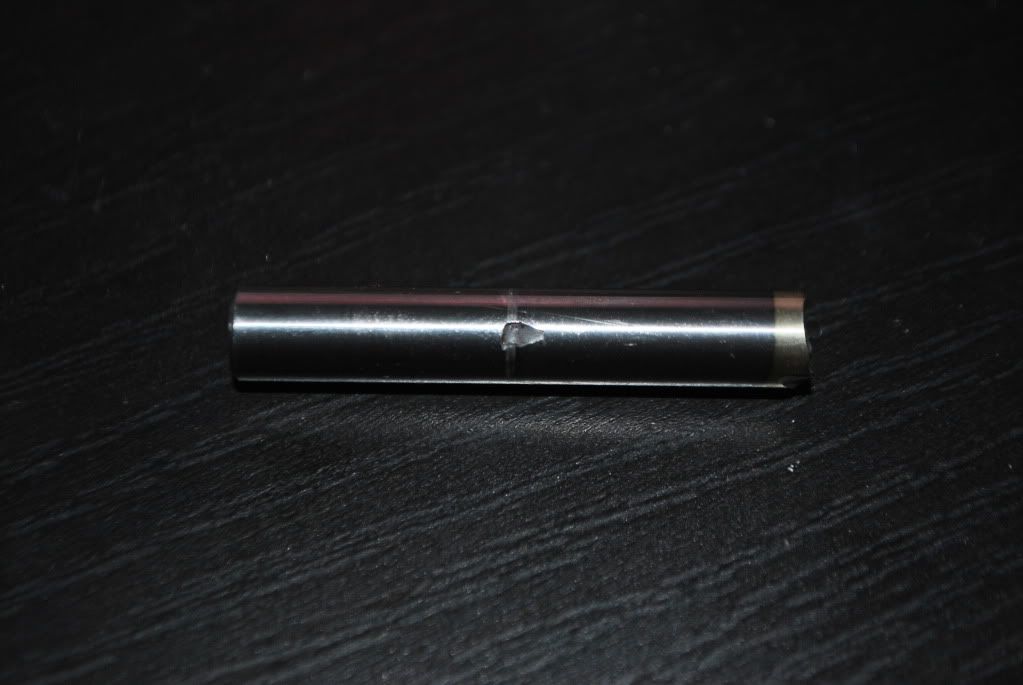
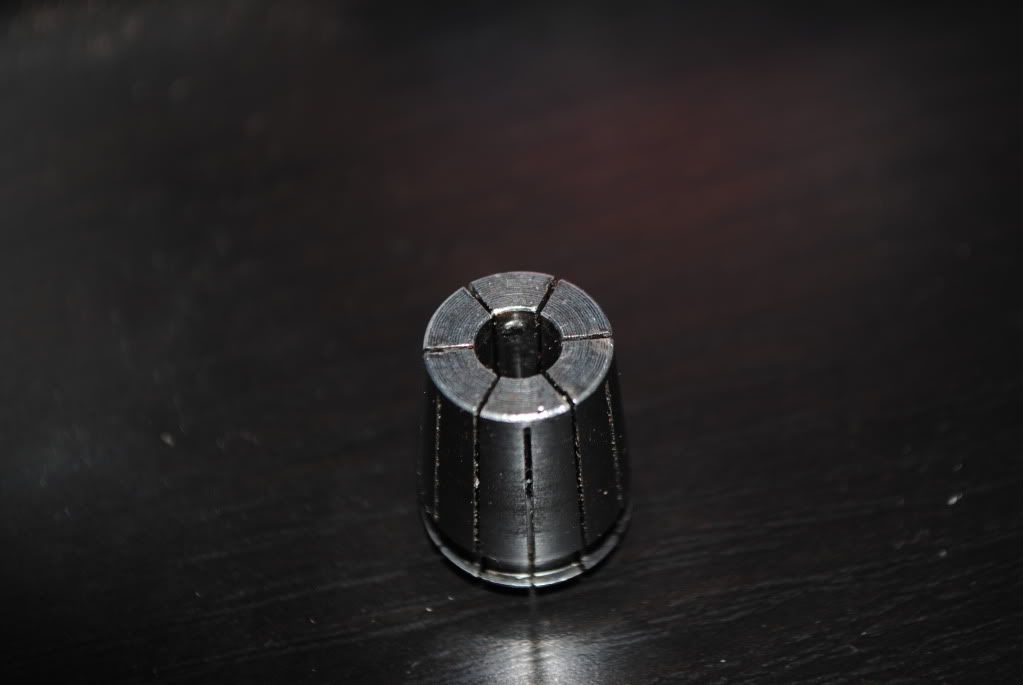
Why I learned this: My bit spun in the collet when My aluminum bowed up and I ended up cutting .125" in a single pass and breaking the bit. When the bit spun in the collet, it fractured and pieces of the carbide bit embedded into the collet.
Pics for anyone who'd like to see it.
Aluminum cutting info:
Bit: 1/4" Carbide High helix AL 2 Flute
Alloy cut: 3003 aluminum 1/8" sheet
Spindle Speed:24,000
Feedrate: 84 IPM
Depth of cut: .007"
BTW: I was able to reposition my hold downs and cut the part fully with great success once cutting was at a uniform depth through the entire toolpath.
Thread: Cutting Aluminum Learning Curve
Results 1 to 20 of 31
-
03-30-2011, 12:23 AM #1
 Registered
- Join Date
- Sep 2010
- Posts
- 0
Cutting Aluminum Learning Curve
-
03-30-2011, 01:46 AM #2
Registered
- Join Date
- Mar 2011
- Posts
- 0
What spindle speed do you estimate you were running at? I'm having a lot of problems with it gumming up. I can cut it with no problems on my mini mill, with the same tooling.
-
03-30-2011, 01:56 AM #3
Registered
- Join Date
- Aug 2007
- Posts
- 31
For cutting aluminum plate with a 3hp Millwaukee Router @ 10,000 rpm,
I use a single flute 1/4" solid carbide end mill.
I run about 22ipm with a pass depth of 1/8".
And i use a spray coolant that is 8 parts water and 2 parts dish soap.
The results are outstanding!
-
03-30-2011, 01:59 AM #4
Registered
- Join Date
- Aug 2007
- Posts
- 31
Gumming up or Galling
Make sure when you are routing aluminum , that you are throwing of the biggest chip you can handle. These carry the dreaded heat away and ensure the best quality cut. Originally Posted by nulluser

-
03-30-2011, 02:05 AM #5
Registered
- Join Date
- Sep 2010
- Posts
- 0
Spindle speed: 24000 rpms. Yes, max on my router. Probably running 20k under load. Originally Posted by nulluser
Feed: 84 IPM
Cuts like butter so long as the pass depth is .010 or less. Anything any deeper and it gums up hard.
Warning: VERY Small chips!
My break wasnt associated with the feeds and speeds best I could tell. It was a cut depth at those feeds and speeds issue. With all of the cutting I was doing, eventually my piece bowed up in the middle because my hold downs probably were not adequate enough. I guess heating up aluminum by cutting on it for more than an hour straight makes carpet tape lose its grip.
-
03-30-2011, 02:17 AM #6
Gold Member
- Join Date
- Apr 2009
- Posts
- 5516
My belt/pulley/leadscrew system on my x axis somehat limits my feedrates with aluminum, but after some testing, I was able to achieve 100ipm at .075doc with a 1/4" bit. This is maxing things out; I would typically run at 40-50ipm with a 1/4" bit at .035doc. With a 1/8" bit I'm at about 30ipm and same doc. I only use an ocasional spray of WD-40.
The other thing is spindle speed. You need to lower the spindle speed enough to produce chips, not aluminum powder. The problem is your router may not have enough torque at that speed and the machine may not be ridgid enough to handle this at higer feedrates. I have a SuperPID on its way which should help in that regard (Roman!)
I've been using spiral-o-flute bits from Amana with success. Having only 1 flute really helps with producing chips, since I can keep the rpm relatively high. Note Amana recommends 120ipm at 18krpm with a 1/4" bit and 1/4"doc! I have also purchased 1/16", 1/8", and 1/4" super-o bits from Onsrud (through Enco) which seem to be of better quality, though untested due to router mods I'm making now (new ab motor couplings, SuperPID installation prep, etc)
Another thing is the type of aluminum you're using. I've been using surplus Mic-6 aluminum tooling plate bought on eBay. The difference is it's cast, which makes it easier to produce chips without galling. I haven't tried it yet, but I think 7050, 7075, and 2024 should work as well...
I've cut quite a few things witn aluminum, some of which is in my YouTube page YouTube - AtienzaLouie's Channel. Heck, I was even successful with my wooden Solsylva machine! The descriptions have more info on the cutting parameters I used. Hope it helps...
-
03-30-2011, 02:38 PM #7
Registered
- Join Date
- May 2010
- Posts
- 290
I have some 3/16 Onsrud single O-flutes that I have run at 20,000 rpm and 60ipm at 1/2 cutter width for depth of cut (.09375). I was just giving it a shot of WD-40 every 5 second or so, and using an air nozzle to keep the chips from building up in the groove. Haven't broken one, yet......and the cut quality is pretty nice. This was on 1/2" 6061. Doesn't use much spindle power.....it hardly seems to notice its cutting at all.
The single flutes don't seem to leave the best bottom finish, though.
-
03-30-2011, 09:13 PM #8
Registered
- Join Date
- Jan 2007
- Posts
- 723
I use a Chinese 2.2kw spindle at 7680rpm with a 3 flute aluminum cutting bit at a max depth of .05" at a speed of 30 imp. I use a little wd-40 and compressed air to cool and blow out swarf. It leaves a mirror finish! I'll post som Picts when I get a chance.
http://www.glenspeymillworks.com Techno LC4896 - 2.2Kw Water Cooled Spindle | Moving Table Mill from Omis 3 CMM, 500Lb granite base | Epilog Legend 32 Laser Engraver
-
03-31-2011, 12:04 AM #9
Gold Member
- Join Date
- May 2005
- Posts
- 2502
Guys, you want to try for a chipload in the 0.002" per tooth range. You can look up the formulas for that, or get G-Wizard on trial to figure it out.
If you just plug in 24K rpm, the feedrates to generate 0.002" chipload are:
- 2 flute: 96 IPM
- 1 flute: 48 IPM
It's proportional, so at 12K rpm you need half the IPM travel rate. You can see how single flute cutters have more manageable feedrates, as was suggested. They will also clear the chips better.
Don't slow down too much or you'll burn the cutter. I wouldn't let the chipload fall below 0.001" if your cutter is 1/8" or larger. What happens is you start burnishing the material and it "rubs" instead of cutting. Much heat generated!
Also, the small chips are not necessarily easy to clear, especially if you're using WD-40, which will kind of ball them up into a sticky mass.
Depth of cut in a slot will limit your ability to clear chips. Too much width of cut is also hard on the cutter. When cutting full width, you only give each flute 1/2 a revolution to cool off and get rid of any chips it picked up. Try to use 25-40% stepovers and things will be happier.
When you are thinking about your toolpath, try to arrange it to leave room for chips to leave. Beware tight corners and such. Open out a cavity where they can't hide early, and blow air at it to keep them out of there.
You can do nearly as well as flood coolant if you're diligent about the lube mist and keeping the chips out of the cutter. Just to emphasize that last, I see more peeps breaking tools in aluminum because they had no lubrication or because they didn't clear the chips enough than from bad feeds and speeds.
You want to be totally paranoid about recutting chips. Get them out of there with compressed air or whatever. If you have to stand over it with the air hose, dem's da breaks with aluminum. It also needs lube or it tends to weld onto the tool. WD-40 works great. If you can run a coolant mister, you get both the lube and the chip clearing in one shot. If not, at least running an air jet that travels with your router will mean you have to watch it yet.
That MIC6 looks cool, but it is way gummier than most any of the wrought aluminums like 6061 or 7076. They all cut easier and better than MIC6.
Cheers,
BWTry G-Wizard Machinist's Calculator for free:
http://www.cnccookbook.com/CCGWizard.html
-
03-31-2011, 11:23 AM #10
Registered
- Join Date
- Feb 2010
- Posts
- 0
What Bob said with emphasis on 6061, single flute, < 40% stepover, and chip removal. I use Tap Magic Aluminum for lube.
Keep in mind that most routers have large swings in motor speeds from different loads. It's the actual speed of the cutter under load that you want to use in your calculations. Unless your router has a closed loop speed controller, no load speeds can be very misleading.
In most cases, metal machining requires both rough cuts and finish cuts. Often, a tool change is necessary for optimum results and finish.
-
03-31-2011, 12:55 PM #11
Gold Member
- Join Date
- Apr 2009
- Posts
- 5516
Usually for profiling, I stick with the spiral-o, it gives a pretty good finish. If the finish is not critical on the pocket floor, I keep it as-is with the spiral-o. If I want a smoother finish or it's a visible part, I'll switch to a 2-fllute bit. Originally Posted by iplay1515
As my system has a little bit of flex, if I need a more accurate cut, I'll do the finish pass with conventional milling. Also I'll switch to a smaller diameter bit for outside profiling if I need more detail in the profile.
I use the rest machining feature in VCarve Pro if I need more detail in the inside profile, bosses, etc.
The mic-6 IS 6061, just cast and milled flat. I'm not really equipped to do facing operations and the pre-milled surfaces really helps a lot and looks good! Not prone to warp when machined. Plus you can get it very inexpensively if you hunt around, even cheaper than regular 6061 sheet!
-
03-31-2011, 02:50 PM #12
Registered
- Join Date
- May 2010
- Posts
- 290
Alcoa lists Mic 6 as a 7000 series alloy. My experience with it is that it's pretty gummy compared to 6061.
-
03-31-2011, 03:53 PM #13
Gold Member
- Join Date
- Apr 2009
- Posts
- 5516
I stand corrected! Though I have not had the "gumming" problem. Also I've been able to achieve pretty good surface finishes; maybe not as good as a vmc, but pretty good for my needs. I do have some of the other alloys on hand, but haven't had the need to cut them as of yet (other than experimenting, and that can get costly!) Originally Posted by michaelthomas
-
03-31-2011, 04:14 PM #14
Registered
- Join Date
- Sep 2010
- Posts
- 0
This thread is great for all of the info and different results on cutting aluminum. I searched for days and couldn't find this much information about how to go about cutting aluminum the best. I see that alot of people are able to cut it in a variety of ways very well. The key points I am noticing is shallow cut depths and clearing the chips out.
I've edited my post on the first page to denote the aluminum I was cutting and put a feeds/speeds for simple reference.
-
04-01-2011, 08:08 PM #15
Gold Member
- Join Date
- Apr 2009
- Posts
- 5516
Some pics of test cuts in Mic 6. These toolpaths were done in Vectric VCarve Pro 5.5. Though the pocket floor is not glass smooth, it is flat and has a pretty decent finish (at least for me!) Also the pic illustrates the size of chip I'm getting, and aim for. Here I'm using a 1/4" spiral-o-flute, at about 16k rpm, 40 ipm, and .030 doc.
-
04-01-2011, 08:18 PM #16
Gold Member
- Join Date
- Apr 2009
- Posts
- 5516
Now for the heck of it, I tried using the high speed pocketing toolpaths found in OneCNC XR3 Mill Advantage. I was able to crank up the speed to 60 ipm, with .040 doc. The HSM toolpaths create smoother motion than standard toolpaths, which under my observation actually 'help' a DIY router, since there are no abrupt direction changes. As you can see the finish is more consistent as well. This is also with the single flute spiral-o bit. If I needed a smoother floor I would use a 2-flute bit at about 80-100 ipm, taking only .005" in the pass.
Short video of the pocketing
[nomedia="http://www.youtube.com/watch?v=9q9yuWQ31gs"]YouTube - Home Made DIY CNC Router Milling Aluminum HSM Toolpaths! Part 1[/nomedia]
-
04-01-2011, 08:19 PM #17
Gold Member
- Join Date
- Apr 2009
- Posts
- 5516
I forgot the pics for the last post:
(I should add that this would probably have taken twice as long, and not came out as good, with a standard toolpath, on my router...)
-
04-02-2011, 12:32 AM #18
Gold Member
- Join Date
- Apr 2009
- Posts
- 5516
The same pocket, this time cleaning up .005 with a 2 flute bit at 100 ipm
-
04-02-2011, 12:40 AM #19
Member
- Join Date
- Apr 2007
- Posts
- 8082
Beautiful machining Louie, but the router sounded like a wounded chain saw.
 Is that due to the single flute cutter?
CarveOneCarveOne
http://www.carveonecncwoodcraft.com
-
04-02-2011, 12:50 AM #20
Gold Member
- Join Date
- Apr 2009
- Posts
- 5516
Yeah possibly... or maybe the spindle speed a tad too low. I've put it through hell BEFORE putting it on the table! I think too my new table amplifies every sound; my wood table with the 1hp Craftsman router never sounded this loud! Originally Posted by CarveOne

 Reply With Quote
Similar Threads
-
MC learning curve?
By Ted Filley in forum MastercamReplies: 2Last Post: 03-09-2011, 02:42 PM -
Cutting along a curve.
By Odd Egeland in forum MadCAMReplies: 8Last Post: 04-02-2010, 12:29 PM -
Learning curve!
By IanH in forum Benchtop MachinesReplies: 1Last Post: 06-01-2009, 02:36 PM -
What's the learning curve for the TL-2
By rbest27 in forum Haas MillsReplies: 4Last Post: 12-18-2006, 05:29 PM -
First of many questions in learning curve
By STS_John in forum Daewoo/DoosanReplies: 11Last Post: 09-19-2006, 11:29 PM
