


:banana: ...... :drowning:
1st Post here, been searching for a while.
I have a few questions for you CNC Wizards. (group)
Here is what I have bought so far.
3900 HiTorque Mini Mill
1660 Drill Chuck, 1/2" Keyless
3489 Tooling Package, R8 Mini Mill
3131 Rotary Table, 4" with Tailstock, Dividing
(copied from my receipt)
I currently have a 7x16 mini lathe from MicroMark with QCTP and all A.R.Warner tooling so I can fabricate anything I'll need for this build.
I'm looking at going CNC on the mill, for now I've just bought some Igauging DRO's off Amazon to install so I can easily start using the mill. I've been searching on here for a couple weeks and haven't quite figured out the exact setup I want to do, so here is my shopping list questions.
EDIT: - Anyone had any experience with this - KL-5056D-48 4 Axis CNC Stepper Motor Driver Controller: $769
1. Keling 5056D Drivers, I will also be looking for a quality power supply (Keling KL-600-48 48V/12.5A)
2. As I'm building on the SX2 LMS mill I'm going to go with the CNCFusion Mini-Mill CNC kit #2 - with X-Y-Z BALLSCREWS with LMS add-on.
3. Motors will be NEMA 23 Stepper Motor: KL23H2100-35-4B (1/4” Dual shaft with a flat) 381 oz-in - I'm not sure what size Motor I'll need when I go to 4th axis for the rotary table.
4. I'm really not sure what all I need for BOB and cabling yet (Haven't researched, but want the good stuff)I believe I'll need a "smooth stepper board" for using a laptop?? Any direction in this would be helpful. (SmoothStepper USB Motion Control Interface for
Mach 3) At that price... I may just buy a dedicated PC....
6. I already have a copy of MACH3 (paid) Haven't screwed around with it much.
7. I'm looking at what you guys have found to be the best pendent so I can run the Mill in "manual" mode. (MPG2 – Pendant?)
All in all I only need everything for a 3 axis setup but will move to 4th axis so anything I buy now I will buy for the 4 axis (so I'll order 4 motors now, 4 drivers, etc)
Thanks for reading this guys, I hope to get some good info.
(I've had a long day, may have missed some things, will re-read tomorrow.)
Results 1 to 20 of 26
-
08-22-2011, 12:07 AM #1
 Banned
- Join Date
- Aug 2011
- Posts
- 0
 CNC LMS 3900 Build Help - Pictures soon!
-
08-22-2011, 12:48 AM #2
Registered
- Join Date
- Oct 2010
- Posts
- 266
well if you want the best digital drivers made then you are definitely looking at the wrong place with keling lol.
im not knocking them at all since my mill conversion on doing is using their motors and drivers but it is chinese made stuff and there is definitely way better stuff out there that will burn a huge hole in your pocket.
im not the most knowledgeable in this field but id have to say that their less expensive drivers will be more than adequate at that size of mill. if i went digital id go with the 5056D, dunno if you need the 70 volts that the 8056D can offer. but yea like i said im a beginner in this that relies greatly on other peoples opinions and what has worked for them.
-
08-22-2011, 12:54 AM #3
Banned
- Join Date
- Aug 2011
- Posts
- 0
hmm... I guess what I meant to say was I want the best Digital Driver for 381oz Steppers, but I want it to be able to handle larger steppers just incase... maybe up to 570oz just incase.
-
08-22-2011, 01:06 AM #4
Member
- Join Date
- Apr 2006
- Posts
- 8159
An X2 will never handle what a 570 can throw at and even if, a 570 only needs a 5056D.
Don't waste your money on something you'll never be able to take advantage of with this mill.
381's are all you need.
Hosshttp://www.hossmachine.info - Gosh, you've... really got some nice toys here. - Roy Batty -- http://www.g0704.com - http://www.bf20.com - http://www.g0602.com
-
08-22-2011, 01:19 AM #5
Banned
- Join Date
- Aug 2011
- Posts
- 0
Again sorry - This mill will ONLY have 381's on it, but I want to have Drivers capable of running 570's when/if I upgrade to another mill (or anything else I CNC), then I won't have to buy more drivers... I do this with alot of things when possible, kinda dual purpose things, ya know why buy 2 of something crappy when you can buy 1 of something of very good quality and use it for both things. Did that make sense?
5056D it is! Thanks Hoss!!
-
08-29-2011, 01:28 AM #6
Banned
- Join Date
- Aug 2011
- Posts
- 0
Well I've received the mill and found it to be a little better quality than my Micromark 7x16 lathe as in less work over all to get it running smoothly.
I put some 600 grit sand paper on some plate glass and ran everything I could with a flat surface on it to make it as true and as smooth as I could, also ran the 600grit along the ways to polish them up a bit. Coated it all in Tri-Flow and put it all back together adjusting everything and man does this baby feel nice now. I had to shim the front of the column up in the front as it was leaning forward .006".
I've mounted Igaging DRO's to it and made some better,larger,longer aluminum knobs for it so I can get more torque so I can make the gibs tighter, it runs a 3/4" 4 Flute Endmill .250doc no clue how fast, maybe 15rpm with the X handwheel - I'm actually VERY VERY SUPRISED!! I do think it has to do with all the work I put into the mill tho - I wish I would of tested it before I tore it apart tho... Maybe somebody with a stock HiTorque could test this aswell?
I have the Mill mounted to this for moving it out of the way to put the car in the garage.
I completely forgot to get pics of my setup - but will tomorrow.
I DO HAVE A PROBLEM THO...
LMS VISE
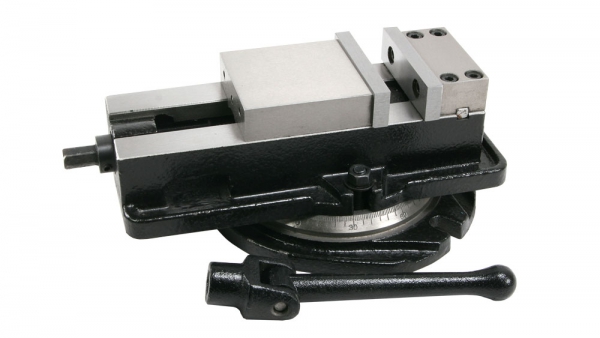
I have stripped out the bolts that allow this vise to swivel - So this is a warning for those of you who have this vise. I just threw some 3/8" bolts in and they work perfectly. Still though, those bolts seem to be made out of aluminum, that's how soft they are...
CELLPHONE PICS ADDED!!!!
These are the most up-to-date pictures (taken 3 min ago) So you can see the 3/4" endmill, new bolts in vice, DRO's, etc... (And yes those are green kids letter magnets for a temporary fix )
)
The last picture is a picture of my 7x16 lathe, I've had it about 2 months and I've done alot to it, no DRO's yet, haven't seemed to need them (I'm building one for the Tailstock now, hole depth is the only thing I can see needing DRO for at this point in my amateur hobby...) I've put on a A2Z QCTP, A.R. Warner tools, Carriage lock, Chuck key holder(top left), New Handles, working on a ball turning tool now (95%done) oh and LOTS OF POLISHING!! OOOOHHHH was it bad...
Now to start on the CNC Conversion.....
-
08-29-2011, 02:58 AM #7
Registered
- Join Date
- Jul 2011
- Posts
- 0
EDIT I've seen this exact motor size/driver/powersupply postings Originally Posted by B-RAD

I've seen this exact motor size post many times and all the guys I'd trust say the same thing as what Hoss is saying and that you buy what you need for the mill you have now. If you buy something bigger or more than is required for the mill you have now you will run into issues i.e. under/over amping your motors, loosing torque(if I remember correctly) etc.
Buy what is required for the mill you are building. By the time you get enough experience and the need to have another mill (bigger mill) hardware will have advanced. I guess what I"m trying to repeat is that you will be spending more money at present on future parts when you can save money in present and get more parts ,tooling etc. And you will have to buy more drivers to replace where you took them from the SX2. I'll bet that Hoss and many others still use there mini mills
I hope I didnt confuse the time space continuum Lol
Hoss knows what he is talking about. Look at his site, his experience and knowledge are well documented. He also reminds me of Carl in slingblade so dont get him mad mmmhmmmm Lol. JK Hoss
Richard
-
08-29-2011, 03:12 AM #8
Banned
- Join Date
- Aug 2011
- Posts
- 0
Hmm.... 381oz Steppers are perfect for the SX2 on all 3 axis's - what I'm wanting "bigger" is the drivers, not the motors. Originally Posted by sabastion
") I can easily make plug and play adapters if I ever needed to use the same drivers for both mills (not at the same time obviously...) This isn't a permanent solution, but I like to have better built things.
I can easily make plug and play adapters if I ever needed to use the same drivers for both mills (not at the same time obviously...) This isn't a permanent solution, but I like to have better built things.
I know have everything figured out - Just need to pay off some things... then on to CNC!
-
08-29-2011, 03:44 AM #9
Registered
- Join Date
- Jul 2011
- Posts
- 0
Hmm.... 381oz Steppers are perfect for the SX2 on all 3 axis's - what I'm wanting "bigger" is the drivers, not the motors. I can easily make plug and play adapters if I ever needed to use the same drivers for both mills (not at the same time obviously...) This isn't a permanent solution, but I like to have better built things.
I know have everything figured out - Just need to pay off some things... then on to CNC!
Hoss uses 270 oz/in on X and Y axes and recommends a 381 for Z axis
If you go to Hoss' site Hossmachine_Cnc Conversion you can follow his build and end up with a pretty much bullet proof machine. He's already done all the work for us and even provides free schematics or you can but them on DVD and get many extras.
You asked and they're trying to give you the benefit of their experience and knowledge but if you dont want it all I can say is....you can lead a horse to water but you cant make it drink.
Oh yea...I would recommend the sterling steel CNC conversion kit millplans over the CNCfusion kit. The fusion kit has a potentialy problematic design flaw with the Z axis http://www.cnczone.com/forums/bencht...ion_kit-2.html Good luck with your build :cheers:
Richard
-
08-30-2011, 03:40 PM #10
Banned
- Join Date
- Aug 2011
- Posts
- 0
Hmmmmm, you do realize my table is larger than hoss's X2? :stickpoke Therefor 381's on all axis's
-
08-30-2011, 04:09 PM #11
Member
- Join Date
- Apr 2006
- Posts
- 8159
Not larger than the freak table Originally Posted by B-RAD
 which ran with 270's but that was with kl4030 drivers.
He is confused mmmmhuh. I recommend a g540 and 381's all around if he read a little more carefully.
Hosshttp://www.hossmachine.info - Gosh, you've... really got some nice toys here. - Roy Batty -- http://www.g0704.com - http://www.bf20.com - http://www.g0602.com
-
08-30-2011, 04:18 PM #12
Banned
- Join Date
- Aug 2011
- Posts
- 0
Right. Was ur table alum or steel? Also who knows what ill have on that table, I need the power.
-
08-30-2011, 04:34 PM #13
Member
- Join Date
- Apr 2006
- Posts
- 8159
The table was made from a full cast iron column and an ally 12 x 20 x 3/4 plate. Originally Posted by B-RAD
Not lightweight but would have enjoyed 381's.
Hosshttp://www.hossmachine.info - Gosh, you've... really got some nice toys here. - Roy Batty -- http://www.g0704.com - http://www.bf20.com - http://www.g0602.com
-
08-30-2011, 09:03 PM #14
Registered
- Join Date
- Jul 2011
- Posts
- 0
Yes, I did read that you recommended the 381's. I was merely stating that you were using the 270's and they worked fine. But, yea...I did get it a little confused Lol. sorry for that. Originally Posted by hoss2006
Don't listen to me, I am just learning Lol
Richard
-
09-03-2011, 01:49 AM #15
Banned
- Join Date
- Aug 2011
- Posts
- 0
Lol - Then learn *WITH* me.
Anyways I just made a spindle lock today - it's made out of aluminum for now, I usually mock things up in aluminum first, sometimes the aluminum works for a longtime, and sometimes not so much so I make it out of steel. (Mostly muzzle breaks for rifles...)
Hope to see some creative criticism on the spindle lock, so I can make it out of steel. I have made a ball turner for my lathe and haven't quite figured out how to use it like a pro yet, to make a ball for it...
NOTE: There is an E-clip on the other side on the rod to keep it all together. I plan on shortening up the block, but just had to get a pic for this thread.
-
09-03-2011, 07:29 AM #16
Registered
- Join Date
- Jul 2011
- Posts
- 0
pretty rough finish on those ends..no finish pass? Originally Posted by B-RAD
-
09-03-2011, 01:27 PM #17
Banned
- Join Date
- Aug 2011
- Posts
- 0
Nah, was in a hurry. Im not done with it yet either.
-
09-11-2011, 02:14 AM #18
Banned
- Join Date
- Aug 2011
- Posts
- 0
A note for anyone with this mill...
Please read this - Spindle to Column Alignment...
After following this guide, aligning the head to the Z column plus a little more (sanding everything smooth and flat, deburring, taking off some paint, etc..) I have since taken out my shims under the 3 bolts holding the column to the base, the reason the mill was nodding forward was because of loose bolts, un-square rough mating surfaces within the head itself. When I first did all the "cleaning" when I first got my mill I never completely tore apart the head, I'm glad I did now!!!! This mill is like a new machine, it is crazy to see just how nicely this operates, it's actually smoother, quieter, and squared up now. (Every mating surface that is possible to sand flat has been done, using a piece of tempered glass and alot of wet sandpaper and WD-40 for the wet...)
So yeah, it took me the better half of the day to be meticulous and get everything just right, but the reward is worth it!
I also took out the spacer/washer under the draw-bar and made one out of aluminum for a snug fit, this also noticeably makes the mill vibrate less at high speed due to the draw-bar being centered now. (spacer pictured)
-
09-17-2011, 03:28 PM #19
Banned
- Join Date
- Aug 2011
- Posts
- 0
Column Support
Here is a drawing of my design so far of a column support, it spans the whole length of the column, I will then attach the electrical box to the support. The mounting holes are every 4 inches up the column, so I took that out to zoom in on the bottom section. This is the first time I've ever used CAD software, I whipped this up in 1hr... should take 5min I know... I didn't measure the main stud, I just heard someone say 15/16ths, I will double check that before moving forward.
It is going to be 3/4" thick aluminum, and the bottom section of this where it comes off the column will be milled out about 1/4" so there is room for the base, I don't feel like grinding away at the base. The reason I came down to the work bench with the column support is so I can put another plate over it as shown here > Column Support with Nodding fix Article I will also be adding blocks on the sides of this plate to help with tramming the mill, something like this > Traming Article.
Lets hope this project goes well, I'll be starting on it today. If I find out that the Aluminum isn't strong enough atleast I will have a good template to make a steel one with
-
09-18-2011, 09:42 PM #20
Banned
- Join Date
- Aug 2011
- Posts
- 0
Column Support
Here are some pictures from this weekends column support build :banana:
Picture 1 - Just getting ready to drill and tap the holes in the column
Picture 2 - Main column support done! - I had to end up changing the upper 6 bolts to something that had a smaller head profile so they could mount under the circuit board inside the box easier, I clear coated the bottom of the circuit board and the bolt heads just as a precaution. As you can see by the 1-2-3 blocks I just got done tramming before I built the Y tramming bracket.
Picture 3 - Y tramming bracket with 6 holes (most have 4, I like having things solid)
Picture 4 - Drilled and tapped holes in the column support, column, and base - The Center holes are just short screws to screw the bracket to the column, next holes are the ones that make the head nod forward as they push against the base, the outer holes are the ones that nod the head back as they screw into the base.
Picture 5 - Y tramming bracket done, I can't believe at how nice this is!!
Picture 6 - My completed column support! - I spray painted the control box while I had it all apart, I also clear coated it - Yes I work on wind turbines... I made the sticker on a hacked Cricut machine...
Picture 7 - 6 inches off the table I am showing the dial test indicator zeroed
Picture 8 - 6 inches off the table I am showing the dial test indicator showing .002 as my wife pushes on the top of the column from behind. (I said as hard as you can....)
Picture 9 - Just showing how I square up my vise more accurately than the normal method... (Wish I could get a 12" straight bar, even more accurate)
Picture 10 - My little Machine shop - The sliding miter saw in the background has an aluminum blade in it - works very well!!
My next project will be a tramming aid, I need to get out more than 3" from center to get a more accurate tram, something like Hoss's tramming tool he made. My tool will be longer than his and also make it so I can tram with the head at the top of the column. Accuracy Rules!!!

 Reply With Quote
Similar Threads
-
Crane's 25x25 Solsylva Build w/ Pictures
By crane550 in forum DIY CNC Router Table MachinesReplies: 220Last Post: 07-25-2017, 09:30 AM -
Rookie 1st build with pictures
By slkret in forum DIY CNC Router Table MachinesReplies: 27Last Post: 04-14-2009, 09:10 PM -
My second cnc build. Lots of pictures. A couple of problems.
By OneAndy in forum DIY CNC Router Table MachinesReplies: 4Last Post: 01-09-2009, 08:16 PM -
Taig Drainage/Coolant System-Enclosure Build~ Pictures~Video~!
By CROSSHATCH in forum Taig Mills / LathesReplies: 25Last Post: 01-16-2008, 12:58 AM -
Steel C-channel Build - Questions and pictures
By olskool in forum DIY CNC Router Table MachinesReplies: 10Last Post: 07-07-2007, 07:31 AM
