


Yes, that is the chart I measured yesterday. I had the x axis recalculated into ipm since I can relate to that better for the practical application. If my calculation is not wrong, the 80 ipm is indeed 2.25 rps. Actually I could run the motor set to the equivalent of 150 ipm but over 80 it became very unstable.
I bought the set of 4 motors, 4 individual 7.8 amp/80V drives and 2 separate 48V/8amp power supplies on eBay like this from Longs Motors at $580 but back then it had the dual shafts and the (older?) model of MD882 driver. I found it a reasonable deal although the shipping made it about $825 eventually. It came unconventionally but well packaged within a week.
I found one problem with the microstepping: when going to the highest 10,000 pulse per revolution setting (1/50), I lost occasionally steps when I used the drivers on my current CNC with smaller NEMA23 steppers. But that may have been my controller as well. Now I am running 1/8 microsteps and that works perfect.
JB
Results 41 to 60 of 644
-
09-12-2011, 03:59 PM #41
 Registered
- Join Date
- Aug 2011
- Posts
- 999
-
09-13-2011, 09:23 PM #42
Registered
- Join Date
- Oct 2005
- Posts
- 2392
Thanks for the info.

I think with your skills and the clever design so far you will get a great performing machine!
-
09-17-2011, 06:19 AM #43
Registered
- Join Date
- Aug 2011
- Posts
- 999
Got some more work done over the last couple of days. I cut out and pocketed the inside lower gantry posts and glued them together:

Something is moving ! although for now by hand and only 1/2 of one of the posts. Oh well, that project will keep me busy for another couple of weeks.
-
09-25-2011, 12:34 AM #44
Registered
- Join Date
- Aug 2011
- Posts
- 999
I had some difficulty, getting the gantry posts perpendicular (that means REALLY perpendicular to the x-axis) before starting assembly. I posted that in the upper level forum section and got some advice but not a clean solution. I am not sure why nobody else apparently had trouble with that, especially with the bigger machines.
Anyway, I figured out some jury rig, see below. I got the gantry posts repeatably perpendicular to the x-axis within 15/1000" on a 36" distance (which is 0.023 degrees off). Not great but with 5 contact points between 2 squares, 2 rulers and the indicator there is just too much uncertainty in the measurement setup. Oh well, probably good enough for the gantry itself buy once I install the y-axis rails I need to find a more precise way of doing it.

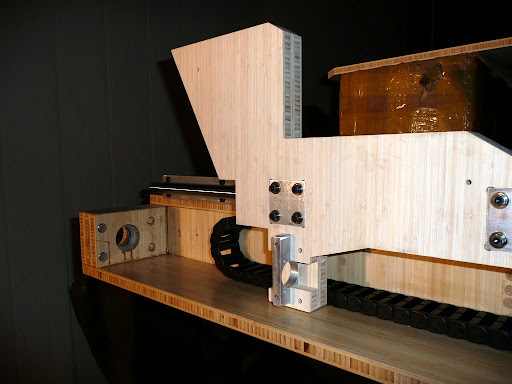
Then I installed the front plate of the gantry. Next step will be to complete the gantry box and install the Y-rails.

-
09-25-2011, 02:05 AM #45
Community Moderator
- Join Date
- Mar 2003
- Posts
- 35538
If your table is square, the easiest way to get it perpendicular is to attach some equal size blocks to each side and push it against the stops.
Before I had home switches, each time I used my machine, I would run it into the hard stops to make sure it was square. Now that I have home switches, I let Mach3 make sure it's square (perpendicular) when it homes. All you need is one adjustable home switch.Gerry
UCCNC 2017 Screenset
http://www.thecncwoodworker.com/2017.html
Mach3 2010 Screenset
http://www.thecncwoodworker.com/2010.html
JointCAM - CNC Dovetails & Box Joints
http://www.g-forcecnc.com/jointcam.html
(Note: The opinions expressed in this post are my own and are not necessarily those of CNCzone and its management)
-
09-25-2011, 09:35 AM #46
Registered
- Join Date
- Oct 2005
- Posts
- 2392
What I have done is clamp a flat glass plate to the front of the gantry (where the bearing rails will go) so the glass plate is vertical and comes down to touch the table.
Then your carpenter square stood up will test the vertical square of the gantry front plate. And the carpenter square laid flat on the table will test the XY square of gantry to table.
-
09-26-2011, 02:00 AM #47
Registered
- Join Date
- Aug 2011
- Posts
- 999
Thanks for the ideas. I will play with that when I get to the Y-rails.
I had a panic attack today when I slid off the gantry to machine hard-to-get-to areas and tried to put it back on. A bit careless and the linear bearings spilled 3 of the small balls
15 minutes on my knees and I found them all, pushed them back into their channels, made sure not more were missing and apparently it all works again. Whew, I think I will not take the gantry off again if I can avoid it. It is getting a bit heavy anyway, even for 2 people to do some precision fitting.
-
09-26-2011, 02:37 AM #48
Community Moderator
- Join Date
- Mar 2003
- Posts
- 35538
Get some wooden dowels the size of the shafts and slide them into the bearings as you slide them off the shafts.
Gerry
UCCNC 2017 Screenset
http://www.thecncwoodworker.com/2017.html
Mach3 2010 Screenset
http://www.thecncwoodworker.com/2010.html
JointCAM - CNC Dovetails & Box Joints
http://www.g-forcecnc.com/jointcam.html
(Note: The opinions expressed in this post are my own and are not necessarily those of CNCzone and its management)
-
09-27-2011, 03:51 AM #49
Registered
- Join Date
- Aug 2011
- Posts
- 999
I started playing with the lead screws. I can not machine proper bearing seats and threads at home and did not find a local shop that was interested in such a one-off job. So I cheated, drilling out precision 3/4" shoulder bolts to 15mm on the lathe (I can do that at least after annealing) and affixing them to the lead screws with cross dowels (and J-B Weld
") ). Looks a little blacksmithy but the runout is actually quite good. For the bearings I picked 3/4" tapered roller bearings (a.k.a. trailer bearings) and I hope with proper pre-load using belleville spring washers it will be accurate enough. The plan is to support the bearings only axially with the aluminum plate and pretty much let them float radially (except for the pre-load friction).
). Looks a little blacksmithy but the runout is actually quite good. For the bearings I picked 3/4" tapered roller bearings (a.k.a. trailer bearings) and I hope with proper pre-load using belleville spring washers it will be accurate enough. The plan is to support the bearings only axially with the aluminum plate and pretty much let them float radially (except for the pre-load friction).


-
09-27-2011, 07:52 AM #50
Registered
- Join Date
- Oct 2005
- Posts
- 2392
Hi again JerryBurks.
Is that the opposite end of the screw to your motors? I thought you were going to use the motors as the axial (thrust) bearings?
If you fix the bearings axially at the far end of the screw then when the screw expands in length from heat it will bow and give you a heap of whip and other issues.
Or maybe I misunderstood your description and these bearings support the screw radially but NOT axially? ie; the screw can move lengthways through the support?
-
09-27-2011, 03:48 PM #51
Registered
- Join Date
- Aug 2011
- Posts
- 999
Yes this is the opposite end of the motors and it is axially fixed. I had originally planned to use the motor of the Z-axis only as a thrust bearing but with all the concerns in the feedback here I chickened out and will now have a dedicated set of thrust bearing for all lead screws. Originally Posted by RomanLini

I am still planning to use all motors as support bearing (no thrust) for the other side, that is if I manage to fabricate or buy rigid couplings with excellent run-out. I understand that will require the motors to have some small axial leeway to avoid the heat expansion bowing (0.2mm should be enough) while being firmly mounted radially. I expect the flex of the large motor mounting plates to take care of this screw expansion but it will probably need some experimentation.If you fix the bearings axially at the far end of the screw then when the screw expands in length from heat it will bow and give you a heap of whip and other issues.
-
09-28-2011, 07:00 AM #52
Registered
- Join Date
- Oct 2005
- Posts
- 2392
Ahah! Thanks for clarifying.
-
10-02-2011, 06:15 AM #53
Registered
- Join Date
- Aug 2011
- Posts
- 999
Another week passed....I believe I sunk already some 200 hours into this project (don't ask how much money). But it is FUN!
Anyway, here the latest progress:
Completed the gantry torsion box and varnished the gantry. Bolted the lower Y-rail in place and tomorrow I will attach the upper rail.

Also, I fabricated new motor couplings with clamp screws all on one side to minimize runout (thanks for the tip, Roman). I did a quick test with a torque wrench and they started slipping at 30 ft-lbs (the steppers will be set to 5 ft-lbs max). I think not too bad for a wood lathe job.

-
10-06-2011, 08:15 AM #54
Registered
- Join Date
- Oct 2005
- Posts
- 2392
Excellent work on the couplings! I really like the way you are methodical and test and measure as you go along. Lots of people doing builds should follow your lead with that methodology I think.
Just a couple of observations, the peak roational torque of the stepper shaft can be many times the max torque of the stepper motor. This is because of the situation where the stepper armature mass and/or screw mass accelerates very rapidly (even if just for a fraction of a degree rotation) then when the leadnut backlash is taken up it "whacks" hard into the load (the gantry mass). A stepper can generate enormous acceleration over a very small rotation and that can give very high rotational peak force there on the shaft.
It's fairly trivial to drill a couple more holes and tap threads in your couplings and add a grub screw onto the flat on the stepper shaft and leadscrew. Those shaft flats are there for a reason!
How is the parallel alignment of your two gantry bearing rails? Have you been able to measure the rails are an exact distance apart? I'm curious how you get the rails parallel.
-
10-06-2011, 10:01 PM #55
Registered
- Join Date
- Aug 2011
- Posts
- 999
Thanks...I am an office guy for a living but that engineering education has to pay off sometimes Originally Posted by RomanLini
 I believe I spent about as much time measuring and building measuring jigs as I did cutting parts and assembling.
I have to watch that. So far I tried to stay away from setscrews (or grub screws) at least on the lead screw side of the coupling because I don't want to mess up the ends of my pretty C5 grade precision lead screws where I may have to take off the ballnut sometimes (remember the fixed bearing is on the other end). If really necessary I may use setscrews with brass tips like McMaster is selling. Originally Posted by RomanLini
I am quite satisfied with the distance parallelity, I got it to better than 2/1000", that is within the uncertainty of my dial gage jig. I measured using a 3" wide strip of plywood that I can rest against the sides of both rails with another square wood strip attached that is riding on top of the lower rail. The dial indicator is bolted to the plywood strip and measures against the bottom side of the upper rail (you can see this contraption in the picture on the table) and I can watch the indicator change while sliding along the rails. Originally Posted by RomanLini
I am not entirely happy with the twist. I hope it is good enough but the top rail ended about 10/1000" out of plane across the length. Not sure how I screwed that up but if I end up with tramming problems due to this twist I will have to go back and move the top rail.
That is actually how I got precision alignment: I built the gantry from bottom to top starting at the X-rails, measuring parallel and perpendicular alignment over and over with every new piece being attached and sanding or planing until it fits exactly. Basically one side of the gantry box every day. Since everything is glued and screwed together there is no room for error. Once the glue sets I can only start over. I made especially sure the rail mounting surfaces were already parallel, perpendicular to the table and straight.
The rails were then set in epoxy (actually J-B Weld because it does not easily drip or run) for leveling. The fine tuning of the parallel adjustment was done with moderate force by 4 or 5 clamps. Once the epoxy had cured, I drilled the bolt holes through the existing holes in the rails, countersunk and fastened the bolts.
I noticed building such a rigid structure comes at the price of serious accuracy requirements. A flexible machine is much more forgiving to assembly errors.
-
10-06-2011, 11:04 PM #56
Gold Member
- Join Date
- Apr 2009
- Posts
- 5516
I have the same ballscrew assemblies as you, but decided to have the ends machined down. In hindsight, this is the more cost-efficient method; so I'm very interested to see how having the "fixed" end on the opposite side works... Originally Posted by JerryBurks
.001" of "twist" is pretty darn good...
-
10-07-2011, 12:05 AM #57
Community Moderator
- Join Date
- Mar 2003
- Posts
- 35538
10/1000 = .01".001" of "twist" is pretty darn good...
Gerry
UCCNC 2017 Screenset
http://www.thecncwoodworker.com/2017.html
Mach3 2010 Screenset
http://www.thecncwoodworker.com/2010.html
JointCAM - CNC Dovetails & Box Joints
http://www.g-forcecnc.com/jointcam.html
(Note: The opinions expressed in this post are my own and are not necessarily those of CNCzone and its management)
-
10-07-2011, 01:03 AM #58
Gold Member
- Join Date
- Apr 2009
- Posts
- 5516
Yes it does... reading too fast again, could havev sworn it said 1/1000! Originally Posted by ger21
-
10-07-2011, 01:36 AM #59
Registered
- Join Date
- Aug 2011
- Posts
- 999
yes it is annoying. If I would tram the spindle in the middle and have 5/1000 error to the left and -5/1000 to the right over 12" distance between the rails that should cause a worst case path step of 0.0001" for a 1/4" end mill. I suppose for a ballnose it does not really matter. Originally Posted by louieatienza
But I am not a machinist and have no idea if that would be visible or if that is still pretty good. Guess I will find out in a couple of weeks.
-
10-07-2011, 04:36 PM #60
Registered
- Join Date
- Oct 2005
- Posts
- 2392
Re the grubscrews on the shafts, if you don't have a flat on the shaft that can be a problem as the screws bite in a bit and will make defects that make it hard to take the couplings off. With a flat ground on the shaft the place the screw bites in is always inside the circumference so it doesn't interfere with the shaft roundness or smoothness.
Thanks for the info on how you lined up the 2 shafts. Normally I would have used one shaft for alignment and the other one adjustable a bit, even if just the small amount of play in the mounting holes allows 0.5mm (+/-0.25mm) adjustment. Epoxying the shafts in is unusual.
When you say 5/1000 error is that 5 thou ie 0.005"? That's generally 5 divisions on the dial gauge (assuming a typical dial gauge of 0.001" divisions)?

 Reply With Quote
Similar Threads
-
7 x 10 project started
By blades in forum Mini LatheReplies: 125Last Post: 01-25-2017, 05:27 AM -
CNC Project Started
By NotSqueaky in forum CNC Wood Router Project LogReplies: 8Last Post: 09-10-2014, 12:41 AM -
New Project Started
By Rumblebelly5 in forum Joes CNC Model 2006Replies: 1Last Post: 09-15-2012, 10:50 PM -
My 4x8 project has started
By MetalHead6263 in forum Plasma, EDM / Other similar machine Project LogReplies: 37Last Post: 01-31-2012, 07:30 AM -
Started new project
By rustamd in forum DIY CNC Router Table MachinesReplies: 55Last Post: 05-31-2009, 04:12 AM
