


Very nifty clamps there! I confess, I use a junkyard dog clamping system.
Results 401 to 420 of 644
-
03-21-2013, 01:07 PM #401Gary588 Guest
-
03-22-2013, 03:07 AM #402
 Registered
- Join Date
- Aug 2011
- Posts
- 999
Back to business....I had to do one more metal job. These will be new LED tail lights for my other hobby (a Lotus Super Seven replica). The material is 1/2" 6061 aluminum. To hog out the inside I used a 3-flute S-Carb stub cutter (by SGS, especially made for aluminum). 15krpm, 0.1" pass depth and 30 ipm feed. For the holes and cutout a cheap 2-flute 1/8" bit from Drillman @ 18krpm, 0.02" pass depth and 25 ipm feed. I tried 1-flute bits first but broke 2 of them. For the chamfer I used a simple 90-degree router v-bit.
inside

outside
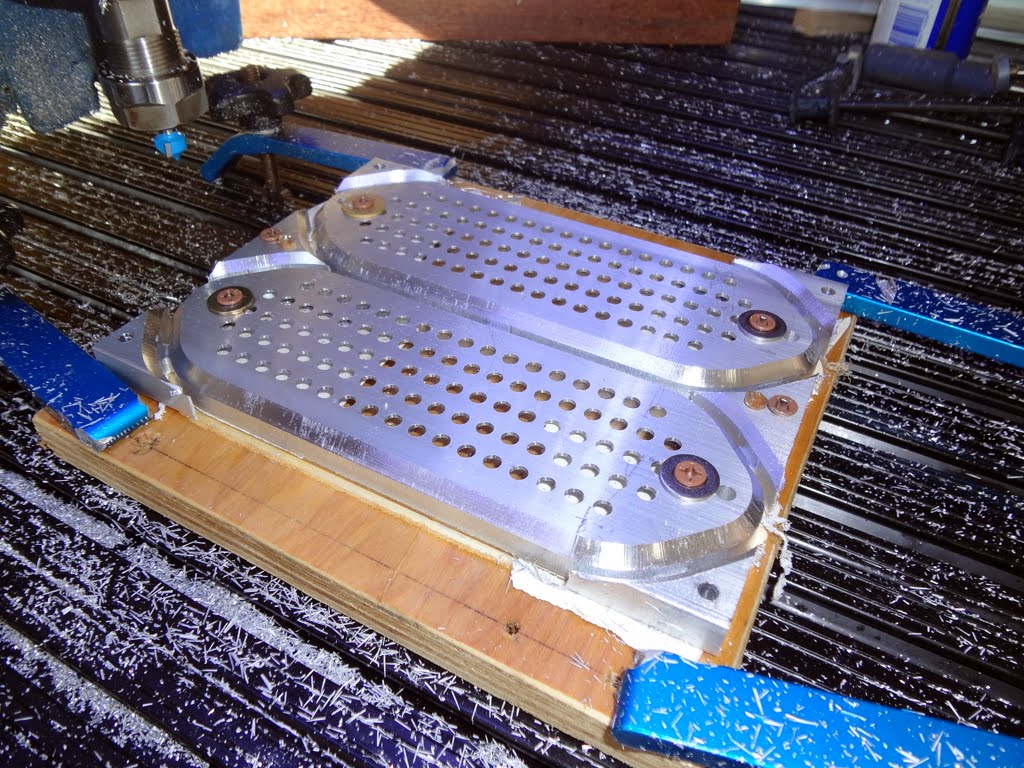
finished

-
03-22-2013, 03:40 PM #403
Registered
- Join Date
- Mar 2013
- Posts
- 8
Hi, Originally Posted by JerryBurks

Are they those 3 LCDs on you new control box ammeters for each of the axis or somthing else?
Great thread by the way, I found it as I am interested in getting the 4th axis you have (is it still holding up well?) and ended up ready the whole thread from the beginning, you have a great talent!
Thanks,
Anthony
-
03-23-2013, 03:15 AM #404
Registered
- Join Date
- Aug 2011
- Posts
- 999
I installed the instruments and powered them when I built the box because I got them for free. But actually I did not hook them up to anything yet. The idea was for the left one to show spindle current, for the middle one spindle temperature and for the right one hold-down vacuum. They can also be programmed for alarm or e-stop trigger. Problem is only the machine works perfectly fine without them and I was just too lazy to do the wiring for the sensors. Some day I will do that. Originally Posted by Aquaaddict
-
03-23-2013, 03:47 AM #405
Registered
- Join Date
- Mar 2013
- Posts
- 8
They sound like interesting devices, do you know what make / model they are? Although they sound expensive if you have to pay for them.
Thanks Anthony
Sent from my GT-I9300T using Tapatalk 2
-
03-23-2013, 05:18 AM #406
Registered
- Join Date
- Aug 2011
- Posts
- 999
The company I work for makes them. When we introduced this new series last year, I scrounged a few that had cosmetic defects and were scrapped. They are for industrial use and indeed expensive, about $400 each since they are multi-functional for flow measurement, pH, conductivity, temperature, pressure, chlorine, salinity etc. For the amperage measurement I even have to trick them because that is not what they are normally used for. Temperature and pressure need special digital sensors that are expensive as well. While I like them, they are not really an option for a hobby machine. But if you want to buy one I am all for it (pays my salary). They are available from industrial distributors like Ryan Herco or Harrington.
http://www.youtube.com/watch?v=juJYJ...yer_embedded#!
-
03-23-2013, 12:42 PM #407
Registered
- Join Date
- Apr 2005
- Posts
- 253
Nice machining, am impressed how well the alu polished up, did it take much effort to get that finish?
RobI'll get it finished sometime after I start it.....
-
03-24-2013, 06:33 AM #408
Registered
- Join Date
- Aug 2011
- Posts
- 999
Aluminum polishes nicely. I sanded the parts with 220 grit on an orbital sander to remove the tool marks, then used 600 grit to remove the sanding scratches of the 220. After that I just polished it down with a 4" buffing wheel in a hand drill and Mother's aluminum polish. The whole process took only 30 or 40 minutes but it is very messy. The polishing leaves a lot of black residue and you need old clothes and gloves. Originally Posted by robe_uk
I did not have the patience to go for perfect mirror finish. That would have taken 2 or 3 times as long with longer sanding, more steps in the grain up to 1000 or higher. Consequently you still see the extrusion traces in the aluminum surface and it is not as shiny as it could be. But it is good enough for the purpose and the mirror finish does not last very long anyway if not varnished or otherwise protected.
-
04-03-2013, 02:26 AM #409
Registered
- Join Date
- Mar 2012
- Posts
- 68
Question on the 4th axis.
I am trying to firgure out the way to wire it to a gecko.
How do you have the stepper motor wired.
Mine have 4 wires, red, green, blue and yellow and is model XY57STH56-2804B.
-
04-03-2013, 03:52 PM #410
Registered
- Join Date
- Aug 2011
- Posts
- 999
The rotary stepper is wired exactly as any of the linear axis stepper motors. I verified with a multimeter which wires are for each coil (for most steppers red and green are for one coil (A) while blue and yellow are for the other one (B)) and just connected them to my Geckos. If it spins the wrong direction after that you can still swap red and green. Originally Posted by allengambrell
-
04-12-2013, 12:28 AM #411
Registered
- Join Date
- Aug 2011
- Posts
- 999
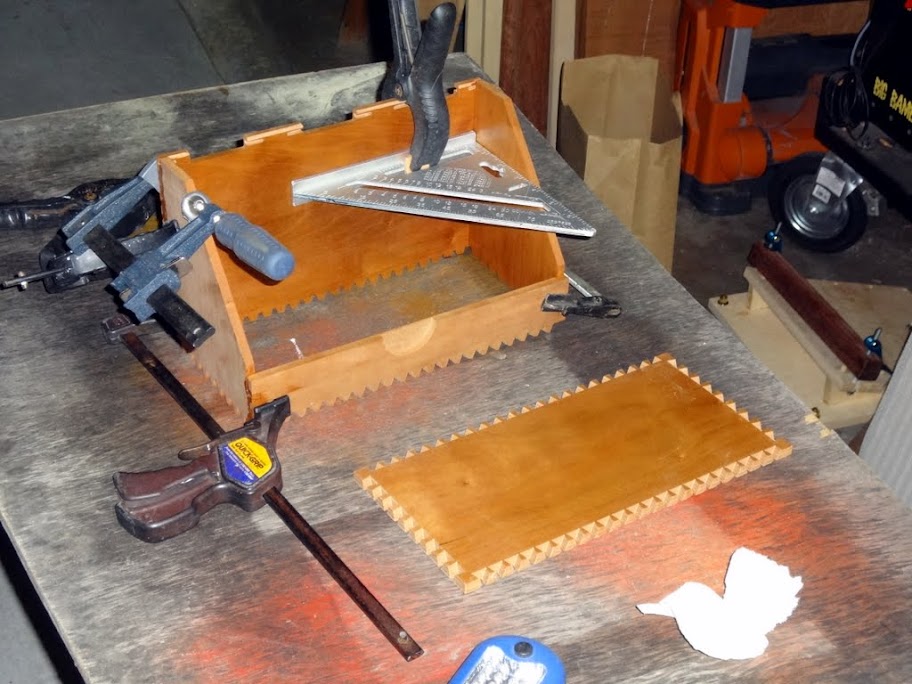
I did some joinery experiments with quasi-flat cut dovetails (see picture below) more info and pics in this thread and a question for advice....At least I am no longer regretting that I did not make the spindle go beyond the table for vertical clamping.

-
04-12-2013, 03:24 AM #412
Plastic
- Join Date
- Apr 2013
- Posts
- 0
I do not have Mach3 but the Planet-CNC USB controller.
-
05-10-2013, 03:11 AM #413
Registered
- Join Date
- Aug 2011
- Posts
- 999
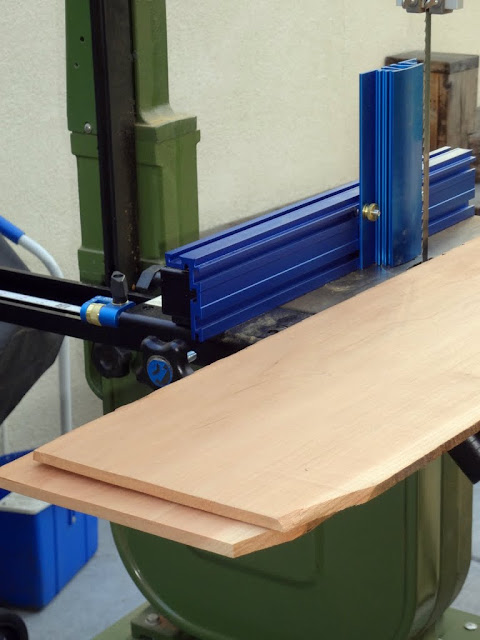
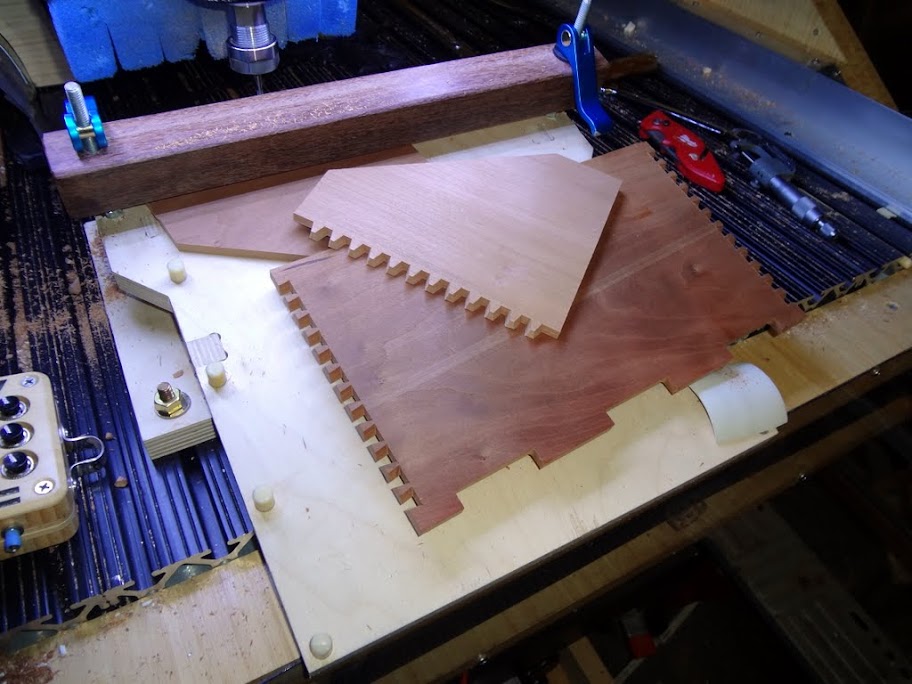
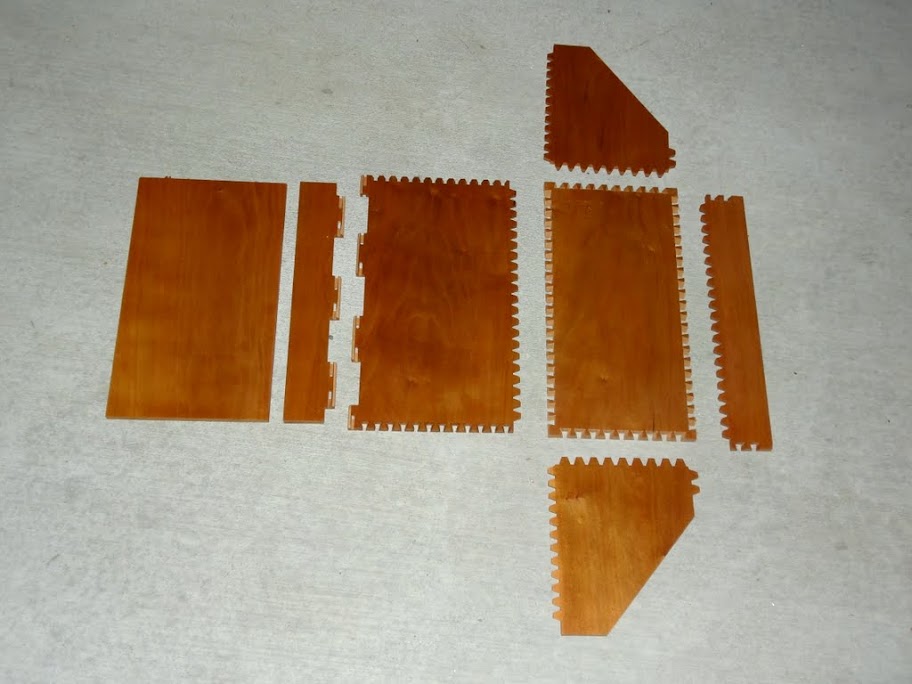
In the meantime I continued improving my v-bit dovetail software. I think I am almost ready for prime time (i.e. distribution). But before I do that I want to do a few projects as showcase. Here is the first one, a storage box for cosmetic stuff that I made as a birthday present for my wife. I made it from a 1" rough cherry board that I found at garage sale, resawed and planed to 7.5mm sheets:
Cutting the pieces and dovetailing with my new program:
All parts finished. I had to change the CNC machined hinges eventually; the thin wood was just too weak.
Partially assembled:
Finished box:

Opened:
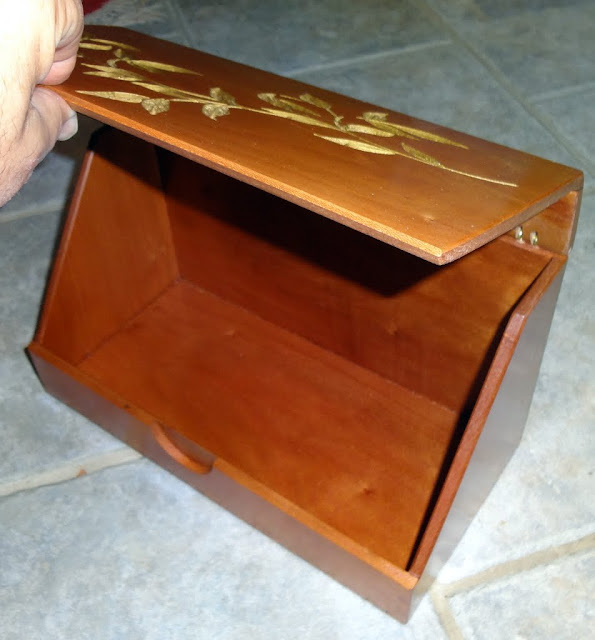
Three edged dovetail joint:

-
05-10-2013, 04:04 AM #414
Registered
- Join Date
- Aug 2011
- Posts
- 107
That looks great Jerry! I really want to be able to do dovetails with my machine when its finished (I plan to have end clamping, but nothing is in stone yet). This looks like its coming along nicely and fills the niche for people with no way to end clamp.
My wife's b-day is in December. At the rate I'm going she will be lucky to have my CNC machine parts out of our gameroom, let alone such a fine gift built on one, lol..
-
05-14-2013, 04:13 AM #415
Registered
- Join Date
- Nov 2006
- Posts
- 1036
Congratulations Jerry! Your project really points out the value of cnc produced joints because all the joints on all five boards line up perfectly. It would seem very difficult to do that manually or even with an expensive jig. I hope your software does well!
-
05-14-2013, 04:14 AM #416
Registered
- Join Date
- Nov 2006
- Posts
- 1036
Oops! All SIX boards.
-
05-14-2013, 03:41 PM #417
Registered
- Join Date
- Aug 2011
- Posts
- 999
Thanks Don, that was a nice project. I have to admit that I did two of the parts twice because they did actually not line up. But that was not the fault of the program, just my setup mistakes. The method is excellent for such special projects. I don't believe cutting pins and tails that are less than 8mm wide by hand into the ends as well as the sides of the boards would be feasible by hand. But I can also imagine this is even more interesting for larger quantity series production of regular cabinet parts. Once set up with a fence you can cut dovetails one ofter the other in no time. Originally Posted by DonFrambach
I am not yet far enough to release (just worked out a few more bugs), but I am getting there. Right now I am working on options for half-blind joints, protruding tails/pins and dowel locked pins. I am beginning to like this software work.
-
06-09-2013, 03:37 AM #418
Registered
- Join Date
- Aug 2011
- Posts
- 999
Contour Shuttle "MPG" on the Planet-CNC controller
I have been using a homemade remote control so far for jogging and start/stop etc. and that works actually pretty well. Nevertheless I like tinkering and wanted to try the Contour Shuttle USB remote. I believe this has been used with Mach3 for a while but since last year it works also with the Planet-CNC USB controller that I have. It is actually quite nice (and inexpensive) and I will probably keep it. Only thing it does not have is the spindle speed pot and tool sensor jack but I can find a different solution for that. Also, unlike my own direct remote to the Planet CNC controller this works only when the PC and control software are running. But that is not a serious limitation.
For safer use I extended the center jog knob (the plywood thing on top). Otherwise I sometimes hit the "fast jog" ring when going small steps and that is not good.
Here a quick video:
Box Joint and Dovetail CAM software here: WWW.TAILMAKER.NET
-
06-30-2013, 03:52 AM #419
Registered
- Join Date
- Aug 2011
- Posts
- 999
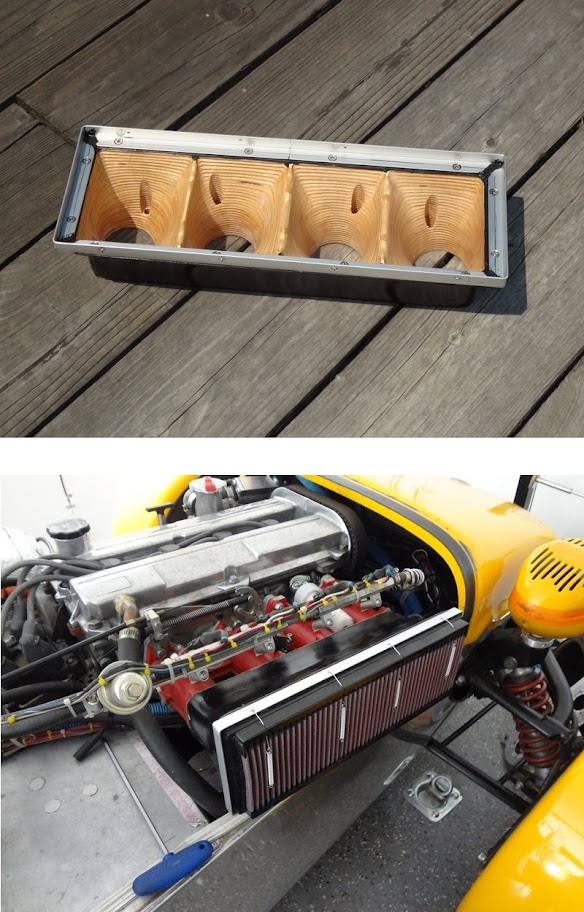
Deep machining with 4" end mill and ball end mill
I wanted to make an intake filter holder/air box/velocity stack for my toy car and tried machining this out of a 3.75" thick laminated Baltic Birch block (5 layers of 3/4" sheet. This came out quite good with the extra long 4" end mills (from HTC) held in the collet only by 1/2". I had to go easy on the feed rate and depth (120ipm and 0.1") as not to break them. They did flex quite a lot and made a hell of a racket but this part allows for moderate accuracy. I could have sliced the model and machined each sheet before gluing together but that is also not trivial and I wanted to try the practical limits of my machine (also finally use the long bits for something). A major benefit came from the "waterline strategy" of the Deskproto CAM. That allowed for machining the profiles at each layer with minimum movement. For some reason Vectric 3D-Cut can not do this for the finish cut. See pics below.


 Box Joint and Dovetail CAM software here: WWW.TAILMAKER.NET
-
06-30-2013, 10:53 PM #420
Registered
- Join Date
- Jun 2012
- Posts
- 817
That's pretty cool. I wonder how the longevity will be on that? And the obvious question, can you tell if it runs better? I like it.


 Reply With Quote
Similar Threads
-
7 x 10 project started
By blades in forum Mini LatheReplies: 125Last Post: 01-25-2017, 05:27 AM -
CNC Project Started
By NotSqueaky in forum CNC Wood Router Project LogReplies: 8Last Post: 09-10-2014, 12:41 AM -
New Project Started
By Rumblebelly5 in forum Joes CNC Model 2006Replies: 1Last Post: 09-15-2012, 10:50 PM -
My 4x8 project has started
By MetalHead6263 in forum Plasma, EDM / Other similar machine Project LogReplies: 37Last Post: 01-31-2012, 07:30 AM -
Started new project
By rustamd in forum DIY CNC Router Table MachinesReplies: 55Last Post: 05-31-2009, 04:12 AM
