


Ok, it is looking like I got caught with my pants down, I had purchased and made up a battery holder to keep power to things while changing the bios battery but had not changed the battery out yet, one of those " When I get done with this project I will do it" things.
Well any way, two days ago my Mill, a Arrow 1000 with a 2100 controller, was reluctant to boot, taking a couple of attempts, coming up with a black screen looking for a boot disc in drive A:
When it did boot up, it stalled on a green screen with a message in a white box, can't remember what that message was but think it might have said I needed to reset my clock...but then it moved forward after sitting on the screen and then said the operation timed out, multiple set ups missing and then booted up through some different screens eventually making it to the home screen.
I finished the Job I had loaded, shut it down and proceeded to change the Bios Batteries, I only found one battery, have not located a second one, thinking my Mill only has one Battery?
but any way...now on to the real problem, It will not boot up.
After the Battery change, it came up to the Black screen again, still looking for a boot disc, but in the text it also said the Battery test had failed.
Trying again, same results but no longer shows a battery fail message.
I am guessing..I have lost the bios settings? and those will need to be reconfigured? How do I find those settings and do this, I have no Boot disc. Will I need a boot Disc?
I have a disk that came with the machine when new but the machine does not recognize it as a boot disc, when I try to open the disc on a normal PC, windows does not know what to use to open it, but it looks to be some type of back up file format. The File is M1Y-2449.BCK The Disc its self is Marked with the !000 ERO Arrow 7049-AOA-96-0076 SI-AZI00IY-2449 M/C Data dated 13-12-96
once again, any help with this matter will be greatly appreciated!
Please remember this is "Mill Repairs for Dummies" time so the more detail and step by step information the better!
Thank you, Bill
Results 1 to 20 of 24
Hybrid View
-
01-15-2012, 07:23 PM #1
 Registered
- Join Date
- May 2010
- Posts
- 64
Caught With My Pants Down, New Problem, New Thread
-
01-15-2012, 08:01 PM #2
Registered
- Join Date
- Mar 2011
- Posts
- 463
Based on the vintage, your machine has two bios batteries. One on the WS board and one on the RT Board. You most likely replaced the one on the WS board (has the hard drive mounted to it, but did not look at the RT board. The RT is the board on the far right side of the A2100 control box. It is possible this battery is dead and the BIOS settings are lost, but I've never seen this cause the control not to boot.
It sounds like you lost the WS BIOS settings, but those are not contained on any of the backups you mentioned. These have to be manually set by entering the BIOS at the initial splash screen.
If you contact Siemens, their typical answer is to send the WS board to them for repair (at about $1000). If you can tell me the exact BIOS version on your motherboard I may have the settings for you. To find this, turn on the machine, and watch the screen immediately as it powers up. The upper left of the screen will usually say somthing like:
AMIBIOS (C) 1992 American Megatrends, Inc.
BIOS Version. 1.00.07.CV2
Let me know what version you have and I will see if I can send you the BIOS settings you need.
If you have lost the RT settings, these are more difficult to restore because you don't have direct access to this board's BIOS (no video card or keyboard).
-
01-15-2012, 08:38 PM #3
Registered
- Join Date
- May 2010
- Posts
- 64
Thank you so much for the offer of Help! Originally Posted by maver1ck

I currently have what I would call the Mother board, yes the one with the hard drive on the back side out, that is the one I changed the battery on, I looked at the other boards but did not pull the last one out ( on the right side) and look at the backside of it. I will do so!
The only screen that was coming up after changing the Battery was the black screen that ended up wanting a boot disc and yes I do believe at the top it referenced a bios number and I think I saw this coming and wrote that number down...hoping it was important!!!
give me a couple of hours and I will take a closer look at that last board and find that piece of paper with that number, being a struggling one man show, not spending a 1000 dollars is HUGH!
I do not know what RT settings are, but I am guessing this will require me to plug a keyboard, mouse and maybe even a moniter to the back of my mill?
I was thinking I would need a boot disc to get it to the point where I could do the bios settings? Also these RT settings?
Again, thank you for the help!!!!
I will return soon!
Bill
-
01-15-2012, 09:37 PM #4
Registered
- Join Date
- Mar 2011
- Posts
- 463
Sorry about the abbreviations. To clarify, the A2100 control actually has 2 motherboards. The Workstation (WS) board which runs windows and the User interface, and the Realtime (RT) board which controls the machine functions.
Since the workstation board is what displays on your machine's monitor, accessing the BIOS is easy using the machine's display and keyboard (If keyboard option was purchased). Just follow the instructions on screen to enter the BIOS (usually press the delete key).
Since the realtime board doesn't have a video display, you need to remove the board from the machine, power it up on a bench with a separate power supply, video card and keyboard (all legacy by today's standards, so not easy to find at the local computer shop). That's why I indicated these are a little tougher to restore. Since you won't be able to get the realtime BIOS version for me, I'll need the P/N from the RT board to see if I have settings for it. These part numbers is usually in a format like: 3-424-2168A02.
-
01-15-2012, 10:37 PM #5
Registered
- Join Date
- May 2010
- Posts
- 64
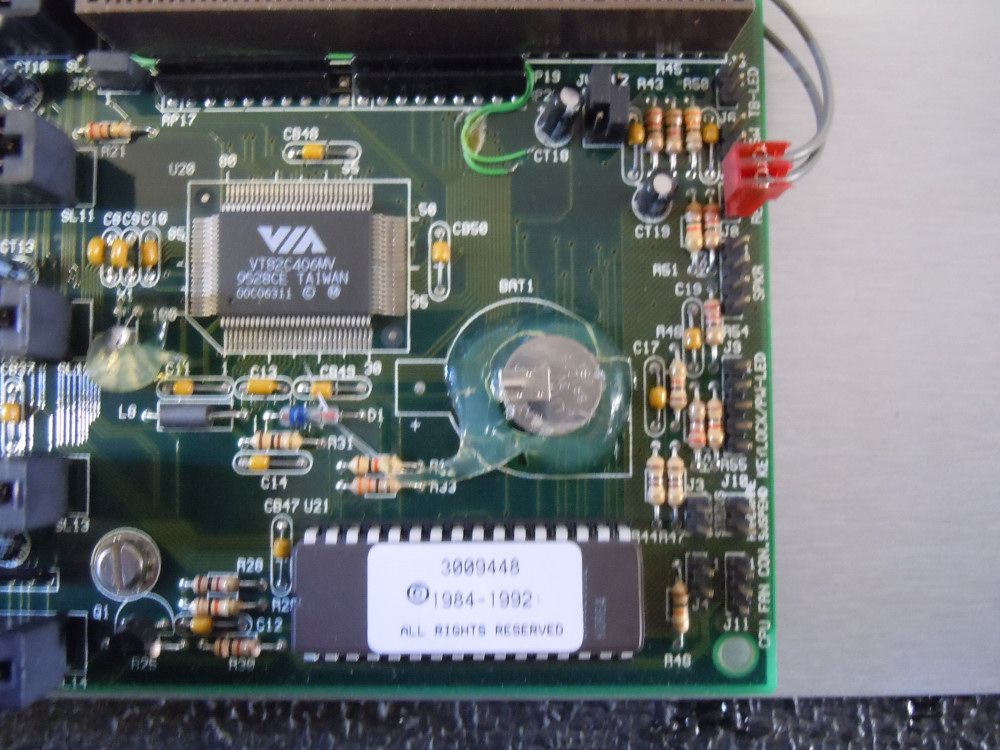
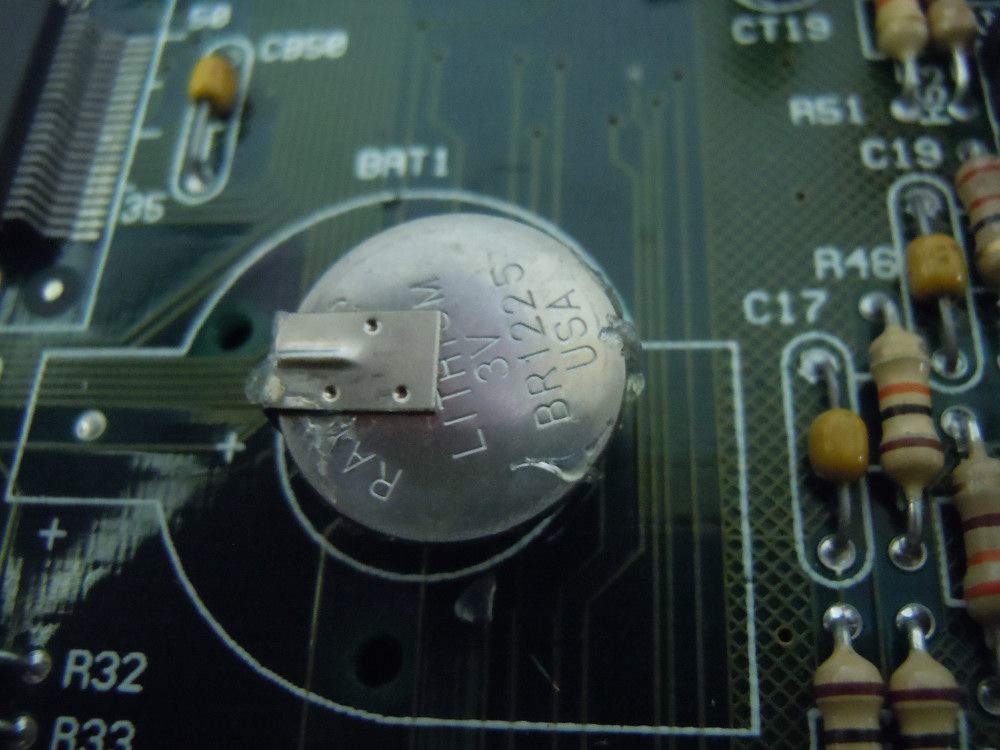
Ok maver1ck!! Thank you for the additional info...my meager brain needs all the help it can get! I did find the Battery on the RT board, the view of it was obscured by what I think is the bridge board. Unfortunately, the battery seems to be bonded in to the holder. It was buried in silicon, I used a exacto knife and carved the silicon away to expose it, I am thinking replacing the battery on the board might be a little beyond my comfort zone, Worried about doing real damage to the board! Originally Posted by maver1ck
What I am hoping is a up side, a voltage check still shows the battery at 2.7 volts on the battery on the RT board. the Battery on the WS board was at 1.6 volts if memory serves me correctly.
The Bios Version that I wrote down, taken from the black screen is 1.00.03 BT0
The part number found on the panel holding the RT board is 3-424-2168A01
But the board its self had a RT: 486-PVT
DOC: 14060
I do not have a external Keyboard on my mill, when I access the key board on my controller it is through the touch screen display that I can not get to at this time do to lack of boot up! but on that black screen I do get a Keyboard not detected prompt so it is at least still looking for one!
Thank you once again and I look forward to your additional help!!
Bill
-
01-15-2012, 10:54 PM #6
Registered
- Join Date
- May 2010
- Posts
- 64
Hoping this comes out right and pictures of the battery show up!
-
12-04-2020, 04:37 PM #7
Registered
- Join Date
- Oct 2017
- Posts
- 9
Re: Caught With My Pants Down, New Problem, New Thread
HELP! My arrow 750 with A2100 had the same issue with loosing BIOS due to dead battery. Does anyone have the settings for BIOS VERSION 1.00.13.CV2 ? Any help would be greatly appreciated.
-
10-26-2018, 06:01 PM #8
Junior Member
- Join Date
- Nov 2010
- Posts
- 12
Re: Caught With My Pants Down, New Problem, New Thread
Hi dear.
I have a Cincinnati Milling Machine. With Acramatic 2100 control. I had a bios battery message. And the clock was constantly erased. I changed the battery on the ws board. Unfortunately, I have ws fail alarms. And does not work.
This ws board model is: aa 670917-310
Do you have bios settings?
please guide me .
my email : [email protected]
Thanx.
-
10-29-2018, 01:07 AM #9
Registered
- Join Date
- May 2010
- Posts
- 64
Looks like Maverick is helping you out! He is the best! If there is any info you stil may need, I can try to figure out how to copy ot!
Originally Posted by am.mohammadi
-
10-15-2020, 01:18 PM #10
- Join Date
- Oct 2020
- Posts
- 1
Re: Caught With My Pants Down, New Problem, New Thread
HI i have a same problem with RT board.
Battery was replaced
Board boot with no problem with vga display and keyboard but unable to boot in machine.
can somone send me a correct settings to BIOS setup program ?
my mail is qdlaczian[at]gmail.com
-
10-23-2020, 05:35 PM #11
Member
- Join Date
- Mar 2008
- Posts
- 285
Re: Caught With My Pants Down, New Problem, New Thread
A2100-Analog CMOS-BIOS Problems:
If you have the control Manual it discusses the A2100 PCA (Processor Control Assembly) which is the large Aluminum Box. Two Boards; the WSCPU and the RTCPU in the control have CMOS BIOS Parameters stored on Volatile SRAM; which requires a battery voltage higher than 3.0 VDC to refresh and retain the BIOS settings in memory went not under power. BIOS is the “Basic Input – Output Instruction” set; making the board smart enough to talk to other pieces of computer hardware; this is specific for each board part number.
Only one board, the WSCPU can be reprogrammed on the machine if you have a PC Style Keyboard on the machine. This is the WSCPU (Work Station CPU) board on the far left by the Hard Drive and Power Supply. To remove the board you would turn off and lock out the power, unplug the 50-pin cable on the front of the board labeled Floppy Diskette Interface.
Remove the large left front cover and the narrow cover to the right of it.
Note or take a picture of the Cables plugged into the top of this board; remove them.
Loosen the Thumbscrews above the top lip and bottom lip of the PCA for the WSCPU.
Gently push to swing the board assembly to the left on it’s swivel pins.
Reach in to the lower right of it and unplug the 16-pin ribbon cable from the BBB (Basic Bridge Board; smart board connecting all the PCA boards together); it may be keyed; if not mark the top.
Gently slide the board out 3/8th inch (8mm) to clear the two pivot pins; then use you right hand to push the board to the left up against the power supply.
Gently slide the board out towards the front using your right fingers to clear the Power Wires (P8-P9), Capacitors, or RAM Memory Modules attached to the WSCPU that will try to catch on the BBB.
When it is halfway out; take a photo of the P8-P9 power connectors; note the four black wires are towards the middle. Firmly grab the wires of each plug and disconnect them.
Pull the board out all of the way and take a photo or write down the PN : 3-424-xxxxAyyy part number and the serial number off the barcode label on the bottom inside aluminum lip.
Examine the board looking for a CR2032 Button Cell Battery. If you have a 3-424-2123A, or 3-424-2290A board it does not have a replaceable battery. Instead it has a Real-Time-Clock Chip (RTC) with an internal battery for the BIOS, that needs to be replaced by an electronic repair facility.
I would prefer to have a plug-in IC-Socket 24 (2 x 12) Pos DIP, 0.6" (ED-24DT CONN IC DIP SOCKET 24-POS TIN) put on the board so the chip can easily be changed again by the user.
If you want to test and measure the battery on the board touch the Red lead of your DC multimeter to the top of the battery and Black lead to the metal board case. Voltage should be higher than 3.0 VDC or CMOS BIOS settings can be corrupted or lost.
You can only Test the Battery voltage on the RTCPU card on the far right side; but DO NOT REMOVE it. This BIOS is reprogrammed on a bench, normally using a Floppy Disk with a binary program to Re-Flash the BOS Settings. This board would be sent to the Cincinnati repair group for reflashing if the battery is low. It fails the NC Engine, WS-RT or Fails between loading Module 2 to 3. If the RTCPU boots normally the battery could be replaced if over 3.0 VDC on a bench hooked up to an AT power supply.
Once the battery is removed from the WSCPU short the battery holder (+/–) connections for 20 seconds; then install a fresh new battery plus-side up.
Reconnect the plugs in reverse order; be careful and gentle in reseating the plugs and board; don’t force anything. Tighten the thumbscrews, top-first; but leave the front cover off.
The Control reference manual has the CMOS BIOS Settings by WSCPU Board number and BIOS Name and Type; or contact Tech-Support-Cincinnati 1-800.934.0735
Leave the hard drive power unplugged and boot the control up, watching the screen to tell you what button to press in order to get into SETUP. If you miss it; “Ctrl+Alt+Del” will reboot the BIOS.
This could be “F2”, “DEL”, etc. You will enter all of the data from the BIOS Setup Sheet specific to that WSCPU board P/N and BIOS Type. When all of the settings are correct and verified; Press “F10” to Save and Exit. When the hard drive is not seen; shut down the control and plug in the hard drive and replace the front cover and Floppy diskette connector.
Power back up the A2100 to see if it will read the hard drive and load the A2100 Applications.
-
12-30-2020, 08:48 PM #12
Member
- Join Date
- Mar 2008
- Posts
- 285
Re: Caught With My Pants Down, New Problem, New Thread
+1-859-534-4750 or +1 800-934-0735 (Cincinnati Tech Support & Parts)
https://store.fivesmsi.com/contact
Fives-MSI CINCINNATI is out on Holiday until JAN 4th 2021

 Reply With Quote
Similar Threads
-
Saggy pants and your place of employment
By tom tom in forum Safety ZoneReplies: 50Last Post: 10-10-2012, 03:23 PM -
VF-1 Almost caught on fire!!!
By autotechsteve in forum Haas MillsReplies: 13Last Post: 07-30-2012, 05:07 AM -
VF-1 Almost caught on fire!!!
By autotechsteve in forum Haas MillsReplies: 2Last Post: 05-31-2012, 03:43 AM -
Attn: Pants
By behindpropeller in forum Haas MillsReplies: 0Last Post: 07-14-2009, 03:51 PM -
Caught Sleeping On The Job
By Five-10 in forum Community Club HouseReplies: 7Last Post: 04-19-2009, 05:18 AM
