


Figured with some of my problems out of the way id post this. Here is a link to a blog I tossed up that will document my progress on this cnc ar15 lower im attempting to make.
As the blog states, this is my first real milling project. Ive done a few little 2d things with my converted x2 but this is a whole new world
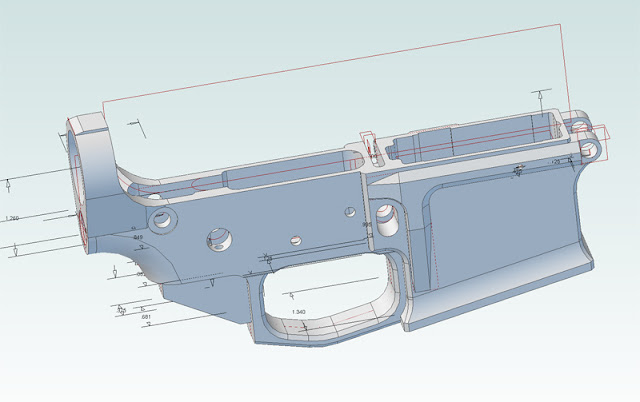
I designed it with alibre and the cam with sprutcam. I already had a few issues with user errorBut im gonna finish this first billet and then create a second with the lessons learned
CNC AR-15
Jesse
Results 1 to 20 of 68
-
01-19-2012, 12:57 AM #1
 Registered
- Join Date
- May 2006
- Posts
- 143
First Tormach Project - AR15 Lower
-
01-19-2012, 01:18 AM #2
 Member
- Join Date
- Sep 2005
- Posts
- 1195
Very nice job. What material do you use? I do not know about gun at all.
-
01-19-2012, 02:13 AM #3
Registered
- Join Date
- Aug 2009
- Posts
- 986
Nice looking part. Is the first picture a rendering?
Just like you, I moved up from an X2 conversion. Once I started to figure out what the Tormach could do, I wanted to kick myself for spending years fighting that P.O.S. mini-mill.
I imagine that you're having the same eye opening experience, especially now that you've tackled the collet slip issue.
Be sure to post pictures of the completed AR. I can't wait to see it.
Frederic
-
01-19-2012, 03:42 AM #4
Gold Member
- Join Date
- Apr 2007
- Posts
- 2580
Jesse.....
First let me commend you on tackling a complex project and getting it done so far. It is one of those things I want to do with my CNC at some point. Let me ask you about your strategy here. How do you plan to machine the opposite side? Are you gonna completely machine thru leaving tabs or did you plan to machine some sorta fixture to hold the other side while you whittle away the rest? What are your plans to machine thru for the mag well and trigger areas? Did you make those anodized ones in the first pic or are they renderings as previously asked? They sure look good but do not appear to have threads in the buffer hole...
I would love to see someone complete one of these with their tormach because it will mean it is doable with my RF45 as well. I know there is a fellow on youtube that made one with an X3 CNC. What kinda upper are you planning to use? Anyways, nice work and keep the pics coming...peace
Pete
-
01-19-2012, 04:04 AM #5
Registered
- Join Date
- May 2006
- Posts
- 143
Just 6061. There isnt any realy forces etc held in the lower of an ar15. Might wear out more at the pin locations etc vrs 7075. This i more about learning the mill and other milling concepts. Originally Posted by asuratman

-
01-19-2012, 04:08 AM #6
Registered
- Join Date
- May 2006
- Posts
- 143
The picture is a 3d render i made. Yeah i figure im gonna try just flip the part and machine most of the plane work first then finish the contour leaving a couple tabs. Then i dont need to make a special fixture for this step. We'll see how it goes Originally Posted by pete from TN
I started with a 1-1/2" piece of aluminum which was much cheeper as well. Not 100% sure on mag well but I got a square broach to try in the corners but not sure how well that will go
Jesse
-
01-19-2012, 07:44 AM #7
Registered
- Join Date
- Sep 2009
- Posts
- 318
I plan to do this as well. I found the following site which shows step by step machining of a lower and other parts and the guy also sells adapters to hold it in place while machining.
CNCGUNSMITHING - www.cncguns.com - AR15
-
01-19-2012, 10:30 AM #8
Registered
- Join Date
- May 2006
- Posts
- 143
Oh yeah great site too. Originally Posted by compunerdy
-
01-19-2012, 03:34 PM #9
Gold Member
- Join Date
- Apr 2007
- Posts
- 2580
Jesse....
Thanks for the information man and I look forward to seeing you test fire this project soon!! :cheers:
Pete
-
01-19-2012, 04:20 PM #10
Registered
- Join Date
- Feb 2008
- Posts
- 389
Cool project! Thanks for the your blog link too, it'll be fun following your progress.
GerryCurrently using SC7 Build 1.6 Rev. 64105
-
01-19-2012, 08:06 PM #11
Registered
- Join Date
- Dec 2009
- Posts
- 1416
If I can ever figure out the dimensional differences between the AR-10 and the DPMS-LR308 platforms this is exactly what I want to do as well on my little BF-25. Figure 6061 to learn on but 7075 once I feel confident. I'm just stuck at how to gather the dimensions from my existing DPMS without tearing it down which I don't really want to do.
CNC: Making incorrect parts and breaking stuff, faster and with greater precision.
-
01-19-2012, 08:22 PM #12
Registered
- Join Date
- May 2011
- Posts
- 0
Which do you want to build, and what dimensions do you want? I have DPMS style lowers lying around. Originally Posted by photomankc
I’ve also seen dimensions here and there, if you let me know what you want I may be able to help.
Maybe start with an 80% lower and get the dimensions from it? The prices are coming down Quentin Defense just came out with a nice DPMS style .308 lower in 80% for under $150.00 shipped.
-
01-19-2012, 08:52 PM #13
Registered
- Join Date
- Dec 2009
- Posts
- 1416
Vader, thanks for the leads, I had not seen those 80% before. I think I can also buy the Tactical Machining jig for about that price and it should have the pin dimensions. I'm trying to figure out where to start in changing the blueprints I have for the Armalight AR-10 to match the DPMS upper and magazine. I wanted to start from scratch and kind of make it my own design is the reason I don't just go on with a forging mostly.
I have a DPMS .308 SASS that I simply adore shooting but it just such a heavy bugger to carry around when I go hunting that I want to build out two different versions also in .308. A long barrel but non-railed free-float longer distance target shooter and a 17" standard handguard rifle for hunting with. The bad news is that if I build them then I'm going to want optics on them and then I need to sell a kidney or tell my daughter to hit the pole for her college savings or something because since two years ago, holy @#$#@ has the money flowed out of my bank on this stuff! Maybe if I get a southern drawl and say "game changer" more often Discovery channel will fund some better toys for me?!
I just really want to be able to say "Yeah, I made that. No, I mean I MADE that"
CNC: Making incorrect parts and breaking stuff, faster and with greater precision.
-
01-19-2012, 09:08 PM #14
Registered
- Join Date
- May 2011
- Posts
- 0
I built a DPMS style in a .260 Remington and I love that thing but as you say carrying it while hunting is another matter.
To that end my last build was a .25 WSSM on an AR-15 platform, with an Olympic Arms game stalker upper. The ballistics are nearly identical to the .260 but it weighs four pounds less. Both are great long distance rifles.
For a little more close range knock down (for bears and such) I built a .308 with a light weight 18” Kaiser barrel and a carbon fiber hand guard.
-
01-22-2012, 09:46 PM #15
Gold Member
- Join Date
- Sep 2006
- Posts
- 1738
Beautiful
-
01-30-2012, 12:50 AM #16
Registered
- Join Date
- May 2006
- Posts
- 143
Updated! finished the side and added an engraving.

CNC AR-15
Jesse
-
01-30-2012, 01:21 AM #17
Registered
- Join Date
- Jan 2012
- Posts
- 789
Sweet!
What did you do for the surface finish, sandblast?
-
01-30-2012, 01:23 AM #18
Registered
- Join Date
- May 2006
- Posts
- 143
yep just quickly blasted over it to see how it would effect the tool marks
-
01-30-2012, 03:22 AM #19
Registered
- Join Date
- Sep 2009
- Posts
- 318
Nice!!
-
01-30-2012, 09:54 PM #20
Gold Member
- Join Date
- Apr 2007
- Posts
- 2580
jesse....
Man I gotta say that looks very cool. Nice 3d toolpaths... Can't wait to see the thing finished. Can you tig weld those holes shut carefully maybe and then carefully sand over them followed by a bead blast so you can use that thing when it is finished. Peace
Pete


 Reply With Quote
Similar Threads
-
milling an AR15 lower..
By opcode1300 in forum GunsmithingReplies: 37Last Post: 10-27-2018, 11:23 AM -
G-Code for turning a AR15 barrel from blank
By Gtrigg in forum G-Code ProgramingReplies: 1Last Post: 09-11-2011, 06:27 PM -
finishing 80% ar15 lower (Micro mill or Zen Toolworks CNC DIY)
By phey05 in forum Hobby DiscussionReplies: 4Last Post: 03-30-2011, 12:42 PM -
555$,666$,777$ for 4th kit-Rotary Table,even lower
By ray sun in forum News AnnouncementsReplies: 0Last Post: 05-20-2010, 08:41 AM -
Annoucement: Tormach Project Amnesty. Send us your stuff for Technology Education!
By ag53711 in forum Tormach Personal CNC MillReplies: 0Last Post: 05-13-2009, 08:44 PM
