


Well its been over 5 years since I joined this forum, and I've been tinkering with the idea of building a CNC machine for longer than that.
So after years of false starts and running out of time, I decide this would be the year I built a working router. I have a bunch of parts that I collected over the years, but never really enough to get anything going. So to get ball rolling, I setup the prebuilt belt driven slide that bought from a surplus store as as my Y axis of my machine and would build from there. I ordered my Gecko drives, some 8020 and some parts to build my Z axis from CNC Router Parts.
My 48" wide Y axis:
As the boxed started coming in I did a dumb thing and searched CNC on my local craigslist. Normally it is just junk or some huge machine that needs it own shop, but not this time.
A Simple add with this image..
Well that looked interesting, some of the parts looked familiar. I could see some 8020 and some cold rolled steel. It was looking like someone else had also like Ahren's linear carriages, but I needed more info. So to keep the story short, a few emails and pictures later I pulled my tax return back out of the bank and headed over to the owners home. After about hour of tinkering, I had the computer running tested the system to see that everything worked and loaded it into my van.
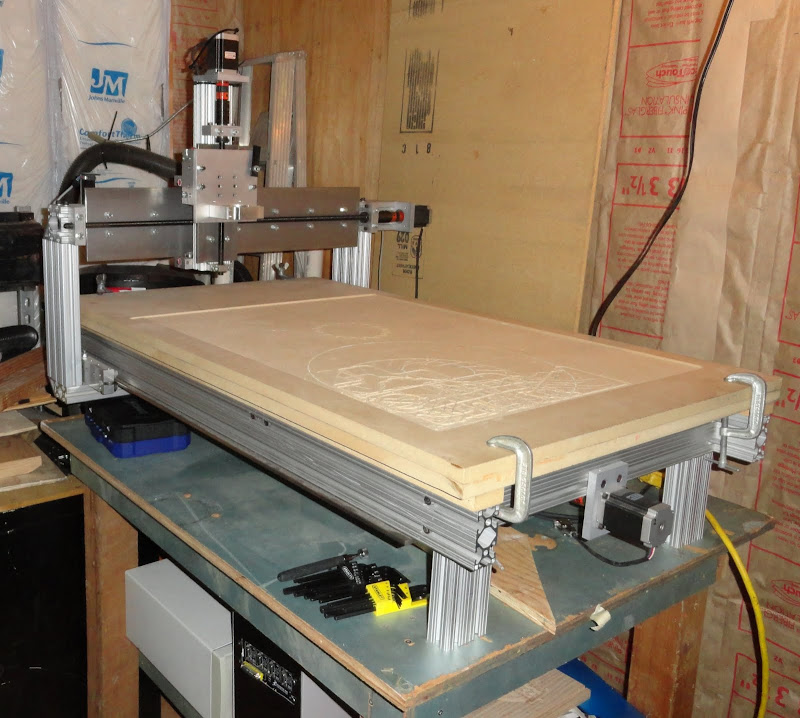
The package included the CNC Machine, table, computer, Gecko G540, router, shop vac, home made dust collector can, table, and some router bits.
I'm not positive, but the machine is either a FLA100 from Fine Line Automation or built from his plans using his parts and CNC Router Parts. From what I can see from the markings of the previous work it looks like it will cut a work area of 34" x 25" of the 29"x 48" bed.
After sitting in the van for 2 days, I finally got it moved into my shop. I had help loading it, but I had to take it apart to get it to its new home.
This is machine really a compromise, but most of life is... In an ideal world, I'd wanted to have a small (desktop) machine to mill PC Boards and Dog ID tags, and a big machine that could handle a 4'x8' sheet of wood. But this is here now and I'm happy to have something that is complete and functional. I just need to plug in all back together and I'm ready to run. Maybe next year I'll get the 4'x8' machine built... I have most of the parts for the Y and Z axis, just have to build that table, rails, drive system (ugh, more work that I though)
If anyone can help...
I'd really like to know some more back story on the machine but I don't know what I'll ever find out. I'm not exactly sure how the seller obtained the machine, but he never ran it. It was build and owned by someone in the Oklahoma City area, not the seller. The builder passed away sometime in 2011 and the machine ended up in the sellers garage. I tried searching this forum for a build thread, but no luck. I did find some youtube videos of the machine being run. I know they are video of this machine because other video on the Mach computer are also posted on Youtube.
Here is one of the videos I found.
[ame=http://www.youtube.com/watch?v=UX7_OjCi_Ms]CNC Router build - YouTube[/ame]
The date on the video is the same one on all of the videos I found so I have to guess he never set the date on the camera. From what I can tell is the machine is just over 2 years old.
If anyone know anything about the machine or the man that built it, please let me know on this thread or PM.
Thanks,
-C
p.s. I guess it time to drop some cash on software. I've used CamBam on some files exported from Sketchup, and I own ACAD. I see MeshCam is on sale till the 20th, is it a good piece of software for $175 or is there something better in the same price range?
Thread: I just gave up and Bought One!
Results 1 to 20 of 21
-
03-14-2012, 09:57 PM #1
 Registered
- Join Date
- Jul 2006
- Posts
- 102
I just gave up and Bought One!
-
03-15-2012, 01:27 AM #2
Member
- Join Date
- Apr 2007
- Posts
- 1955
I am not sure of the builder, but it looks like a pretty classic 8020 + Ahren's parts.
It should be good for a lot of light duty hobby style cutting, and certainly will help you build the larger one.
Is there one X axis screw or 2 ?
Good luck
Harry
BTW- I could swear I saw that same video on cnczone before, but I have no idea where.
-
03-15-2012, 04:06 PM #3
Registered
- Join Date
- Nov 2006
- Posts
- 1036
Congrats on your purchase!
-
03-15-2012, 04:40 PM #4
Registered
- Join Date
- Jul 2006
- Posts
- 102
I'm not sure who else build / sells this style kit, but it really looks like the Fine Line Automation kit: Originally Posted by harryn

Complete 2'x3' Router Kit : Fine Line Automation
It has a single screw for the X-axis. I'm pretty sure they are all 1/2" 5 start machine threads.
If you ever see that video again let me know. From what I can tell by the files on the computer, the previous owner was a Mini Cooper Fanatic. His youtube user name was OKMINI. (Not that I'm much better, mine is OKFJ as in FJ Cruiser.)
Thanks!! Originally Posted by DonFrambach
 It was my biggest single jump into this hobby, I just need more hours in a day to get it going and to finish insulating my work shop. I need go get the AC going before summer hits, I don't work in the shop when its 120 degrees in there. My job just seems to take a big chunk out of "free time", funny how that happens.
-C
-
03-15-2012, 09:31 PM #5
Registered
- Join Date
- Mar 2010
- Posts
- 371
It's the fineline design. Could be the kit, could be a home brew from the free plans.
Meshcam is fine. I like Cambam better. It's $150.
-
03-15-2012, 10:42 PM #6
Registered
- Join Date
- Jul 2006
- Posts
- 102
I looked at Cambam a while back and it seem like it did a good job, granted I was only processing the Gcode on a simulator. Originally Posted by brtech
I just didn't think that it was able to process 3D images. I remember I could pocked and cut out parts, a some profiling, but no true 3d processing, maybe I'm wrong.
This may be a situation where I need to spend cash on both. Not my favorite idea, but I know you've got to pay to play... Or write gcode by hand..
Hopefully I'll get the rest of the wiring run tonight and give it a test run. Some of the limit switches didn't make the move to the last home, so I removed them all and need to rewire them. I think the old wiring was CAT5 cable so any movement caused the wires to fail.
-C
-
03-15-2012, 10:51 PM #7
Registered
- Join Date
- Mar 2010
- Posts
- 371
Some of the lower cost CAM programs can do 3D relief cuts, where you have some simple shape with varying elevation and you cut it with a VGroove bit. The mid/upper range Vectric products are real good at that.
However, mostly, to build a 3D part, you have to manually instruct the program to do 2D operations. It's pretty simple, and the program figures out all the dimensions, but you say "pocket this with this tool" "profile that with that tool", in the order you want it to.
-
03-15-2012, 10:57 PM #8
Gold Member
- Join Date
- Apr 2009
- Posts
- 5516
Originally Posted by Miata2k
MeshCam is a heluva deal for $175. Cut3D is similar but costs over $100 more, and MeshCam actually has more toolpath strategies.
-
03-16-2012, 12:16 AM #9
Registered
- Join Date
- Apr 2007
- Posts
- 663
Cam Bam 3D
The older versions of Cam Bam may not have worked well, but Andy has really done a lot with 3D and it works stunningly well. Originally Posted by Miata2k
I recently made four sets of 18th century ogee feet for a spice cabinet I am building. First made the profile with an STL file then cut the leg from a DXF file. Worked like a charm.
It is a big jump form 2D to 3D, but with the printable help files, new tutorials, and a lot of recent forums postings about 3D by Andy [the inventor] I think you will be very happy with Cam Bam.
Great forums as well.
Remember, there are 40 free sessions before you have to buy.
Your find on Craig's List has us all envious .. in case you have not figured that. I have built two CNC routers, if I go for a bigger one still, I am buying [possibly hiring someone to build]. The time spent building can be expensive if you put time into planning, designing, and building rather than production. Like you I want to cut 4x8 sheets.
-
03-16-2012, 05:24 PM #10
Registered
- Join Date
- Feb 2011
- Posts
- 270
I use MeshCAM Art, it will allow you to do 3D sculptures from bitmap images. It does take a while to learn, but definitely worth it! Sorry I can't help you with any info about your particular machine. It is a shame the builder did not write an owner's manual (perhaps he did, but it was just lost somewhere along the way). I know that when I initially started my build, I just started a list of information about where I obtained the various component parts, etc. Which quickly grew into a scattered bunch of random documents. So, the thought to organize all of the information into a single document so that I could reference it if needed in the future came into play. And the Owner's Manual for my machine was born. Like the machine itself, the Owner's Manual is in a constant state of refinement. With each new addition to the machine, a new entry is added to the manual describing the design and components added. And drawings of the new additions added. As time (and money) passed, I became aware that I may someday sell my machine to someone else, who would then be pestering me with details about this or that from that day on! So, I also started a list of suppliers that I used for the various components, and common parts such as bearings, (and their part numbers) etc. My only regret in writing the book, is that I did not include exact measurements (drawings to scale, etc.) As to have included this information along the way, the book could then be used for anyone to duplicate my machine. Which would have made the book a marketable product in itself! Good luck in your search for the original builder's info- as there probably does exist some pretty detailed information about his build SOMEWHERE! My book exists in electronic format on my computer. But I have made it a habit, to print out hard copies whenever I add something, which I keep in my shop close to the machine. Because you never know when your time is up!
-
03-19-2012, 04:03 PM #11
Registered
- Join Date
- Jul 2006
- Posts
- 102
I'm going to give the new version of CamBam a try some time this week. I found the old copy I had and loaded it, but watching the online tutorials just didn't match up with the program. I still need to spend some time with MeshCam, the sale is over tomorrow so I need to get it now, or not get the sale price. Originally Posted by zool
Well I wouldn't be too envious, I never said what I paid for it, or how well it worked. I finally had a chance to run it this weekend just long enough to draw the standard Road Runner with a sharpie and run some dry cuts(? no router?). Any way at 100 imp feed rate the wood table under the machine is just rock'n and roll'n. The machine has a few bearing that need adjusted, the limit switches need to be replaced, and it has some squeaks and grumbles that are questionable. Overall it looks solid, but we will see when I start to do some real cuts. Originally Posted by zool
Most of my time in the shop right now is spent trying to get the walls and ceiling finished. I'm trying to get the building insulated and build a small attic area, but working on the building with all the stuff in it is like trying to build a ship in a bottle by first putting all of the materials and tools in the bottle first.
Adprinter, Originally Posted by adprinter
Do you have any examples of a starting image and a finished product? When you say 3d sculpture, do you mean like a raised image or a real sculpture (all sides)?
Also I think the owners manual is a great idea, so I started a log book this weekend. All I was able to add so far were the general dimensions of the table and how I wanted it to operate. The previous owner must of had other ideas in mine because the first thing I had to switch was the X and Y axis and the + - directions. I guess its all in how you look at the machine.
Do you use Mach? How much does your manual cover about the mach settings for your machine?
And you are right about when your number is up. I lost my dad the year I graduated from college somewhat unexpectedly, and I'm sure the builder of this machine had years of expected use for it.
Thanks everyone for all the great input!
-C
-
03-20-2012, 02:43 AM #12
Registered
- Join Date
- Feb 2011
- Posts
- 270
While MeshCAM Art is capable of 4-sided machining, I have never used that particular option. What I have done, (but unfortunately don't have photos of), is to generate a tool path for a 3D carving, saved the Gcode. Then opened the Gcode into another program called CNCWrapper, to convert the tool path to be wrapped around a cylinder. (4th axis cut). Originally Posted by Miata2k
It basically carves the same shape as it would on a flat plane, except that it wraps it around a piece of round stock. As far as the artwork pictures, and the carved results, see the attached jpgs.
As for the Mach info in the manual, another user suggested some time back a time-saving feature. Once you have Mach3 set up, and properly tuned motors velocity and acceleration rates, to do a screen capture of the various screens, and save the jpgs into your Owner's Manual document. Do this for each of the pertinent screens (Ports and Pins, Motor Tuning for EACH axis, Homing & Limits, etc.). A Picture being worth a thousand words, it is a more convenient method of recording all of your settings in Mach3.
And "how you look at the machine" should be oriented with the left corner closest to your vantage point would be the (-)X axis limit, and the (-)Y axis limit. With the (+)X axis limit and (+)Y axis limit as the right corner of your machine table farthest away from you.
Positive Z limit should be oriented as the Top of travel for your Z axis. (Fully Retracted Z), with the (-)Z limit as your depth of cut (set Z Zero to your stock surface). I actually installed a (-)Z axis limit switch on my machine, with a digital caliper (during a time when the mounting bolts had vibrated loose on my Z axis Nut assembly-unknown to me at the time).
Using The (-)Z limit switch assembly, prevents the machine from physically cutting any deeper than the Gcode program calls for. So it is definitely a safe guard improvement. You should be able to read more of the details on this, in a later issue of Digital Machinist Magazine. (I'm not sure if it will be included in the next issue or not- we'll see).
-
03-20-2012, 03:43 PM #13
Registered
- Join Date
- Jul 2006
- Posts
- 102
The images you attached look great! how do you tell it to carve more detail onto the earth? I watched some tutorial and see how you use the colors to raise and detail the images, but not the extra carving. Originally Posted by adprinter
I also spent some time last night reviewing MeshCam. It worked very well for the test 3D image I loaded into it, but it really didn't have the options to process the DXF file that I loaded that is for a real job, or at least I couldn't figure it out quickly. I loaded the same project into Cambam and quickly made all the tool paths and generated the gcode. So for now it looks like I'll stick with CamBam. I'm still torn, I hate to miss the $175 sale price for MeshCam, but I also don't want to spend $175 on software that I rarely or never use.
My goal right now is to get an electronics display rack finished for a test fixture at work. It is just some some basic part cut outs, light text engraving an some pocketing. I tried to figure this out in MeshCam and all it wanted to do was cut out big square holes where I really wanted to shallow notch milled to indicate product location.
So I may come back to the 3D tools at some time, I can see a great use for it in model building, but I'm just not there yet.
Another great idea! With your experience writing your manual, you could generate a template for other to create there own manual. A generic document that you use to just fill in the blanks. Then people could add it to their CNCzone profile to help others answer their own questions. Originally Posted by adprinter
Ex.1 CNCUser1 has a similar machine to me, how did they setup the steppers in Mach. I'll just check their online manual.
Ex.2 CNCUser2 machine looks great, but will it fit in my shop. Their manual says the overall dimension are x,y,z.
I have the machine setup that way for me now, but I think the previous owner looked at the machine from the short end so everything get switched around. Now I just need to figure out the best way to mount the limit switches to the 8020. I'm sure that someone has already figured this out and has drawing files somewhere on this site. Originally Posted by adprinter
Cool, I've been thinking of subscribing to it, but I usually end up at the local book store looking for the latest issue. Hobby CNC is not my only hobby, so I don't always have the time to stay on top of the required reading. Originally Posted by adprinter
-C
-
03-21-2012, 02:40 AM #14
Registered
- Join Date
- Feb 2011
- Posts
- 270
The details of the earth were accomplished as described in my previous post (select the BLUE and RED to form the dome shape first, then select ONLY the RED to subtract, or add to the dome surface). However, it is important to note here, that this is only possible using MeshCAM Art. While standard MeshCAM can work with bitmap images, it does not include the ability to edit by colors. This is a function which is only available with MeshCAM Art. Originally Posted by Miata2k
Don't want to confuse you here, but the artwork file I uploaded does NOT include the RED land masses of the earth. (I did not save the file after adding these for exporting to MeshCAM Art). Sorry!
As for a "Generic Manual"- trust me on this, even two identical machines would differ in some of the settings in Mach3. Unfortunately, things like calibration, and motor tuning is a very individual trial and error process. One has to simply make adjustments, and try it out to see what works best for their particular machine!
As for machine orientation- that is an issue sure to spark some differing opinions. I mentioned it in my previous post, as a convience for you (to help you to avoid confusion, it is easiest to understand if what you are seeing on the Mach3 screen matches the movements you see happening on the table of your machine).
As for Digital Machinist, just go to their website and fill out a registration form. I THINK they still offer 1 free issue, just for doing this. (Not sure, just go there and read). www.digitalmachinist.net
Hope this helps. Good luck with your machine, and your journey! It really is a fun learning experience, once you get things ironed out!
-
03-21-2012, 03:22 PM #15
Registered
- Join Date
- Jul 2006
- Posts
- 102
CNC Manual Template
Adprinter, Originally Posted by adprinter
Maybe this is just the Engineering mind at work here, but I think you missed my point. I don't think you should generate a generic manual, but a DIY CNC Manual Template, so everyone can generate a manual in a standard format.
Just have a document that has a list of section and a description of information to enter about your machine. It would basically be a good checklist of things to have in your manual in a standard format.
Ex.
1. Introduction
1.1 Why did I build this machine(essay format)1.2 Goals for the Machine (essay format)
2. Mechanical
2.1 CAD Drawings (add images here)2.2 Dimensions2.3 Hardware used (80/20, MDF, Etc)3. Electrical
3.1 System Wiring Diagram3.2 Motor Wiring Diagram4. Software
4.1 CAD Software4.2 CAM Software4.3 MACH / Linux CNC4.3.1 MACH Manual5. What I learned.4.3.2 Personal MACH Settings
This document could be used all through the life cycle of the machine. I know it has been hard for me to pin down a machine to one task. I really want 1 machine that is big enough to cut a 4x8' sheet of plywood, strong enough to machine aluminum, and precise enough to engrave PCB board. I didn't that that was possible so I made some compromises, this would be recorded for anyone else that wanted to know why I build this machine the way I did.
Maybe this gives you a better idea of what I'm thinking about. Maybe it could be another article for Digital Machinist, "Planning Your Router Build" (or maybe this has be done). Just throw in some stuff about construction time, some Gantt Charts, Budgeting, Social Networking for help(online resources), etc.
So if you would be willing to share the outline of your Manual, I'd be happy to try to use it and give you my input.
Thanks,
-C
I
-
03-21-2012, 03:28 PM #16
Registered
- Join Date
- Jul 2006
- Posts
- 102
CpectorBon, Originally Posted by CpectorBon
Are you talking about MeshCam or MeshCam art? I can see where the ART part could take a while to learn, and develop a good technique, but I'm not so sure about MeshCam.
From what I can tell from the MeshCam trial software it seems pretty simple. Open 3D part into program, set up tools and pick your routing path, generate g-code. Maybe I'm missing something so please let me know if there is more to it. CamBam has all types of routing tools and options to configure the end product. It just occurred to me as I type this, that if I generated the finished object in my CAD program MeshCam would just make that part. But if I just do a 2d drawing I need CAMBAM to make it 3d.
Now I have to go test my theory..
-C
-
03-24-2012, 05:35 AM #17
Registered
- Join Date
- Feb 2011
- Posts
- 270
Please have a look at the original manual. Unfortunately, I cannot post the current manual, as it contains information which would be a conflict to a copyright agreement with a publisher. (Attached MyCNCV1.PDF). Originally Posted by Miata2k
-
03-24-2012, 06:16 AM #18
Registered
- Join Date
- Feb 2011
- Posts
- 270
The beauty of MeshCAM Art, is that one does NOT need a CAD program to work with it. And to answer your question: I am referring to MeshCAM Art! Originally Posted by Miata2k
(Which also includes standard MeshCAM for working with CAD created files).
But it's main strength, (referring to MeshCAM Art) is working with bitmap files without the need to also go through the learning curve of a CAD program in order to create 3D tool paths.
And yes, there is a LOT more to it! I actually use Corel Draw for artwork creation, in order to achieve precision scale, and colors. The "colors" are key, to controlling the 3D carving results in MeshCAM Art. And since Corel Draw is a vector-based graphics program, the drawing can be created at the actual desired size.
Scaling (with MeshCAM Art's default settings of Preserving aspect ratio), is accomplished when you open the bitmap into MeshCAM Art (by specifying the exact X dimension size to match the original artwork drawing). Y dimension is entered automatically (since aspect ratio is preserved).
You could use pretty much ANY bitmap editor software for artwork creation. However, not every bitmap editor package has the ability to save the file as non-interlaced colors. Or even the ability to limit the number of colors used to create the file. This is the reason I prefer Corel Draw for my artwork creation. I always export the artwork file from Corel Draw in a resolution of 200 dpi. And when opening the file into MeshCAM Art, I click the "Allow Resize" button, and then click the resolution box and reduce it to 80 or 90 dpi.
The reason for this, is to reduce the Artifacts which sometimes occur in the pixels between 2 or most contrasting colors. (They will appear as spikes, protruding above the rest of the carving image preview). After editing all colors to the desired shape in MC Art, I always run a "Smoothing" operation (to reduce, or eliminate any artifacts). THEN select the desired cutting tools for the roughing cut, and finishing cuts and generate the tool paths!
One would be well advised to ALWAYS use both a Roughing Cut, AND a Finishing cut. A lesson which I learned the hard way in the beginning. RESIST the temptation to just go straight to a finishing cut. For it may generate the prettiest toolpath preview on screen, but the reality is, that it will do exactly what you see on screen! (I.E. PLUNGE Full depth into the stock, which usually results in a broken bit!).
The Roughing cut is a NEEDED operation, to remove the bulk of the material in preparation of the (usually smaller diameter) Finishing cut. Patience is required, as some carvings can take MANY hours to complete! I just did one yesterday, in Oak that measures 21" wide by 12" tall with maximum cut depth of about 5/8" The total cut time was over 12 hours long!
You can see many examples of MeshCAM Art carvings on my facebook wall.
(Michael Hobgood - McDonough, Ga).
-
03-24-2012, 10:21 PM #19
Community Moderator
- Join Date
- Mar 2003
- Posts
- 35538
MeshCAM only reads 3D stl files (it can read some 3D .dxf files, if you know how to create them the way MeshCAM expects them). If you want to work with 2D .dxf files, there are many 2D CAM programs available. Some popular 2D programs are Vectric's Cut2D, and V-Carve Pro, and SheetCAM.It just occurred to me as I type this, that if I generated the finished object in my CAD program MeshCam would just make that part. But if I just do a 2d drawing I need CAMBAM to make it 3d.
CamBam can work with both 2D and 3D CAD files.Gerry
UCCNC 2017 Screenset
http://www.thecncwoodworker.com/2017.html
Mach3 2010 Screenset
http://www.thecncwoodworker.com/2010.html
JointCAM - CNC Dovetails & Box Joints
http://www.g-forcecnc.com/jointcam.html
(Note: The opinions expressed in this post are my own and are not necessarily those of CNCzone and its management)
-
03-26-2012, 09:29 PM #20
Registered
- Join Date
- Jul 2006
- Posts
- 102
Adprinter, Originally Posted by adprinter
Thanks for the PDF, I'll try to get some time to review it soon. Its mowing season again and my house so spare time is really at a minimum now.
-C


 Reply With Quote


Similar Threads
-
Somebody gave me V22. What should I do with it?
By Fadal Error in forum BobCad-CamReplies: 9Last Post: 02-22-2011, 12:19 AM -
Anyone ever bought an X2 and wished they'd bought an X3?
By isaac338 in forum Benchtop MachinesReplies: 17Last Post: 04-15-2008, 04:06 AM -
I bought V21 the other day.
By Jim Estes in forum BobCad-CamReplies: 2Last Post: 01-11-2007, 03:37 PM -
has anybody bought from here
By chevy in forum Stepper Motors / DrivesReplies: 2Last Post: 01-13-2006, 06:56 AM -
you guys gave me the bug, i'm gonna retro a mill
By dannystooblue in forum Benchtop MachinesReplies: 5Last Post: 10-20-2005, 02:05 AM
