


Another rf45 clone build...
I bought a PM45m with 3hp dc motor and factory tach and variable speed just before new years. This is my first cnc so I am a newbie. I also have a Jet 13x40 lathe with dro. I am ready to start the conversion. I am going servo and looking at the Keling 34 servo kit. I downloaded Mach 3 last month and have been familiarizing myself a bit.
Any suggestions etc would be appreciated
Questions:
1. What if anything should I consider for upgrades/additions to the Keling 34 1125 oz servo kit?
Here is what it comes with-
NEMA 34 Servo Motors 3 Axis CNC Kit
A: 3 PCS Geckodriver G320X, 80V/20A
B: 3 PCS KL34-180-90 (NEMA 34) Dual Shaft, 1125 oz-in Peak 90V/40A
C: 3 PCS CUI AMT102-V KIT Encoder
Individually Packaged Shaft-Mount Encoder with latching connector,
Installation Tool + 3 PCS 6 feet CABLE SHLD LATCH 5PIN 24AWG
D: 1 PCS KL-7220, 72V, 20A, Unregulated Power Supply, 110V/220V
E: 5V Power Supply, 110V/220V
F: 1 PCS Breakout Board for 6 axis, Isolated signal, E-Stop or Limit Switch
can be wired
2. Does smoothstepper replace anything above?
3. Any other options alternatives in this price range?
Once I finalize the above list I plan to order and get to work. Thanks in advance for suggestions
Here are couple of pics of the machine in Jan when it arrived:
Welded a stand:

Results 1 to 20 of 100
-
03-15-2012, 05:49 PM #1
 Registered
- Join Date
- Mar 2010
- Posts
- 156
PM45m(rf45 clone) cnc build log with factory 3hp variable speed
-
03-16-2012, 08:10 PM #2
Registered
- Join Date
- Mar 2010
- Posts
- 156
I decided to go a different route and just get the DMM Tech 900 watt 3 axis ac servo kit. It seems more elegant than doing the dc servo route. I will post more after stuff arrives. In the meantime, I am going to tear down the mill and cut the oil grooves and look at ballscrews.
The ac servos are 1000 rpm vs 3k for most of the dc ones I have been looking at. What tpi should I be considering for ballscrews?
-
03-18-2012, 06:52 PM #3
Registered
- Join Date
- Dec 2006
- Posts
- 839
I think you will like the DMM A/C servo setup, and if yuo call them up and talk with them they may have a higher voltage driver out now that gives the motors more RPM. Any of his drives/motors are hard to beat, quite, powerfull and very smooth.
I would still run either 4 or 5 tpi screws, depending if the servo's go dirrect drive or a belt drive. WIth a belt drive go with 4, and dirrect drive go with 5. Even if you have to get 5 tpi for a belt drive I don think you will have any rapids problems. These motors run so good you will still get all the rapids you can make use of.
What machine is that ( or who sales I should ask). Is that Qualilty Machine Tools mill? It sure looks good if it is.
The SMooth Stepper doesnt replace anything you listed. WHat it does is off load the signal from the PC ( or Mach3) and it gives its own signals which are much faster & smoother (hence the name). I would get the new eithernet version if you get one. Not %100 needed, but they are nice and work good.
I would also talk with DMM and see which BOB ( breakout board they suggest).
There are some RF-45's I believe that are already running the DMM setup. It might be good to look into these system and see what screw,drive ( belt or dirrect), and what ratio if belts they use. Then you would kinda see what performance they where getting and make ajustments if needed to fit your needs.
I will looking forward to seeing your build, keep us posted.
JessGOD Bless, and prayers for all.
-
03-18-2012, 11:53 PM #4
Registered
- Join Date
- Mar 2010
- Posts
- 156
Thanks for the suggestions, especially on the ballscrew tpi. I was talking to Li at DMM on Friday and they seem pretty helpful. I will ask about higher voltage breakout board and then maybe just add my own powersupply. Originally Posted by LUCKY13

If I get higher voltage the rpm should go up - what tpi screw should I use?
On the mill, yeah, it is a rf45 clone from Quality Machine Tools. Matt gave me a decent deal on a 3 hp variable speed dc he had in stock. I have been pretty happy with it so far.
-
03-19-2012, 04:31 AM #5
Registered
- Join Date
- Dec 2006
- Posts
- 839
The drive is what is higher voltage, but they will know what your asking about.
I just got through reading some threads on a DMM system on a IH clone mill. It seems with a 5 TPI screw, 3 to 1 belt drive, Mach 3 "no Smooth Stepper" and only 48v on old drive he was getting 120ipm rapids. Ofcourse these systems will be able to use what ever they get for cutting because they dont lose power at RPM like other systems. But Mach3 is what was holding him back at 120ipm. WIth a SS and some more voltage he would be flying.
So with a Smooth Stepper & 75v 150 to 200ipm should be possible.
If I understand right they can run the old driver at 75v and get 1300rpm instead of 1000. Plus they have a new drive which should be out in March that drives them even better ( plus it doesnt need a power supply). IDK if its really ready or not but when you talk to them again just ask.
Anyway a 5 TPI screw should work fine ( or 5mm per turn which is close to same).
These systems are so quite and smooth I would upgrade my system if I could afford to and I havnt even finished mine yet. I have the one you listed from Keling except I have the 850 instead of the 1125 servos. STill a heck of a system but they dont compair to the DMM A/C setup. I noticed Keling has two A/C motor/drive setups but I dont know anyone that has run them. The DMM has proven itself and thats hard to over look.
Just for the heck of it here is a video of a IH mill cutting at 85 & 100ipm. I havnt seen any other machines cutting this fast so it goes to show with good power ( which the A/C systems have) even 120 ipm can be alot.
Untitled Document
JessGOD Bless, and prayers for all.
-
03-19-2012, 09:45 PM #6
Registered
- Join Date
- Mar 2010
- Posts
- 156
Originally Posted by LUCKY13
Thanks for the additional info.
I talked to DMM and ordered the 3 axis ac servo kit with upgraded drives less power supply. These will run 1300 rpm like you talked about. I added an Antek PS-15N63 power supply that is 63volts at 23 amps per their suggestion.
FYI, about a month for the faster drives that will drive the 900 watt servos to 3k like you said. I don't think I need the extra speed and am impatient
-
03-21-2012, 12:34 AM #7
Registered
- Join Date
- Mar 2010
- Posts
- 156
Update:
I ordered (2) 5/8" 5 tpi ball screws for x&y axis and (1) 3/4" ball screw for the Z from Roton. I also ordered double ballnuts for each axis.
Between the antek psu, dmm tech servos package and the ballscrews, the ups guy is going to be busy!
I ordered ball screws from Roton x and y were 5/8" x 5 tpi 15" and 48" respectively to be cut to size and z axis was 48" to be cut to size but 3/4"/ 5 tpi
5/8 X .200 Right Hand Recirculating Lead Screws & Nuts for Power Transmission - Roton Products, Inc.
3/4 X .200 Right Hand Recirculating Lead Screws & Nuts for Power Transmission - Roton Products, Inc.
I also ordered (8)12mm double row angular contact bearings + (4) 15mm from
Double Row Angular Contact Bearings:Ceramic,Miniature Ball Bearings
I will machine my own bearing blocks with 2 bearing per side on each side of the block.
-
03-25-2012, 04:28 PM #8
Registered
- Join Date
- Mar 2010
- Posts
- 156
I picked up 80lbs of aluminum rem stock from industrial metal supply. Mostly 2 1/2" x 3" thick and 1/2" thick plate. There is also 20lb chunk of steel rem for the z axis ball nut mount. All of the aluminum was at 1.69lb and the steel was 1.39. Basically a $150 for stock metal costs for the conversion:

Got to use the new Glacern Face mill. It really is awesome!

I should have snapped a pic right after I milled it- shiny metal and dead smooth flat. I took this one 3 hours later after measuring the mill a and stock to check fitment and design. This chunk is a a bearing block to be.
Here is a pic with the basic shape cut and one side bored for the double row angular contact bearing. There are to be 2 double row bearings on each block in a sandwich to support each end of the ballscrew.

I plan to mount a block like this on each side of the x axis and then a 1/2" thick plate for the offset to mount the motor.
UPS man should be busy with servos, ballscrews, power supplies etc on the way.
More to come, thanks for looking....
-
03-25-2012, 08:39 PM #9
Gold Member
- Join Date
- Jan 2010
- Posts
- 2141
Interesting build. Great photos. Wish that I had a local metal source where I could get such prices.
I can guesstimate the dimensions of the part that you show by comparison to the size of the bearing or the sizes of other objects in the photo, but it would be helpful if you could mention the actual dimensions. Is the bearing block essentially the same as the stock size, minus facing to square it off?
-
03-26-2012, 02:22 AM #10
Registered
- Join Date
- Dec 2006
- Posts
- 839
Nice bunch of rem stock, did you pick it up local or was it shipped to you? I agree with Doorknob I wish I would find metal rems like that where I am at. Heck even the scrape metal places have got to where they will not sale anything.
Looks like your taking right off with your build. AT this rate you will be cutting chips soon.
JessGOD Bless, and prayers for all.
-
03-26-2012, 04:09 AM #11
Registered
- Join Date
- Mar 2010
- Posts
- 156
Local metal supply rem piles are always best! Originally Posted by doorknob
I machined to identical bearing blocks and will use the stock bolt holes for coplanar alignment. Waiting on my ballscrews though to verify alignment before i drill the bearing blocks for mounting holes. Here are some pics to show perspective better:
Width of bearing block:

I basically cut the blocks to size and then drilled through the block with a 1/2" drill to to provide a way to locate and bore the bearing hole on each side of the block and have them be coplanar.

Checking fitment:

gang machining to make them identical:

finished blocks with 2 bearings per side:

-
03-28-2012, 03:28 AM #12
Registered
- Join Date
- Mar 2010
- Posts
- 156
today everything arrived:
dmm ac servo kit, antec 65v psu, ballscrews, ballnuts...

roton:

dmm control board:

removed the table and figured x axis ball nut mount:

table off:

-
04-01-2012, 10:09 PM #13
Registered
- Join Date
- Mar 2010
- Posts
- 156
Update, x axis getting there. Diy preloaded double nut seems to work. It currently has 2 50lb bellville washers per screw to provide preload force.
In this pic, you can see the nut loose and the parts, there are actually 2 opposing bellevilles per bolt like this () They generate 50lbs wer washer x 8 washers:

All tightened up:

Head on view:

It fits!

Next I got to put my lathe back together enough to try and turn the ball screws to size.
Thanks for looking...
-
04-16-2012, 03:04 AM #14
Registered
- Join Date
- Mar 2010
- Posts
- 156
Anyway, just got back from Arizona and got a bit more done. X axis is getting there and fitment seems fine. I turned down the ballscrews- no power feed on the lathe and it was a bit tedious as those things are hard. Remembered reading something on the Roton site and sure enough, they said to anneal the ends with acetylene torch. Once I did that it was fine and I also threaded one end. I drilled and tapped one side for the bearing mount and turned the ballscrew with a drill to check for binding but it all aligned
Fyi, the preloaded ballnut setup with 2 cheap roton ballnuts (24.00 each + 5/8" ballscrew at $11.00 a foot) seems to have absolutely no backlash with 300lbs of preload from belleville washers.
Here are few pics:

It fits!

cheap harbor freight marking punch. I am amazed how much i use the set.

Test fit of the gear side:

Tail side:

BTW, this is my new favorite tool. I always hated tapping and these spiral flute taps are awesome. The chips come through the flutes and they just cut better. I got 4 sizes so far all on ebay:

Close up because I really really like these taps!

That's it for now, thanks for looking.
GT40
-
04-16-2012, 04:37 AM #15
Gold Member
- Join Date
- Jan 2010
- Posts
- 2141
Thanks for the close-up of the tap - I had read about that type of tap, but had never seen a picture...
-
05-27-2012, 06:18 PM #16
Registered
- Join Date
- Mar 2010
- Posts
- 156
Update:
I have made some good progress.
X axis is largely done:

Y axis ball nut block with boss:

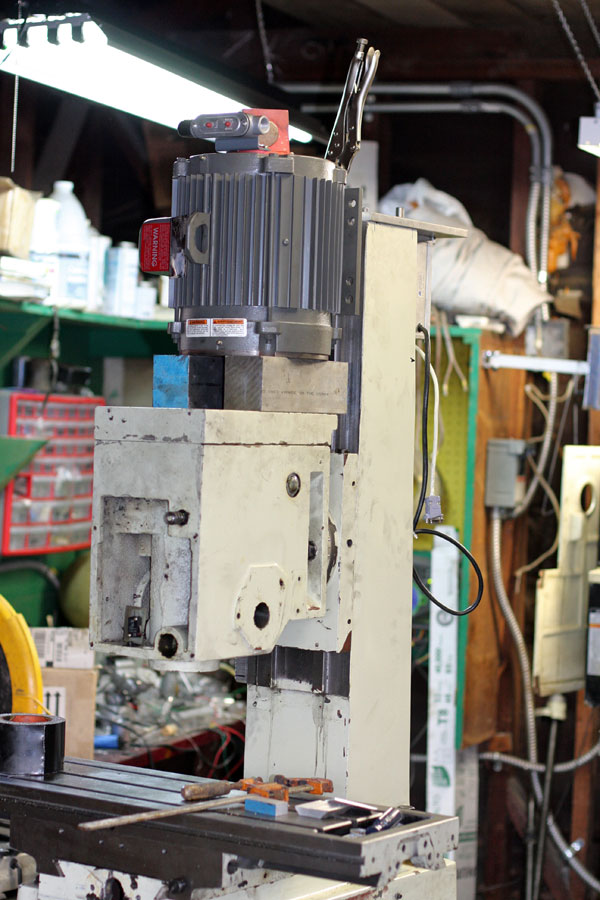
I had to take the mill head off. Considering the 300 + lb weight, this was done by disassembly. I will be adding bigger motor anyway:

Gears:

Z axis lower bearing support block. Alignment of Z axis was a little tricky. In the end, i snuck up on it but had to make several of these to get the fitment right. It was hard to take accurate measurements inside the column:

z axis ballnut block. Basically a 3"x8"x5" block with a boss cut on the end. I am really happy with the fitment as there is absolutely no slop:

Here is the opposite view with the boss cap:

3 hp inverter duty motor and drive. It is heavy at 130lbs and makes the AC Tech vfd look tiny:


I was going to use the pm factory dc motor but I scored the inverter motor for 180 dollars new surplus and the motor that came with the mill is a "tad" optimistic in its "3hp" rating. The lincoln motor is really a monster in comparison and 4x the size. It will be a little interesting shoe horning it on top of the head...
On another note, I was able to cut grooves in the ways and drill/tap x, y and z axis using the bridgeport at roadrace engineering. They work on my car and let me use it after hours. First time using one and it cut like butter:

thanks for looking
Mark
-
05-30-2012, 04:35 AM #17
Registered
- Join Date
- Mar 2010
- Posts
- 156
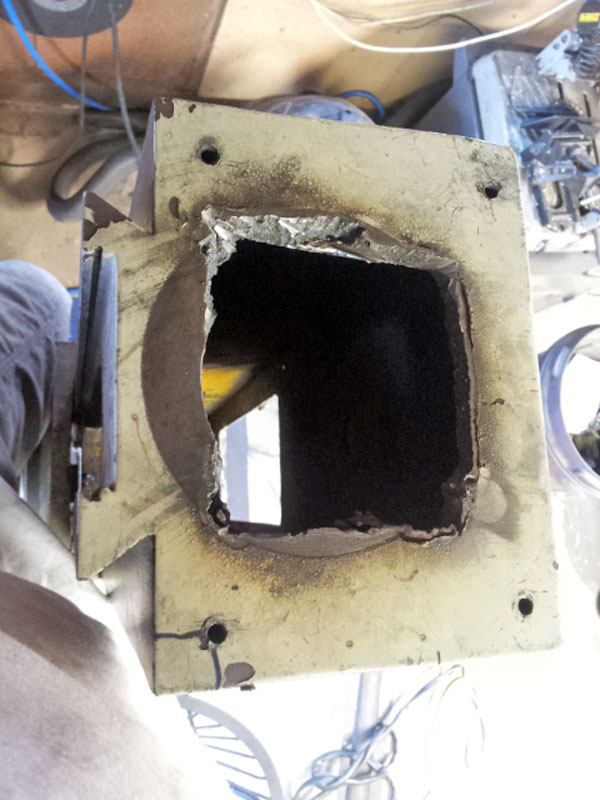
I made a little more progress towards finishing the z axis. I performed surgery on the top of the mill, opening the top up for my flush, undermount bearing block. Not the prettiest cut but it will be covered entirely by the servo mounting plate. I basically climbed up on the mill stand and cut it out with my plasma. I think I won't do that again :P
My favorite way for boring the bearing blocks is proving to be a surplus 1" diameter mt3 drill bit. Much faster making the hole and then finishing off with a boring bar:
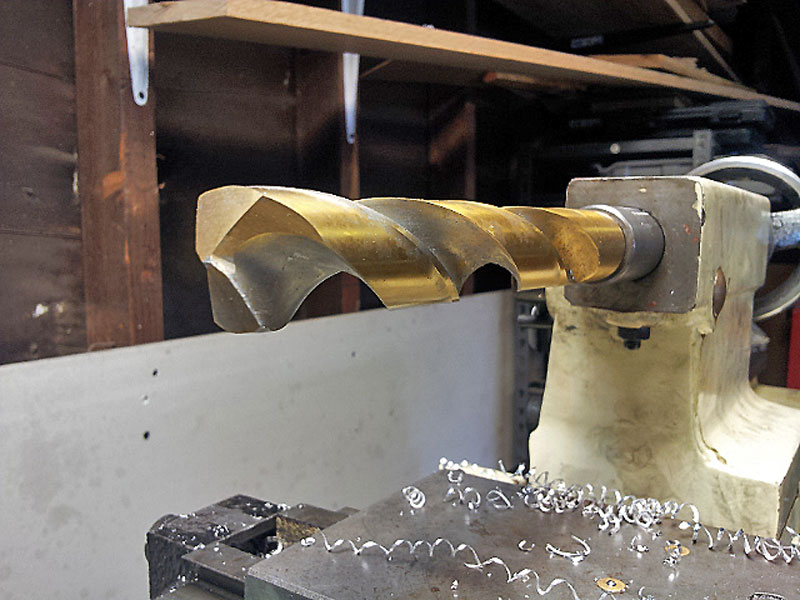

Thanks for looking...
-
06-09-2012, 06:23 AM #18
Registered
- Join Date
- Mar 2010
- Posts
- 156
Update:
I thought I should thank some folks who have made my build possible. I am learning as I go and would be a square one with out all the info on this site. I thought I would condense best threads that have been a help so far for my cnc conversion of my PM45/DM45/ZX45/RF45 clone:
g.d. marshes awesome thread got me started and was inspiration for use of cost effective roton ballscrews with 2 ballnuts and bellvilles, vfd with poly v belt and pulleys + repurposing of the spindle tube and so much more:
http://www.cnczone.com/forums/bencht...onversion.html
Ekkeke for lubrication, over building the z axis and misc:
http://www.cnczone.com/forums/bencht...f45_clone.html
mattbesquare for wiring and servo mounting:
http://www.cnczone.com/forums/bencht..._thread_-.html
Bob Warfield and CNC Cookbook- awesome resource I am still reading:
CNC Machinists Cookbook: Software and Information
Jid2 for bearing block design, ballscrew mounting, spindle mounting. The fact that he has a evo like mine: http://www.mccomsey.net/evo/
+ all the great pics on his thread.
I think his and g.d marshes threads really made things accessible made me inspired to hack up a perfectly good mill:
http://www.cnczone.com/forums/bencht...sion_rf45.html
Graetech site for tearing into the head:
Graetech RF45 milling machine CNC conversion - RF45 gearbox photos
Lucky13 for good general advise and about DMM tech
I will post more as I remember others.
Well, I have made good progress. x, y and z axis ballnut blocks, angular contact bearing blocks on both ends are also done and x and z servo motor mounting plates are finished. I also was able to test fit the 3 hp inverter duty motor. It is a beast and I think you can't fit a much larger motor without mounting it offset so I am extremely happy. It clears the column with a full 1/2" to spare with it's designated mounting location:
I cut the side plates and hope to mount it tomorrow then make the the 2 step poly v pulleys. That should allow for 2 speed ranges up to 7000 rpm with the vfd.
Here is a shot of the z axis bearing block and double ball nut with 300lb belleville washers to prevent backlash:
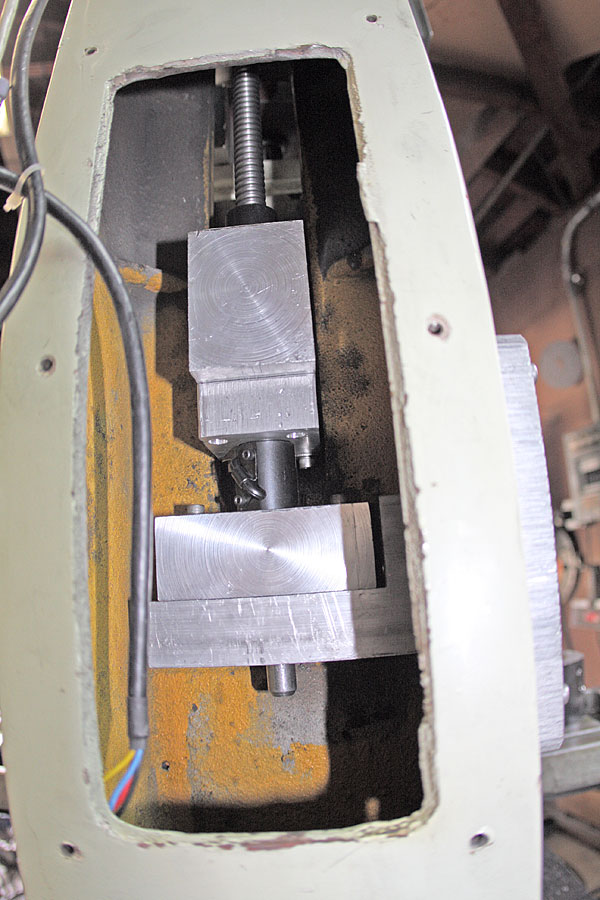
Keep in mind the bearing block is 8" x 4" chunk of aluminum.
Next I have to figure out how to wire the 3 phase motor and the vfd.
Thanks for looking and for all who have posted on here to show the way...
-
06-11-2012, 05:51 AM #19
Registered
- Join Date
- Feb 2011
- Posts
- 605
Nice! We also have the same TIG welder.
PM-45 CNC conversion built/run/sold.
-
06-11-2012, 06:10 PM #20
Gold Member
- Join Date
- Sep 2006
- Posts
- 1738
Fix those pictures ! JK, but no really, I want to see what you have been doing, sounds great!


 Reply With Quote
Similar Threads
-
An Aussie IH Clone Build (Long Travel RF45)
By Wallerawang in forum Benchtop MachinesReplies: 91Last Post: 08-28-2014, 10:22 AM -
What RF45 clone should I get?
By Nigel Tufnel in forum Benchtop MachinesReplies: 2Last Post: 12-03-2013, 06:24 AM -
Build Thread: HF 8x12 variable speed DC motor conversion
By gt40 in forum Mini LatheReplies: 1Last Post: 04-13-2010, 10:16 PM -
X3 or RF45 clone?
By logjammer in forum Benchtop MachinesReplies: 13Last Post: 12-14-2006, 03:34 PM -
convert rf45 type to belt variable speed and some cnc info?
By ataxy in forum Knee Vertical MillsReplies: 20Last Post: 09-03-2006, 04:58 PM
