


Having some surface finish issues which I think are related to low tool clamping force. I've ordered 100 new belleville washers to replace the old stack. I see from the parts breakdown how they are to be installed. The parts diagram doesn't show how to take it apart, of course, though it looks pretty straightforward.
Anyone have one of these apart to replace the bellevilles? Any tips or gotchas?
Looks like I can remove the spindle cartridge from the casting, then remove some kind of a nut from the top where the knockout cylinder presses onto the drwabar. Presumably the whole drawbar then sides out of the spindle taper.
I'll measure the knockout cyl to drawbar clearance before I take it apart so I can put it back the same way.
--
Aaron
Thread: BMC Drawbar bellevilles
Results 1 to 6 of 6
-
04-04-2012, 06:20 PM #1
 Registered
- Join Date
- Feb 2010
- Posts
- 163
BMC Drawbar bellevilles
-
04-04-2012, 07:03 PM #2
Gold Member
- Join Date
- Feb 2009
- Posts
- 6028
Done other Hurco's but not that one.
Should come out from the top of the spindle, and i don't think you need to remove the spindle to do it. Usually, leave a tool in the spindle, remove unclamp cyl., lock nut on top of spindle, put unclamp back on, eject tool and carefully remove unclamp cycl... Lots of upwards force, so be careful.
-
04-04-2012, 11:24 PM #3
Member
- Join Date
- Jun 2008
- Posts
- 1104
Aaron, just measure the top of the drawbar to the top of the first locknut, note it down then remove both nuts.
The drawbar will come out of the bottom of the spindle (make sure to catch the six balls that come free from the collet as it drops).
Remove all the springs with a magnet.
Fill the spindle with the new springs in order and re-insert the drawbar (use a small blob of grease to keep the balls in place).
refit the nuts to the same measurement as when you removed them.
-
04-10-2012, 03:58 AM #4
Registered
- Join Date
- Feb 2010
- Posts
- 163
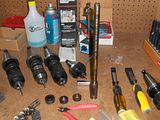
This went relatively easy. I probably spent 4 hours over 2 days. I could do it again in about 1 to 1.5 hours now. Click the pictures for bigger ones.
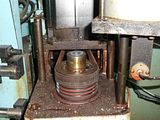
First, here's the top of the spindle showing the 2 drawbar nuts, the orientation magnet, the knockout cylinder's rod, and so on.
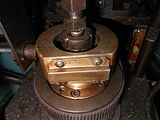
I moved the knockout cylinder aside and bolted it to the standoffs to keep it out of the way.
I didn't want to mess with the orientation magnet. There just wasn't any way to get this apart without taking the magnet off. I put a blob of dykem on the pieces and scribed a match mark.
I took off the magnet. It's got two grub screws on opposite sides. Now I could get at the drawbar nuts. I removed one of the standoffs holding the knockout cylinder for better access.
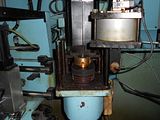
The top of the drawbar has flats for a 12mm wrench. For the lock nuts I ground up a cheap pair of locking pliers to have two tabs to lock into two opposite slots. The nuts weren't terribly tight, perhaps 30 ft-lbs.
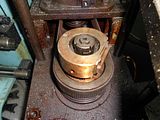
I dropped the drawbar out of the spindle taper being careful not to loose the 6 locking balls.
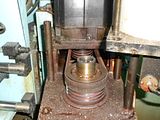
Notice the height of the belleville stack in the spindle. I pushed the bellevilles out from the bottom. A 3/8" drive 18" long extension was perfect for this.
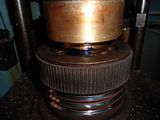
There are 96 bellevilles stacked up like this:
(drawbar oring piece)] >><<>> (...) <<>><< [(drawbar collet)
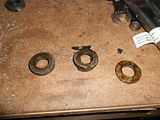
There's a top piece with an o-ring between the drawbar nuts and the top belleville. This part is asymmetrical; the o-ring is closer to the bellevilles than the drawbar nuts (the red handled pliers are pointing at this part in the drawbar picture).
The bellevilles looked OK as I was taking them out until I got to the very bottom. The 4th and 3rd to the last bellevilles were broken.
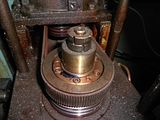
I greased up the new bellevilles from Key Belleville ($135 for 100 pieces). I stacked them in 4, 20 washer high stacks with the rest in 2 washer thick stacks.
To put the bellevilles into the spindle I used the 3/8" drive extension again. I poked this up through the spindle and just stacked the bellevilles up on it. No pictures, my hands were full. The drive socket is big enough to keep the bellevilles in place. Then I lowered the whole stack into the spindle.
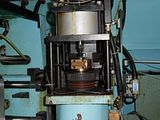
Note how high the belleville stack is now! Each new <<>> stack was 0.015 taller than the old one. Even though the old bellevilles looked more or less OK they had fatigued.
I put the o-ring piece on and screwed the bottom drawbar nut on. The drawbar is long enough and has enough threads on the end so that I could start the nut a few turns before it contacted the longer belleville stack. I measured the distance between the end of the drawbar and the top of the lower nut as 0.535" before disassembly, so I matched the dimension. This gives about 0.500" preload on the new bellevilles as opposed to about 0.030" on the old ones. I know that 0.500" preload sounds like a lot. This is really only about 0.020" compression on each >> stack (there are 48 of the >> stacks). The top nut was screwed on and torqued, the orientation magnet reinstalled.
I bolted the knockout cylinder back on and we're ready to go!
I carefully checked the clearance between the orientation sensor and magnet. I'm sure that these are an inexpensive part from Fanuc (not!) so I didn't want to wipe it out. The clearance was fine. I had to move the spindle inside the magnet a tiny bit. I believe it's always been slightly out of alignment when oriented.
The toolchanger works very nicely now. Before I would occasionally get unclamp failures. Likely these were caused by the broken belleville pieces getting where they didn't belong.
I will have to see if the surface finish is better. Should be soon, I need to run some more of those parts later this week.
Thanks for the help Cliff, and underthetire!
-
04-10-2012, 06:26 PM #5
Registered
- Join Date
- Feb 2010
- Posts
- 163
Oh, the belleville for this machine is a stock item at Key Bellevilles. Their part# is 31.5-16.3-1.75 meaning 31.5mm OD, 16.3 ID, 1.75mm thickness.
Key Bellevilles, Inc.
100 Key Lane
Leechburg, PA 15656
(724) 295-5111
-
04-14-2012, 04:02 PM #6
Registered
- Join Date
- Sep 2006
- Posts
- 300
Fasto,
Thanks for posting.
That will be very handy for someone. The pics really help, too.
JAckal :cheers:Everything is bio-degradable, if you run over it enough times with the lawnmower.

 Reply With Quote


Similar Threads
-
VF2 Drawbar
By rrbmachining in forum Haas MillsReplies: 19Last Post: 12-15-2023, 08:24 PM -
Drawbar
By ALUM in forum Haas MillsReplies: 1Last Post: 09-09-2011, 03:52 PM -
How to Change Bellevilles, Specifics...
By quickturngreg in forum FadalReplies: 6Last Post: 09-13-2009, 02:32 PM -
TC-22 DRAWBAR
By tpmx57 in forum Bridgeport / Hardinge MillsReplies: 10Last Post: 12-19-2008, 03:29 AM -
drawbar
By advt001 in forum Cincinnati CNCReplies: 2Last Post: 11-24-2008, 12:49 AM
