


I have 2 TAIG mills sitting around and as awesome as these little machines are, two things I could never get past are the backlash in the leadscrews and what a pain they are to lubricate. I love the box ways, and the design of these mills is very smart, so I thought they warranted some nice ballscrews and an oil pump. I only started this today, and the process will likely be slow, but I thought I'd post a step-by-step since I have never done that before and someone might be interested to see it come together.
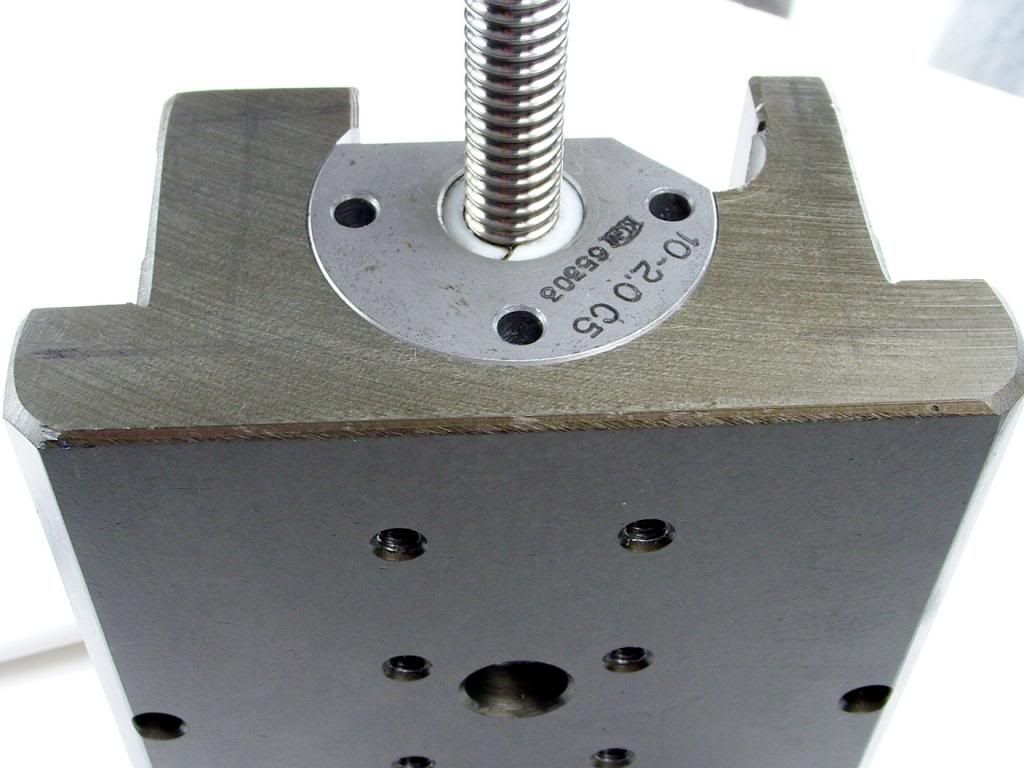
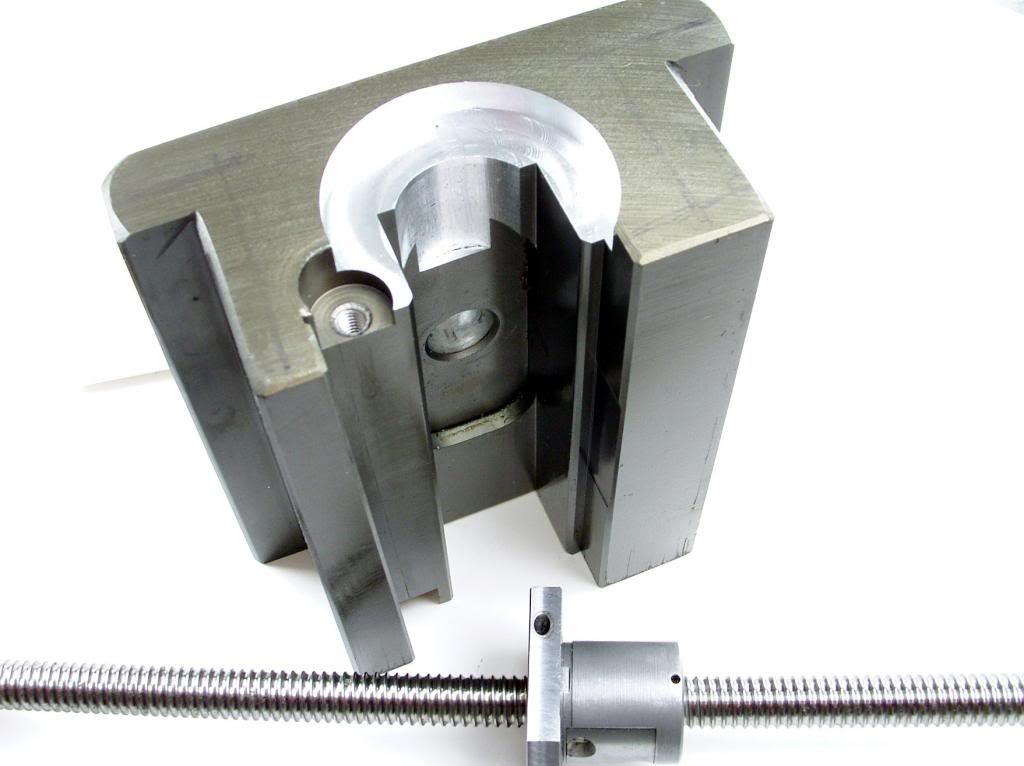
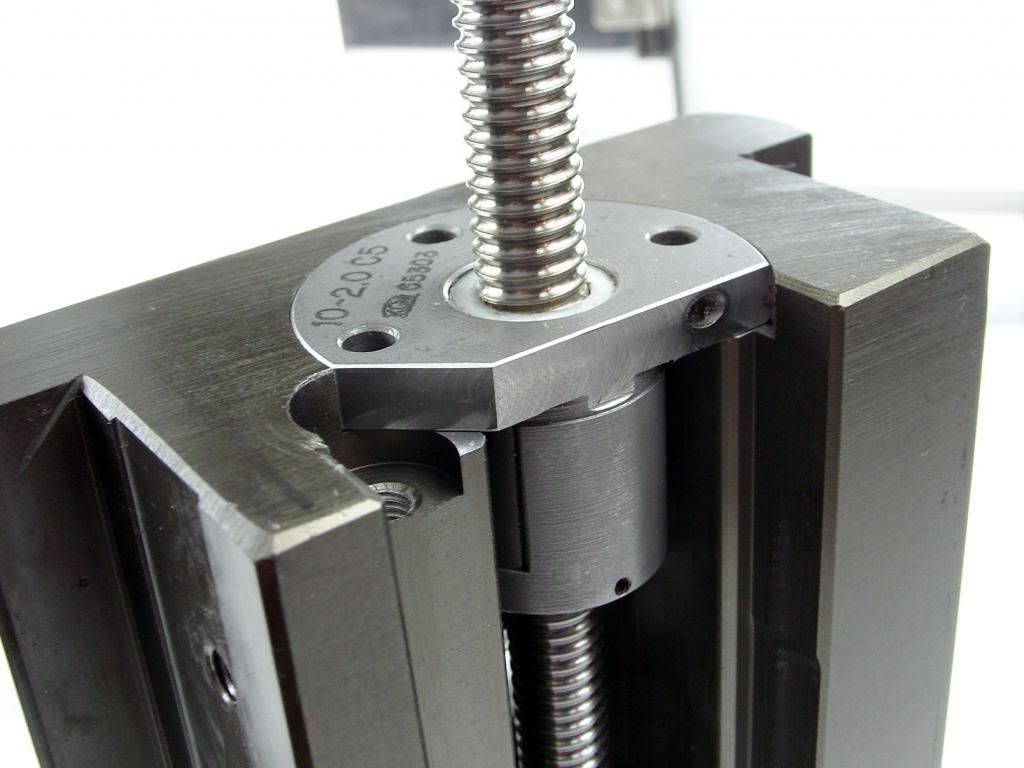
I started by milling the flange on the ballscrew. It was pretty hard, so I used an end mill made specifically for hardened steel. They are expensive, but if taken care of, can last quite a while when doing stuff here and there like milling flats and keyways in shafts, etc. I milled it down to the ballnut body, and it seemed like it would be a perfect fit. The screw is a C5 ground screw, 10mm with a 2mm lead. It is a barely used, high quality screw I got on eBay for about 30.00. It came complete with A/C bearings.
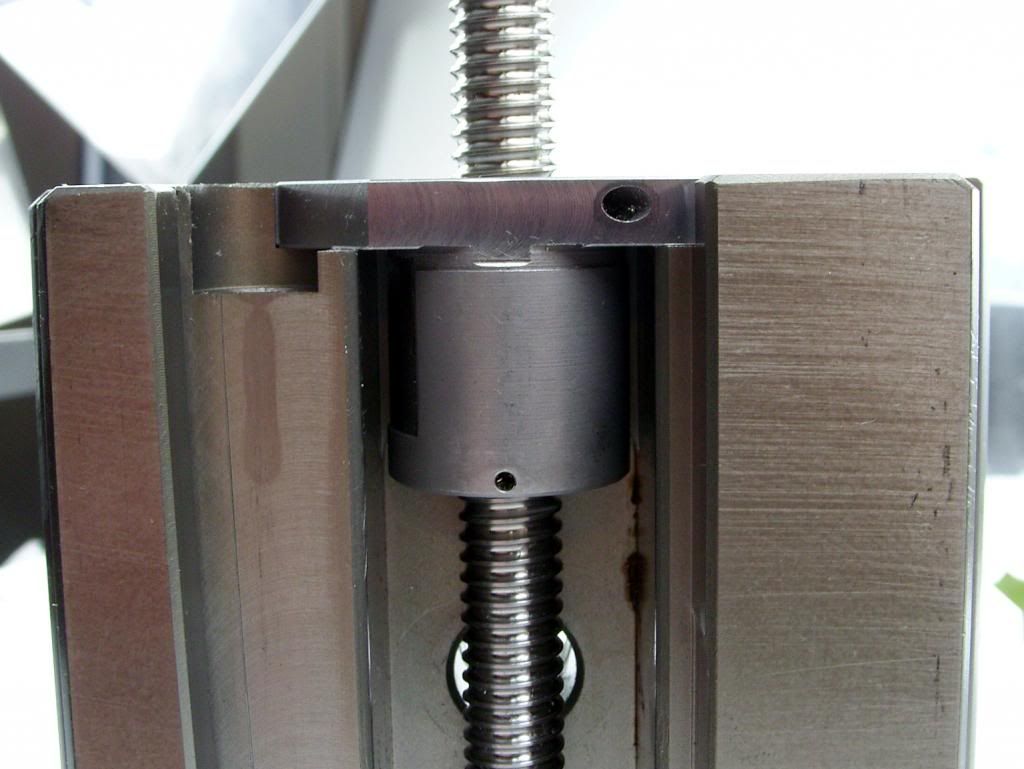
I milled the pocket into the Z axis to fit the ballnut body. Due to the fact that the ballnut is in the way, it requires moving it out about a quarter inch to clear the Z axis rail. It fit like a glove, and I will have to make a new bearing block for the AC bearings at the top. I will thread the OD of the bearing keeper so that the factory TAIG motor mount fits on it.
Results 1 to 20 of 20
-
04-02-2013, 12:07 AM #1
 Registered
- Join Date
- Oct 2006
- Posts
- 210
TAIG Ground Ballscrew and Bijur Oiler Conversion
-
04-02-2013, 10:01 AM #2
Registered
- Join Date
- Mar 2013
- Posts
- 41
Very nice work, and I look forward to watching the progression on this mod.
Thanks for sharing-
Dave
-
04-02-2013, 10:08 PM #3
Registered
- Join Date
- Aug 2006
- Posts
- 671
indeed. My Taig will be getting a ballscrew conversion very shortly. Looking forward to seeing your progress.
-
04-03-2013, 04:16 AM #4
Registered
- Join Date
- Oct 2006
- Posts
- 210
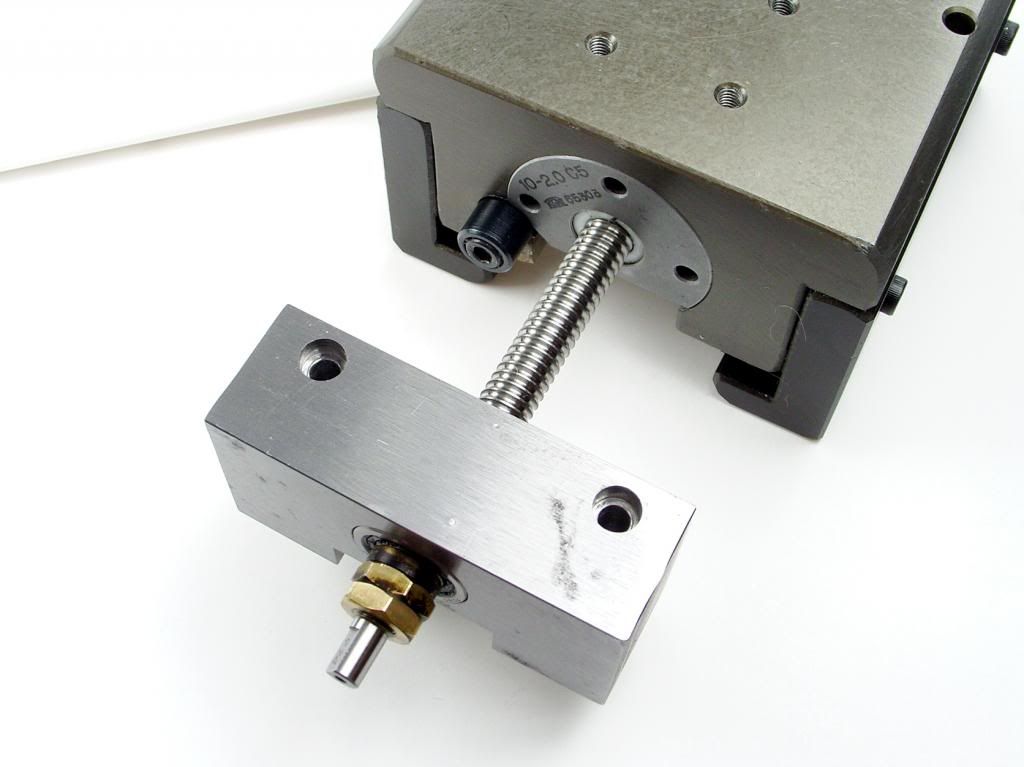
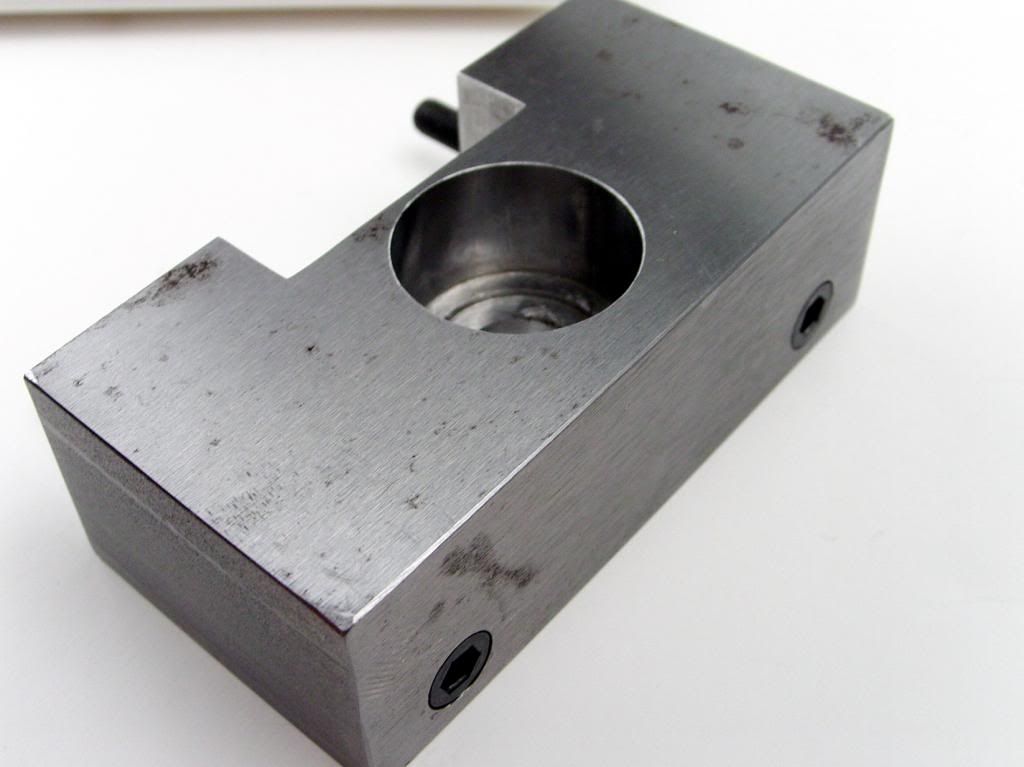
I had a few hours today to work on it, and in that entire time, all I managed to get done was the Z axis bearing block. It sucked to make, and if I had to do it again, I would make it out of aluminum. I used ground 1018 because I hate squaring stock to make a part - I like to just grab it and make the thing. It definitely worked against me here because it took all afternoon, but works very well, and now the Z axis is just about complete. I am excited to get to the X/Y.
-
04-03-2013, 11:58 AM #5
Registered
- Join Date
- Aug 2006
- Posts
- 671
do you plan on making a support for the free end?
-
04-03-2013, 12:33 PM #6
Registered
- Join Date
- Oct 2006
- Posts
- 210
No, as there is no need since the screw is very straight. Ground ballscrews are very straight and balanced, so often have no free -end support. Also, the screw is so small and so short that there would be no appreciable whip anyway. Also, the free end of the screw has to be able to go up behind the Z axis carriage to utilize the length of the screw since the ballnut is on top.
-
04-08-2013, 06:16 AM #7
Registered
- Join Date
- Oct 2006
- Posts
- 210
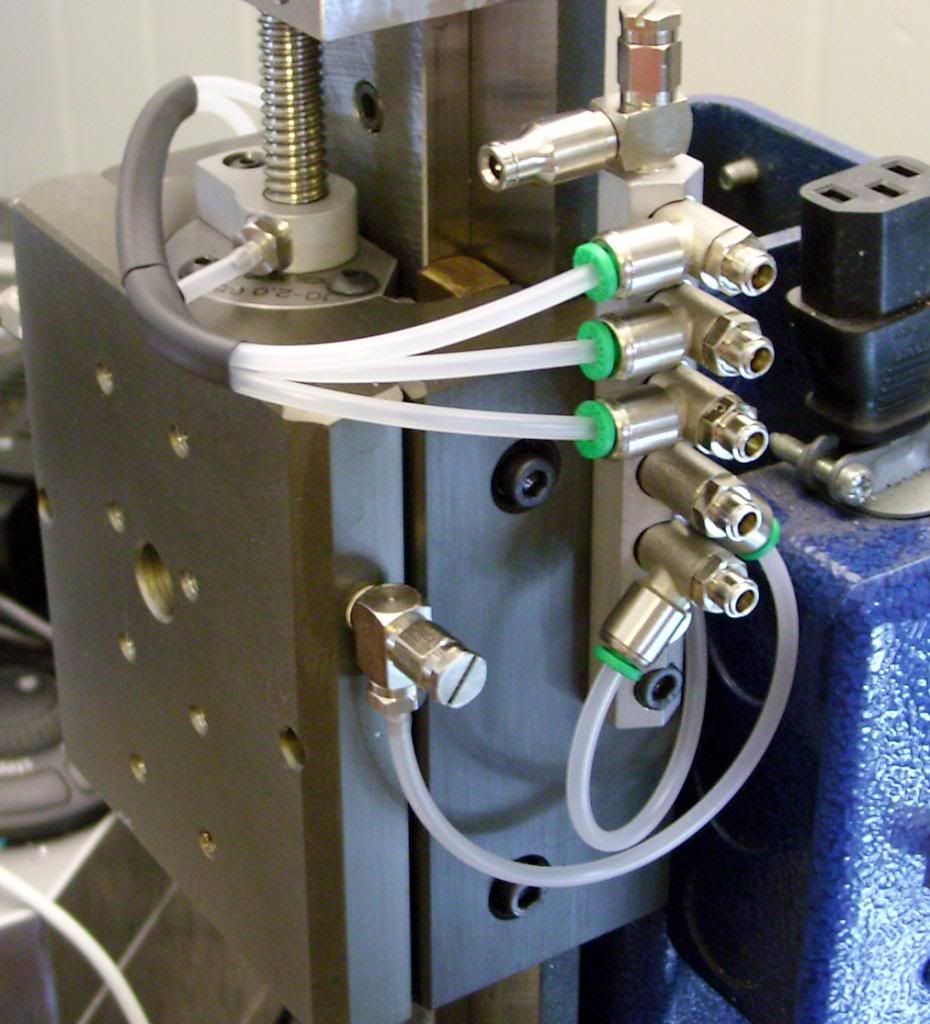
I pretty much completed the Z axis now. I have only one small part to make or the gib adjustment screw. The lubrication on the Z is done. I used 1/16" ID tubing that fits over barbs since the fittings are usually more compact. Drilling all of the holes took an hour or so. I made a manifold for the flow control valves out of 1/2" hex stock. There will be a 7 port version of the same for the X/Y to include a quick-disconnect coupling for the rotary table. I am using servos on this machine, so the high speeds on the rotary table require frequent lubrication. I also had to make a ballscrew lubrication fitting. The fluid pools up inside, and the ballscrew threads get saturated as they go through it. I received the THK ballscrews for the X/Y on Friday. They are 12mm screws and look like they will fit perfectly. I have already done some of the machining on the flanges and it sent sparks everywhere. Those ballnuts are very hard. I have a tiny, Taig scale cable carrier on the way, and a small 20lb. gas spring that will go on the Z axis. I am looking forward to finishing this so I can move on to other things (like the other Taig (which might end up with linear rails).
-
04-08-2013, 09:06 PM #8
Registered
- Join Date
- Dec 2007
- Posts
- 101

-
04-11-2013, 08:32 PM #9
Registered
- Join Date
- Aug 2010
- Posts
- 10
Winnfield, I'm not seeing the pictures with your posts. Are they linked to a website? BTW, I'm also going to do a ball screw retrofit to a Taig in a couple of months.
Joe
-
04-11-2013, 08:48 PM #10
Registered
- Join Date
- Mar 2013
- Posts
- 41
I see them fine, Joe, possibly a browser issue? I'm using Chrome now.
Dave
-
04-11-2013, 09:38 PM #11
Registered
- Join Date
- Aug 2010
- Posts
- 10
The browser is the latest Firefox, most likely the problem is the restrictions on the internet at work. If the pictures are linked to another website, such as Photobucket, the content is blocked. I can get IT to unblock those sites, but I have to know which site the pictures are coming from.
Joe
-
04-11-2013, 10:19 PM #12
Registered
- Join Date
- Oct 2006
- Posts
- 210
Hi Joe,
It is photobucket.
-
04-13-2013, 04:21 PM #13
Registered
- Join Date
- Dec 2004
- Posts
- 5
Pretty interesting - got your link from Nick at cartertools.com where I get all my Taig mill stuff from. Unbelievable customer service - that is a good lesson to the newbies on value.
I'm currently in the planning/design stage of the same 2 areas you're in, after a ball screw failed attempt previously. I have a suggestion that I got from a lubrication specialist regarding your pooling of lube oil on the screw, which they claim is not only wasteful & a mess, but can be almost as bad as not enough lube. Since that little screw is not traveling at both a long distance or a rapid rpm he recommended to split an oil line into 2 or even 3 lines off of 1 to other areas so the pooling doesn't occur but lubrication is still affective. Also Bijur Delimon offers lube kits for this type of need. I had a manual pump so all I needed were the lines, fittings, block, etc.
-
04-13-2013, 08:42 PM #14
Registered
- Join Date
- Apr 2013
- Posts
- 0
Great work! Where were all the parts purchased?
-
04-13-2013, 08:59 PM #15
Community Moderator
- Join Date
- Dec 2003
- Posts
- 24221
Did you not use Bijur style metering devices on the end of the lines?
This is how it is normally done, they come in various orifice sizes, otherwise the lowest restricted line gets all the oil, besides being generally wasteful, especially with that dia of piping.
Al.CNC, Mechatronics Integration and Custom Machine Design
“Logic will get you from A to B. Imagination will take you everywhere.”
Albert E.
-
04-14-2013, 01:52 AM #16
Registered
- Join Date
- Oct 2006
- Posts
- 210
The flow control valves are all meter-out, and come off of the manifold in the picture. The adjustment screws are hard to see in the picture because they are recessed. They are needle valves and control the flow to each port individually. The tubing is .062"ID, which is suitable for this application. What size tubing would be better? Regarding the screw pooling, the amount of oil to the screw is well regulated by the adjustable valve, and the oil is distributed by the movement of the Z axis since the ballnut gets the lube. There is no threaded hole in the ballnut itself, so I did essentially the same thing externally. The fluid goes straight down into the ballnut, and any pooling is momentary, and only a means to distribute the oil.
The Bijur metering valves are too large for this little thing. They are also unnecessary because the lubricant doesn't have very far to go and doesn't need a check valve at every lubrication point. One inline check valve works fine.
-
04-14-2013, 02:00 AM #17
Registered
- Join Date
- Oct 2006
- Posts
- 210
The flow control valves are from eBay. You can find them for a few $ each. It is best to find valves with nitrile parts because Vactra 2 won't destroy them. They are for pneumatic applications, but work perfectly well for this. I bought them with a 10-32 thread and 1/8" OD hose fitting. The hose is also typically used for pneumatics, and can be found on eBay, or McMaster-Carr or MSC. The banjo-style fittings are also from ebay. After I finished buying parts for this, I realized that you can buy directly from Clippard, which is what I would have done to begin with if I had known it was easy to do that. Originally Posted by gopedhead

The ballscrew for the Z axis is a 10mm, 2mm lead screw. They can be had for very little on eBay. I picked up a dozen or so for $30/each. The X/Y screws are C5 THK 12mm 5mm lead screws. I also got them on eBay, and the angular contact bearings for them came from VXB since the screws were ground to 7mm (instead of 8mm). In all, I probably have well under $500 in the whole conversion, including the little Bijur pump.
-
05-19-2013, 11:59 PM #18
Registered
- Join Date
- Oct 2006
- Posts
- 60
Nice work dude!!! High 10 !!! I don't know if there is much reason for me too finish my Ball Screw thread! I'm done with my Z/Y/X but started a Brushless Motor mod so It can keep up with my ballscrews... Cant wait to see some video
-
05-20-2013, 01:24 AM #19
Registered
- Join Date
- Oct 2006
- Posts
- 60
I don't want to crash your party! But with the looks of that nut.... your going to have a tough time.. ( Well I did anyway ) fitting your X/Y X should be easier than Y... You might have to switch systems = Motor Rotates nut... or Mill that nut down and add a extra nut attachment to table.
I'm going to be honest... I thought my nuts where big.... But yours my friend... are far larger!
P.S. I don't even have (Automatic) oil on mine!
-
05-20-2013, 03:31 AM #20
Plastic
- Join Date
- May 2013
- Posts
- 0
The Bijur metering valves are too large for this little thing.


 Reply With Quote
Similar Threads
-
Bijur oiler
By hmoore01 in forum Bridgeport / Hardinge MillsReplies: 3Last Post: 05-22-2012, 01:46 PM -
NM135 Oiler on Z ballscrew??
By Frogblender in forum NovakonReplies: 4Last Post: 10-12-2011, 04:39 PM -
Bijur oiler adjustment
By sharp-shooter in forum Bridgeport / Hardinge MillsReplies: 3Last Post: 08-30-2008, 04:34 AM -
BIJUR OILER
By tpmx57 in forum Bridgeport / Hardinge MillsReplies: 5Last Post: 06-08-2008, 10:33 AM -
Another which is better R&P,Ground ballscrew,rolled ballscrew,Acme,beltdrive etc.thre
By lgalla in forum Linear and Rotary MotionReplies: 10Last Post: 01-16-2007, 06:27 PM
