


Being the manufacturer, we don't have such issues. Where are you, what color and material would you like? Brushed aluminum is the only real finish as the other metal looks are just paint. After seeing your creativity, I was think of stacking 2 together with the wires laid between them. Or use small zip ties to hold the wiring down though your clamps are resourceful.
Thread: DIY Cable Carrier
Results 261 to 277 of 277
-
10-20-2012, 03:28 PM #261
 Gold Member

- Join Date
- Nov 2009
- Posts
- 4415
A lazy man does it twice.
-
10-20-2012, 03:50 PM #262
 Member
- Join Date
- May 2009
- Posts
- 1332
Being the manufacturer, we don't have such issues. Where are you, what color and material would you like? Brushed aluminum is the only real finish as the other metal looks are just paint. After seeing your creativity, I was think of stacking 2 together with the wires laid between them. Or use small zip ties to hold the wiring down though your clamps are resourceful.
I think it wouldn't work to stack 2 blinds together. The trick to get it to work properly are the spacers I have under the ties across the cables. If the spacers are to tight the cables bind and dont allow proper movement and if are too loose the cables come out to the sides. The spacers must be just right to hold the cables a bit tight but also allow a bit movement.
I'm in Canada, thanks for the offer but I have enough blinds to last me for ever LOL. I replaced all the blinds when I bought the house and kept all the old ones, but they all are beige and I went to the store to get plain aluminum color; no problem I just use paint remover and they come out pretty good.Nicolas
-
10-20-2012, 09:30 PM #263
Gold Member
- Join Date
- Nov 2009
- Posts
- 4415
I wondered about if the cables or if 2 pieces in parallel would need to slide on each other to bend. It would seem like they would need to as one is required to be longer if on the outside of the bend and vice versa for the inside slat. I thought of slots, just hadn't done a physical test. You have got me curious now.
A lazy man does it twice.
-
10-20-2012, 10:03 PM #264
Member
- Join Date
- Apr 2007
- Posts
- 8082
I used two layers of scrap vinyl siding and zip ties to make cable carriers for this machine. Virtually no cost. The trays that it lays in is 1/2" steel angle only because it is lower cost than 1/2" aluminum angle. It has given no problems whatsoever since installation a year ago. This is my most often used machine now.
Making chain links is fun (I have made them in the past) but the flexible strip method is fast and can be very low cost.CarveOne
http://www.carveonecncwoodcraft.com
-
10-20-2012, 10:06 PM #265
Member
- Join Date
- May 2009
- Posts
- 1332
I spent a lot of time making mine to work good, now its your time if you want to make changes to do some tests. Perhaps it will be better but I dont think so. Having two blinds provide no benefit to my opinion plus it will be much more difficult to add / remove cables Originally Posted by Fastest1
 Nicolas
-
10-20-2012, 10:11 PM #266
Member
- Join Date
- May 2009
- Posts
- 1332
Didn't see your post before CarveOne. Truly your cable carriers looks good and neat. Good job Originally Posted by CarveOne
Nicolas
-
10-20-2012, 10:33 PM #267
Member
- Join Date
- Apr 2007
- Posts
- 8082
You posted just before me. Originally Posted by kolias
I used two strips of vinyl because one strip didn't have quite enough support. I have lots of the vinyl cut-offs from building my work shop. If I had some aluminum blinds I don't think two layers would be needed. I don't see much sliding of the two vinyl layers relative to each other and doubt that it will be a problem if using two aluminum blinds.
When I added some 12vdc DIY fan coolers to the steppers I just threaded some two conductor speaker wire under the zip ties on the opposite side from the motor and router cables. It all just works and works...
Just thought I would show that there are other alternatives.CarveOne
http://www.carveonecncwoodcraft.com
-
10-21-2012, 12:11 AM #268
Gold Member
- Join Date
- Nov 2009
- Posts
- 4415
I am so glad you did show us. I was thinking of using the PVC slat material as opposed to the aluminum. The double layer was just for added protection and is most likely not necessary. I run coolant as much as possible. That and swarf go everywhere. On the other hand my cables have endured a few years of dragging around in the mess with no issues.
A lazy man does it twice.
-
12-31-2012, 04:07 PM #269
Registered
- Join Date
- Dec 2010
- Posts
- 0
hello Rob Originally Posted by voltsandbolts
bit of a blast from the past,
but did you ever release the detailed drawings for this?
I do like the idea of a one part design
cheers
Mike
-
03-03-2013, 07:55 AM #270
Registered
- Join Date
- Sep 2011
- Posts
- 0
Check this[ame=http://www.youtube.com/watch?v=JAWcicckaMA&feature=fvwp&NR=1]DIY Cable Carrier for Homemade CNC Router - YouTube[/ame]
-
03-03-2013, 12:33 PM #271
Member
- Join Date
- Apr 2007
- Posts
- 8082
That's a really interesting design in that it has a minimal number of unique parts and it uses no glue in the assembly. I suppose that the slot shapes are set up so that it does not bend backward.
For an update on the vinyl strips I showed in my last posts here, I use this machine for 95% of my work now and the vinyl has worked flawlessly since I installed it. There is no reason to make links other than to make it look prettier.
My 12' machine has a combination of Igus e-chain links and some homemade birch plywood links that I designed to connect directly to the Igus links to make it long enough to go the full 11' 4" travel of the X axis. Although it starts sagging beyond the halfway point of travel from the plastic links flexing, it has not been a problem.CarveOne
http://www.carveonecncwoodcraft.com
-
05-23-2013, 05:00 AM #272
Registered
- Join Date
- May 2013
- Posts
- 0
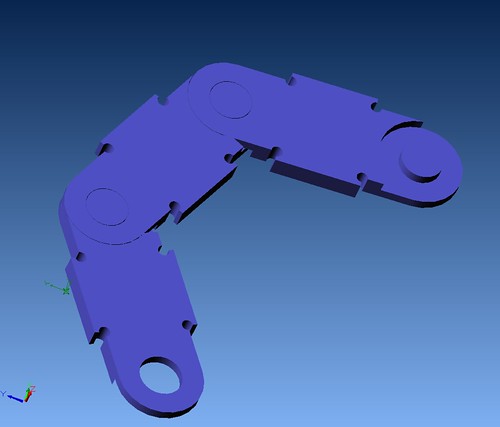
Hello, chaps! Look what I found in yuotube - a preety good cable carrier, simple to make and without any gluing: DIY Cable Carrier for Homemade CNC Router - YouTube
Here you are my solidworks picture, I made tonight.
-
05-23-2013, 03:05 PM #273
Community Moderator

- Join Date
- Mar 2004
- Posts
- 1661
And no snap clips. Really sweet! Originally Posted by mikky
-
05-24-2013, 12:47 AM #274
Registered
- Join Date
- Feb 2013
- Posts
- 39
I just used some 36" zip ties, some cable racetrack from a home center, some slotted shelf standard for brackets and did this:
Full resolution here: File:Wfa shapeoko ziptie cable-mgmnt mk-iii.JPG - ShapeOko
-
07-04-2013, 08:21 AM #275
Registered
- Join Date
- May 2013
- Posts
- 1
hello svenakela good job if you want to ask the DXF little thanks
-
03-22-2014, 05:36 AM #276
Registered
- Join Date
- Mar 2014
- Posts
- 1
Re: DIY Cable Carrier
new design constraints to get the wires when neededAttachment 229136Attachment 229138Attachment 229140
-
03-29-2018, 03:09 AM #277
Registered
- Join Date
- Apr 2010
- Posts
- 32
Re: DIY Cable Carrier
This is similar to the snake toys

 Reply With Quote
Similar Threads
-
DIY cable carrier
By sixtyeight in forum MetalWork DiscussionReplies: 1Last Post: 12-18-2018, 08:47 PM -
DIY Cable Carrier
By rogerquin in forum VideosReplies: 86Last Post: 05-12-2018, 03:22 PM -
Cable carrier
By Gamble in forum TorchmateReplies: 2Last Post: 07-31-2014, 03:21 AM -
AC power cable in the same cable carrier with motor cables
By bandtank in forum CNC Machine Related ElectronicsReplies: 12Last Post: 06-02-2010, 12:06 AM -
Cable carrier competition: The way you use your cable carriers could earn you a cash
By igus in forum News AnnouncementsReplies: 0Last Post: 01-22-2010, 07:06 PM
