


OK, this is mostly to start the begin the thread for my series of tests, but I wanted to start with some examples also. Now you'll have to keep in mind that this first part was purely an experiment, just to get my feet wet.
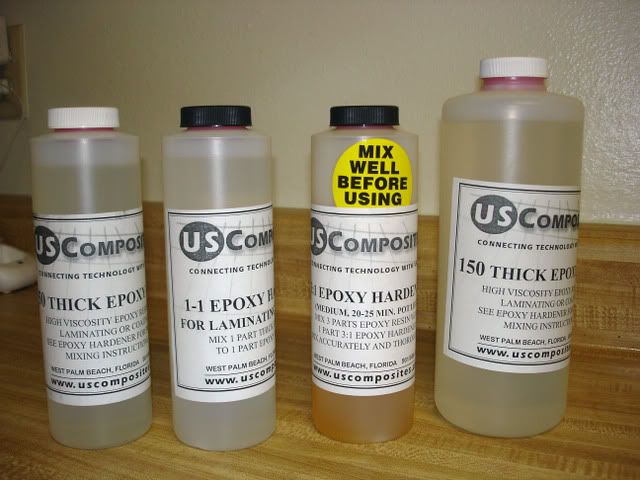
Here is the picture of the expoy I received.
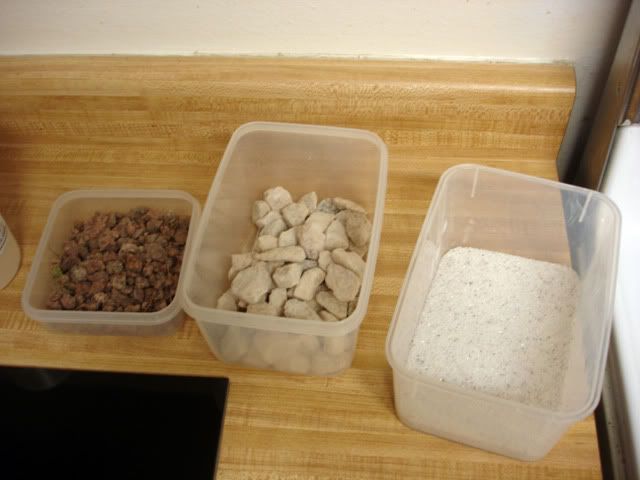
Then I went to Home Depot and bought some aggregate. I bought .5 cubic feet of marble rocks. It was about $4. I bought a 50lb bag of playsand, that was white and small. It was also $4. I also bought a toilet bowl ring. It's made of bee's wax. I'm going to try it as a mold release agent. I also use it in my woodworking, so it serves two purposes. I also went outside my place and gathered a few handfulls of medium sized rocks. I just wanted a good mix of sizes. Here is a pic of all three categories.
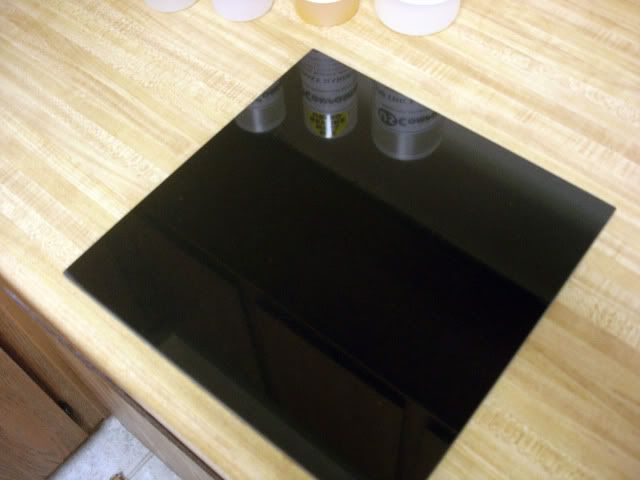
I also bought a 12x12" granite tile. It's about 3/8" thick, and seems very flat. It also has a very smooth surface. It will serve for some testing purposes.
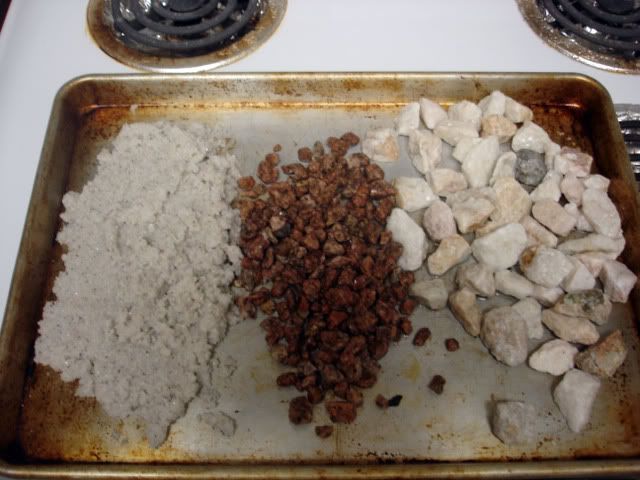
So then I washed the rocks. I used a straining bowl, and washed them with water. For the sand, I would fill the bucket up half way with water, then empty out the cloudy water. I did this about 10 times, and it was pretty clear. I would definetly want to streamline that process, a larger slab would take FOREVER!
I had already set the over to 400F, and put the aggregates on a cookie sheet.
It didn't take long at all for the bigger rocks to dry. But I had to spread out the sand some and it took about 20 minutes. I really don't think this is how I'd normally do it, but I just wanted to do something tonight.
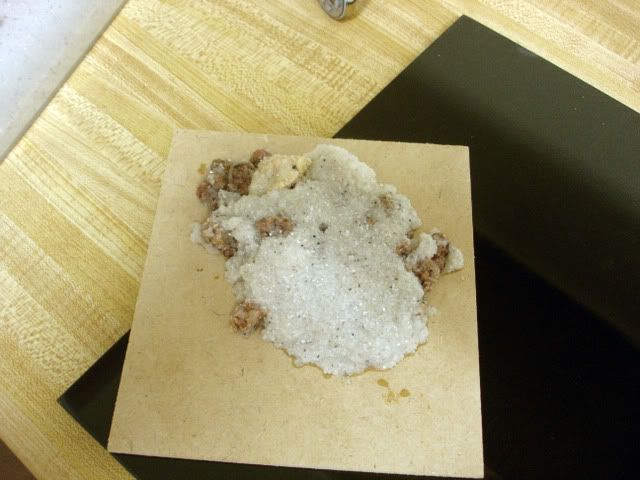
I decided to try the 1:1 epoxy first. So I mixed a table spoon of each in a mixing bowl. Once it was mixed well enough, I added some of each aggregate. Of course I only used a few of the big rocks, more of the middle rocks, and filled the rest with the sand. The sand absorbed the sand surprisingly well, and definetly made a semi-pourable mixture. The 3:1 epoxy has a hardener that is thinner than the 1:1. So I'm sure it will be even more pourable.
Here is a picture of the mound I made.
This weekend is when I'll be at my shop and doing some real testing. I already learned an important lesson about wearing latex gloves. I wasn't wearing any, and got some epoxy on my hands. It's tough to get off! I'm also going to buy a whole set of bowls and utensils to use, instead of my wifes.I will be making some square molds this weekend, and making some 1" thick, 8x8" blocks.
Some more observations. There was really no heat involved. The rocks were still warm from the oven, but the epoxy generated no heat. After i mixed everything, I used a thermometer to measure the temp, it was 114F. After thirty minutes, is was DOWN to 105F. After 3 hours, it was at room temp which was 77F. It's definetly getting harder, and I'm going to give it until the weekend to do some strength analysis. I'll probably break it in two and see about voids and how hard the center is. I have plenty of woodworking tools at my shop, and am going to use the ideas about sanders and other things to vibrate the molds. I have an old scoll saw that will vibrtate the thing to pieces!
So again, this is really just to get the thread started, and get more ideas flowing. Again, if there's anything I'm missing, or a better method of experimentation, please let me know. I've never really dealt with epoxy, so this is all new.
Thread: Polymer Concrete Tests (PICS)
Results 1 to 20 of 47
-
03-01-2007, 07:20 AM #1
 Registered
- Join Date
- Sep 2005
- Posts
- 249
Polymer Concrete Tests (PICS)
-
03-01-2007, 07:51 AM #2
Community Moderator


- Join Date
- Mar 2004
- Posts
- 1661
I've been cleaning a lot of sand and gravel for aquariums (I had a couple of hundred once upon a time...), fill a bucket with sand and just dig down a water hose to the bottom. Let the water flow, when it's clear the sand is clean.
In the epoxy business we are very often "boosting". After 10-20 hours of curing, the object is heated to 100 degrees Celsius (it depends on the epoxy though) for another 20 hours. It raises the heat resistance and the mechanical properties very much.
Good luck with the experiments!
-
03-01-2007, 09:11 AM #3
Registered
- Join Date
- Mar 2004
- Posts
- 1306
The Recommended ratio of epoxy to aggregate is roughly 10:1 by weight - between 88 and 92% sand and rock, and 8-12% epoxy.
Have you given thought to how you will vibrate the mass to get the air bubbles out?Regards,
Mark
-
03-01-2007, 04:51 PM #4
Registered
- Join Date
- Sep 2005
- Posts
- 249
Svenakela,
Thanks for the tip! I will be certain to try heating it up like you say. Also, a very good tip on cleaning the sand. That will be a must!
RotarySMP,
I'm definetly going to up the aggregate to epoxy ratio. This last little test amounted to about 8:1. I think with how wet the sand became, it could definetly be increased. I'm going to my shop this weekend, to make square molds and do larger sized molds. I have a battery of vibrating equipment there, so I don't think it will be a problem. I have a plethora of hand sanders, and a Skil Jig Saw that I wouldn't curse my worst enemy with. It should definetly be able to vibrate any mold I bolt it too. I also have a torch, and will experiment with the heating exercises.
-
03-01-2007, 06:28 PM #5
Registered
- Join Date
- Jul 2006
- Posts
- 1256
William,sorry you should have purchased the thin epoxy.The viscosity of thick is 12,000cps and the thin is 600cps.What you have has similar consistancy to pourable honey while thin is like maple syrup.Good you didnot buy too much.If you get results with the thick,you will find it really easy when using the thin.It is still worth experimenting with the thick.Wax the granite tile as epoxy sticks to granite.If you try the torch(flame2) you must move rapidly over the mix.
Methyl hydrate is very good to remove epoxy if you get it on your hands,but no substitute for gloves
Larry
-
03-01-2007, 09:27 PM #6
Community Moderator
- Join Date
- Mar 2004
- Posts
- 1661
Epoxi (or, epoxy as some write it) is extremely allergy developing! Gloves is a must!!!
The thick will probably fill out well, it just takes a little bit more time.
Regards,
Sven
-
03-02-2007, 12:57 AM #7
Registered

- Join Date
- Jul 2003
- Posts
- 586
Are you going to try a vaccuum put to get bubbles out? I have ordered epoxy as well and will start testing as well. My first tests with what i had did not work well due to contamination from the gravel :-(
-
03-02-2007, 01:05 AM #8
Member
- Join Date
- Dec 2005
- Posts
- 1408
Dear William, Originally Posted by WilliamD

Many thanks for "getting practical" and experimental.
I do not know if you saw my description of epoxy heating on the original thread. I said that heating epoxy in a microwave for small bursts of heat works well for me. Please note that I have never tried heating an epoxy/aggregate mix in a microwave. It might well work, but I do not know.
I would hate you to have a gloopy mass of exploding rocks blasting out of your oven. However, if you do happen to have an old microwave, and a large open space, please keep us posted.
Best wishes,
Martin
-
03-02-2007, 01:13 AM #9
Registered
- Join Date
- Jul 2006
- Posts
- 1256
I do not know,but if the rocks have residual water inside I imagine it may explode.Play it safe no rocks in microwave.Put your mix in the sink filled with hot water to lower viscosity.
The 4thseal could you elaborate on contaminated gravel?
Thanks
Larry
-
03-02-2007, 01:37 AM #10
Member
- Join Date
- Dec 2005
- Posts
- 1408
Hello Larry, Originally Posted by lgalla
Thank you for sending that extra note of caution to David.
It was really appreciated.
Best wishes
Martin
-
03-02-2007, 02:15 AM #11
Registered
- Join Date
- Sep 2005
- Posts
- 249
Thanks for the input everybody!
As far as vacuuming the air, that's a tricky one. I really need to post some final pictures of what I have in mind for this stuff, and you'll get an idea of what I'm after. I'm pretty much going to be making some 3" slabs around 28" x 28". I definetly have the equipment to vibrate them, so I'm going to try that first. If push comes to shove, and I can't seem to get all the air out with that method, I will cut a 1/4" groove on the top of the mold edge, put in some vacuum tape, and then fashion some sort of lid. Then with my venturi setup for vacuum veneering, I could pull a good vacuum on it. The only problem is the lid. Over a 28" span, I know the MDF would cave in, with that much pressure and being unsupported. So I'd be interested in any alternative ideas to vacuuming the air. I've seem some examples of people buying the 1 gallon paint bucket from Harbor Freight, and putting smaller silicone molds in there. Then pressure it to 90 PSI to get all the bubbles out. Not sure if the same principle would apply here. I had thought about the microwave and moisture in the rocks, and went the oven route. It seemd to get them pretty dry.
I can't wait for this weekend to do some more tests. I had literally just concocted some stuff on my kitchen counter to get a taste for it. I'll do some serious testing this weekend.
I should also point out that I'm not after any crazy tolerances here, or the ability to hold micron levels of accuracy when cutting. This is simply a way to get around my inability to cast hundreds of pounds of cast iron. When I show examples of my mill and lathe, you'll see what I'm after. I just need it to be solid, and heavy. Even if it comes out to just barely adequate when compared to cast iron, that's all I'm really after. I wouldn't care if hardened peanut butter was the solution, as long as it fit the bill. (Hey, I might be on to something there. I'll probably start another thread.) ")
P.S.
the4thseal,
Good luck with your testing. Feel free to add any test or examples to the thread. We can try to keep all the information consolidated to one thread.
-
03-02-2007, 05:52 AM #12
Registered
- Join Date
- Jul 2006
- Posts
- 1256
William I use a large 10 gallon paint pot for vacuum de gassing.you cannot de gass a large mass as it expands 3 times the volume.The silicone molds in the pressure pot is the reverse of de gassing.It compresses the entraped air.Since you vacuum press veneer,how about a bleeder and bag the mold?I won't go in any detail as I assume you will get the jist of it.
I agree with you on the hardened peanutbutter.If you end up with 7% air does it really matter?E/G is 50 times the damping of steel.With a small % air maybe it will be 40 times.
Larry
-
03-02-2007, 10:58 AM #13
Community Moderator
- Join Date
- Mar 2004
- Posts
- 1661
Don't try to microwave epoxy, it will take no or very little effect. The heating should be a long time procedure and if your mold doesn't fit in an owen, use light! Halogen lamps produces a lot of heat energy (even the light turns into heat), I have been using light as a heat source for many years, we even run 8 uge lamps together where 4 is connected to a temperature controller, but that's pure overkill for this experiment.
Take it easy with removing the mold. Even if you're curious as a kid at christmas and want to see the result, let the resin cure.
Can't wait to see your result!
Regards,
Sven
-
03-02-2007, 05:17 PM #14
Registered
- Join Date
- Sep 2005
- Posts
- 249
Great idea with the halogen lights. I can get 500w bulbs pretty cheap. Definetly a possibility. I'm also looking at the saran wrap/garbage bag idea. I'm really excited for this weekend! I'll probably start tonight. I feel sorry for those with 56K connections, because there will be a crapload of pictures.
Does anyone have any advice on additives? I'm really just going for the "rock and epoxy" mix. Some sites say they add different things to increase strength, but what are some possibilities?
-
03-02-2007, 05:37 PM #15
Member
- Join Date
- Dec 2005
- Posts
- 1408
Dear Sven, Originally Posted by svenakela
I was not suggesting putting the mould in a microwave.
I use epoxy potting compound quite a bit for encapsulating electronic components. In order to get the epoxy to flow into small spaces, and in order to minimise air bubbles, it helps a lot if the mix is nice and runny.
There may well be other and better ways of doing this, but if you heat the mix in a microwave it does become less gloopy. Obviously you do not want to "cook" the batch, just to heat it all the way through. Put the mix in a plastic container and heat it for five seconds on high. Then feel if container is warm. It will not be. Just repeat this until it is warm, and the air bubbles rise to the surface. The stop heating it.
This works for me.
Best wishes
Martin
-
03-02-2007, 07:10 PM #16
Registered
- Join Date
- Jul 2003
- Posts
- 586
igalla-
the contaminaion was due to the manner in which i cleaned the rocks, i think. there was left over cleaner that i did not clean off. I though that i had removed it all. It seems that clean is important? I think i need to figure out how to clean the rocks better... ideas...besides tonse of running water.
-
03-03-2007, 03:41 AM #17
Registered
- Join Date
- Jul 2006
- Posts
- 1256
the4thseal
I don't know for sure,but i think washing may be un necessary as even concrete aggregates are washed as any clay is not wanted.If you must a quick rinse of water will rid you of unwanted dust residue.
Larry
-
03-05-2007, 10:18 PM #18
Registered
- Join Date
- Sep 2005
- Posts
- 249
I will have some pictures to post later, but I had a few observations I wanted to post. I really don't see the need to use the bigger rocks, when vibrated, they just seem to surface to the top. That might be because the epoxy was mixed all together well enough.
I'm still not getting any heat. It's definetly hardening, my sample from last thursday is "hard as a rock" LOL. I made a 4" cube, and still haven't gotten any heat. The 1:1 mixture is definetly pretty thick. Thinner is better. I'll also be using a 5 gallon bucket, and my D-handle drill with some sort of wire attachment to mix the aggregate and epoxy next time.
I was thinking granite had to be black, but that's not the case. There's all kinds of granite rock at Home Depot, they just don't call it that. Definetly pretty cheap. I can order it from landscaping companies around the valley for $15 a ton.
I'm still kind of worried about this lack of heat. What causes the heat? Is the heat a good thing? I haven't measured a normal pour go above 80F. I don't really care about the heat, as long as it hardens correctly. I have a heat gun and will be doing some tests tonight.
-
03-05-2007, 10:37 PM #19
Registered
- Join Date
- Jul 2006
- Posts
- 1256
William the heat is a chemical reaction of the epoxy and hardner or catylist.Looks like the heavy filler load is slowing the reaction.In gereral slow curing epoxy produces little heat and fast produces high temperatures.If you made the cube of solid epoxy it would get very hot.If you are doing large batches your pot life will shorten as a large mass will heat or cure faster.Get some of the thin stuff when you finish the thick and perhaps a faster hardner.
Larry
-
03-05-2007, 11:21 PM #20
Gold Member
- Join Date
- Jul 2005
- Posts
- 12177
Probably your rocks are acting as a heatsink. You have many times the mass in rocks than you have in epoxy and the epoxy is in a thin film around the rocks so it loses heat to the rocks quickly.
I think this may be a good thing because it means your epoxy is not expanding with the heat during curing so it will not subsequently shrink and possible generate minute shrinkage cracks.
I would stick with slow curing epoxy otherwise you might get a runaway reaction in a large volume while mixing it before adding the rocks.

 Reply With Quote
Similar Threads
-
Epoxy-Granite machine bases (was Polymer concrete frame?)
By walter in forum Epoxy GraniteReplies: 5052Last Post: 02-08-2024, 12:42 AM -
Polymer Concrete
By ericdwilso in forum Uncategorised MetalWorking MachinesReplies: 10Last Post: 09-14-2009, 07:00 PM -
Tests for Shoptask tolerances?
By pfarber in forum Shopmaster/ShoptaskReplies: 7Last Post: 04-05-2007, 11:26 PM -
Polymer enhanced Concrete Work Area
By jsage in forum Open Source CNC Machine DesignsReplies: 0Last Post: 01-29-2007, 11:37 PM
