


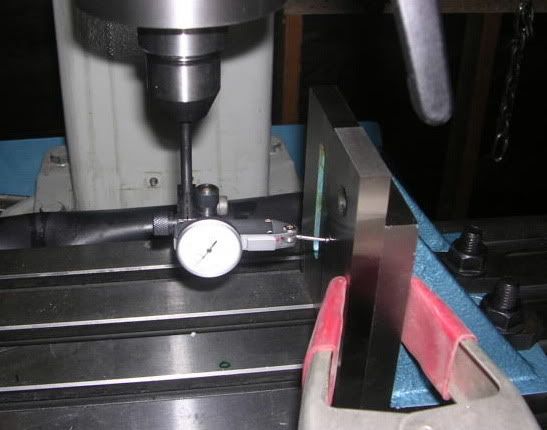
I have a Rong Fu RF45 mill that I need to tram and square. I started by trying to square the column, but I am having no luck. What I have done is attached a ground angle block squared to the table. On that to provide a longer smooth surface is a parallel. All of this is in this picture:
If I raise the head to the top of the parallel and reset the dial indicator to 0, when I lower the head I have more than .025 difference between the top and bottom. I have shimmed the left side of the column to try to compensate for this, but I can't seem to gain any progress. I have already added .075 of shims to the left side. Am I doing this right? Should I have started somewhere different?
Results 1 to 20 of 21
-
12-25-2007, 07:01 PM #1
 Registered
- Join Date
- Sep 2007
- Posts
- 356
Problem/questions about Tramming and Squaring
-
12-26-2007, 05:53 PM #2
Gold Member
- Join Date
- Jun 2006
- Posts
- 3063
Tram is usually indicated by placing the indicator tip on the table and rotating the spindle by hand. I like to use a 1-2-3 block between the table and the indicator tip so the tip doesn't bump when it passes over the T-slots. Take note of the indicator readings at 12, 3, 6, and 9 o'clock positions and shim accordingly.
Mike
-
12-26-2007, 07:06 PM #3
Registered
- Join Date
- Apr 2007
- Posts
- 56
I've got a similiar problem. What's a good shim material? Then, I suppose, where can I find it? The shim stock I am familiar with comes in sheets of various thickness. I don't think I would need that much.
-
12-26-2007, 08:10 PM #4
Registered
- Join Date
- Jul 2007
- Posts
- 190
feeler guages work good for me
-
12-26-2007, 08:35 PM #5
Registered
- Join Date
- Sep 2007
- Posts
- 356
Should you square before tramming, or is tramming enough?
-
12-26-2007, 10:45 PM #6
Registered
- Join Date
- Sep 2007
- Posts
- 356
You can also buy brass that is about 1/2" wide at hobby shops. I bought some and I think it was less than $1.00 a piece.
-
12-27-2007, 01:09 AM #7
Registered
- Join Date
- Jan 2007
- Posts
- 277
I have a wttools 7045 mill. On the rf45, 7045 mills regardless of mfg. It takes some fine tuning of the bottom of the column to get it to sit square. I highly reccomend doing what I did - Drill and tap the bottom column flange for 4 , 1/2-13 thread capscrews, they will be used to move the column left, right or front and back for testing purposes with the main bolts loosened. You will not use them for final adjustment because if you did they would just punch into the cast iron base when you torque the main mount bolts. THEY ARE FOR TESTING ONLY!!! Next after you have the column back on top of the base leave the column mount bolts just slightly loosened. Now you can use a dial indicator mounted to your spindle or side of your gearbox and run the indicator needle on the side and then on the rear edge your right angle block as you crank the Z up and down. It will only take a few adjustments of the capscrews for you to see which corner of the bottom of the column is higher than the others. Adjust the capscrews to make the indicator run perfect. make note of which corner of the column is jacked up higher than the others. The corner that is flat against the base is the one that is high and needs to be ground down. Next take your engine hoist and pick up your column assy and use a 4.5 inch grinder carefully or a right angle sander and take a little off that corner of the bottom of the column- like .020 or so. Re assemble torque the main mount bolts down while the capscrews are retracted and re test. Repeat until you can run that indicator up and down the side and back of that right angle plate with no deviation. Took me a couple times with the grinder and then once with a hand sanding block on the column bottom to get it perfect. Dave
-
12-27-2007, 01:13 AM #8
Registered
- Join Date
- Jan 2007
- Posts
- 277
Trying to shim it just sucks, believe me I tried and its just futile. My method takes a little work but you can get it perfect and dont be afraid of a little careful grinding or sanding on that column bottom. Its not a table way, its a rough machined surface. Edit- actually its a sawed surface from the factory and just needs a little TLC.
-
12-28-2007, 05:37 AM #9
Registered
- Join Date
- Sep 2007
- Posts
- 356
WOW!!!!!!!!!!!! I am an idiot. I just removed my column and discovered that my column and base is machined. Now comes the idiot part..... I bolted the column to the base, reattached the angle block and parallel. Then it hit me, if you look at how I the the indicator mounted you'll see that the indicator is not set in the correct plane! So I have corrected this problem and I have about .006-.008 of movement in about 5". I noticed that if I lower the head and then raise the head about a quarter of a crank on the handle the indicator will move back and then I will have about .003-.004 of movement. Would this be considered "backlash"? How do I go about removing this so I get a consistant reading?
-
12-28-2007, 11:24 AM #10
Registered
- Join Date
- Jan 2007
- Posts
- 277
I think your gib strip in your Z slide might be way too loose. This would let the z slide rock some when you move your crank up and down. The gib strip is shaped like a wedge and has adjuster screws on the top and bottom surface of the Z slide which pushes the gib up and down. The little lever operated screws on the side of the Z slide are just for locking the slide into a certain position and not for adjusting play in the dovetail. Sounds like your column is better than mine was but will prob still need a little work if you want it perfect.
-
12-28-2007, 04:11 PM #11
Registered
- Join Date
- Sep 2007
- Posts
- 356
I'll remove the gib strip tonight and make sure that there aren't any burrs or heavy grease restricting the z movement. Hopefully this will help, if not I will pull the head of off the column and clean the ways.
-
12-28-2007, 06:54 PM #12
Registered
- Join Date
- Oct 2005
- Posts
- 1237
You had my attention until you started writing a horror novel. A 4-1./2" right angle grinder? Remove .020"??????? When I read something like this, I think of the phrase, "Put the tool down and back away from the grinder." Originally Posted by davo727

A big problem is lack of cleanliness when assembing. Sure, take the column off, but then use a flat mill fill to dress any burrs (YOU AREN'T FILING THE BASE OR COLUMN!), then use a large stone on the mating surfaces. CLEAN said surfaces well with a lint free cloth and reassemble. Now tram again. If you have run out, don't kid yourself that a angle grinder will do a precision job. Get the proper shims and shim the base accordingly. If it takes .004 shim in one corner, realize you will want to use thinner shims between the high corner and low corner of the mating surfaces, or you end up with the chance of stresses that could crack your mounting/mating surfaces.
Be warned that dirt will mess up the mating surfaces and give you tram problems. CLEAN these surfaces EVERY time you dissasemble or you will put problems in as you work to take them out. Cleanliness is god.
-
12-28-2007, 09:09 PM #13
Registered
- Join Date
- Jan 2007
- Posts
- 277
Some of these columns are out 3/16, Could take a while with a mill file.
-
12-29-2007, 12:30 AM #14
Registered
- Join Date
- Sep 2007
- Posts
- 89
I agree with MrWild something is not right I've never had to use a grinder for this application . When is the last time you had your indicator calibrated? I would try stoning the table the slightest nib will really throw off your projectory in 4 to 5 in of travel.
-
12-29-2007, 03:15 AM #15
Registered
- Join Date
- Nov 2006
- Posts
- 33
I would think that 3/16 isn`t uncommon. I had to add a little bit less than that to shim the column on my mill to get it trammed to acceptable parameters for me. Might try the grinder on the base of my column to eliminate the shims I had to add. I would rather have the surfaces mate right than to add a bunch of shims & lose the stability.
-
12-29-2007, 07:06 AM #16
Registered
- Join Date
- Sep 2007
- Posts
- 356
Well I removed the gib strip and cleaned off some of the packing grease. I install the gib and tightened it and then tried running the head up and down. I still have the same results. I tried tightened the gib and still the same. I have down this until the gib cannot be tightened any farther with no result. I did notice that I can move the handle for the z-axis about 270 degrees without any vertical movement. There is movement in the gearbox, this might be compounded by the rack? Am I being overconcerned about all of this? I think my column is out about .005", but I would like to overcome the movement caused by raising or lowering the head.
-
12-30-2007, 06:31 PM #17
Registered
- Join Date
- Sep 2007
- Posts
- 89
I'm sorry fellas I responded without reading fully what was going on I was paying to much attention to the first picture posted by Ranchak I thought he wanted to grind on his angle block. Sorry I do not have any experience at tramming in that sort of machine .You don't have to respond that I'm an idiot and need to pay more attention I already realize that
-
12-31-2007, 01:40 PM #18
Registered
- Join Date
- Apr 2007
- Posts
- 56

Big T - Why, that's never happened to anyone before! Lol. I can only speak for me, of course, but don't worry about it.
As a side note, I found a bunch of shims at my local hardware store. My mill is much smaller then the one being discussed, but I've got .023" of difference over a six inch circle. I must have taken it out of alignment when I moved it from the garage to the basement.
-
01-02-2008, 06:25 AM #19
Registered
- Join Date
- Nov 2006
- Posts
- 33
Lexx,
I wouldn`t assume that it was right to begin with. Alot of the mills that are out there are off right out of the box. Now...if on the other hand maybe the column was removed or something & then re-attached afterwards when the mill was placed in its final spot, yes, I would then say it would be out of alignment from what it was. Maybe more, maybe less. Who knows? I believe that it is always a good idea to check tram on any mill regardless of what make or model it is. At least you will then know where you might need to "tweak" it to get it right or at least good enough for the operators requirements. Just my 2 pennies worth.
-
01-02-2016, 06:49 AM #20
Registered
- Join Date
- Jul 2012
- Posts
- 64
Re: Problem/questions about Tramming and Squaring
I have the Charter Oaks version of the RF45 and man do I regret selling my old 9x42 bridgeport. That machine was a GOD compared to this machine. Thanks for all the in
put on this guys. I will try that shimming as well.

 Reply With Quote
Similar Threads
-
Tramming milling vise problem
By chrisnis in forum Maintenance DIY DiscussionReplies: 6Last Post: 09-08-2016, 07:46 PM -
Grizzly G0619 (SX3) Tramming Problem.
By LX Kid in forum Benchtop MachinesReplies: 6Last Post: 11-25-2011, 03:10 PM -
Questions about aligining, squaring, paralleling, self-leveling epoxy
By Dman65 in forum DIY CNC Router Table MachinesReplies: 1Last Post: 09-15-2011, 05:14 PM -
squaring up an IH clone
By cyclestart in forum Benchtop MachinesReplies: 14Last Post: 08-22-2011, 05:09 AM -
Squaring the IH mill
By QSIMDO in forum Charter Oak Automation Support ForumReplies: 13Last Post: 09-02-2006, 02:25 PM
