


Just wanted to let you all know there is a new design, board layout, and kit coming out for the Linistepper (the smooth linear driver with higher speed active current regulation for medium to small, low cost, unipolar motors).
The new Linistepper Version 2 features a few small but important improvements:
- PMinMO standard connections so you can mix and match with other break out boards and drivers
- Screw terminals for the motor leads
- Onboad mode selection (full, high torque half, low resonance 6th and 18th micro-stepping)
- Network resistors for a lower component count and less soldering
- Still open source, still your best bet for great performance from low cost motors. (Unipolar, 1.5 amps/phase, up to 35Volts)
Same great linear microstepping features:
- Ultra smooth, low resonance operation in 6th and 18th over microstepping modes with analog ramping.
- Active current regulation via the onboard PIC microcontroller (open source) and a tricky little feedback circuit for faster operation than the old style linear drivers.
- High-Torque half stepping mode provides 28% more torque and less resonance when half stepping at high speeds.
- Low cost "junk-box" component list for outstanding value. We order large quantities so if you don't have a PIC programmer or a fully stocked parts bin, we can get you a kit for less than you can order the parts from a distributor.
Now we have some good news and some bad news:
BAD NEWS: They aren't quite in stock yet and we are still working on the documentation. We expect to be done updating the web page, publishing the new layout and build instructions, in the next few days, and the shipment of kits is in the air as we speak.
GOOD NEWS: If you are willing to order the kits now, and wait a week or so for delivery, we are knocking $5 off the kit price. That makes a 3 axis system just $75 or $25 per axis!
Place your order at:
http://www.ecomorder.com/techref/ecomprice.asp?p=416015 BEFORE we get the kits in stock, and save! At that price, we are pretty close to loosing money, so there is a limit of 3 drivers per customer.
And... as if that weren't enough... there is a new open source design coming from Roman for a 3A/phase SLA7062 based microstepping driver. The web page with all the documentation should be up soon, and we will be offering a kit for price that is pretty close to the Linistepper.
Thanks for supporting open source designs and products! Your support, customizations, and feedback really make a difference. Please take a moment and take the poll? Thanks!
View Poll Results: What are the most important driver features to you?
- Voters
- 102. You may not vote on this poll
-
Open source firmware and board layout freely available
72 70.59% -
Low parts-count and cost for home building
34 33.33% -
Low kit price to get running on a budget
27 26.47% -
Smooth / low resonance modes for better performance
43 42.16% -
Faster / more reliable operation w/ low cost surplus motors
31 30.39%
Multiple Choice Poll.
Results 1 to 20 of 142
Hybrid View
-
11-04-2009, 10:59 PM #1
 Registered
- Join Date
- May 2005
- Posts
- 1397
New Linistepper design, PMinMO compatible, kit sale.
-
11-10-2009, 12:32 AM #2
Registered
- Join Date
- May 2005
- Posts
- 1397
Linistepper Version 2 in-stock, Sale ends, Rebate opportunity.
Ok, the new version is in stock, and we will be shipping our back orders tonight and tomorrow.
The sale is over, and the price is back to a very affordable $35 each or $30 each for 3 or more for the kit. Has anyone made one at home for less?
If you missed out, no worries, we are going to do a little rebate opportunity that could save you even more:
The current gallery of pictures from users of the Linistepper controller only has the original versions and home built versions in it; there aren't any pictures of the Version 2. So if you buy a version 2 kit or a set, build them and get your CNC machine up and running, then take a picture, clearly showing the Version 2 board and your machine, and send them to me along with a rebate request, I will refund $10 of your purchase price. After you do that, you can get another $10 by sending a pair of pictures or a video showing the difference between full stepping and micro-stepping modes. It can show a finer cut on your finished work, or the sound, or the top speed, or any other comparison of the different modes. Then, you can get another $10 by sending temperature readings at start, and after at least a half hours operation for both the motors and the controller. Again, you must do the first two to qualify for the third $10 rebate. But it's a total of $30, so one of your axis will effectively be free.
We also don't have nearly enough comparisons between the linistepper and other drivers. If you send any substantive (and it's substantive if I publish it) comparison between the same motors and machine running off a Linistepper (purchased or home made) and running off another controller, along with a picture of your setup, I'll pay you $30. You might send top speeds, stall torque, video, working motor temperature, cut smoothness comparison, or just about anything else you can think of. We don't even need to come out on top, we just want to know how we stack up. Be sure to include a picture of your setup, showing the Linistepper, and the exact part number of the other driver.
Thanks again for your support!
-
11-17-2009, 07:54 PM #3
Registered
- Join Date
- May 2005
- Posts
- 1397
Linistepper Version 2 pictures, Linistepper Video
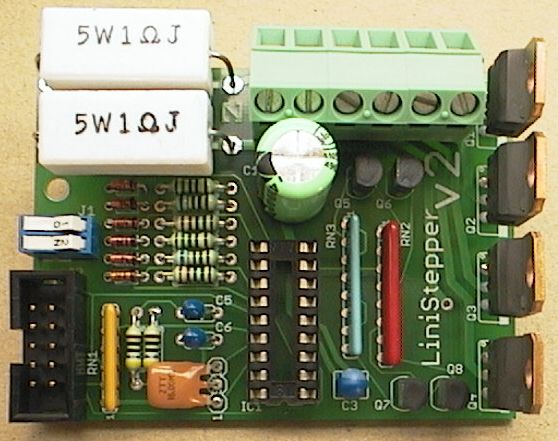
I thought you guys might like to see some pictures of the new Linistepper Version 2 boards
This is what comes in the kit (the PIC isn't installed in this picture, but it IS included in the kit, programmed with the source code which is openly available). The network resistors reduce the parts count and make the kit a lot easier to build. Notice the mode switches on-board at the left edge. Select Full, High Power Half, 6th or 18th micro stepping with linear smoothing and low voltage active current regulation for faster response.
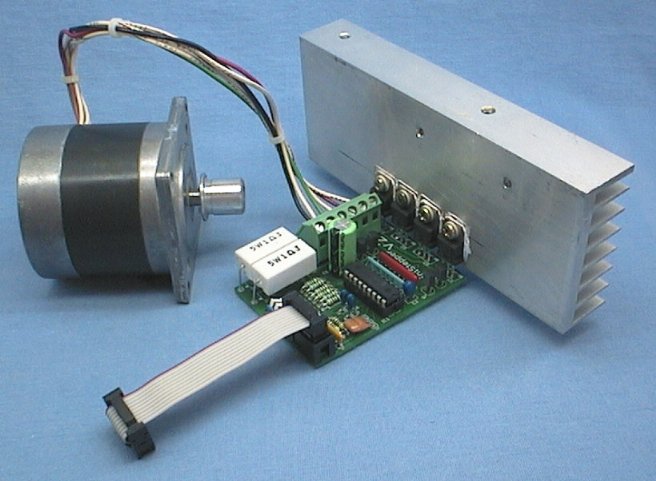
And here it is hooked up and ready to go with the users unipolar 1.5Amp motor, head sink, and cable ready for a PMinMO standard interface board. The linistepper is ideal for high inductance, medium to small stepper motors like those found in copiers, old laser printers or surplus shops. We have a list of good motors and you can add your favorite if you like.
And here is a nice YouTube of linisteppers running a Sherline 2000 mill with the EMC2 open source CNC software from http://www.linuxcnc.org/
Notice how nice those motors sound? Smoooooth music.
More pics and video at:
http://techref.massmind.org/techref/...ep/gallery.htm
Please take a moment to complete the poll at the start of this thread? Thanks!
-
11-23-2009, 01:09 AM #4
Registered


- Join Date
- Aug 2009
- Posts
- 392
Those look awesome James! I'm seriously considering building some of these, but I have one small issue. I can't seem to find any files or images for the PCB Traces, if we were to make our own PCB boards. Do these exist, or do I just need to make them myself using the schematic? Thanks!
-
11-23-2009, 06:00 PM #5
Registered
- Join Date
- May 2005
- Posts
- 1397
There are several board layouts for the Linistepper in different formats at:
http://techref.massmind.org/techref/...ds.htm#layouts
The design of the current V2 does not lend itself to anything less than a multilayer PCB, which is what we include in the kit, but anyone who wants to try and make a single layer or other DIY PCB layout is certainly welcome. I'll be happy to host the files on the page above.
-
11-26-2009, 06:18 PM #6
Registered
- Join Date
- May 2006
- Posts
- 25
Linistepper V2 Eagle files
I modified Patricio Oholeguy eagle files to reflect v2 of the linistepper and made some minor changes.
This is for homemade single sided board.
I have not made them yet so there may be mistakes.
Let me know.
Thanks,
Sam
-
11-27-2009, 12:26 AM #7
Registered
- Join Date
- Aug 2009
- Posts
- 392
Awesome, thanks! Originally Posted by Sam Waters

 I'll take a peek at that once I"m done my homework.
-
01-17-2011, 09:22 PM #8
Registered
- Join Date
- Jan 2006
- Posts
- 15
Slightly modified Sam Waters V2 eagle files. Some minor modifications was added. Built and tested with PIC16F628-20/P.
-
01-26-2011, 10:10 PM #9
Registered
- Join Date
- May 2006
- Posts
- 25
nice
Nice 3d view of the board.. What software did you use to create this picture? Originally Posted by technik
Note: Ive been using the boards that I made using 3 amp motors ( with the tip-142 transistors) for 6 months now with no problems... They get hot but no burn outs yet, and runs very quiet in 18 mode..
-
01-27-2011, 08:11 AM #10
Registered
- Join Date
- Jan 2006
- Posts
- 15
Hi!
The used SW is the Eagle 3D and Povray. Here is a quick tutorial how to use it. Originally Posted by Sam Waters
-
02-25-2011, 01:43 AM #11
Registered
- Join Date
- Apr 2010
- Posts
- 32
Originally Posted by technik
thanks
-
11-27-2009, 05:22 AM #12
Registered
- Join Date
- Aug 2009
- Posts
- 392
It looks pretty good to me. Then again, it's quite possible I've missed something
Just letting you know it looks good though; thanks for that contribution, very useful.
-
11-27-2009, 02:51 PM #13
Registered
- Join Date
- May 2006
- Posts
- 25
Drive 3amp/phase steppers
I am going to try and drive some 3 amp/ phase motors.
I made the traces larger so should take the current.
Added a 100nf cap on the pic and split the ground traces.
Changes I am going to try are
TIP142T (15amp) DK# 497-7653-5-ND for the Tip122.
BC337-AP DK# BC337-APMSTB-ND are inline pins so should work good.
Going to use 0.33 ohm resistors for the sense resitors.
Anyone have an idea what values to try for other resitors to run at 3 amps?
Thanks,
Sam
-
11-28-2009, 12:24 AM #14
Registered
- Join Date
- Aug 2009
- Posts
- 392
If I plan on running lower amperage motors, should I both taking out the 100nf cap, or will it be fine if I just leave it in there? Originally Posted by Sam Waters
Also, what part of Canada are you from?
-
11-28-2009, 05:46 AM #15
Registered
- Join Date
- May 2006
- Posts
- 25
Originally Posted by Jesse B
The 100nf is a "decoupling capacitor" it helps protect the micro from lockup or glitches and should be placed as close to the vcc and grd pins of the micro as possible. With drawing more current I figured it would be generating more noise and the cap wouln't hurt and I had room on the board.
As for you, if you have one put it in, if not don't worry about it, it's not in the original linistepper design.
Saskatchewan....It's freezing rain here right now, oh what fun!!!Also, what part of Canada are you from?
-
11-28-2009, 10:30 AM #16
Registered
- Join Date
- Aug 2009
- Posts
- 392
Alright thanks for the help Originally Posted by Sam Waters
I'm in BC. It's starting to cool down, but it's not too bad yet.
-
11-30-2009, 06:28 PM #17
Registered
- Join Date
- May 2005
- Posts
- 1397
Err... just to make sure, has anyone actually gotten the Patricio Oholeguy version of the boards to work?
Sam, 3 amps on a Linistepper has been done, but it doesn't work well in the microstepping modes just because of the enormous heat load. It isn't terribly practical. Do let us know how it goes for you?
-
12-02-2009, 05:15 AM #18
Registered
- Join Date
- May 2006
- Posts
- 25
Originally Posted by James Newton
I compared the scematic to the one on the Linistepper site and they look the same, only the parts are in a differnt place, so should work the same as the orignial linistepper v2.
The motors I have are low voltage ~3 volt / 3 amp motors.Sam, 3 amps on a Linistepper has been done, but it doesn't work well in the microstepping modes just because of the enormous heat load. It isn't terribly practical. Do let us know how it goes for you?
Even if run them on a 6 volt supply and drop the whole 6 volts across the TIP142's that would only be 18 watts and they are rated at 125 watts so they shouldn't overheat, and I plan on running fans on the heatsinks.
I'll let you know how it goes once I build and test them sometime this winter.
Later
Sam
-
12-02-2009, 11:20 PM #19
Registered
- Join Date
- May 2005
- Posts
- 1397
Did you catch the errata in the Linistepper v2 build instructions? I can't view your board files, or I would check for you. Originally Posted by Sam Waters
Thanks, best of luck. Originally Posted by Sam Waters
-
03-27-2010, 12:24 AM #20
Registered
- Join Date
- May 2006
- Posts
- 25
errata..
Yes I seen the cut trace and wired to the other pin... its already in the file I uploaded before.. Originally Posted by James Newton
l8r..

 Reply With Quote
Similar Threads
-
New design and the promotion sale on lasers
By EXLASer in forum Commercial LaserReplies: 0Last Post: 12-06-2013, 02:40 AM -
troubleshooting POSIX design linistepper
By megeshg in forum Stepper Motors / DrivesReplies: 5Last Post: 10-15-2012, 07:03 PM -
Pminmo electronics
By SCHootie in forum Open Source CNC Machine DesignsReplies: 13Last Post: 02-23-2007, 04:40 PM -
Questions for pminmo
By dfro in forum CNC Machine Related ElectronicsReplies: 0Last Post: 07-02-2006, 04:14 AM
