


Thank you all, and especially NC Cams and Richard Zastrow who made an effort to personally contact me to wish "speedy recovery".
After doing the profiles and proving accuracy ( and teaching me a lesson in saftey..IE run a simulation 1st) I installed the coolant ( I use High sulpher cutting oil, always have, its good to the machines and tooling and my wife has learned to put up with the strange smell) delivery and recovery system. Bought the ENCO 10 gallon system, installed a one inch stand pipe in the catch basin, and used double screens on the ENCO return.I was pleasently suprized at the quality of the system for just a little over $100 bucks, the tank has 3 settling areas that will catch the metal and debris( plus the screens) and what appears to be a good pump. Routed the pressure side to a return that is circulating the oil, then to a pipe system I got off an old lathe that was being parted out ...Can control the flow with the flow knob. I did clean the system and put in new "0" rings, works quite well for $10.00 plus "0"rings. I still have some work controlling the drips at the end of the lathe, but a little silicon caulk should solve.
Installed the Spindle Encoder kit purchased from IM Machine, but screwed up on the instructions and again almost had another crash..I faxed Fred Smith @ IM Machine and he called back immediatley to point out my "little mistake"..with the changes he instructed, the program written by Ron Hill and sold through IM Machine works perfect..Actually better than any thread I've done manually. The thread was a 5/8 -18, the program did 20 passes and 2 "dwell" passes,very quickley and accurate,the thread pitch, major and minor measurements exactley out of the Machinest Handbook.
The pictures are in no order..You can see the spindle encoder. Have decided if the project is over 77 inches, I will just have to use my manual LeBlond lathe..that is if I remember how to thread manually after using the CNC for awhile...remember old people have to forget some things in order to remember new things.
Adobe (old as dirt)
Results 201 to 220 of 257
-
06-21-2007, 01:44 AM #201
 Gold Member
- Join Date
- Nov 2005
- Posts
- 440
-
06-21-2007, 04:10 PM #202
Gold Member
- Join Date
- Aug 2006
- Posts
- 1602
That really is a stunning looking build Adobe - congratulations!
It always amazes me just how much material my tiny CNC mill can remove in an instant when it's trying to cut itself or a fixture in half Despite simulation, I always find the first sets of cuts of a new program rather nerve wracking! But once you get used to it, seeing the tool less than 1mm away from something it really shouldn't bump into doesn't seem all that scary - as long as it's moving in the 'safe' direction
-
06-22-2007, 03:56 PM #203
Gold Member
- Join Date
- Nov 2005
- Posts
- 440
Like I said,I'm usually pretty careful,but just one little mistake...also the 1st two movements were G00, which on the long Z axis is about 200 inches/minute ( I have since reduced that to 90 inches /minute), so in the blink of an eye a lot of damage can be done to tooling and machines, even people with flying parts..
When this was a manual machine,I ran the saddle into the chuck, made some noise but did not hurt much...I was talking on my 1st cell phone while doing a prototype part, and decided then I would never talk on any kind of phone while machining. A few years later an employee crashed our 1st CNC Mill, and later admited he was arguing with his ex-wife on his cell phone. That cost me about $3500.00 bucks if I remember correctly.
I instituted a policy that no cell phones were allowed except during breaks and lunch, made some workers mad at first, but all admitted that no one can really concentrate and talk on a phone.
Respect the machinery and what it can damage, even small mills and lathes can jerk fingars off in a milli-second..Hobbies are for fun, but hurting your self and possibly not be able to work at your regular job while recovering is no fun. Hey people get hurt sky-diving , right ?
And "Digits", thank you for your kind words.
Adobe (old as dirt)
-
06-22-2007, 04:06 PM #204
Registered
- Join Date
- Mar 2006
- Posts
- 2712
Adobe, I see you changed your "sign off". Weren't you happy being "Older than dirt"? Does being merely "Old as dirt" make you feel younger? Just kidding!!!
Keep on tryiing to avoid those crashes. As we both know, S*** happens.DZASTR
-
06-23-2007, 11:52 PM #205
Registered
- Join Date
- Aug 2005
- Posts
- 828
Adobe,
Great project!!
Can you still move the saddle with the hand wheel? Or did you disable it?
ThanksDennis
-
06-24-2007, 03:11 AM #206
Gold Member
- Join Date
- Nov 2005
- Posts
- 440
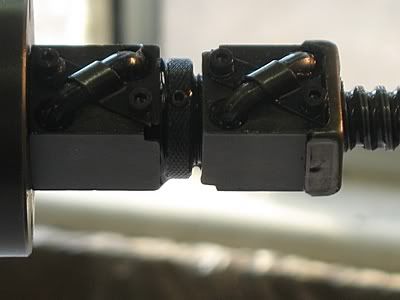
Yes, with the servos turned off I can move both the Z and X axis by hand..but I do not like back driving the very tight ball nuts in Z,as you can see that is a 90 degree backdrive.
Frankley, it is much faster and way easier to move the axis's with the Desk CNC program.I find I might position the X axis with the vice handwheel, like say .002-.003to touch off a part to obtain X0, but since the total system has been hooked up,I have not used handwheels in either X or Z.
We did have the electricity go out while I was turning a part,the DRO "remembers"the axis position when shut down, and all I had to do was use a utility in desk CNC to install the right position # and line #. Really a good utility to work with..
Adobe (old as dirt)
-
06-25-2007, 07:04 PM #207
Gold Member
- Join Date
- Aug 2006
- Posts
- 1602
I couldn't agree more - I bought double-shaft steppers when I did my CNC conversion, but I have never regretted not fitting handles to them - why on earth would I want to move the axes and not have the computer know about it? I use a USB joystick for jogging which is pretty good, but I am considering a manual-pulse-generator wheel for accurately touching off. Originally Posted by Adobe Machine

-
06-27-2007, 01:03 AM #208
Gold Member
- Join Date
- Nov 2005
- Posts
- 440
The manual pulse generator wheel sounds real intresting..Would you post a wiring diagram when yours is done ? Would help a lot of people understand how that would work...I can see some real advantages to a system like that for quick X0Y0Z0 placement.
Thanks
Adobe (old as dirt)
-
06-28-2007, 01:17 PM #209
Gold Member
- Join Date
- Aug 2006
- Posts
- 1602
I think the wiring is pretty simple - I believe the encoder has two quadrature outputs which give enough info to work out which direction it is turning as well as how fast. The magic is all done by Mach 3, which reads the inputs from the dial and converts them to jogs back out to the motors. Have a look at the instructions on the littlemachine shop page - they seem pretty good to me. Originally Posted by Adobe Machine
Cheers.
http://www.littlemachineshop.com/pro...ProductID=2938
-
06-29-2007, 02:24 AM #210
Gold Member
- Join Date
- Nov 2005
- Posts
- 440
WOW...another"gotta have" I'm going to fax Fred Smith @I.M. service, he is the absolute "Guru" on DESK CNC (and electronics as I've found out)..He will be able to tell us yes or no on integration of that systems to my Tree Mill and the CNC Lathe project.
Thanks ..what a GREAT FIND !
Adobe (older than dirt)
'
-
08-19-2007, 06:02 AM #211
Registered
- Join Date
- Jan 2005
- Posts
- 72
Adobe,
If you get an answer from Fred, pls. let me know as I'd like to go for this wheel on my DeskCNC setup too.
Thanks
Paraprop
-
10-23-2007, 02:54 AM #212
Member
- Join Date
- May 2007
- Posts
- 163
This is a very nice post good work! Originally Posted by Adobe Machine
I have question about the double ball nuts.
I have been looking in McMastercarr and you can buy
round and square with treads or flanges.
The see a flanged ball nut and a treaded ball nut and a collar with a set screw.
How did you attach the collar with the set screw to the back of the flanged ball nut?
-
10-23-2007, 01:54 PM #213
Registered
- Join Date
- Dec 2005
- Posts
- 3319
The only criticism of the quote posted in #212 is the use of Vaseline for an assembly lubricant.
Yes the stuff is "petroleum jelly" but it is NOT necessarily a suitable lubricant for metal to metal items. Much more suitable "packing greases" would include but not necessarily be limited to Shell Alvania #2, Exxon Beacon 325 or Lubriplate 105 - all are light greases and Alvania #2 is actually used and recommended for ball screw lubing by NSK.
Save the Vaseline for baby bottoms and/or chapped hands - not as a machinery assembly lube.
PS to Adobe - I hope you're back up and running since your surgery. We've been swamped and are actually looking forward to some upcoming slack time to catch our breadth. P/M me when/if you can.
-
10-23-2007, 02:49 PM #214
Member
- Join Date
- May 2007
- Posts
- 163
I think the Vaseline was for holing the balls in place,
not used as a lube.
I could be wrong but the only time he talks about Vaseline is when he puts the balls in the transfer tube,
the others go in with oil.
-
10-23-2007, 03:17 PM #215
Member
- Join Date
- Aug 2005
- Posts
- 1622
Lubriplate 105 is an assembly grease, but I think it may contain a moly component to it for metal to metal sliding protection. I would be a bit reserved in using it to pack all bearings or at least I understood, that was the general rule above a couple hundred RPM. The only thing I have ever used it on is bushings and worm gear applications.
Here we go again with Vaseline as a viable lube for machine tool use.
 Maybe.......Only if you are checking its tempurature with a rectal thermometer!
DC
-
10-23-2007, 04:23 PM #216
Member
- Join Date
- May 2007
- Posts
- 163
Originally Posted by One of Many
LOL!
-
10-23-2007, 08:11 PM #217
Registered
- Join Date
- Dec 2005
- Posts
- 3319
The problem with Vaseline is that is a water soluble lubricant. Hence, its solubility with other pertroleum lubes is/can be suspect. In an imperfect world, the stuff could (not will gum up when it tries to mix with other lubes later on). Moreover, it is NOT noted for having good film strength which is/can be critical for some applications. Again, Vaseline is great for baby bottoms and thermometers - it ain't necessarilly a good rolling or sliding MACHINE element grease.
The other lubes mentioned (Alvania, Beacon and 105) will do the same thing - assembly lube and/or hold balls in place. These will also tend to intermix with other lubes that may be applied later on - especially Alvania as it is an approved ball screw lube.
Over the years, Vaseline HAS been use for a lot of things it probably shouldn't be - I even know of a case where some well intended soul used it for cam assembly -BUZZZ, WRONG, NO, NEGATIVE, DON"T GO THERE. Yes it worked for years but when he did a high buck "race cam" and it promptly ate itself, he found the one situation where it shouldn't and didn't work.
One tries to quash the use of incorrect urban legends when one can.....
-
10-24-2007, 12:48 AM #218
Gold Member
- Join Date
- Nov 2005
- Posts
- 440
T
-
10-24-2007, 01:21 AM #219
Gold Member
- Join Date
- Nov 2005
- Posts
- 440
Thanks for the concern NC..Yes I feel much better, although I can feel and see some of the hardware in the Thoracic region, there is little discomfort. I am actually walking 1/4 to 1/2 mile every day, and back to almost regular workouts..will be back in the shop soon.
As to the vasoline: I used it to hold the balls in the split return tube, since all the ball nuts have been plumbed to an oil pump, the vasoline is washed out with the way oil.
As to the ball nuts: I do not know about Mc Master-Carrs product, I used Rockwell BMF series fixed angular bearing mounts and the double ball nuts come in kit form. the lead ball nut is attached to flange by threading and a set acrew, the second or tensioner ball nut has a stack of tension washers and the tension nut to press the ball nuts apart. Go to rockfordballscrew.com, they have a lot of info that may help you engineer a system.
I used the lathe the other day to make a shaft for a compressor that had broken (local Auto repair) which was really very complicated, had some real odd ball threads (.677 X 16 th-inch) and 4 different diameters..I drew it up in Vector , transferred to Desk CNC and watched it whittle away on the lathe, and except for one manual tool change, it was like watching paint dry..Part came out to .0003 in all dimeters, and .0008 on all lengths ( Z axis) the threads were perfect, both the major and minor diameters and pitch were right on.Machine time was less than 30 minutes ( I will not tell anyone how long the rest took me, seemed like days, but thats what the pain killers do).
THANKS AGAIN!
Adobe Machine (old as dirt)
-
10-24-2007, 01:59 AM #220
Member
- Join Date
- May 2007
- Posts
- 163
Are you using Mach3 ?

 Reply With Quote