


I actually offset all of the parts for the entire table, but zoomed in on the Z axis.
Very good. I was hoping there was some sort of nifty plugin that would explode the assembly. I added that renderer to my wishlist. It looks very nice. I'm still using the stock renderer.
Results 81 to 100 of 114
-
07-17-2009, 01:32 AM #81
 Registered
- Join Date
- Feb 2004
- Posts
- 313
~Don
-
07-18-2009, 11:45 PM #82
Registered
- Join Date
- Jun 2009
- Posts
- 231
do you see much sag on your table? Toward the center?
-
07-20-2009, 02:51 AM #83
Registered
- Join Date
- Jun 2008
- Posts
- 203
Not as much as I was expecting. maybe 1\16" over the 8' span. I even purchased some marine hardware to counter the sag... I was going to go through the sides at the midpoint between the top skin and the bottom skin... go out the bottom skin near the middle of the table and out the other side. So far I see no need. I intend to hybridize it eventually with 80/20... Originally Posted by JohnnyVegas

-
07-27-2009, 08:49 PM #84
Registered
- Join Date
- May 2009
- Posts
- 19
Really nice MDF CNC
Hi
I am starting to design a simular machine, after seeing this lovely CNC, i was thinking to use metal but this seems to be an better approach, this will be my first CNC.
Great job
-
07-28-2009, 10:49 PM #85
Registered
- Join Date
- Feb 2009
- Posts
- 100
i really like this design.. was the entire gantry made from a single sheet of MDF?... if so, would it at all be possible to modify the width of the gantry to allow for a full 4 feet router travel along the Y axis? so that full sheets of 4x8 plywood and MDF can be carved and shaped?
-
12-14-2009, 03:56 AM #86
Registered
- Join Date
- Dec 2009
- Posts
- 1
Very impressive! I started planning my own machine recently and was wondering if you are using a 8' lead screw for the length of the table? Originally Posted by Grunblau
If so, where did you get it?
Having the models available at McMaster is great. Thanks for the info!
-
12-14-2009, 04:15 PM #87
Registered
- Join Date
- Jun 2008
- Posts
- 203
I think the screw is 100" I ordered it from Roton.com. This is also where I picked up all of the nuts etc.. Consider a bit more beefy lead screw for this kind of span, although my 5/8" diameter screw does just fine. Originally Posted by ChrisLarson
Good luck with your build!
-
12-14-2009, 04:51 PM #88
Community Moderator
- Join Date
- Mar 2003
- Posts
- 35538
The most amazing thing about this project, to me, is that it's in a bedroom in your apartment!

 Gerry
Gerry
UCCNC 2017 Screenset
http://www.thecncwoodworker.com/2017.html
Mach3 2010 Screenset
http://www.thecncwoodworker.com/2010.html
JointCAM - CNC Dovetails & Box Joints
http://www.g-forcecnc.com/jointcam.html
(Note: The opinions expressed in this post are my own and are not necessarily those of CNCzone and its management)
-
10-22-2010, 03:20 AM #89
Registered
- Join Date
- Jun 2008
- Posts
- 36

how to get the dxf files for this machine

-
10-22-2010, 04:44 PM #90
Registered
- Join Date
- Jun 2008
- Posts
- 203
I have made all of the files available through my website Grünblau Design Studio here you will find a link to purchase a package containing all of the 2D CAD drawings in various formats, full scale patterns, bill of materials, wiring diagrams and a step by step instruction manual on how to build the machine. Originally Posted by agguilar
Thank you for the comments!
Brian
-
12-07-2010, 09:39 PM #91
Registered
- Join Date
- May 2010
- Posts
- 146
Is there any chance you can post up the pictures of the rotating lead nut assembly? All of the links are broken now.
-
12-07-2010, 10:44 PM #92
Registered
- Join Date
- Jun 2008
- Posts
- 203
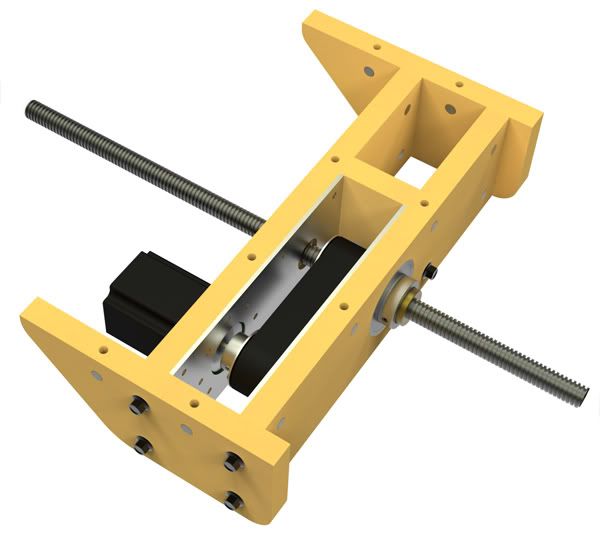
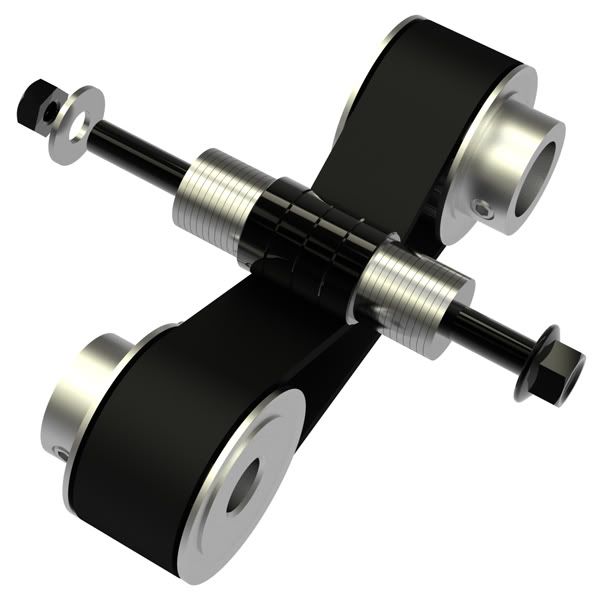
Rotating nut
Here are a couple of the renderings describing this from my PDF package... Originally Posted by prcdslnc13
Full assembly...
Exploded view...

Belt tensioner assembly
Hope this helps!!!
If you need any further assistance, it's all in my complete documentation of my DIY CNC that can be found here...
-
12-21-2010, 11:07 PM #93
Registered
- Join Date
- Jun 2008
- Posts
- 36
pics of the grunblau no plans
hi Brian I'm just going to show some of my progress on building you're machine, and later I'm going to purchase you're plans for the machine : ) I'm just waiting to see if you're going to lower a "just little" the price just for the holidays well let us know, god bless. :wave:
-
12-23-2010, 11:58 PM #94
Registered
- Join Date
- Nov 2010
- Posts
- 0
How are you sizing you parts with out the plans?
For $80 bucks, the plans are a steal. I purchased a set and you can tell a lot of time went into them and they are professional. Plus all CAD files are included. Since using them as a basis for a larger machine they have saved a lot of time.
YMMV.
PCFlyer
-
01-05-2011, 05:43 AM #95
Registered
- Join Date
- Jun 2008
- Posts
- 36
Hi brian, happy new year for you and for all of the members her on the forum (group) can you put some more pictures of youre beautiful machine because i want to put a wallpaper on my computer of you machine. Thank you.
-
02-26-2011, 05:53 AM #96
Registered
- Join Date
- Jun 2008
- Posts
- 36
This is the pic of the machine
-
02-26-2011, 02:50 PM #97
Gold Member
- Join Date
- Apr 2009
- Posts
- 5516
Nicest MDF design... EVER!
-
02-27-2011, 06:54 PM #98
Registered
- Join Date
- Jun 2008
- Posts
- 203
Sorry I missed this post!
Originally Posted by agguilar
I am sorry I didn't see the post! Hope all is well for you!
In November, we bought a house and I didn't have internet except for at work for a couple months while all of the dust was settling.
We also got a puppy that promptly chewed through my camera cable so I am left with an Iphone for picture taking... hope to remedy this soon.

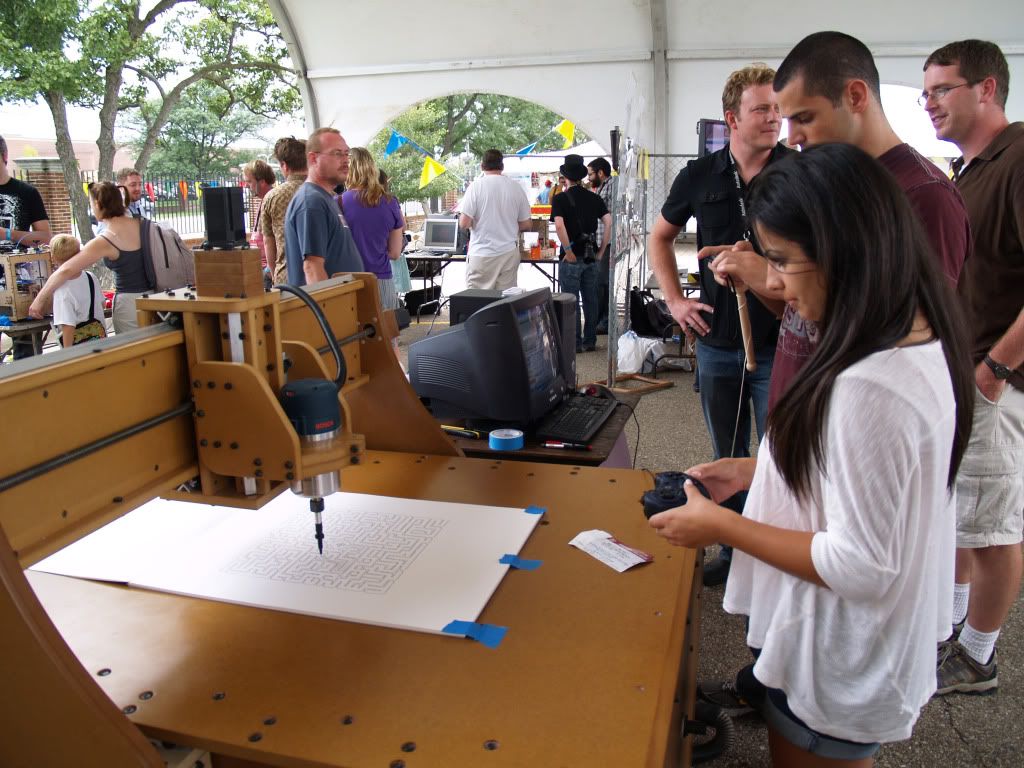
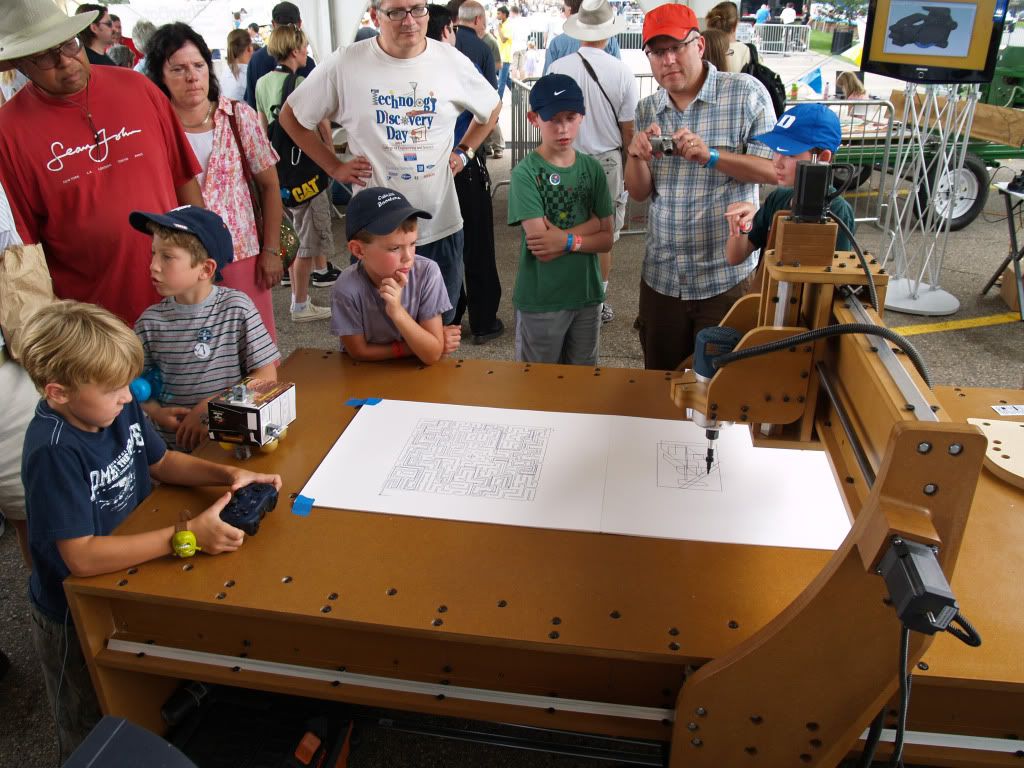
In August, I dissasembled the 'ship in a bottle' and brought the CNC to Makersfaire. It was nice to finally be able to step back and see the whole machine. In case you missed the post
Here are a couple pics from that day...

I used the machine to print a maze. When it was done, it would return to the center of the maze and people were then asked it they wanted to use the playstation controller to solve the maze.
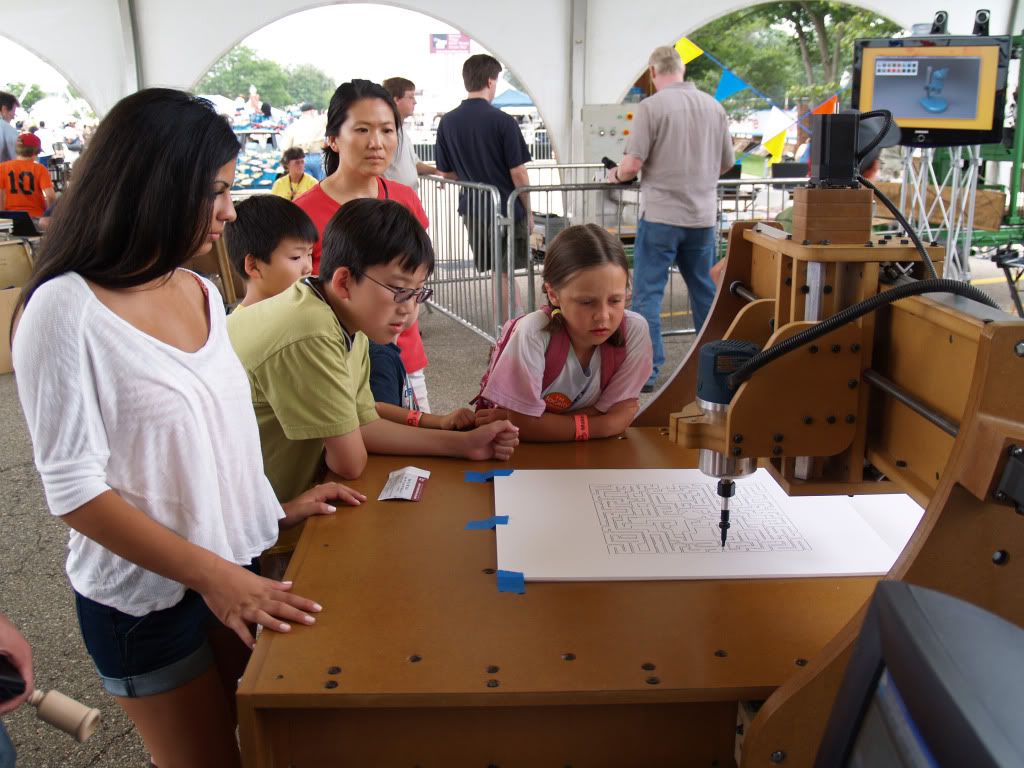
This kid was not about to stop after he solved the maze.
Then the CNC was broken down and taken to storage while we waited on the purchase of our new home to go through. Keep in mind this was August. and we didn't close on the house until mid November. Almost 4 months CNCless.

Picking up the CNC to take it to its new home... I can now dissasemble and reassemble in about 3 hours. Mostly because all of the 'smart' components are all on the gantry.

First week in January pieces were due for a show I had agreed to do in October. Now the machine was up and running again so I was able to begin working on the pieces in my spare time. One of the pieces would be 24" by almost 6' and look like waterdrops on wood. Finally a reason to have such a big CNC!

The entire job took 16:05 hours! Probably should have been faster but I was willing to wait for a perfect piece.

Overall view of the piece. The lighting makes it look much deeper than it actually is all of the relief is no more than 3/16" deep.

Here is a detail of the surface...

This is after a finish was applied...

I also did some self draining concrete tiles. The troughs slope 1/16" of an inch to the edge of the tile and the pattern allows for design flexibility. I used a spiral toolpath to mill the mold out of foam.

Here is a detail of the resulting surface...

Here are the final pieces in the gallery...

I apologize about all of the camera phone pics and thank you for your comments!
Good luck with your build agguilar!
-
02-27-2011, 07:19 PM #99
Registered
- Join Date
- Oct 2008
- Posts
- 406
Beautiful. I love the water drops. Are you going to be using the concrete tiles or were they made strictly for the show?
Bob
"Bad decisions make good stories."
-
02-27-2011, 07:47 PM #100
Registered
- Join Date
- Jun 2008
- Posts
- 203
These were really just a prototype for the show. I intended for them to be porcelain as a compliment to the steam tiles on my website that have been forever a WIP. They are steel reinforced concrete so they are as functional as possible. I am sure they will end up outdoors somewhere would need to cast some more tho. Originally Posted by bobsch
Here is a better view of the digital file and the variations...


 Reply With Quote
Similar Threads
-
Trying to find out more information about a "misterious" CNC used machine -see pics
By jcatanduva in forum Want To Buy...Need help!Replies: 4Last Post: 12-23-2013, 11:52 AM -
X Axis "Goes Off Pattern", "Awry", "Skewed", "Travels"
By DaDaDaddio in forum Laser Engraving / Cutting Machine General TopicsReplies: 1Last Post: 05-06-2013, 09:59 AM -
CNC Router-20"x20"x4" Build or buy machine?
By cbstephenson in forum DIY CNC Router Table MachinesReplies: 3Last Post: 06-04-2010, 08:02 AM -
Solsyva 24" x 48" build, 1st machine
By nikbrewer in forum CNC Wood Router Project LogReplies: 10Last Post: 09-17-2008, 12:27 PM -
17 Years of "Grime" on an Axis card
By donl517 in forum FadalReplies: 8Last Post: 12-28-2007, 12:02 AM
