


Hello "bench top machines" people... went down to the shop today and worked / tossed around ideas for our next moves!!! Also put the spindle together with the new bearings.
Things we talked about...
- Chip pan and some sides to contain chips
Thinking about making the chip pan out of 1/4 plywood and fiber glassing it.... them some small "walls" at the ends of the table and some sort of back stop behind the machine and maybe a removable shield for the front of the table..... our primary focus with the chip pan is that it be small, not looking to build a water tight VMC style enclosure, sorta like catch 80% of the flying chips and we will be happy.
- Gas spring for the head
Weighed the head of the mill with all the goodies on it and she came out to about 100lbs... did some testing with a 90lbs spring we had laying around and it seemed to work really well!! going to order one tonight from Mcmaster. The plan will be to mount the gas spring behind the column with some brackets off the Z carriage.
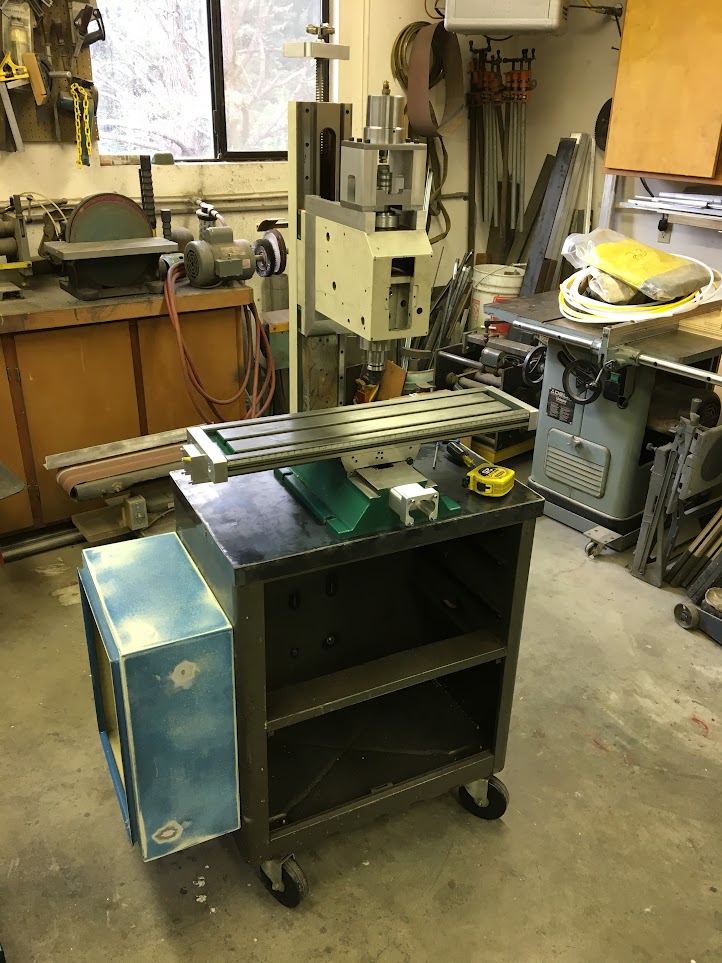
(the grizz so far... notice the "new" used Hoffman enclosure for the electronics. The new base for the machine is the bottom half of a super vintage tool box with some slight structural modifications... more on this later!)
(Weld up a few holes, smear some bondo, slather her in paint and you got yourself a nice enclosure for cheap!!....... "Bobs your uncle")
(the sharpie chicken scratch on the column is attempting to represent the bracket that will wrap around the back of the column to mount the gas spring)
(some improvised mounting of the gas spring for testing purposes)
(Here is the video i shot as we where testing the 90 pound spring. Thoughts ? )
https://youtu.be/WxY9aO-8SBQ
(after the gas spring shenanigans we put the spindle together. Sorry for the lack of along the way photos... grease covered hands and pictures are tough!)
(the bearings for the spindle as well as the "drive barrel thing")
(yummy grease....)
(ta-da!)
(When it came time for the Chinese craftsman to chamfer the outside edge of the spindle snout he must of used a hammer and chisel! it looked really bad so we chucked up the spindle in the grinder and cleaned it up! much better now... lol)
The end..... for now!!!
-Nick
Thread: THE GRIZZ
Results 81 to 100 of 726
-
03-06-2017, 03:35 AM #81
 Member
- Join Date
- Oct 2013
- Posts
- 543
Re: THE GRIZZ
-
03-09-2017, 02:31 AM #82
Member
- Join Date
- Oct 2013
- Posts
- 543
Re: THE GRIZZ
A small mid week update! Installed the new shielded bearings on the spindle barrel, received the gas spring from Mcmaster-carr and started working on the bracket that will hold the spring behind the column, made a stud for the center hole of the head clamping bolts... the next thing on the agenda is going to be home switches. Does anyone have any recommendations or do"s and don'ts as far as home switches are concerned?
(the new bearings spin like "buttah" !!! )
(the current state of the grizz...)
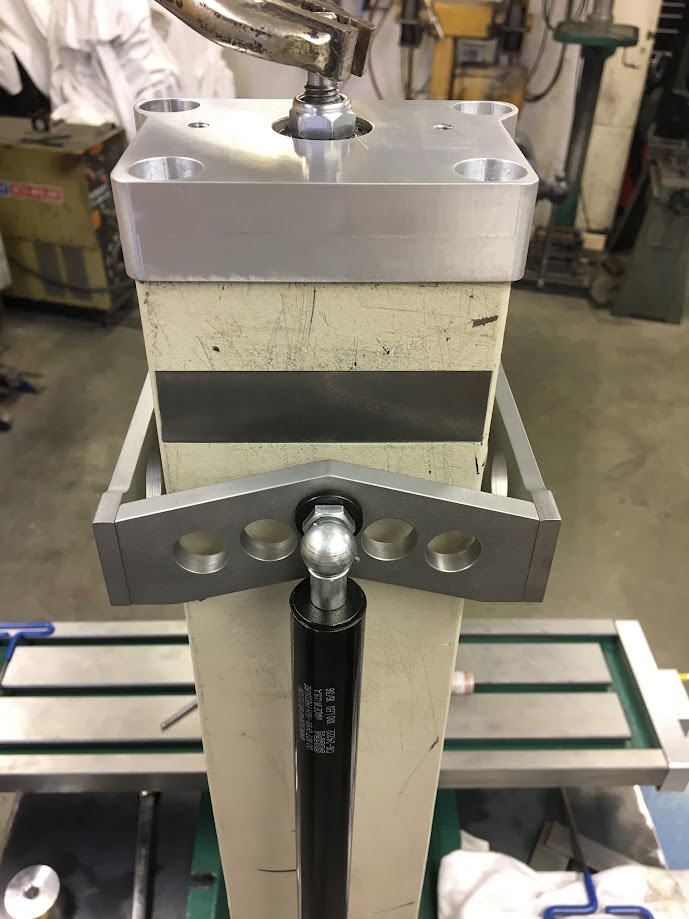
(one side of the soon to be spring mount bracket thing... through exhaustive research and development we have come to the conclusion that the 3 "speed" holes increase the strength and performance of the bracket by a factor of 10!!!)
(the spring should go something like this, there will be a plate with 4 countersunk screws connecting left and right brackets together, the spring will mount in the center)
(stud made from a metric cap screw... one side is metric the other is SAE)
(come to find out the increased length of the hardware due to the head spacer makes it impossible to insert the center bolt when the head is installed, so we had to make a stud to replace the bolt)
🍻
-
03-09-2017, 03:59 AM #83
Member
- Join Date
- May 2008
- Posts
- 1185
Re: THE GRIZZ
Your Z nut holder will be too short now too.
youtube videos of the G0704 under the name arizonavideo99
-
03-09-2017, 04:15 AM #84
Member
- Join Date
- Oct 2013
- Posts
- 543
Re: THE GRIZZ
Dave, Originally Posted by arizonavideo

The Z nut holder is in the stock position..just like you see it in the picture above. The head spacer sits on top of the carriage, hence the longer bolts. Make sense?
-
03-10-2017, 02:49 AM #85
Member
- Join Date
- Oct 2013
- Posts
- 543
Re: THE GRIZZ
Thursday update -
Finished the top bracket for the gas spring, pretty happy with how it turned out, once the bracket is all bolted together it is really rigid. Planning on finishing the bottom tomorrow...
(one side of bracket ready to fit to the machine after being "dehorned" and blasted)
(three screws because its mo-betta than two!!! )
)
(clearance for the side of the column was machined on both brackets)
(holes because.... why not!!!)
THANKS!!!
-
03-10-2017, 02:18 PM #86
Registered
- Join Date
- Aug 2006
- Posts
- 671
Re: THE GRIZZ
great work so far!
-
03-10-2017, 02:30 PM #87
Registered
- Join Date
- Aug 2008
- Posts
- 1186
Re: THE GRIZZ
Super fancy! One potential handicap I see though is with the wrap around column bracket design, and the lower ball joint connecting rod being below chip pan level, you will have a very difficult time enclosing the machine when you realize you want flood coolant.
Sent from my QTAIR7 using Tapatalk
-
03-10-2017, 05:12 PM #88
Member
- Join Date
- Oct 2013
- Posts
- 543
Re: THE GRIZZ
You win the prize sir. Yes..I considered that and decided to work around it..how, I don't know. We are trying to make the footprint of this machine as small as possible as the shop is already full of crap. This means the chip pan and enclosure will be minimal, just enough to catch the 'drip' coolant and contain the chips. I don't plan on a full enclosure but it certainly will take some creatively to seal the column area because of that moving bracket. I thought the trade off was worth it, the strut is out of the way and is centered on the Z axis. Originally Posted by lcvette
Stay tuned for the chip pan from hell!
Stuart
-
03-11-2017, 12:04 AM #89
Registered
- Join Date
- Aug 2008
- Posts
- 1186
Re: THE GRIZZ
Hahaha.. long as you are aware, just would hate to have it surprise you after building the pan. Originally Posted by atomarc
On a side note, a full enclosure would take up any more space than a chip pan.. Is just adding walls really. Also, the instinct is to make a "V" bringing chips down to the base of the machine for coolant drain back. I did mine this way and regret it. Maybe I can save you the headache of cleaning out chips from under the table.
I would propose you make a slanted pan towards the front of the machine so all the chips are right up front and easy to clean out. And I would not eliminate design criteria to go full enclosure down the road, as it really is alot better and flood coolant simple can't be beat on these small machines.
Sent from my QTAIR7 using Tapatalk
-
03-11-2017, 12:11 AM #90
Member
- Join Date
- Oct 2013
- Posts
- 543
Re: THE GRIZZ
Thanks..those are great tips, especially about getting all the chips in front where they can be cleaned out. However haphazard this build appears, we do plan quite a bit so there are no big surprises.
Stuart
-
03-11-2017, 01:58 AM #91
Member
- Join Date
- Oct 2013
- Posts
- 543
Re: THE GRIZZ
Just finished up for the day in the shop. Got the gas spring setup pretty much situated, finished making the bottom bracket and proceeded to slap everything together for a trail run..... well it seems to work!! as it sits right now with a 100 pound spring the head is wanting to always go up with a slight amount of force.. might try a little bit lighter spring (75lbs-ish) to see what feels right. I'am not completely sure but it seems as if it would be better for the head to favor going down apposed to wanting to rise up?
(making some chips!)
(the lower bracket all bolted up)
(as she sits..)
-
03-11-2017, 03:17 AM #92
Registered
- Join Date
- Aug 2008
- Posts
- 1186
Re: THE GRIZZ
I would leave the spring in it that you have. It will loss some of its force after a couple weeks of use and you'll also have a tool in there and maybe some other odds and ends weight you aren't considering at the moment. Maybe a nice cover to wrap the head, cable chain, way cover..Etc... Lots of little things tool think of one is all finished! Looks great!
Sent from my QTAIR7 using Tapatalk
-
03-11-2017, 03:24 AM #93
Registered
- Join Date
- Aug 2008
- Posts
- 1186
Re: THE GRIZZ
You actually gave me an idea for my gas strut... I'm going to put a tube over the dangling ballscrew with an end cap at the bottom and thread the strut end into it.. The have the strut under the column.. That way it's totally concealed and out of the way.. hey thanks!
Sent from my QTAIR7 using Tapatalk
-
03-11-2017, 07:08 AM #94
Member
- Join Date
- Oct 2013
- Posts
- 543
Re: THE GRIZZ
A fair trade for all the good ideas you have shared with us...thanks. Originally Posted by lcvette
Stuart & Nick
-
03-12-2017, 03:04 AM #95
Member
- Join Date
- Oct 2013
- Posts
- 543
Re: THE GRIZZ
Today we installed the motor and spindle onto the machine to give it a test, ran a few wires and set up the Hitachi vfd (took a second to configure but we finally got it, the instructions are mediocre at best). running the spindle through different rpm ranges..... very happy with how smooth and quiet the machine is so far. Planning on pulling the spindle tomorrow and adjusting off a tiny bit of pre-load on the bearings (currently the bearings feel to hot in the 4 - 5000 rpm range).... Overall happy!
(the grizz patiently waiting for the "juice")
(the vfd all hooked up...)
(no glue was used in the making of this video (2500 RPM))
https://youtu.be/uD4M4s36qko
-
03-12-2017, 03:10 AM #96
Registered
- Join Date
- Aug 2008
- Posts
- 1186
Re: THE GRIZZ
Are they new bearings? Tapered rollers will get really hot during break in/bed in prod, don't loosen the preload to much, that is normal. Once they bed in they won't get that hit anymore and will run for smooth. Just use good gear, kluber is what I've found works best.
Sent from my XT1585 using Tapatalk
-
03-12-2017, 03:20 AM #97
Gold Member
- Join Date
- Feb 2006
- Posts
- 7063
Re: THE GRIZZ
You absolutely do NOT want the gas spring pushing the head up. It should provide a force that is somewhat less than the weight of the head. Otherwise, you'll have the head sitting higher than it should when doing light machining, and pulling down deeper when doing heavy machining, and at the end of downward moves, which will make divots in your work.
Regards,
Ray L.
-
03-12-2017, 03:38 AM #98
Member
- Join Date
- Oct 2013
- Posts
- 543
Re: THE GRIZZ
Yes, the spindle has new Nachi tapered rollers bearing. The dynamics of gas springs make them a bit problematic when attempting to balance the weight of the spindle assembly. I believe it's called the 'K' value, and it changes depending on how compressed the spring is. A slight negative balance of the spindle near the vise equates to moderate negative balance nearer the table and zero balance near the extended height of the spindle...guess you have to go with the best scenario.
We'll keep at it and make sure the spindle favors coming toward the table, but has enough 'spring' not to power through the ball screw and drop when the system is shut off.
Stuart
-
03-14-2017, 02:37 AM #99
Member
- Join Date
- Oct 2013
- Posts
- 543
Re: THE GRIZZ
Just a quick note/rant/plea for ideas! We started mocking up the chip pan-machine enclosure today using cardboard to get an idea of what we could make. I'm quite flustered...the silly thing is huge. The whole focus of this project was to use a small machine that would be a CNC addition to a already crowded, manual machine shop. The minimum enclosure we could come up with that would accommodate the vise, total X-Y and Z travel ends up being way larger than I had envisioned..and that's after looking at pages and pages of existing G0704's on this site and others.
We don't intend on using a 1000 hp coolant pump at 300 gpm..just a dribble system. Maybe Ray had the right idea..a minimal pan and some type of curtain you could place when things started to splash.
Anyone have any thoughts on this subject that may ease my mental anguish?
Stuart
-
03-14-2017, 03:11 AM #100
Registered
- Join Date
- Aug 2008
- Posts
- 1186
Re: THE GRIZZ
My enclosure is pretty compact at 30" x 60" (could be shrunk to 54"). That has the back wall flush with the column front face (dovetail flats) and doesn't account for my electronics cabinet behind the column. Overall footprint is 42"x60". Originally Posted by atomarc
If you have not had a cnc machine before, you will find they are great for Repetitive jobs or parts where you setup fixture plates and swap out the plates for different operations. When doing that, chips build up fast and the coolant is excellent for clearing chips as much as lubricating the tool keeping the cutter sharp and aluminum from gumming up. Drip isn't gonna cut it unless you are running a mist system and those are OK, but doesn't come close to a good flood system with some pressure. I've tried them all, and flood is the only way to go in my book.
If you belt drive x axis and put the motor in front of the table, you can shrink the width, but you need to run a quality belt and pulley set to avoid it introducing backlash. You can also use precision tool maker vises which aren't as long and still give you wife is openings. They are not to pricy either. If you put the y axis stepper in the back you can shrink the depth some as well and make getting to the table easy.
Sent from my QTAIR7 using Tapatalk


 Reply With Quote


Similar Threads
-
enough yapping---grizz x3 //ordered// RECEIVED
By project5k in forum Benchtop MachinesReplies: 95Last Post: 01-09-2008, 11:50 AM
