


I really would like to build a nice enclosure by around Christmas time, so i can sell my box and pan brake and use that $ to invest in a real lathe.
I was trying to design a good stand + complete enclosure for my x3 with a completely slanted bottum pan for coolant, and 1 bar to stiffin up the z axis so its just a little steadier while plunging with a large endmill into copper, at any speed. I quickly realized its going to be a LOT of work and will be very difficult to make, especially since the only welder i have is a oxygen acetylene torch...
So what have you guys done? what do you guys recommend? i have seen lots of things that sit on top of a bench but i would love to have this off the workbench and in another corner of the garage.
Cheers guys
Thread: want a enclosure for my x3...
Results 1 to 20 of 54
-
10-25-2009, 06:43 AM #1
 Registered
- Join Date
- Jul 2008
- Posts
- 922
want a enclosure for my x3...
-
10-25-2009, 07:42 AM #2
Member
- Join Date
- Apr 2006
- Posts
- 8159
Check out loadedagains for his IH, really sweet looking.
A couple more designs in devincox's thread.
just scale it down a tad for your X3.
I thought Pete had some pics of his but I can't locate them.
Hosshttp://www.hossmachine.info - Gosh, you've... really got some nice toys here. - Roy Batty -- http://www.g0704.com - http://www.bf20.com - http://www.g0602.com
-
10-26-2009, 05:29 AM #3
Gold Member
- Join Date
- Sep 2006
- Posts
- 1738
I hope and think you will be pleased with my enclosure that I recently been working on. I started about 2 weeks ago actually revising my over one year old enclosure. With full heavy flood it leaked in certain spots, really annoying, but I hope all my new work I have done will pay off and keep it from leaking. I can't believe how long it took to finish, and it's actually not even done. I have spent almost the entire day just putting it back together.
The the fun little stuff is going to be happening now with it. Making and installing my custom collet holders, little racking on the side for certain tools,installing pipe wort for coolant and air hoses. I have coolant through vinyl hoses but I was able to get a ton of stuff from grandmother's home in Brooklyn, that use to belong to my grandfather. So not only did I get all these tools that are useful in the shop, I got a lot of interesting things. Tons of outlets,switches, racks, roller clevis', files and two boxes worth of beutifully chromed piping and fittings that while totally unnecessary to use in the enclosure, since I have it. I will use it
You will see all of the new work done tomorrow, I will be taking pics. I was going for a HAAS look
-Jason
-
10-29-2009, 06:35 AM #4
Registered
- Join Date
- Feb 2009
- Posts
- 90
Metal is great but expensive, try to find some scrap other than bedframe material. I found some scrap pallet rack material on Craigslist, one 8ft vertical section let me make the enclosure below. Cost $30.
$25 more let me make the catch pan underneath out of thin gauge steel, don't remember the gauge but it bends by hand and is hard as hell to MIG weld because it was so thin. Makes me wish I DID have an OAG setup!

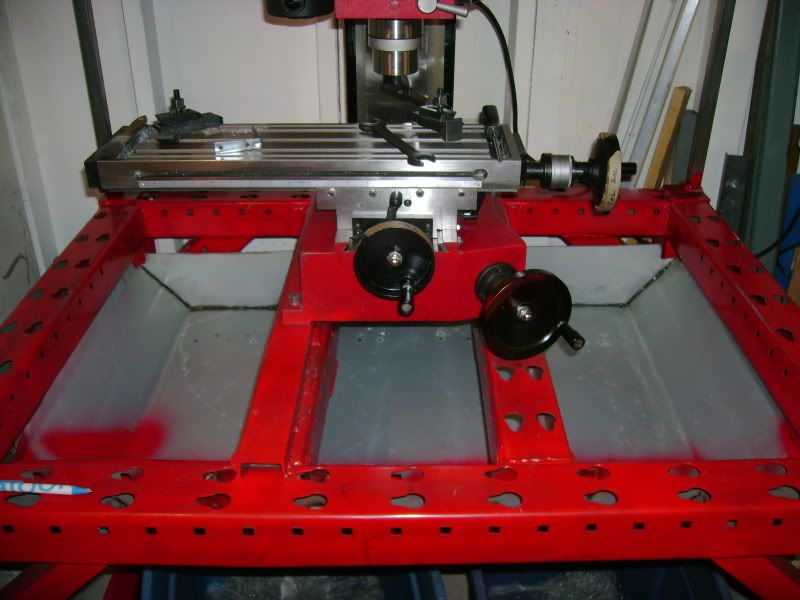
Pix are before the drain hole, side walls, etc. I need to add a bar to the top for a counterweight. The casters were probably the most expensive thing, do a search on my posts (don't have many), there's a link in someone's thread. The plastic boxes were just to hold up the pan while making mounts (it's removable).
If I were to do it again, I'd make the pan drain faster, I get a fair amount of standing coolant which ends up evaporating. I had not planned on flood or mist when I first made the pan. Coolant dripping from the machine into the pan also caused splashes, which when allowed to build up, creates a leak. I cured that by adding plastic sheeting in certain places.
Might as well mention I'm using an HF dirty water submersible pump in housed in an $8 Walmart tall kitchen plastic garbage can. The pump needs 3" of fluid minimum to sit in. Works great, speed is controlled by an HF external router speed controller. Coolant drains from the pan down into a Chevy smallblock water neck I had laying around, through a radiator hose, into a sheet metal tray with holes drilled in the bottom and stuffed with stainless steel wire mesh scrubs. Oh, I cut the foot off one of my wife's nylon stockings and slipped that over the rad hose as a pre-filter. Can you tell I'm cheap???
PS Car oil filter elements and home water purification filter cartridges make great filters, but are terrible at flow unless you pressurize the flow through it. Otherwise, it will just sit and you'll starve your coolant pump. Coffee filter might work also?
-
10-29-2009, 03:25 PM #5
Gold Member
- Join Date
- Sep 2006
- Posts
- 1738
Va va va very nice!
I like the the Red.
-Jason
-
10-30-2009, 04:11 AM #6
Gold Member
- Join Date
- Aug 2004
- Posts
- 2849
Rezcar,
What are the dimensions of your enclosure.
You wife probably turned around and spent $10 on a new pair of hose...
Thanks,
Paul
-
10-30-2009, 06:35 AM #7
Gold Member
- Join Date
- Sep 2006
- Posts
- 1738
Let me tell you what the best filter is: I have been using Humidifier pads from Home Depot for a few years now. Simply the best, I have a real amazing drainage system, but I don't have any chips in the tank EVER.
-Jason
-
10-30-2009, 06:53 AM #8
Registered
- Join Date
- Jun 2008
- Posts
- 614
Jason,
Care to post pics? im interested in seeing your design...http://www.g0704.blogspot.com/
-
10-30-2009, 02:42 PM #9
Gold Member
- Join Date
- Sep 2006
- Posts
- 1738
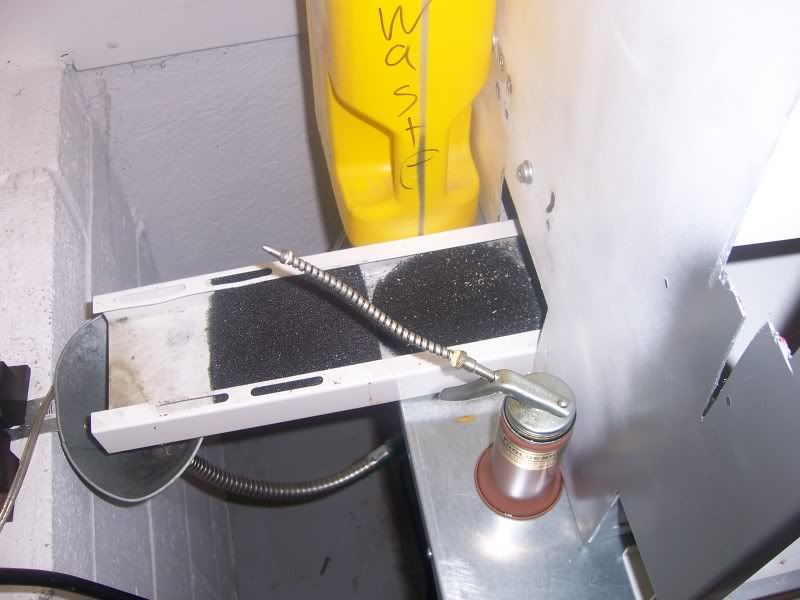
In the first picture you will see this U channel I used that the coolant travels along. The key is to not have a great deal of pressure with coolant and chips, as in...There is only a small angle that the channel creates, enough for the coolant to flow at a good pace but not fall with gravity and chips like most conventional systems.
The drain is a center drain and has a pre-filter, again a simple humidifier pad is use on top of the drain hole and piece of meal stock on top to keep pressure so that it contacts all it's surface area. When the coolant gets through and travels down the channel, it encounter two more filters before falling into the oil funnel which has a screen, that catches any little chip that get through the end.
The coolant travels down a hose and spills on top of the container lid where gravity lets it fall through the cracks.
In the last picture, notice the hose and wet area?

-
11-01-2009, 07:44 AM #10
Registered
- Join Date
- Feb 2009
- Posts
- 90
Ha! I'm dreading the day I'll have to go buy new ones to replace the clogged one!
Dims are:
28" tall without caster
36" deep
48" wide
The thinner surround frame is 40" tall
 Originally Posted by ViperTX

-
11-01-2009, 07:49 AM #11
Registered
- Join Date
- Feb 2009
- Posts
- 90
Very nice, I'm thinking of switching to a resovoir with a lid to slow down the evaporation. Originally Posted by SpeedsCustom
Any pix of the entire enclosure? From the bench, it looks as if it's flat bottomed?
-
11-01-2009, 07:51 AM #12
Registered
- Join Date
- Feb 2009
- Posts
- 90
Also, what section are the humidifier pads found in at Home Depot?
-
11-01-2009, 08:35 AM #13
Registered
- Join Date
- Feb 2009
- Posts
- 90
You may need to go bigger for steppers/servos. Originally Posted by rezcar
-
11-01-2009, 06:59 PM #14
Gold Member
- Join Date
- Sep 2006
- Posts
- 1738
Usually by the shop-vacs, they have a rather large area for these pads, there exact location I'm not sure. Ask an employee for the exact spot, it's been a while since I need new ones. Originally Posted by rezcar
Glad you like the design.
-Jason
-
11-01-2009, 08:13 PM #15
Registered
- Join Date
- Jul 2007
- Posts
- 675
Here's mine
The base is made from 2x4's and 3/4 plywood sheeting. The top is sealed with poly. I don't run flood but the base could easily be modified for it. The enclosure portion is the 8020 quick frame material with 6mm coroplast sheeting in between. Minus painting, it can be built in one weekend.
Good luck.
P.S. If you haven't done so, make some denim way bellows. Best mod I ever did for the X3.
-
11-05-2009, 07:49 AM #16
Registered
- Join Date
- Feb 2009
- Posts
- 90
Denim bellows, yeah, another thing that's already on my to do list!
Couldn't find humidifier pads, they did have de-humidifier filters though. They didn't say what micron sized particles could pass through. I ended up buying some vent (like heater vents in the walls) filters which also didn't give a spec on the microns.
-
11-05-2009, 05:47 PM #17
Registered
- Join Date
- Jul 2008
- Posts
- 922
thanks for the great suggestions guys
mrm i didn't realize that you built a stand for your x3, thats exactly what im looking for but being a HS coolant i can't afford $400 on a cooling system, so i will be going wtih flood coolant. It doesn't seem impossible to adapt your enclosure to something like that.
Cheers again everybody
-
11-06-2009, 06:32 AM #18
Registered
- Join Date
- Jul 2007
- Posts
- 675
Thanks. For flood, I would angle the base top towards the center and add a sink drain. Good luck and post pics.mrm i didn't realize that you built a stand for your x3, thats exactly what im looking for but being a HS coolant i can't afford $400 on a cooling system, so i will be going wtih flood coolant. It doesn't seem impossible to adapt your enclosure to something like that.
-
11-06-2009, 03:31 PM #19
Gold Member
- Join Date
- Sep 2006
- Posts
- 1738
Teyber, all in all, My coolant system cost me what about 45.00 - 50.00? Tank, filters, pump and hosing? I made my own manifolds for the hosing etc, and hopefully you can get some ideas from it.
I'm adding another 2nd pump inside my enclosure that is much stronger, but much louder. It use to use a rubber impeller but wore out and broke from the RPM of this pump I had. My idea is that the main pump will pump coolant into the second pump, if the snd pump is not on, it should still flow through and deliver a stream. When I am doing some heavy work, i'll have the second pump iether controlled by relays or a secondary switch and turn that on! it will deliver much heavier coolant!!!!!
-Jason
-
11-06-2009, 04:09 PM #20
Registered
- Join Date
- Jul 2008
- Posts
- 922
Hey speed, where did you get that stand and how much was it? I was just going to build my own flood coolant like you mentioned, i was referring to mrm's fogbuster
darn you mrm haha no fair you have all the toys
Another idea would be to try to pay the autoshop teacher to weld up a stand out of say 1.5" steel square tube, then bend thin metal for the coolant. I just can't quite see how i could slant that wood base yet still mount the mill on top of it? Im going to try to draw some stuff up and will report back.
cheers

 Reply With Quote
Similar Threads
-
What to use for an enclosure?
By Tim Wiltse in forum XylotexReplies: 8Last Post: 10-03-2008, 08:36 AM -
Another Enclosure : )
By Rich05 in forum Charter Oak Automation Support ForumReplies: 12Last Post: 06-13-2008, 01:45 AM -
tl 1 enclosure
By fourperf in forum Haas LathesReplies: 3Last Post: 02-25-2008, 11:56 AM -
My new enclosure
By David Da Costa in forum Commercial CNC Wood RoutersReplies: 3Last Post: 10-28-2006, 06:03 PM -
New All In One Enclosure
By mlaws1172 in forum CNC Machine Related ElectronicsReplies: 5Last Post: 10-21-2006, 01:26 AM
