


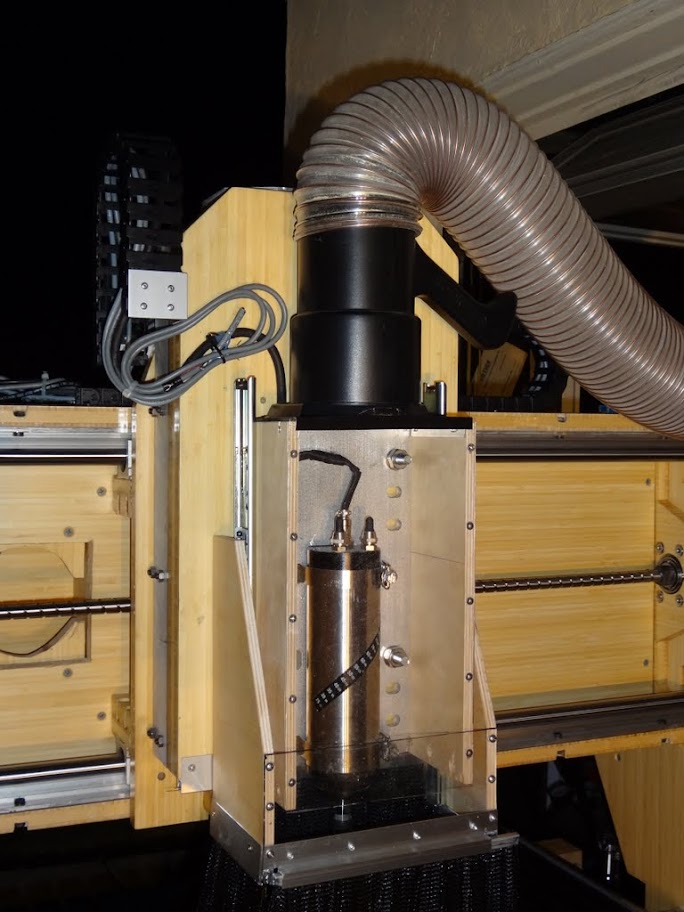
I did not have much time to work on the machine last week. But I did get the control box mounted and started the wiring.
X-axis cable guides (IGUS chains):
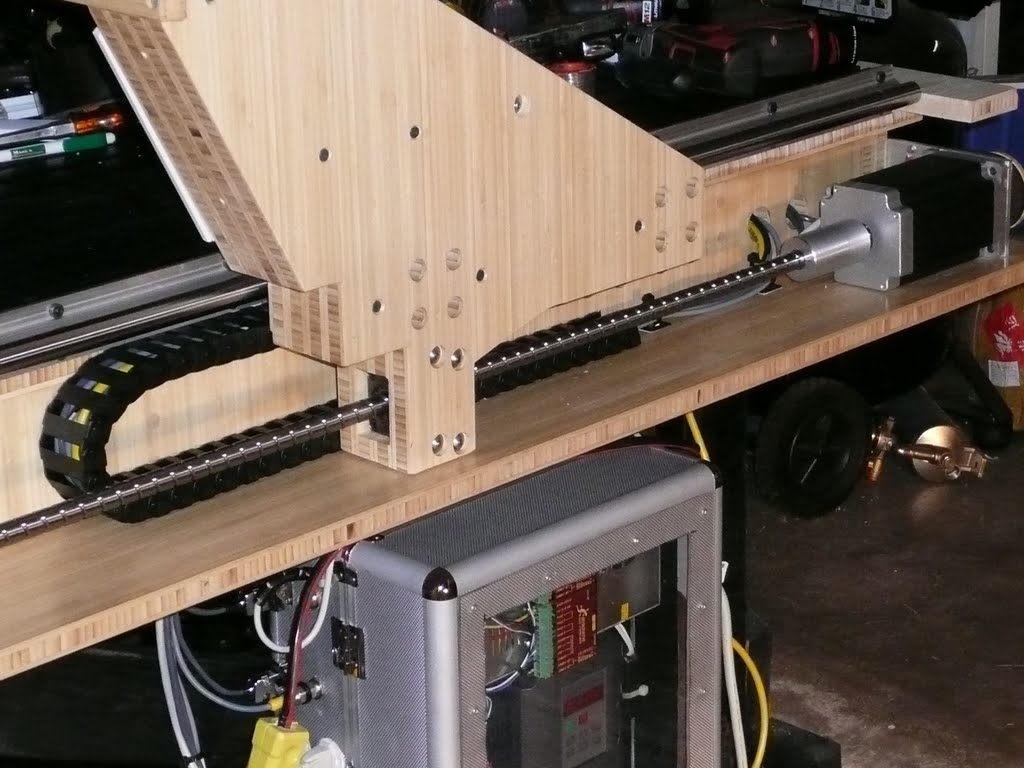
Y and Z axis cable guides. So far only the steppers and spindle are hooked up. Limit switches and end stops still to be installed.

Results 121 to 140 of 645
-
11-12-2011, 06:42 AM #121
 Registered
- Join Date
- Aug 2011
- Posts
- 999
-
11-12-2011, 09:02 AM #122
Registered
- Join Date
- Oct 2005
- Posts
- 2392
That's really looking like a machine now!

-
11-14-2011, 05:57 AM #123
Registered
- Join Date
- Aug 2011
- Posts
- 999
No kidding....I am getting to the point where I can actually use this machine to make some parts for itself, e.g. the limit/home switch housings and the parts that will be the dust enclosure for the x-and y- screws and rails. But first I had to build the cooling duct for the spindle with the dust brushes. The front and side brushes move up and down on drawer slides to clear the collet for bit installation and when the bit dives into the blank. Originally Posted by RomanLini

Last picture is my elegant trash can cyclone dust machine. But works pretty good and easy to build.


-
11-14-2011, 06:26 AM #124
Registered
- Join Date
- Nov 2006
- Posts
- 1036
Very clever dust skirt design!!!! I assume you can lock it at different heights so that one dust skirt will work with bits of different lengths.
-
11-14-2011, 07:13 AM #125
Registered
- Join Date
- Aug 2011
- Posts
- 999
Not yet but I will, at least for the top position. The built-in end position detent of the slides is not strong/reliable enough. Since the drawer slides move quite freely I am wondering if the stiff brushes will just push the skirt up to the proper position while machining. I will find out. Originally Posted by DonFrambach
Here a first video clip of the fully wired machine running some squares and circles at 250 ipm.
-
11-14-2011, 11:19 PM #126
Registered
- Join Date
- Apr 2007
- Posts
- 663
Very elegant execution. The bamboo plywood really gives it something unique.
-
11-15-2011, 03:36 AM #127
Registered
- Join Date
- Aug 2011
- Posts
- 999
Thanks, the bamboo idea started out just to do it somewhat differently. But as far as lumber goes it turned out to be much better to cut and join than I expected and was used to from common plywood. Last weekend I made the dust duct for the spindle from 3/8" baltic birch which reminded me of the difference. The bamboo just does not split between the plies, cuts clean and is much harder. I guess there is a reason people make fly rods from bamboo instead of birch. Originally Posted by zool
-
11-17-2011, 08:41 PM #128
Registered
- Join Date
- May 2010
- Posts
- 146
Where are you at that you can find Bamboo Ply? I would be very interested in trying this.
-
11-17-2011, 10:01 PM #129
Registered
- Join Date
- Aug 2011
- Posts
- 999
I got mine at Pacific Western Wood in Los Angeles (around the corner for me). Originally Posted by prcdslnc13
Another well known place is CaliBamboo in San Diego.
I believe one of the major importers is Plyboo or otherwise you can Google for a source.
I have used the natural vertical "edge-grain" variety which is already very hard at 1700 Janka. If you can get a hold of the strand-pressed plywood that is even harder like lignum vitae. But in any case you need to pre-drill screw holes when joining.
-
11-20-2011, 12:58 AM #130
Registered
- Join Date
- Aug 2011
- Posts
- 999
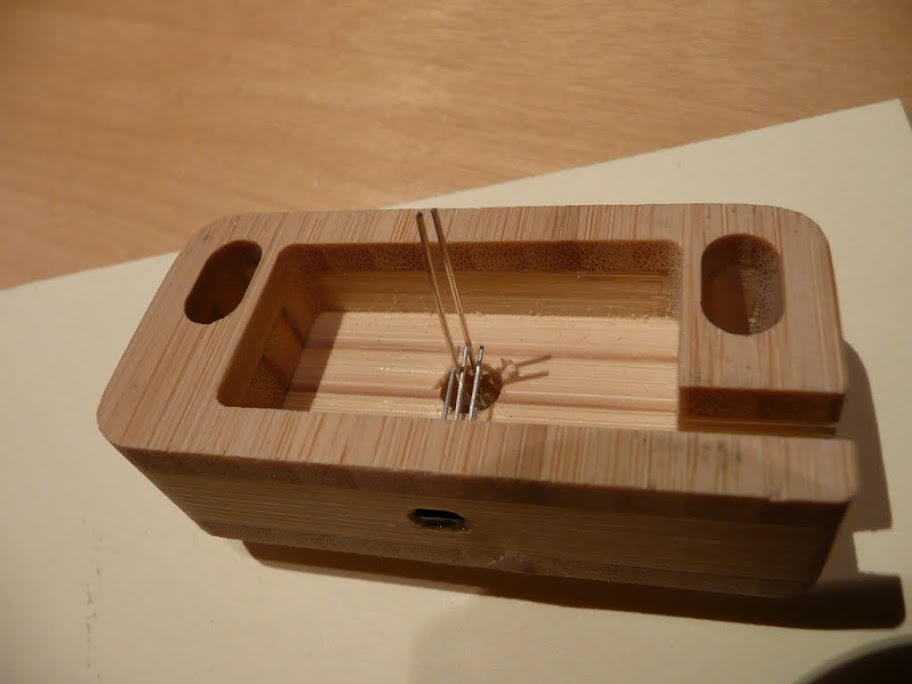
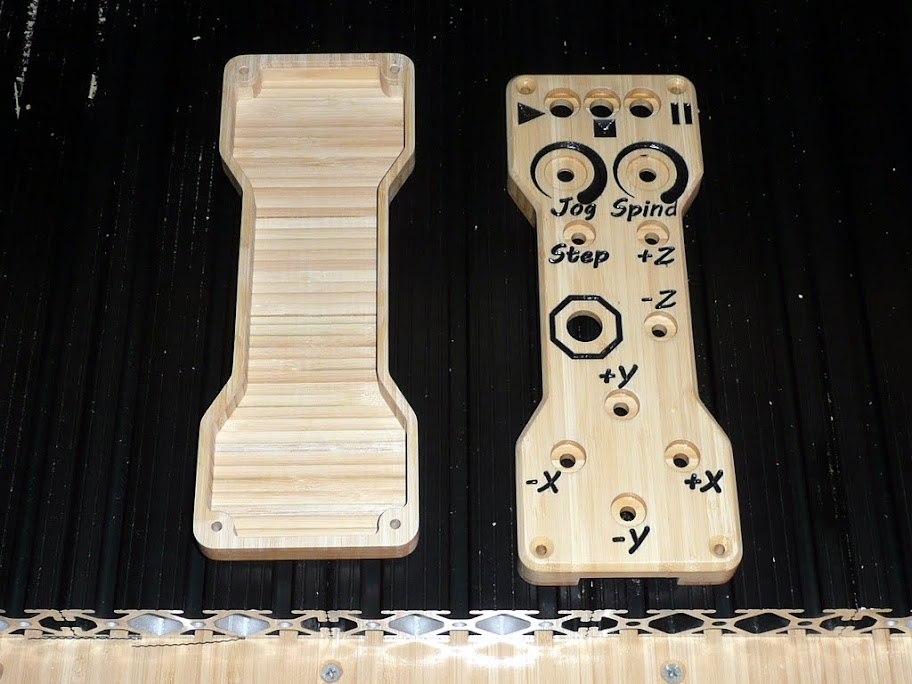
I still had a bunch of cutoff scrap pieces left over and used them for a few accessories: Housings for home switches (hall effect w/ LED) and limit switches (mechanical), and the handheld remote. That will allow me to adjust jog and spindle speed, start/stop/pause/resume the program and jog all axes continuously or in small steps without touching keyboard or mouse in the shop.
The limit switches will be mounted adjustable using short T-slot rails. These housings shows nicely how clean the bamboo can be machined. I left 5mm wall but down to 2mm is surely possible.


-
11-20-2011, 04:12 AM #131
Registered
- Join Date
- May 2009
- Posts
- 435
I think that's the first DIY handheld controller I've seen on here. Care to share how you wired it up?
-
11-21-2011, 07:36 AM #132
Registered
- Join Date
- Aug 2011
- Posts
- 999
Really? Well, maybe another sign I am rather new to all that CNC stuff. I thought it is a useful accessory and my old CNC machine did not have one. I considered one of the MPG pendants but did not want to cough up the money and did not like that one must switch the axis for jogging in different directions Originally Posted by CNC Lurker
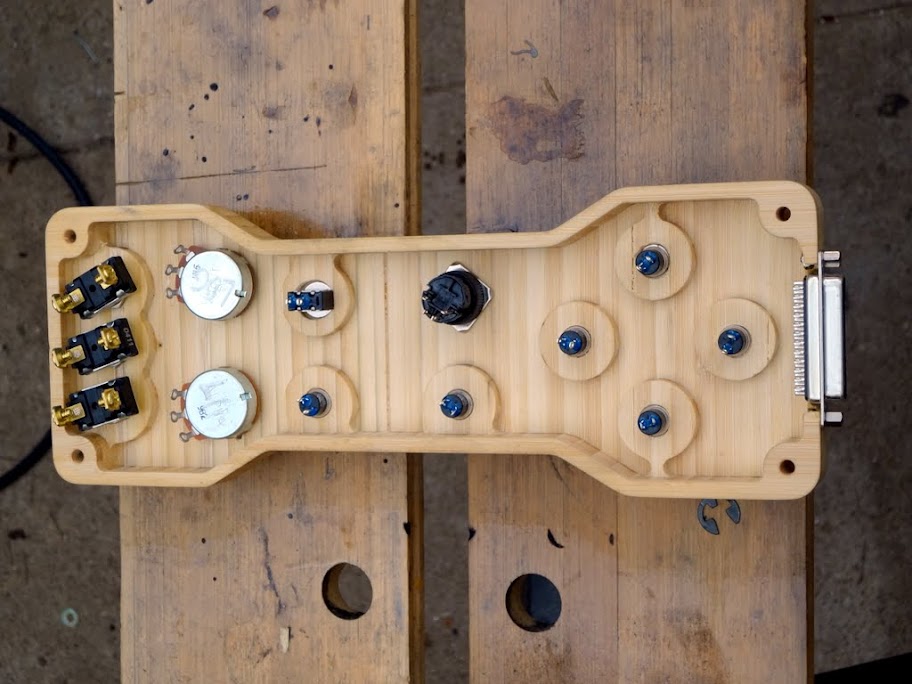
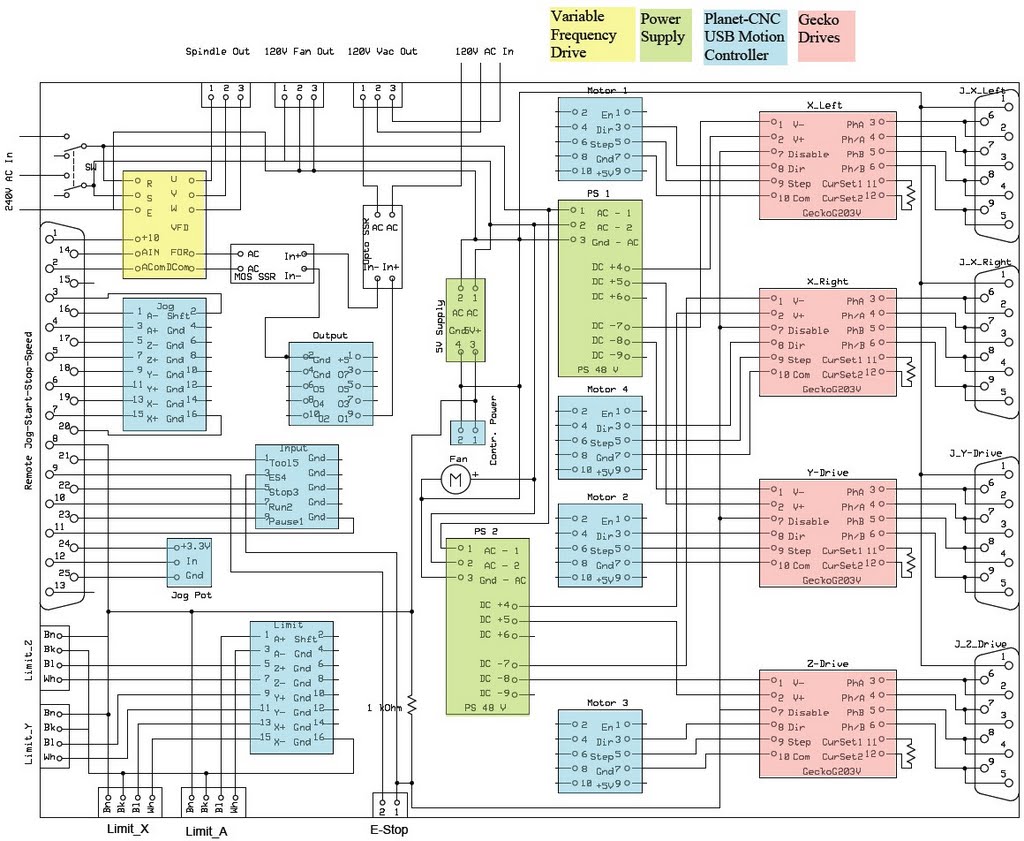
As for the wiring, the handheld itself just routes all the switches directly to the DB25 connector and pushing the button connects the control input to ground. Exception is the E-Stop that is always connected to ground and disconnected when activated. The spindle pot goes to the analog input of the VFD and the jog speed pot to the respective connector on the motion controller. I have the wires for rotational axis jogging connected but did not bother to install buttons because I do not have a rotational axis (yet). The jog "shift" line switches from continuous jog to adjustable steps (I use 2/1000" steps).
All the switches are just wired in the control box to the jog and control inputs of the motion controller. I use the Planet-CNC Mk2 USB controller with the user interface software that came with it. I had posted that before but below is again the schematic of my control box with the DB25 connector that goes to the handheld controller on the left hand side.
-
12-07-2011, 04:40 AM #133
Registered
- Join Date
- Aug 2011
- Posts
- 999
Limited progress the last 2 weeks due to holiday travel and some pesky work things....yes it is performance review time. How I hate that.
Anyway, I managed to finish and install the limit/home switches (RomanLini-style Hall-Effect). Configured my USB controller and it looks like it is really repeatable. At least as far as my dial gage can measure:
Youtube Video
-
12-07-2011, 09:48 AM #134
Registered
- Join Date
- Oct 2005
- Posts
- 2392
Haha we aren't reviewing your performance... Why isn't that machine built yet? Originally Posted by JerryBurks

Very nice! You can't argue with a dial gauge. Originally Posted by JerryBurks
I crashed a job today, nothing serious just forgot to set something, and (as always) it's wonderful to be able to re-home to within 0.001" or better and then start cutting on the exact same place on the job. That's what it is all about.
-
12-07-2011, 05:35 PM #135
Registered
- Join Date
- Aug 2011
- Posts
- 999
Hey Hey Hey....I started design in June, bought most material in July, cut the first frame parts in August and had all 3 axes running end of October. All what is missing now is the moving dust shield for x and y. Originally Posted by RomanLini
Can you please consider that in my performance review?
Now how do you do that....I know I can re-home after a crash and assuming the bit did not break or push the workpiece around, could run the whole job again. But how do you re-start at the crash position? Or do you manually edit the G-code? Originally Posted by RomanLini
Unfortunately most times when I had a crash on my old machine, the steppers were stronger than the clamps or the bit and even with most careful re-zeroing there is always a step or misalignment visible. Usually it was just easier to start over and scrap the accident victim.
JB
-
12-07-2011, 05:46 PM #136
Community Moderator
- Join Date
- Mar 2003
- Posts
- 35538
Roman wrote his own control software, so I'm not sure how he does it. But mach3 has a "Run from Here" option, that lets you start anywhere in the g-code. Perhaps Planet CNC has a similar option? Originally Posted by JerryBurks
Gerry
UCCNC 2017 Screenset
http://www.thecncwoodworker.com/2017.html
Mach3 2010 Screenset
http://www.thecncwoodworker.com/2010.html
JointCAM - CNC Dovetails & Box Joints
http://www.g-forcecnc.com/jointcam.html
(Note: The opinions expressed in this post are my own and are not necessarily those of CNCzone and its management)
-
12-07-2011, 07:52 PM #137
Registered
- Join Date
- Aug 2011
- Posts
- 999
Since you mentioned, I looked it up. Planet-CNC has a bookmark feature that allows running a program to or from a specified G-Code line or to skip lines. I guess that should do the job although one would have to take note where the crash happens, because the CNC controller software just keeps going. Originally Posted by ger21
Maybe I should really read the manual before asking dumb questions.
-
12-09-2011, 11:06 AM #138
Registered
- Join Date
- Oct 2005
- Posts
- 2392
Yeah I just tell it where to start cutting from, I guess that's the same as "run from here".
In most cases I'm doing 2D pattern cuts, multiple passes (going deeper each time) so a restart might be as easy as saying "start from depth 3mm" instead of starting from the top.
A lot of my "crashes" are simply forgetting to use the tool height setter after a tool change, so Z comes down and hopefully I can kill it before the tool cuts too deep (or preferably too high) into the job. Then I re-home and go from there.
-
12-09-2011, 01:51 PM #139
Registered
- Join Date
- Mar 2004
- Posts
- 1306
Nice job
Wow, great build. It will be interesting to see how your motor bearings hold up.
Have you had any issues with the two slaved screws jacking / loosing sync?
The Bamboo pendant is pretty
Regards,
Mark
-
12-09-2011, 07:36 PM #140
Registered
- Join Date
- Aug 2011
- Posts
- 999
Thanks....actually I built the pendant rather to be practical than pretty but if it comes out good-looking, even better ;-) I still want to replace the cheapo Radioshack jog buttons with big and more solid arcade game buttons. Originally Posted by RotarySMP
The 2 belt-slaved screws work without problems, even with my homemade wooden pulleys. It just took a while to find the right length belt cheaply on eBay. If one motor stalls the other one is held in place and if I manually turn one side the other one follows. I can use the screw couplers to fine adjust the perpendicularity of the gantry and don't need to slave the 2 motors in the CNC controller or resync both with home switches. That means a single pulse/direction channel controls both stepper drives.
I am not worried about the motor bearings (I gave up on the idea to use the stepper as thrust bearing for the Z-axis). The machining and acceleration forces for all axes are taken up by a pair of tapered roller bearings with several 1000 pound capability. The steppers are just hanging rather loosely on the other end of the screw. The motor mounting plates take up the torque but give them enough axial flex to compensate for minor misadjustment. Actually, one of the X-axis couplers (rigid, not flex) has a bit of runout and you can see the motor wobble slighly when spinning without it affecting accuracy because the above mentioned fixed side bearing of the lead screw is on the other end.

 Reply With Quote
Similar Threads
-
7 x 10 project started
By blades in forum Mini LatheReplies: 125Last Post: 01-25-2017, 05:27 AM -
CNC Project Started
By NotSqueaky in forum CNC Wood Router Project LogReplies: 8Last Post: 09-10-2014, 12:41 AM -
New Project Started
By Rumblebelly5 in forum Joes CNC Model 2006Replies: 1Last Post: 09-15-2012, 10:50 PM -
My 4x8 project has started
By MetalHead6263 in forum Plasma, EDM / Other similar machine Project LogReplies: 37Last Post: 01-31-2012, 07:30 AM -
Started new project
By rustamd in forum DIY CNC Router Table MachinesReplies: 55Last Post: 05-31-2009, 04:12 AM
