


Hey folks...just finishing up my first tabletop build a Solsylva 10x9. I realize I don't really have a bench in the garage big enough to run it. I'm also planning my next build which will be a moving table 8020 design. The new design calls for an approx. 24x30 footprint with room for the table to move.
So I'm looking to build my own bench. I'd like to put casters on it so that I can move it out into the center of the garage, or outside when cutting. I'll also want to mount my LCD on it and put the electronics underneath.
I did an extensive search coming up with hundreds of threads, but not many on a stand/bench/table. I did find the following which is a great start.
http://www.cnczone.com/forums/jgro_r...ighlight=bench
I was hoping that other folks had designs worth sharing. I'd like to stick with lumber based builds for cost and simplicity. I'd also be interested in enclosures that reduce noise.
I'm adding all possible search words to the title so hopefully if I get some good information back, this can be usable by others.
Thanks,
PiperPilot
Results 1 to 20 of 77
-
11-17-2011, 05:41 PM #1
 Registered
- Join Date
- May 2007
- Posts
- 86
Bench/Table/Base/Cart/Stand Design Help
-
11-17-2011, 09:35 PM #2
Registered
- Join Date
- Nov 2006
- Posts
- 1036
I did exactly what you're thinking about with my small fixed gantry router. I put the router on a table with casters. I mounted my electronics below the router on shelves in the table. My dust collector is mounted behind the electronics. The router is accessed via a door in front but the side and rear panels are easily removed. The monitor is enclosed in the front mounted on a torsion hinge so it is easy to move out of the way.
The system allows me to move the router around in my shop. The sound is greatly attenuated and the dust is contained.
Here's a link to my build log (for both the router and its enclosure): http://www.cnczone.com/forums/diy-cn...ry_router.html
Here's a couple of photos. The first with the door under construction. The second shows the case closed around the router.
-
11-17-2011, 10:07 PM #3
Registered
- Join Date
- May 2007
- Posts
- 86
Thanks Don!
I think I had actually seen your build log at one point. VERY NICE. You don't happen to have any drawings of your table/enclosure do you? What are its dimensions?
How did the neoprene table mounts work out? Do you think it made a big difference in noise?
I have small kids and would love to do some cutting at night with the garage door down, but not sure it will reduce noise by that much. Thinking for the walls maybe getting acoustic foam and sandwiching it betwen 1/4" Ply or MDF.
Anyways, you've given me some good ideas. I figure I'll start with the table first and the add the enclosure from there just like you did.
Again, any drawings you might have would help.
Thanks!
Curtis
-
11-18-2011, 03:50 AM #4
Registered
- Join Date
- Nov 2006
- Posts
- 1036
Sorry, never made any drawings.
I think the neoprene mounts work great but I don't have a control so can't say for sure. I was concerned that the table top would act like a large sounding board and mine, with the mounts, clearly does not.
I was very concerned about sound attenuation when I built my enclosure so I used 2x4's and 3/4" mdf for all surfaces except the window which is 1/4" acrylic. My plan was to replace the acrylic with thicker glass but that has proven to be unnecessary. The wires and vacuum hose enter through baffles. I have a baffled air inlet at the bottom of the router and a baffled exhaust at the top. The door is sealed with two layers of weather stripping. When I am using my router with either a Taig or a Kress spindle and with the enclosed Fein vacuum, my wife cannot hear the router in our house with an attached garage. Consequently, I commonly run the router late at night with no complaints!
Good luck with your build.
-
11-18-2011, 05:56 AM #5
Registered
- Join Date
- Apr 2007
- Posts
- 663
some superb tables/stands
Take a look here in the Gallery. Joe's Hybrid 4x4 CNC Router
There are some superb tables/stands there.
-
11-18-2011, 03:53 PM #6
Registered
- Join Date
- May 2007
- Posts
- 86
Don,
This is probably a "dumb" woodworking question...but it looks like your base is built by building 2 frames and then putting the legs in the middle. How do you screw the legs to the frame? Obviously with a 2x4 you would need really long screws to go all the way through width wise. Do you put your screws in at an angle?
I've never really built a sturdy frame based table like this, so just wanting to understand the best way to put it all together. This will likely be my project for the weekend.
Curtis
-
11-18-2011, 05:32 PM #7
Registered
- Join Date
- Aug 2011
- Posts
- 999
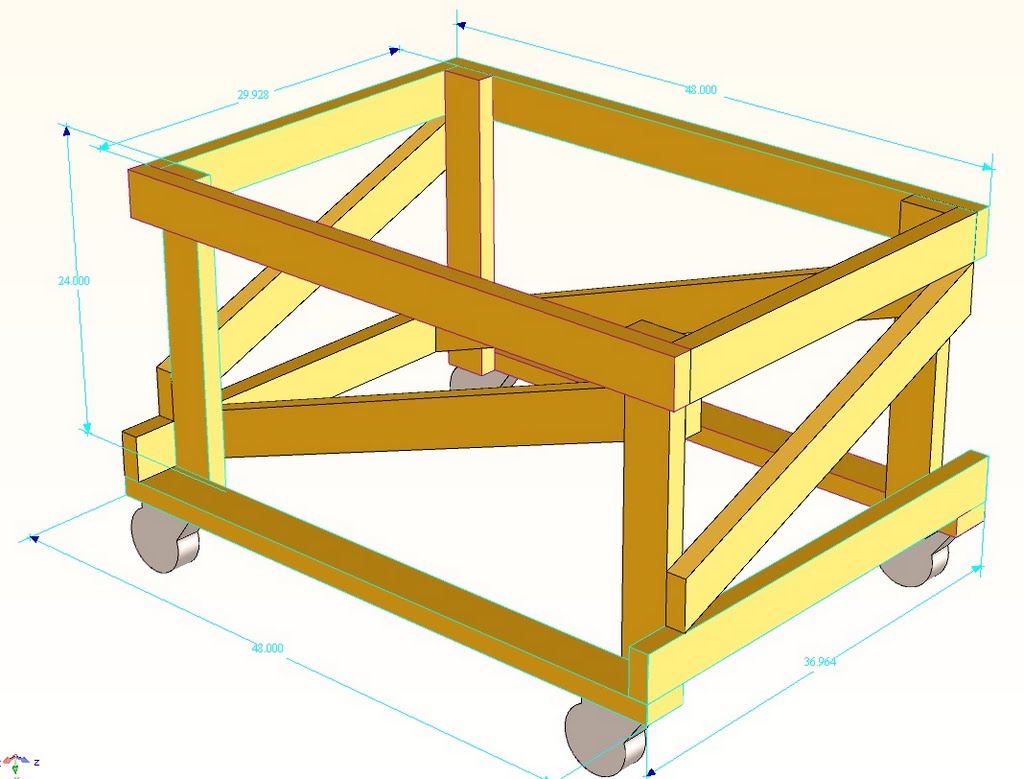
Simple cart that I made for my new CNC machine; lightweight but solid. All from 2x4 (i.e. 1.5" x 3.5") but I did make sure to pick very straight and dry pieces of lumber and when gluing and screwing (with 2.5 and 3.5" screws) I paid a lot of attention to get it all perfectly perpendicular. Tha casters are 6" ones with brakes from Harborfreight. The dimensions can obviously be adapted to fit the size of the machine. I do not need diagonal bracing of the surface because the table is one sheet. Actually, the table surface is a bit larger than the cart (53" x 48"). The odd numbers for 2 dimensions should be be rounded, some CAD mistake.
-
11-19-2011, 04:40 AM #8
Registered
- Join Date
- Jul 2011
- Posts
- 0
Solsylva
Hey
Sorry this is a little off topic but do you have any build pictures of the 10X9 solsylva? i wanted to make one but i havent really seen anyone else make it. Also how does it perfom as a machine?
Thanks
Praneet
-
11-19-2011, 04:41 AM #9
Registered
- Join Date
- Jan 2008
- Posts
- 853
Here is nice cart made for a Stinger, taken from the Vectric-Aspire forum.
Vectric Forum • View topic - CAMaster Stinger table
There are no diagonals that I can see, but Mike uses sheets of MDF to stiffen the wooden frame. The Stinger is a welded steel tabletop machine, so the frame that Mike built does not have to fight racking the way an integrated frame/machine design would have to.
Cheers!
-
11-19-2011, 05:27 AM #10
Registered
- Join Date
- Apr 2007
- Posts
- 663
With 2x8's set into 6x6 legs with 2x6 table supports, who needs diagonals. Originally Posted by PaulRowntree

With the MDF covering , he made the whole table a torsion box, though a large one. Torsion box - Wikipedia, the free encyclopedia
That has got to be one of the best designed and most extraordinary execution of a small CNC table that I have ever seen. With the MDF skin it probably weights close to 500lbs. Had I seen this, I would have used this design rather than an 8020 frame for my ShopDroid.
-
11-19-2011, 11:13 PM #11
Registered
- Join Date
- May 2007
- Posts
- 86
Praneet, Originally Posted by praneetn7
I have a few pictures and a couple videos I took during the build. I will start a build thread this weekend. I have all axis moving, but haven't cut anything yet. I did a little bit of an upgraded build...used Red Oak for the frame...its very heavy and solid. I also used 3/8 Acme 2 start for the x and y axis but left the Z with the standard threaded rod.
I hope to spend some time in the garage tonight mounting the router and doing some test programs with a pen. I'll try to post my build thread later.
Curtis
-
11-20-2011, 02:31 AM #12
Registered
- Join Date
- Nov 2006
- Posts
- 1036
The other tables shown look very good.
Here's a few pictures showing the construction details of the table I built for my small router. I used 2x4's and 3/4" plywood glued in dados cut in the 2x4's in order to prevent racking. The back of the table did not have these supports so I used 8x11" steel angles to prevent racking there. To prevent sagging, the table top was supported by 5 2x4 cross beams while the bottom was supported by 3 cross beams. I used 2", 2.5", and 3" wood screws to hold the 2x4's together. I screwed through not into the MDF. I used pocket screws to secure some joints.
I used "premium" quality dry 2x4 from Lowes (I think $4 for each 8' length) and hardwood plywood remnants from other projects.
Here's some photos:
-
11-20-2011, 04:13 AM #13
Registered
- Join Date
- Jan 2008
- Posts
- 853
How big can a 'tabletop' machine be?
While we are exchanging ideas on this topic, what is the largest size of CNC that folks have built as a separate cart & machine? How well does this work for large machines?
I am thinking of a 4'x6' machine, and would like to build the machine of steel, perhaps a separate wood cart like the Stinger photos and an acoustic shell like Don's. Is this realistic? Aside from the trouble of getting the machine onto the tabletop that is ....
Cheers!
-
11-20-2011, 12:53 PM #14
Member
- Join Date
- Apr 2007
- Posts
- 8082
If the steel framework is stiff enough, you can lift it from one corner and the adjacent corner will lift at the same time without bending. The cart rolling on a non-flat floor will cause very little twist in the framework. If the machine is too heavy for you and three friends to lift onto the table, jack and block the machine up high enough to roll the cart under the machine. Originally Posted by PaulRowntree
There are many ways to safely get the machine onto the cart. Just be sure that the cart can safely handle the weight while pushing the cart around the shop. A 4' x 6' machine shouldn't be a real problem.
CarveOneCarveOne
http://www.carveonecncwoodcraft.com
-
11-20-2011, 04:22 PM #15
Registered
- Join Date
- Apr 2007
- Posts
- 663
If the weight of the steel, which produces a downward force, is directly over the vertical structural members, then any table will carry a significant amount of weight. If you skin each side of the structural members you are creating a torsion box. An example of the amount of weight a torsion box can dissipate is house framing. An automobile frame and suspension are also a form of a torsion box. Originally Posted by PaulRowntree
Following is a video of building a torsion box workbench, but you will get the idea from it. Make torsion boxes for the bottom, sides and ends too. Maybe one down the middle as well.
ShopNotes Magazine - Torsion Box Workbench Video - Video Online Extra
The idea behind a torsion box is to evenly distribute and direct force. Not only does the torsion box distribute and direct force, the webbing making up the frame of a torsion box also cancels some of the force as when the force travels around the webbing, some goes one direction and some go another, when they meet they cancel each other out.
It is not the weight [a static] that you are concerned with, it is the force [a dynamic] that is the result of that weight. You want to direct that force through a structure to the foundation, the wheels, and then to the floor, and then to the ground, where all the force will eventually be dissipated.
Always remember: Gravity sucks.
-
11-24-2011, 05:49 AM #16
Registered
- Join Date
- May 2007
- Posts
- 86
Thanks everyone for the comments and links/pictures.
Don,
How big is your bench? How big is your router? What is your cutting area? I'm trying to understand the ramifications of design decisions. Right now, I have a very small wood based router, but eventually want to step it up a little bigger when I build my 8020 based design.
Thanks,
Curtis
-
11-24-2011, 07:11 AM #17
Registered
- Join Date
- Jul 2011
- Posts
- 0
 That would be great! Originally Posted by piperpilot
Thanks
Praneet
-
11-24-2011, 07:13 AM #18
Registered
- Join Date
- Nov 2006
- Posts
- 1036
bench is 34" wide and 40" deep Originally Posted by piperpilot
router is 22" wide and 29" deep
cut area is about 14" x 14" (fixed gantry)
The bench is much wider than the router to allow for baffles for the dust collection and wiring. The photos below show the extra space on either side of the router and one of the baffles stuffed with a cloth towel.
Don
-
11-24-2011, 03:36 PM #19
Registered
- Join Date
- May 2007
- Posts
- 86
Originally Posted by praneetn7
Here is a link to my build thread:
http://www.cnczone.com/forums/diy-cn...rst_build.html
I'll put some more pictures and video up later...I just wanted to get it updated and give you the link.
-
11-25-2011, 10:29 AM #20
Registered
- Join Date
- Oct 2005
- Posts
- 2392
DonFrambach- may I ask how you do servicing on the machine, like get to the back of the machine for wiring or inspection etc? It looks like some of your wiring is attached to the wooden cabinet?
I'm considering cabinet options myself and my CNC machine is a similar size to yours. But I would really like to allow full access to all parts of the machine for cleaning and servicing.

 Reply With Quote
Similar Threads
-
PRICE ALERT - HF Bench Mill (or Lathe?) Stand - $59
By blades in forum Benchtop MachinesReplies: 18Last Post: 03-03-2013, 04:15 AM -
JGRO - Support Table / Stand / Bench
By datacop in forum Commercial CNC Wood RoutersReplies: 0Last Post: 08-02-2010, 01:45 AM -
Stand, base or bench designs for the Super X3?
By lumpyfingers in forum Syil ProductsReplies: 4Last Post: 04-24-2007, 03:33 PM -
Tormach Stand (Base)
By nutzenboltz in forum Tormach Personal CNC MillReplies: 2Last Post: 10-07-2006, 04:53 AM -
X2 Stand or Bench
By RTP_Burnsville in forum Benchtop MachinesReplies: 4Last Post: 06-10-2006, 11:50 PM
