


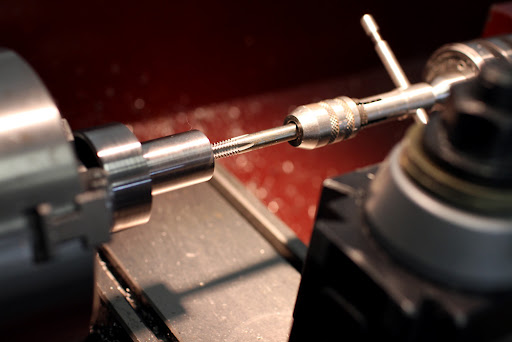
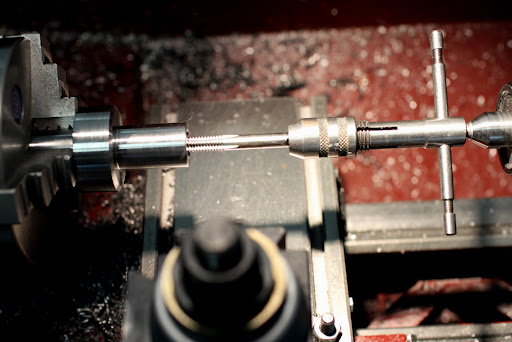
I have a part that requires me to put a .254" target depth (Z axis) and a .95" WOC target depth split in the middle of my parts top. I'm trying to avoid the constant flip of parts and hoping that I can cut this in one shot. This setup is until I get my 2" .25" face thickness splitting saw blade, then I can knock this out in one pass in 6 WOC passes.
I'm working with a .062" thick - 2" Dia. - 40 tooth carbide splitting saw. Here's the link to the blade
MSC Google Search Results
I'm not finding any info on from the company that produces it and really would like to know the speeds or feeds. So I thought I'd ask here to see what you guys would do or any recommendations would be ?
Here's what I was going to try, but don't want any pieces of carbide blade in my head... One thing I'm not really sure about is the WOC passes, or it being solid carbide I could take the whole .95" in one pass ?
Stock - 6061 Aluminum
.062 passes x 4.1 = 0.254" (little bit of play room for the clamp)
WOC passes - ?
RPM - 573
Feed - 22.9
SFM (just guessing here) - 300
FPT 0.001"
Coolant - ?
Here's what the split will look like on an old part. Split is holding a .25" top plate that a gearbox is attached too.
Thanks and Happy Holidays
Results 1 to 19 of 19
-
12-26-2010, 12:44 AM #1
 Registered
- Join Date
- Feb 2007
- Posts
- 1041
Help With Splitting Saw Operation ?
-
12-26-2010, 03:32 PM #2
Registered
- Join Date
- Aug 2010
- Posts
- 599
Here is what GWizard gives me when entering the parameters of your blade:
saw diameter: 2"
saw thickness: .062
saw composition: carbide
number of teeth: 40
Material to cut: Aluminum 6061
Depth of cut: .95" (your WOC)
RPM: 1375
Feed rate: 52.881 ipm
MRR: 3.1147cipm
SPM: 720
Chipload: .001 IPT
IPR: .0385
HP: .6541
-
12-26-2010, 04:05 PM #3
Member
- Join Date
- Jun 2007
- Posts
- 3757
Source of blades.
I found that locksmith suppliers, have a great range of blades used for key cutting.
Have you thought of stacking blades to make the thickness?
I use a blade about 4" diameter. Much stiffer. Hacks off lots easily.
Make sure you climb mill, observe surface speeds and use flood coolant.Super X3. 3600rpm. Sheridan 6"x24" Lathe + more. Three ways to fix things: The right way, the other way, and maybe your way, which is possibly a faster wrong way.
-
12-30-2010, 07:28 AM #4
Registered
- Join Date
- Feb 2007
- Posts
- 1041
Thanks for the replies guys.
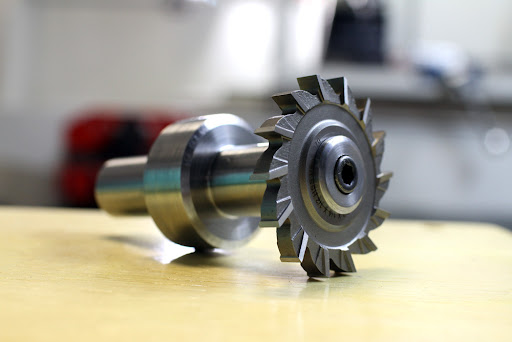
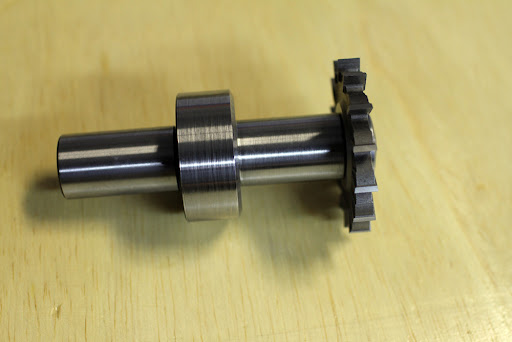
To hopefully make things simple I decided to buy a 1/4" face width 2" OD HSS slitting saw from MSC, that arrived today (lighting fast shipping MSC BTW!!) This will also keep my other work horse (0.0625 2" OD carbide splitting saw) nice and sharp for the parts I plan to cut a lot of.
After buying the new blade and now seeing it, I have a few concerns.
My current splitting saw, I own a non expensive $40 arbor (1/4", 3/8", 1/2") set that I'm not 100% sure how safe one little 5mm socket head screw is... ?
The new blade I bought has a slot/broach on it, but my locking arbor nut or the arbor itself doesn't, do you think I'm ok or should I buy another arbor ?
The new blade is for this project for now. It's my first time using a blade this thick on my Tormach or on any mill, curious what type of speeds & feeds you'd recommend for this to start out with ?
MSC Google Search Results
I couldn't find a F & S sheet for slitting saw on Nigara site, but here's what I came up with
saw diameter: 2"
saw thickness: .25
saw composition: HSS
number of teeth: 14
Material to cut: Aluminum 6061
Depth of cut: .95" (your WOC) (with this saw blade and the arbor, it looks like I'm about .3 shy. Was really hoping for a straight shot, but I'm going to try running the saw blade along the edges of the parts until I've reached my WOC)
RPM: 382
Feed rate: 10.7 ipm
SPM: 200
Chipload: .002 IPT
.
-
12-30-2010, 09:14 PM #5
Registered
- Join Date
- Jan 2007
- Posts
- 1332
I made my own arbor for a 1/16"x 3.5"/ 30T HSS slitting saw from a $16.50 TTS Machinable Blank (30475) http://i72.photobucket.com/albums/i1...TSblankSaw.jpg The slitting saw slot isn't used. I used a 1/4-28 SHCS to secure the saw blade excellent results. Originally Posted by twocik

Here is the slitting saw in action slitting 6061-T6 aluminum.
TTS SlittingSawon Tormach video by miltons_stuff - Photobucket
Here is the finished part shown in the video http://i72.photobucket.com/albums/i1...iant-Mount.gif
Don
$24.50
TTS Machinable Blank (30475)Hardened and ground TTS geometry on the spindle end, but the working end is 38 mm x 60 mm cylinder of unhardened steel. Make your own tool holders, fly cutter, or whatever you like. $16.50 http://www.tormach.com/Product_TTS_misc.html
-
12-30-2010, 11:35 PM #6
Registered
- Join Date
- Feb 2007
- Posts
- 1041
I remember this one Don, totally forgot you made one. I have one blank on hand and firing her up now.

Curious how you got a perfectly centered tap on that blank ?
Did you add a key to the shaft/blank or is the locking flange enough to hold it in place for most cutting ? What was your feed & RPMs in the video ?
My lathe needs a bit of tuning and not sure this is my best option right now. Maybe I'll try and turn this in my tormach with my turning tool in a vise or something.
-
12-31-2010, 06:10 AM #7
Registered
- Join Date
- Jan 2007
- Posts
- 1332
Here’s where the power draw bar really comes in to play. I fixtured the cylindrical part in a 1.5” 5C step collet in an Eagle Rock camlock 5C fixture. http://i72.photobucket.com/albums/i1...5C-Fixture.gif I then set the X,Y center on the Tormach using my center finder tool http://i72.photobucket.com/albums/i1...nterFinder.jpg I then set the Z datum of the top of the fixtured part using my Tool #1 http://i72.photobucket.com/albums/i1...uff/TooNo1.jpg All TTS tools heights have been measured offline on a surface plate and entered in the Mach 3 tool table. So centering and Z datum only have to be done once for each run of parts. I made a run of a >50 parts total. The part stays fixtured while all processes each with a different TTS tool is performed. So for the blind (at least before slitting saw process) tapped hole process: A spot drill followed by a an 1/8” parabolic drill then tapping using the TTS mounted Procunier tapping head with a Balax 6-32 forming tap. The slitting saw process is the last process to be performed. So the center of the part is the zero datum and all processes are done with the part fixtured and not moved between processes. Originally Posted by twocik
No key was used. I find the 1/4-28 SHCS plenty without a key to hold the slitting saw securely for all of my needs. Originally Posted by twocik
I turned the TTS machineable blank in a 3/4" 5C collet in my lathe. But machining mounted in the Tormach spindle would work also. Originally Posted by twocik
-
12-31-2010, 06:22 AM #8
Registered
- Join Date
- Feb 2007
- Posts
- 1041
On Don's recommendation I've gone ahead and turned my blank. I spent a few hours tuning my machine up and got to work. Pretty happy with the results and going to test it tomorrow. So far it looks like it has saved me a tool holder ($$) and having to buy a $130 arbor. Thanks for the idea Don !!!
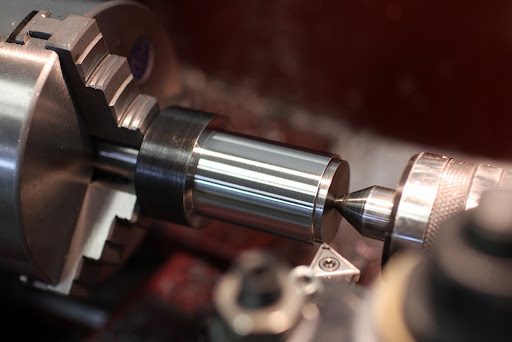
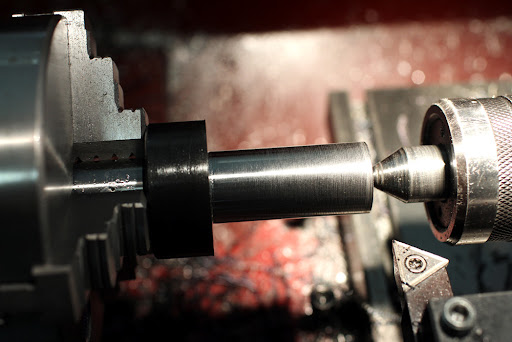
All done on a 9 x 20 lathe in about 2 hours, could have been faster but I wanted to knock this out in one shot. Only the blank was used for all material.
The Process
- I turned the blank to .75" diameter all the way until I had .640" thickness left on the TTS holders flange. Just incase I decide on a ATC later, I'll have the room to add a groove.
- Then turned the flange locking nut on the front half of the blank to 0.4985" diameter at .3" in length, and also leaving .1" for the flange (now both pieces have the same diameter).
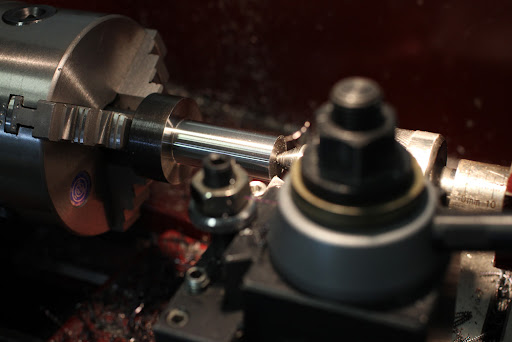
- Tapped drilled .201"
- Clearance drilled .25" at .46" depth
- Parted the locking flange at 0.4" in length
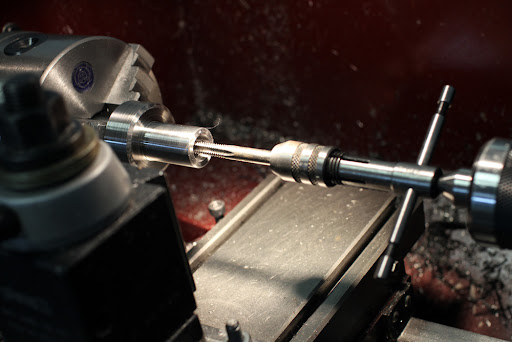
- Bored a 0.5" pocket in the TTS holder at .323" depth
- 1/4-20 tapped the TTS inner 0.201" tap drill hole (use lots of fluid !!!)
- inserted the locking flange and faced the outer side by .03"
- Bored a .375" diameter pocket at .222" depth
- Flipped the locking flange around, then very carefully sanded until it was a perfect fit.
I was only able to take so many photos while doing this, some parts may jump.

-
12-31-2010, 06:35 AM #9
Registered
- Join Date
- Jan 2007
- Posts
- 1332
twocik: I see that you are using a 3jaw chuck to hold your arbor while machining. what kind of runnout do you see with the arbor mounted in the Tormach spindle? Also I find the Micro tap guide very handy for tapping in the lathe http://www.cartertools.com/fmpdtg.html
Don
-
12-31-2010, 07:04 AM #10
Registered
- Join Date
- Feb 2007
- Posts
- 1041
Just checked and surprisingly looks to be about .0002" - .0003" out from the inner bore. How close did you get ?
-
12-31-2010, 07:11 AM #11
Registered
- Join Date
- Jan 2007
- Posts
- 1332
Can't get better than that unless it was machined in the Tormach spindle. Good Job! Originally Posted by twocik
Don
-
12-31-2010, 07:16 AM #12
Registered
- Join Date
- Feb 2007
- Posts
- 1041
Thanks, yea I spent a few hours tuning the beast! I spoke with a Tormach tech today and they have a TTS slitting saw coming out very soon. Something to look forward to, until then I'm going to buzz some parts. :wee:
-
01-02-2011, 07:13 PM #13
Registered
- Join Date
- Jul 2007
- Posts
- 438
Originally Posted by twocik
is that measurement taken once the tool is mounted in the tormach spindle? i would be really surprised if you only have two or three tenths of runout between the shank that goes in the r8 collet and the tool holding end if you flipped the part in a 3 jaw chuck while making it.
-
01-02-2011, 11:20 PM #14
Registered
- Join Date
- Jan 2007
- Posts
- 1332
By "tuning" do you mean adjusting the mounting for the three jaw chuck so that you have minimum runnout for a particular diameter? Originally Posted by twocik
-
01-03-2011, 04:08 AM #15
Registered
- Join Date
- Feb 2007
- Posts
- 1041
"is that measurement taken once the tool is mounted in the tormach spindle? i would be really surprised if you only have two or three tenths of runout between the shank that goes in the r8 collet and the tool holding end if you flipped the part in a 3 jaw chuck while making it."
Yes. No flipping, the blank was mounted the whole time until I was finished. The part I talk about being flipped is the locking flange that the 1/4" socket head screw passes thru.
"By "tuning" do you mean adjusting the mounting for the three jaw chuck so that you have minimum runnout for a particular diameter?"
Sorry guys It's not shown in the pics and forgot to mention that I turned the first few layers on the Tormach mounted in the spindle with a turning tool in my vise. I took off a few layers and then brought that to my lathe. Next I tested the blank in the 3 jaw chuck with my dial test indicator and started turning.
-
01-03-2011, 05:24 AM #16
Registered
- Join Date
- Jul 2004
- Posts
- 595
twocik,
Im guessing photography is a hobby of yours? Very nice images!
David
-
01-03-2011, 05:27 AM #17
Registered
- Join Date
- Jan 2007
- Posts
- 1332
[QUOTE=twocik; I took off a few layers and then brought that to my lathe. Next I tested the blank in the 3 jaw chuck with my dial test indicator and started turning.[/QUOTE]
So you chucked the blank in the 3 jaw, turned it on your lathe and then checked the finished arbor in the Tormach spindle and runnout was < 0.0003" ?
-
01-03-2011, 07:41 AM #18
Registered
- Join Date
- Feb 2007
- Posts
- 1041
Thanks David, yea little bit
IFocus Films
Don yes that's correct, I'll test it one more time just to make sure my eyes weren't going crossed being up that late and all.
-
01-05-2011, 06:51 PM #19
Registered
- Join Date
- Jan 2007
- Posts
- 1332
You did way better than I could with a standard three jaw chuck in the lathe. The only practical way I could have gotten <0.0003" runnout would have been to chuck the almost finished arbor in the Tormach spindle and machine the finial process in situ.
Don

 Reply With Quote
Similar Threads
-
Program splitting not wanted
By RJSheets in forum MastercamReplies: 6Last Post: 10-27-2020, 05:54 PM -
Splitting a Large Part
By wayja in forum MastercamReplies: 2Last Post: 06-03-2010, 09:22 PM -
Optima web splitting cable
By sckirk in forum Want To Buy...Need help!Replies: 0Last Post: 12-09-2009, 10:09 PM -
Splitting entities
By Claude Boudreau in forum VectricReplies: 16Last Post: 04-30-2009, 01:37 AM -
MDF - screws splitting the MDF
By studysession in forum DIY CNC Router Table MachinesReplies: 11Last Post: 01-16-2007, 02:00 AM
