


Good Day,
How do I remove this front gear? Does the center hub spin off? If so, how do I turn it? The gear and hub want to spin freely. Any tricks to hold it while trying to turn the hub off? What do I use for a tool to grab the hub?
Thank you.

Results 1 to 14 of 14
-
07-31-2011, 11:53 PM #1
 Registered
- Join Date
- Jan 2008
- Posts
- 77
Bridgeport 2J Head - How do I Remove this?
-
08-01-2011, 10:54 AM #2
Registered
- Join Date
- Dec 2005
- Posts
- 769
Gear Removal
Hi,
Are you trying to get the nut off the shaft? If so, you might want to try an impact wrench. Just give it a quick jolt at the low setting on the impact wrench and it should pop it loose. Don't know if you have a right or left hand thread on the nut, so don't over do it and strip the threads on the shaft or nut.
I had the same situation on a Porter Cable router trying to get the adapter off the bottom that holds the collet. One quick jolt and the adapter was in my hand.
Just something you might want to try at your own risk of course.
John2007 HAAS TM-1P OneCNC XR5 Mill Pro. Shopbot PRT running Mach3 2010 Screen Set, Super PID and PMDX Electronics.Check out my Gallery on: http://[email protected]
-
08-01-2011, 02:56 PM #3
Registered
- Join Date
- Jan 2008
- Posts
- 77
Thanks for that input, but I'm trying to get the lower (front) gear off. I don't know if it is press on or screw on. I'm thinking it is screw on. I'm wondering what people use for a tool and how they hold it to turn it. Your impact wrench idea may be applicable in this case as well, but I want to be sure it is screw on before I attempt anything.
-
08-01-2011, 03:35 PM #4
Registered
- Join Date
- Apr 2010
- Posts
- 486
Just to clarify. Are you referring to the gear marked 59, or to the other gear? Originally Posted by pofo

Tom
-
08-01-2011, 09:38 PM #5
Registered
- Join Date
- Jan 2008
- Posts
- 77
The other gear.
-
08-02-2011, 04:30 AM #6
Registered
- Join Date
- May 2008
- Posts
- 132
I beileve you take the gear marked 59 off first then flip the assembly over and loosen the bearing retainer nut from the gear you want to remove.
Craig
-
08-02-2011, 01:14 PM #7
Moderator
- Join Date
- Nov 2004
- Posts
- 3028
Remove the aluminum pulley by removing the nut and pull the aluminum pulley off.
Then pull out the HI LOW shift rod, Yes the rod that is almost 8 inches in length. Now you can pull straight up the steel back gear and hub as an assembly. I had to make a special wrench from a tube with teeth to get the nut off the inside of the hub which allows dis assembly and removal of the gear.
George(Note: The opinions expressed in this post are my own and are not necessarily those of CNCzone and its management)
-
08-02-2011, 03:25 PM #8
Registered
- Join Date
- Jan 2008
- Posts
- 77
Thanks George. Removing the High/Low was the trick.
Easy! Removing the Hi/Low and pull up. No need to remove either gear. I guess I should have said my objective was to get the assembly off. I thought for sure I had to remove the bull gear.
I'm trying to sort out an issue with the quill skirt. I may be back with more questions.
-
08-03-2011, 03:44 AM #9
Moderator
- Join Date
- Nov 2004
- Posts
- 3028
To get to the quill skirt I remove the 3 bolts that hold the back gear housing to the quill housing and lift the entire assembly off the quill housing. You now have access to the quill skirt. You may need to remove the swing in quill feed cradle to remove the quill skirt. There is a set screw and locking set screw that holds it in place hidden by the feed per revolution selector cover.
George(Note: The opinions expressed in this post are my own and are not necessarily those of CNCzone and its management)
-
08-04-2011, 12:56 AM #10
Registered
- Join Date
- Jan 2008
- Posts
- 77
Thank you again George. You were way ahead of me. I wish I had checked back here. I spent a lot of time trying to figure out how to get that part out of there. Arggh. All is well now.
-
08-05-2011, 04:30 AM #11
Registered
- Join Date
- Jan 2008
- Posts
- 77
I need one last bit of help. How do I get the variable speed spring back on? Reversing the instructions in the user manual for disassembly does not work. I can't get the belt to the high speed position far enough to get the tension of the spring soft enough to get the clip back on. I've tried several things to get the disks together as far as possible and I have tried several things to compress the spring, but it just isn't working.
When taking the spring off, the pulleys are in the highest speed position. With only a little bit of umph, the spring is compressed by hand and the clip comes out. But in the installation, the pulley just doesn't want to go up enough to make the spring pressure soft enough so it can be compressed by hand.
What is the trick?
-
08-05-2011, 01:44 PM #12
Moderator
- Join Date
- Nov 2004
- Posts
- 3028
Next time: turn variable drive to slowest spindle speed. Take 2 screws that hold the bottom back cover and compress the spring keeper to the vadi-disc using these screws.
10-24 for 1.5 hp and 10-32 for 2 HP. Now that spring is compressed, turn vari drive handle to as fast as it will go without turning the spindle on. This frees up the belt so you can remove the motor with the pulleys attached.
If I am called in on someone that has not followed this procedure, I find a socket of the appropriate size such that I can put the stack in a press and still be able to but the screws in and compress the spring. Then install the motor with the discs on the shaft, turn the motor shaft by hand while i turn thr vari speed adjuster untill the discs grap the belt well, then remove the screws.
Even the quill works well as a arbor press to compress the spring.
George(Note: The opinions expressed in this post are my own and are not necessarily those of CNCzone and its management)
-
08-05-2011, 04:53 PM #13
Registered
- Join Date
- Jan 2008
- Posts
- 77
Ahh, ok. I did NOT follow the manual then. I just read the part about 'put it in high speed' and I did not leave the pulley in one piece. Silly me. I just assumed you had to take the pulley apart to get the motor out. But there it is as plain as day in the diagrams; leave it together.
Ok, now I'm paying for that.
Very good, and thank you once again for your great help George.
.
-
08-05-2011, 11:08 PM #14
Registered
- Join Date
- Jan 2008
- Posts
- 77
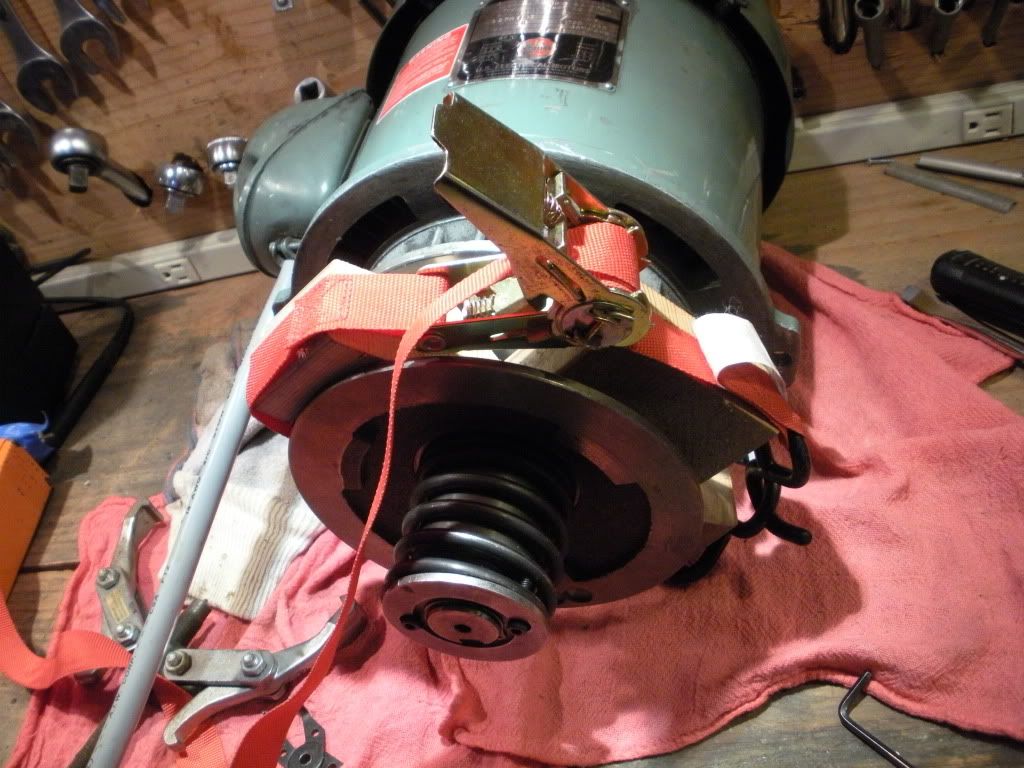
I used this method to compress the spring. Three 2x4 blocks with a bit of an angle cut in them and a strap. Worked ok.

 Reply With Quote
Similar Threads
-
How do you remove (or reinstal) the head on a Sieg X2?
By GimpyPaw in forum Benchtop MachinesReplies: 3Last Post: 04-08-2009, 11:14 PM -
How to remove the R8 arbor in the mill head??!!
By willio in forum Shopmaster/ShoptaskReplies: 1Last Post: 04-06-2009, 02:40 PM -
Can I remove this from my mill head?
By cnczoner in forum Uncategorised MetalWorking MachinesReplies: 2Last Post: 08-14-2008, 10:16 PM -
Help - remove head on 45 Square Col Mill
By kramerda in forum Benchtop MachinesReplies: 11Last Post: 12-22-2007, 04:49 PM
