


very coool...
it will work on 1 or 2 part... but you need at least hss..
or carbide...
i fyou were work with oak.. that dulls even hss very quickly due the acid its contain...
i made some layout in ac express.. i going to send you.. to see i made.. but there are other ways too..
Thread: using my CNC router as a lathe ?
Results 41 to 52 of 52
-
11-13-2012, 02:07 AM #41
 Member
- Join Date
- Jan 2007
- Posts
- 1795
-
11-13-2012, 09:35 AM #42
Registered
- Join Date
- Aug 2011
- Posts
- 617
 Originally Posted by PaulRowntree

Paul, there is a natural progression in my thought process and experimenting, that is becoming very like this image.
I tried the pocketing, and it's downfall is speed. The feed rate is the same (slow) on the non cutting part of the pocket toolpath, as on the cutting part.
so then I duplicated my outline with an offset equivalent to my pass depth of cut, and enough copies to get to the final size. the downfall of this way, is the work piece needs to have material clearance as the cutter gets closer to the finished outline , as you would manually, and as your drawing shows Basically, there needs to be clearance for the cutter, and the cutting forces are different depending on the amount of cutter edge being used , i.e. not just the point of the cutter. If you can see what I am trying to say ?
It's all the stuff that comes automatically when you are cutting manually, but the CNC will only do what it's told ! so you virtually have to make the part in your head, and then translate that into a toolpath.
if that doesn't make sense ... it's because I'm VERY tired !
RichMy 1st Build (ongoing) http://www.cnczone.com/forums/diy-cnc_router_table_machines/134670-one_big_one_smaller_my.html
-
11-13-2012, 09:42 AM #43
Registered
- Join Date
- Aug 2011
- Posts
- 617
yes, it was just a quick and easy way to make the next experiment/test Originally Posted by victorofga
For now, I will just sharpen with a file every few parts. (hmmm.... maybe I could make a CNC toolpath for sharpening ... )
I have a few cutting tools for the metal lathe, but this was easier and quicker than making a tool holderMy 1st Build (ongoing) http://www.cnczone.com/forums/diy-cnc_router_table_machines/134670-one_big_one_smaller_my.html
-
11-13-2012, 09:47 AM #44
Registered
- Join Date
- Aug 2011
- Posts
- 617
Buy Indexable Carbide Inserts DCMT11T304-TP1500 Carbide Insert Seco 2600996 online from RS for next day delivery. Originally Posted by victorofga
yes, I can buy them locally
I could also make a tool holder pretty easily too
ThanksMy 1st Build (ongoing) http://www.cnczone.com/forums/diy-cnc_router_table_machines/134670-one_big_one_smaller_my.html
-
11-13-2012, 11:18 AM #45
Registered
- Join Date
- Aug 2011
- Posts
- 617
Thanks Louie Originally Posted by louieatienza
There are soooo many ways to approach this ! that is half the problem.
I did 1st expect to have to make a new software controler setup file to swap axis and speeds etc, but so far, I think I won't have to.
the main problem, is the learning curve of how to cut on a lathe and translate that back to a toolpath. 1st rounding off, then roughing out, and leaving room to get the cutter in for the final pass. Even doing it manually, I would use several different gouges (rounding, scoring, straight cuts, curved edges etc. ) but for CNC it would be best (time wise) if I can just use the one cutter.
RichMy 1st Build (ongoing) http://www.cnczone.com/forums/diy-cnc_router_table_machines/134670-one_big_one_smaller_my.html
-
11-13-2012, 02:13 PM #46
Gold Member
- Join Date
- Apr 2009
- Posts
- 5516
Originally Posted by TrickyCNC
Yes thinking about it now you could just do it with x, y, since the z would just position tthe cutter on center of the lathe.
Another cool way would be to use your spindle to hog the waste, then create an offset for your lathe tool to come in and do the finsh work. Might save you a bit of time. Then you can even mill features on the turned part as well. I do plan to make a rotary axis some time, so it's great to see some idea here...
-
11-13-2012, 10:59 PM #47
Registered
- Join Date
- Aug 2011
- Posts
- 617
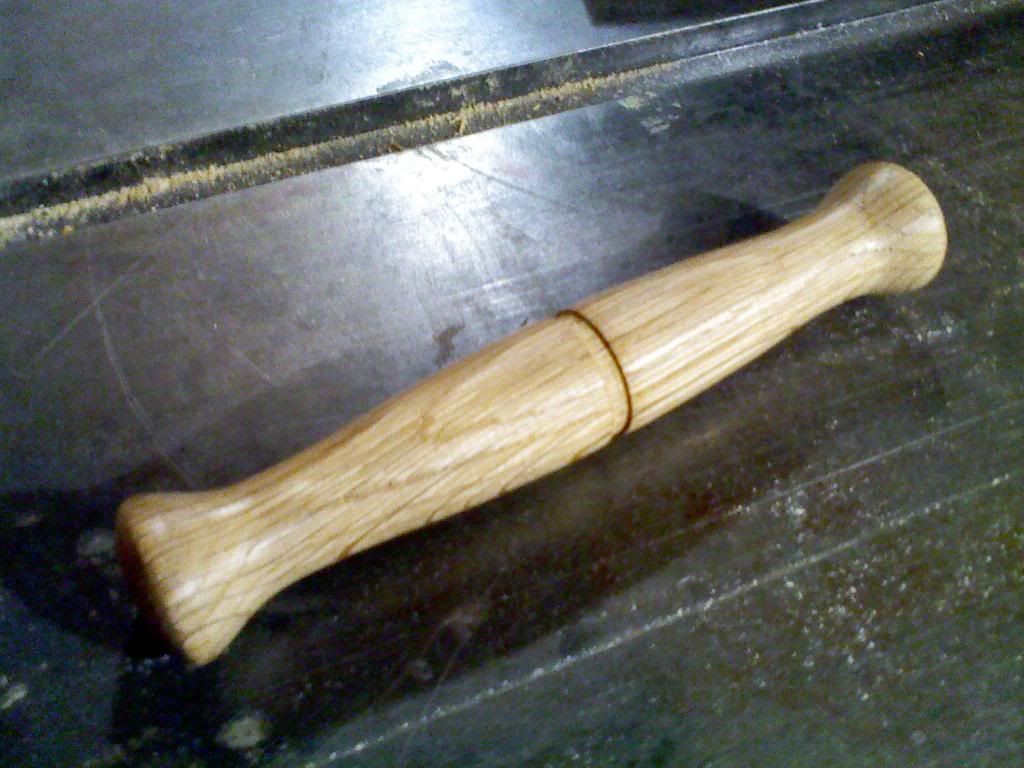
Acceptable results now. Still some tweeking, and testing then I'll rebuild the final setup.
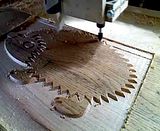
old Vid of the cCNC cutting a house number sign for a mate
Click to play
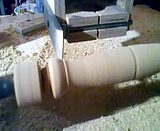
and one of the CNC lathe working
click to play
and a finished handle
 My 1st Build (ongoing) http://www.cnczone.com/forums/diy-cnc_router_table_machines/134670-one_big_one_smaller_my.html
-
11-13-2012, 11:01 PM #48
Registered
- Join Date
- Aug 2011
- Posts
- 617
I must say thanks to Viktor, for the time he has taken to make a tutorial on the way he does his cnc lathe work
I will give it a try soon.My 1st Build (ongoing) http://www.cnczone.com/forums/diy-cnc_router_table_machines/134670-one_big_one_smaller_my.html
-
11-14-2012, 12:37 AM #49
Member
- Join Date
- Jan 2007
- Posts
- 1795
who said you cant turn with router :-))
i like that picture..
""sundiszno"""
the most important was you could imagine first and knew it somehow must work...
-
09-05-2013, 02:25 PM #50
Registered
- Join Date
- Oct 2012
- Posts
- 23
Hi Victor, I know this is an old thread, but I need some advice and help on stationary tool holder like yours.
fordav11 has helped me to understand that my ShopNotes conversion CNC lathe is really a XZC setup since I have "live tooling" with the Porter-Cable on my Z-Axis and a rotary-indexer C-axis (Y set to zero, and Y stepper moved to run the lathe stock.
I saw your post about your adding a two tool seat and Harbor Freight cutters to your lathe, and I am wondering if I could do the same with my ShopNotes CNC. Could you tell me where you got the two tool seat, and also if you are running the lathe chuck with a stepper or a servo? Or are you running it with the lathe motor or belt setup?
I don't have a motor or belt setup for my ShopNotes since it was a hand crank machine originally, but I'm wondering if I could attach a servo and run the stock at high enough speed to use stationary cutters like a regular wood lathe controlled by computer.
Thanks for your advice,
Joe DeBottis
-
09-05-2013, 04:53 PM #51
Member
- Join Date
- Jan 2007
- Posts
- 1795
hi joe
thak you to interesting on this..
its a simple lathe, no anything modified.. put on routertable and simply plugged into outlet..
that two tool stuff I made of 1 inch thick aluminum.. it Is fitted onto the bushing that hold the routerspindle..
so any time can be removed simply..
I believe I have a drawing yet..
however it will be different for each machinery.. also tools are available 1/4 1/2 3/8 shank so too many variation..
this post about using a regular lathe and cutter moved by cnc control..
a smooth spindle that can be turned otherwise by hand this way easier due it will be identical all part too each other..
also the wrapping as is too slow for simple turning..
as I tried to analyze with wrapping you might encounter at least 10x more invested machining time.. a porch post will takes about 5-10 min this way... with wrapping form square column... it might takes an hour mightbe two..
lathe at harborfreight about 250 sometime.. very solid..
no any modification, due after turn I want to sand the part.. yet , it would worth to put on cnc control..
mightbe later..
-
05-28-2020, 04:35 PM #52
Registered
- Join Date
- Aug 2011
- Posts
- 617
Re: using my CNC router as a lathe ?
lockdown reminiscing ! wondering if I should go back to making things after a couple of years off ?
My 1st Build (ongoing) http://www.cnczone.com/forums/diy-cnc_router_table_machines/134670-one_big_one_smaller_my.html

 Reply With Quote
Similar Threads
-
Router Lathe Combo ?
By hotbike in forum DIY CNC Router Table MachinesReplies: 0Last Post: 09-02-2013, 09:39 PM -
Lathe Spindle for CNC Router
By tpsimer in forum CNC Machine Related ElectronicsReplies: 8Last Post: 02-06-2011, 05:53 AM -
Router or Lathe
By Dman65 in forum Wood Lathes / MillsReplies: 1Last Post: 07-30-2009, 02:06 PM -
A Small Lathe Router
By Clockwork in forum Open Source CNC Machine DesignsReplies: 4Last Post: 12-27-2007, 04:46 PM -
CNC Router Lathe
By wjfiles in forum DIY CNC Router Table MachinesReplies: 2Last Post: 10-03-2006, 12:34 PM
