


Here are some photos of mine. Note that there are no internal photos because it's a rat's nest in there!
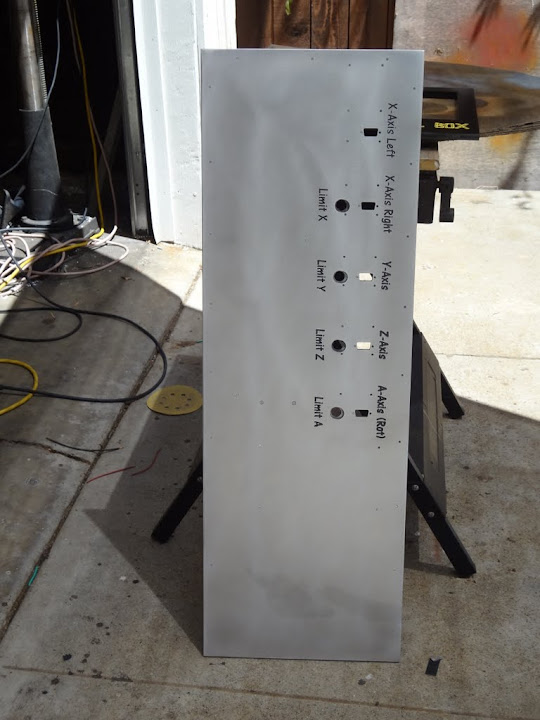
In addition to the On-Off switch and E-Stop, I've also put in a switch to turn my vacuum on (even when the controller is turned off) so I can use the vacuum for shop cleanup. The other settings for the vacuum are "off" and "auto" (where it is under Mach3 control).
I also have a momentary "limits override" switch that I can use to move the machine when a limit switch is activated. Haven't used this in many months but it was helpful when I was getting the machine set up.
There are three displays to view the current used by the system, the spindle, and the vacuum. Not really necessary but the numbers are cool and could be an indicator of a malfunction.
The final indicator is a resettable hour meter for my spindle (so I have an idea of when to inspect/change the brushes of my Kress spindle).
edit: for thermal control, my control box is made mostly of aluminum so it radiates heat fairly well, I also have two fans that blow air INTO the box through small filters. The air inlets are positioned inside my router enclosure which also reduces dust. The inside of the control box is essentially dust free.
Results 21 to 40 of 55
-
12-29-2012, 05:33 AM #21
 Registered
- Join Date
- Nov 2006
- Posts
- 1036
-
12-29-2012, 05:41 AM #22
Registered
- Join Date
- Nov 2006
- Posts
- 1036
Have another control box mounted outside my enclosure to start, pause, and stop g-code executed by Mach3. (These photos were taken before I built my current control box and set up a vacuum outlet on the front of my enclosure.)
-
12-29-2012, 05:58 AM #23
Registered
- Join Date
- Nov 2006
- Posts
- 1036
Here's a link to an amazing contol box!: http://www.cnczone.com/forums/1194758-post194.html
-
12-29-2012, 06:28 AM #24
Registered
- Join Date
- Nov 2010
- Posts
- 520
Thanks to everyone
Thank you everyone for contributing to this thread. It has been a big help to me and hopefully to others.
I've gutted the pc enclosure that I plan on using.
Rick
-
12-31-2012, 05:42 AM #25
Registered
- Join Date
- Aug 2010
- Posts
- 686
I built this for the 2012 DC Science and Engineering fair. It worked so well I use a variation on all my machines.
[ame=http://www.youtube.com/watch?v=C6mszkT711c]CNC PC and controller case - YouTube[/ame]Author of: The KRMx01 CNC Books, The KRMx02 CNC Books, The KRmc01 CNC Milling Machine Books, and Building the HANS Electric Gear Clock. All available at www.kronosrobotics.com
-
01-01-2013, 02:11 AM #26
Registered
- Join Date
- Aug 2011
- Posts
- 999
Oh well, here is another one...
That is the new control box of my "Big Bamboo" machine. The back plate is a solid 1/4" thick aluminum sheet that serves as heat sink for the geckos and the solid state relay as well. Sides and part of the front are 3/8" Garolite and the rest of the front is Plexiglass to see the status LED of the Geckos and the Planet-CNC controller. It also houses a Keling 72V/20 amps PS and a Hitachi X200 VFD. A computer fan blows filtered air into this enclosure.
The 3 instruments are for spindle current, temperature (not yet connected) and vacuum (for the future vacuum hold-down). All instruments can trigger the emergency stop if so programmed. Before you ask, the company I work for makes the instruments and they are normally for water distribution equipment and rather expensive.
The control computer is a separate small net book on a swiveling wall mount bracket.


-
01-01-2013, 10:16 PM #27
Registered
- Join Date
- Nov 2010
- Posts
- 520
Fusing
So I started to wonder if it would be a good idea to put some fuses in there also.
Anyone have any thoughts on that?
Rick
-
01-01-2013, 11:47 PM #28
Community Moderator
- Join Date
- Dec 2003
- Posts
- 24221
To follow good practice. Originally Posted by RicknBeachcrest

All power supplies should be individually fused inside the enclosure.
Al.CNC, Mechatronics Integration and Custom Machine Design
“Logic will get you from A to B. Imagination will take you everywhere.”
Albert E.
-
01-02-2013, 12:22 AM #29
Registered
- Join Date
- Nov 2010
- Posts
- 520
Please excuse my ignorance, but should the input power be fused or the output, or both? Originally Posted by Al_The_Man
I know enough about electronics to be dangerous.
Thanks.
Rick
-
01-02-2013, 01:03 AM #30
Community Moderator
- Join Date
- Dec 2003
- Posts
- 24221
The input for sure.
The output side of power supplies is optional to a point, any fault causing over current is normally reflected back to the input side, or the device may have current fold back or limiting.
So it is at the discretion of the MTB based on the individual item.
Al.CNC, Mechatronics Integration and Custom Machine Design
“Logic will get you from A to B. Imagination will take you everywhere.”
Albert E.
-
01-02-2013, 01:34 AM #31
Member
- Join Date
- May 2012
- Posts
- 231
Both sides of a power supply since input side protect the over all system. On the output side to protect the drivers/ motors. I personally would do each driver/ motor separate. Originally Posted by RicknBeachcrest
-
01-14-2013, 05:40 AM #32
Registered
- Join Date
- Nov 2010
- Posts
- 520
Progress is happening on my enclosure. I took Gerry's idea using an automotive air filter and modified it slightly. Here is my take on it. I posted pictures on my build thread.
http://www.cnczone.com/forums/cnc_wo...ter_build.html
Building this enclosure is almost as hard as the machine itself.
Rick
-
01-14-2013, 07:32 AM #33
Registered
- Join Date
- Jan 2012
- Posts
- 22
I found a cool phone box to use as my enclosure. I don't have a current picture, but here is a video of it before I finished all the cabling.
-
01-30-2013, 02:00 PM #34
Registered
- Join Date
- Sep 2011
- Posts
- 32
Here are a few pics of my recently completed controller.
The case is an old computer case that I picked up at an electronics junk shop. I took an angle grinder to it and removed the front and rear panels, as well as making some octagonal cut-outs for the cross-flow fans. I made new front and rear panels from some 16ga aluminium and pop riveted them on.
There is a 48v power supply for the Leadshine DM856 drivers and a 5v supply for the C10 BOB.
Dave.
-
01-31-2013, 01:35 AM #35
Registered
- Join Date
- Jul 2012
- Posts
- 44
All very nice guys. I have been thinking about shrinking my enclosure for a few months now. This is giving me a few ideas to try. Below is what I'm starting with, it's a pretty big mess. The computer is still outside the cabinet, so I'm thinking a 2U rackmount cast to hold the computer and drive. Maybe a smaller power supply, the one that's in it is overkill for the machine.
-
02-02-2013, 05:10 AM #36
Registered
- Join Date
- Feb 2010
- Posts
- 61
Simple acrylic box these are the pictures when I was building it. The Gecko fits nicely into the provided space and the inputs are all attached via the RCA jacks (stops and probe). Dual 48v 120mm fans keep it cool, the box is mounted under the table. As to dust buildup I actually took it apart the other day to wire an extra input (zero tool) and found that it was dust free. My only guess is that under the table is some type of dust twilight zone.


-
02-02-2013, 05:31 AM #37
Registered
- Join Date
- Apr 2011
- Posts
- 63
Here is mine! Rest of electronics are in a computer case under the router.
-
02-05-2013, 03:50 AM #38
Registered
- Join Date
- Nov 2010
- Posts
- 520
Here is a picture of my enclosure with the wiring almost finished. All that is left is the fans that will blow on the Gecko G540. And a little more to the SPID.
But it is enough to calibrate the router anyway.
-
02-05-2013, 04:14 AM #39
Gold Member
- Join Date
- Oct 2003
- Posts
- 927
Are those joysticks analog? ...in that they also vary speed depending on amount of throw? Originally Posted by Ed3XP
I like your control panel!
...and that keyboard..Are they still available someplace?Shoptask rebuild:
http://www.cnczone.com/forums/showthread.php?t=2139
Home built gantry router:
http://www.cnczone.com/forums/showthread.php?t=5049
-
02-05-2013, 04:47 AM #40
Registered
- Join Date
- Jan 2005
- Posts
- 24
Imo, your setup is probably the best I've seen. Very nice job on that! I would like to know more about specific parts used to make that (if you don't mind of course). Originally Posted by Ed3XP

 Reply With Quote
Similar Threads
-
Automation Technology CNC controller enclosure
By ChrisAttebery in forum For Sale OnlyReplies: 0Last Post: 06-12-2014, 07:57 PM -
DIY Controller enclosure
By Jkountz in forum CNC Machine Related ElectronicsReplies: 0Last Post: 12-22-2012, 03:16 AM -
Stepper controller enclosure?
By jviss in forum Uncategorised MetalWorking MachinesReplies: 19Last Post: 09-17-2012, 09:04 AM -
New controller PC / electronics enclosure
By blades in forum Mini LatheReplies: 15Last Post: 07-22-2010, 06:26 PM -
EDGE II controller(phoenix V.6) can not show error messages of Command THC
By Automation in forum Hypertherm PlasmaReplies: 3Last Post: 06-18-2010, 03:20 PM
