


This is undoubtedly a dumb question but as a beginner to machine work I have to admit I am kind of stumped.
I have a new 2012 Patriot VFD and am starting the projects in the Lathe Coursework book by Harold Hall you can buy from Shopmaster (or Amazon, etc).
On like the third step of the project after center drilling the end of the work (a 80mm long by 45mm or so in diameter piece of steel) he wants you to use a dead center and face the end of the piece to make it flat.
Ok, so that seems simple enough in theory and it shows him in the book doing that.
Problem is, on my Patriot there is no way to get the dead center close enough to the headstock to hold the piece. Even removing the bellows and the stop screw. Then moving the table with the cutting head on it as far toward the headstock as possible and with the tailstock extended to its limit it falls about 3 inches short of even touching the piece.
I do have the toolpost mounted in the default center position so I guess I could move it over one groove but that only picks up about 2.75 inches so I am still short of being able to engage it. On top of that with the tailstock extended out it's full length it would seem to defeat the purpose of it adding centering/rigidity for the cut. I have even seen pictures of lathes on the internet where they have a dead center in the tailstock and a point in the headstock touching to align them. Figuring I must be missing something.
I know I could probably just try to face the end without the dead center but I am trying to follow the book step for step to learn the lessons he is trying to teach. Plus I doubt that would true up the end of the piece which I think is what this step is supposed to be teaching you how to do.
So am I just not setting something up correctly? Should I be using a different configuration of the machine? Because it's a 3 in 1 the generic lathe information on the internet hasn't been too useful as this seems more machine specific.
Thanks for any help you can offer.
Results 1 to 19 of 19
-
02-03-2013, 05:43 AM #1
 Registered
- Join Date
- Oct 2012
- Posts
- 0
can't get dead center close enough to use.
-
02-03-2013, 06:06 AM #2
Gold Member

- Join Date
- May 2004
- Posts
- 4519
Is the center you are using the same size as used in the demonstration? Get a longer center.
-
02-03-2013, 07:22 AM #3
Registered
- Join Date
- Oct 2012
- Posts
- 0
Will go get a picture to post.
It's that generic MT3 dead center that comes with the Patriot. about 4" long or so. Looks like to reach and actually provide stability it would have to be at least double that or more. I will try to take a picture as that would probably be helpful in showing where I am hung up.
-
02-03-2013, 07:59 AM #4
Registered
- Join Date
- Oct 2012
- Posts
- 0
Photos
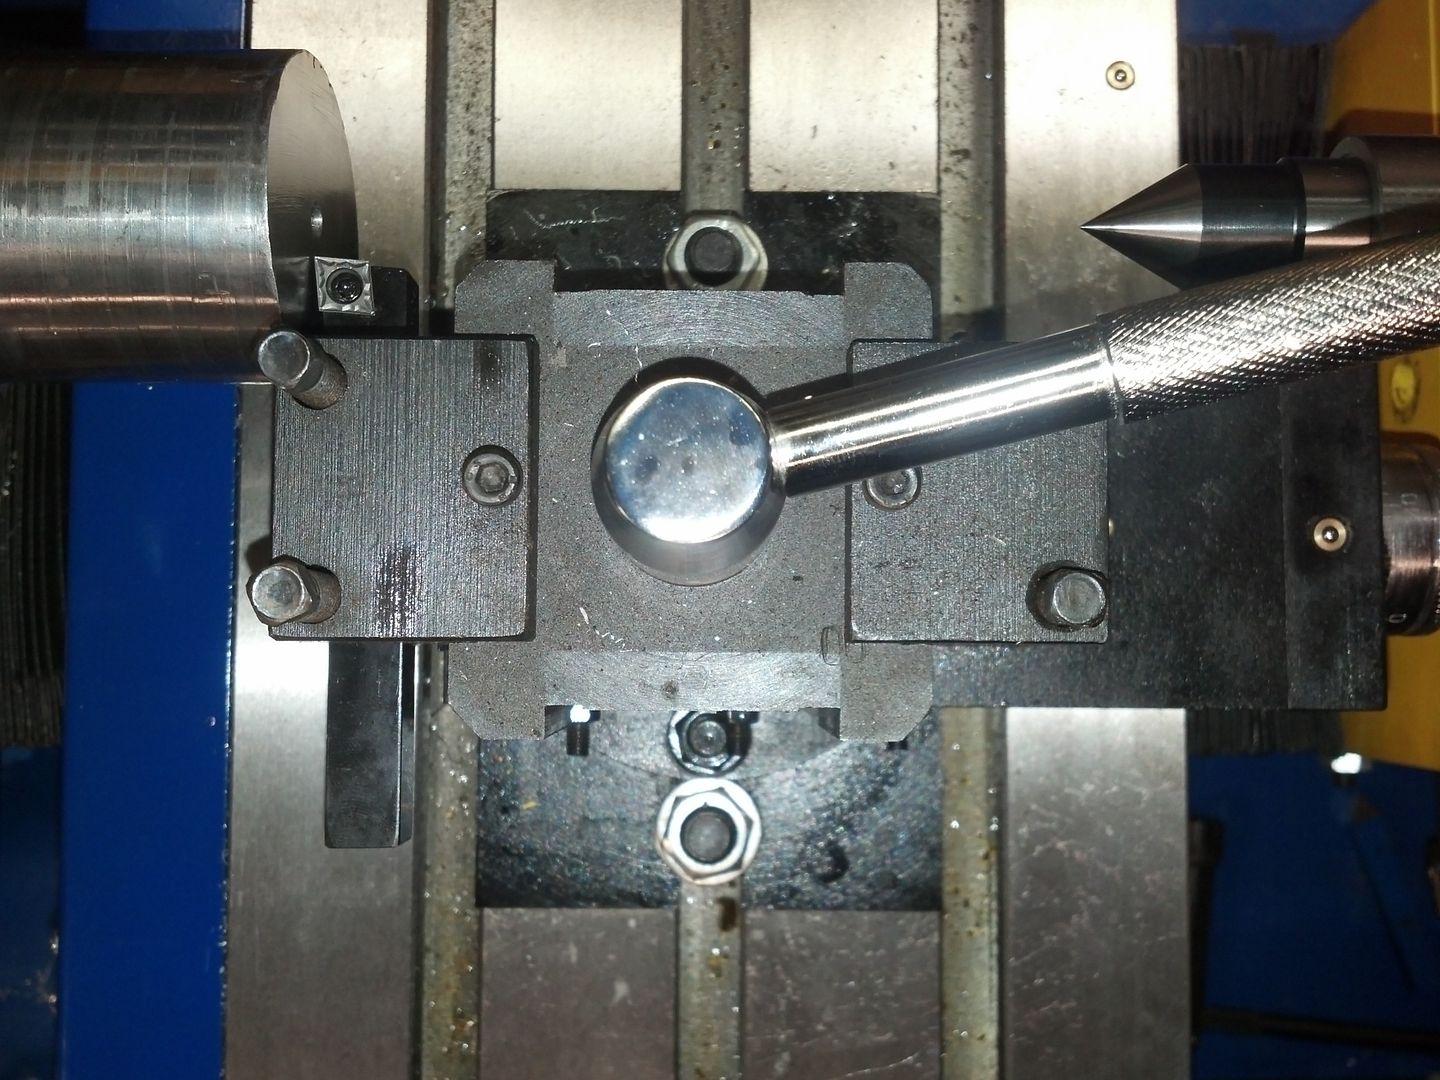
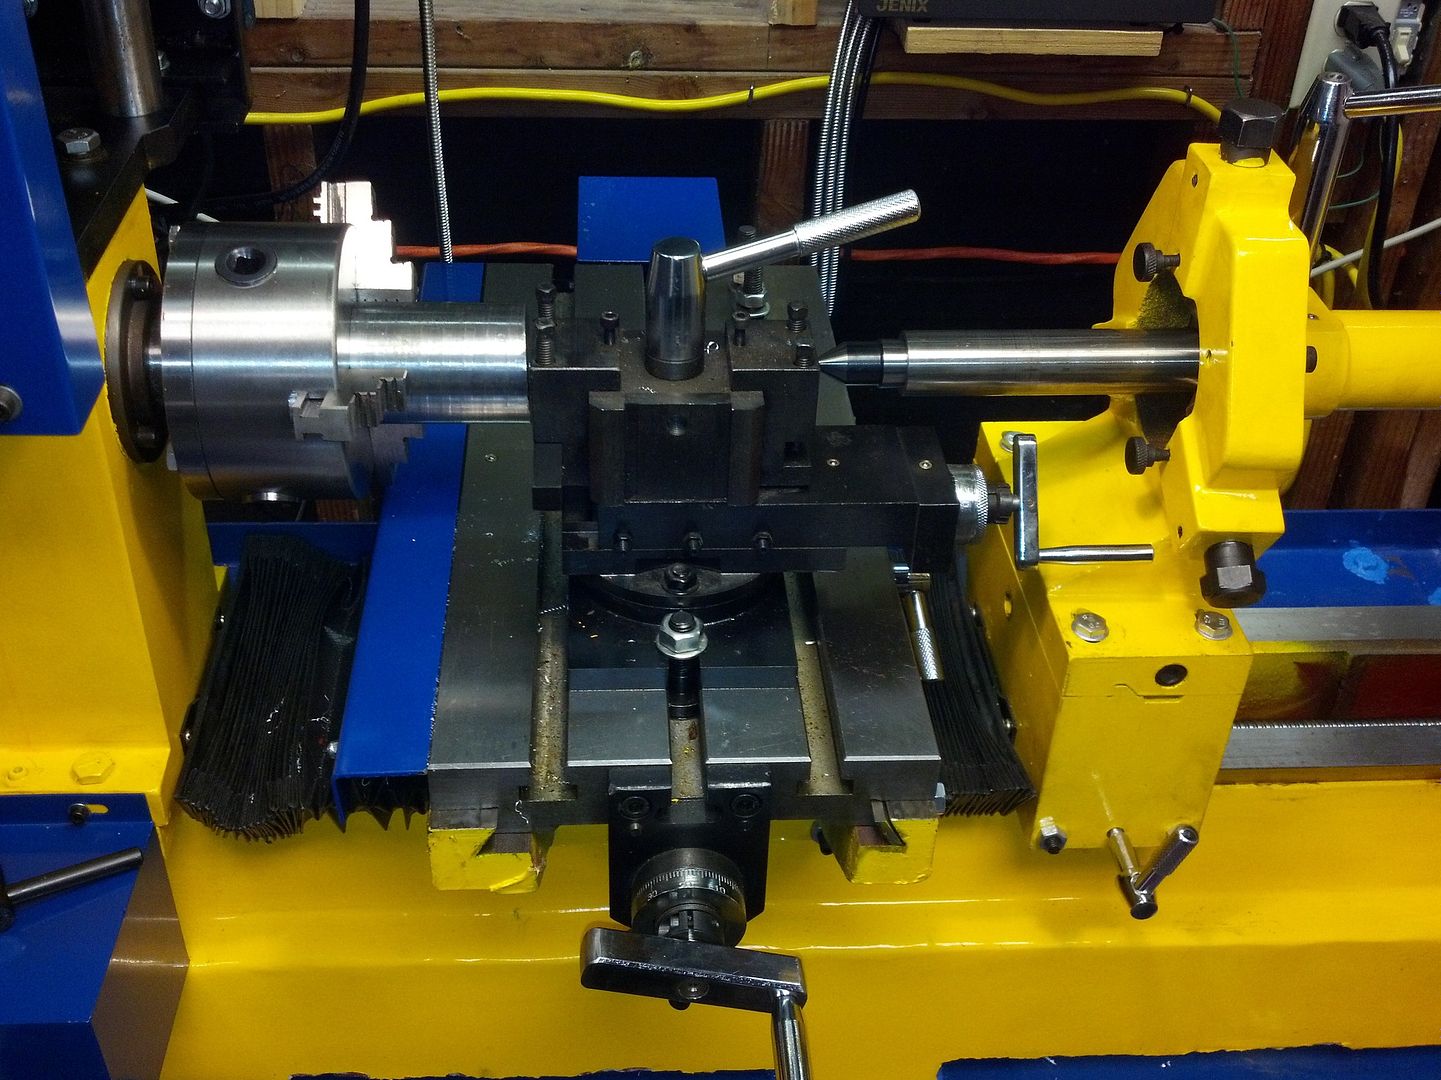
Ok, here are some photos. You can see I removed the little spacer bar from the tailstock so I could get it closer but the bellows is compressed as far as it can go. It can be removed but it's not designed to do that as it breaks off some of the plastic retention teeth every time you do it.
The spacing from work face to tip of dead center is 5.3"+/-. I could move the toolpost over a groove which is 2.3"+/- but that would still leave me 3" short with no room for the dead center to seat in and provide any stability, not that I think it would as it is on the last thread out of extension.
I could remove the bellows again and crunch the tailstock right up against the table but that still only buys me another 2" or so leaving me short of a full engagement with the dead center and it sticking out too far. To be able to bring the tailstock back into a more solid recessed position and bridge the gap would require it would seem something on the order of an 8" long MT3 dead center. Haven't seen one, and it just seems this is such a simple operation I am missing something.
I am sure on a small machine like this people have turned and faced things this size so I am sure I am just missing something. Maybe flip something around or swap the position of something. I just can't figure it out and the single use machine people are NOT usually very helpful it would seem to people with 'mere' home use machines, not taking them seriously.
The book I am doing the project from shows a picture of standard lathe with a table only a few inches wide with a tailstock that arcs over much more so the reach doesn't appear to be an issue with a lathe only machine.
Thanks for any insights. EDIT: Just noticed my browser didn't auto resize the pictures. If yours doesn't just right click and select 'view picture' and it will show the whole thing. Sorry about that
Overhead:
Full view:
-
02-03-2013, 12:20 PM #5
Registered
- Join Date
- Jan 2008
- Posts
- 458
Jaxian,
The older machines came with a morse 3 to 3 extension socket to reach over the table-
Not sure if its a standard feature on the new machines-
BTW- I know you are doing a "by the book" process, but you should-
1. Move the toolpost to the T slot nearest the chuck
2. Take a cleanup cut on the OD of your part to get at concentric surface to grip with the jaws
3. Flip the part around and grip on your cleaned up OD-
4. face off the part and drill
For a piece that size you really do not need to use the center.
-
02-03-2013, 03:39 PM #6
Gold Member
- Join Date
- May 2004
- Posts
- 4519
I do not know if this will help with clearance issues, but most people run the compound at 45 degrees.
-
02-03-2013, 10:14 PM #7
Registered
- Join Date
- Oct 2012
- Posts
- 0
Great advice.
Smallblock, that sounds like good advice and basic stuff that I should do even if it isn't in the book. Thank you.
Also you know that extension was mentioned on the list of 'standard' items but I didn't know what it was and didn't recall seeing it. I went item by item through the things I ordered so it stood out. There was an MT4 to MT3 adapter which I still am not sure I know the use for as the mill is R8 and the tailstock is MT3, but was thinking maybe there is an MT4 surface behind the chuck or something. You may have answered my question so I will double check my items and get on the phone to JT to get that thing if it is missing. If that is the case that will be awesome. Hugely appreciated.
Txcncman, your idea was what ended up moving me one step forward last night. I took everything off again, slammed it all together, moved the toolpost over, then spent a long while rotating the toolpost, its' mount and using the extension ability of the toolpost (forget what that is called) to finally make the facing cut. It took hours to get set up and cut finally completed and it is ugly but it is square to the sides. Not really sure how with how much it was moving but other than that center area around the dead center he wanted left raised for a future step it's square. Good idea. What I did was an ugly time consuming kludge though and I am sure not what the normal procedure should be.
Of course that doesn't help with the next step of actually turning the side down since the table was wedged tight between the tailstock and headstock so there was no room for the table to move on the Z axis to make the side cut (thank god I hadn't put on the 6" 4 jaw chuck yet I don't think it would spin freely over the table with the jaws hanging out from a big workpiece).
I am now praying that Smallblocks' extension is the thing I overlooked or am missing. That sounds like the problem solver. Thanks again guys I really appreciate the input, it has been very helpful indeed. Going out to check my fittings now.
-
02-03-2013, 11:40 PM #8
Registered
- Join Date
- Oct 2012
- Posts
- 0
temporary work around.
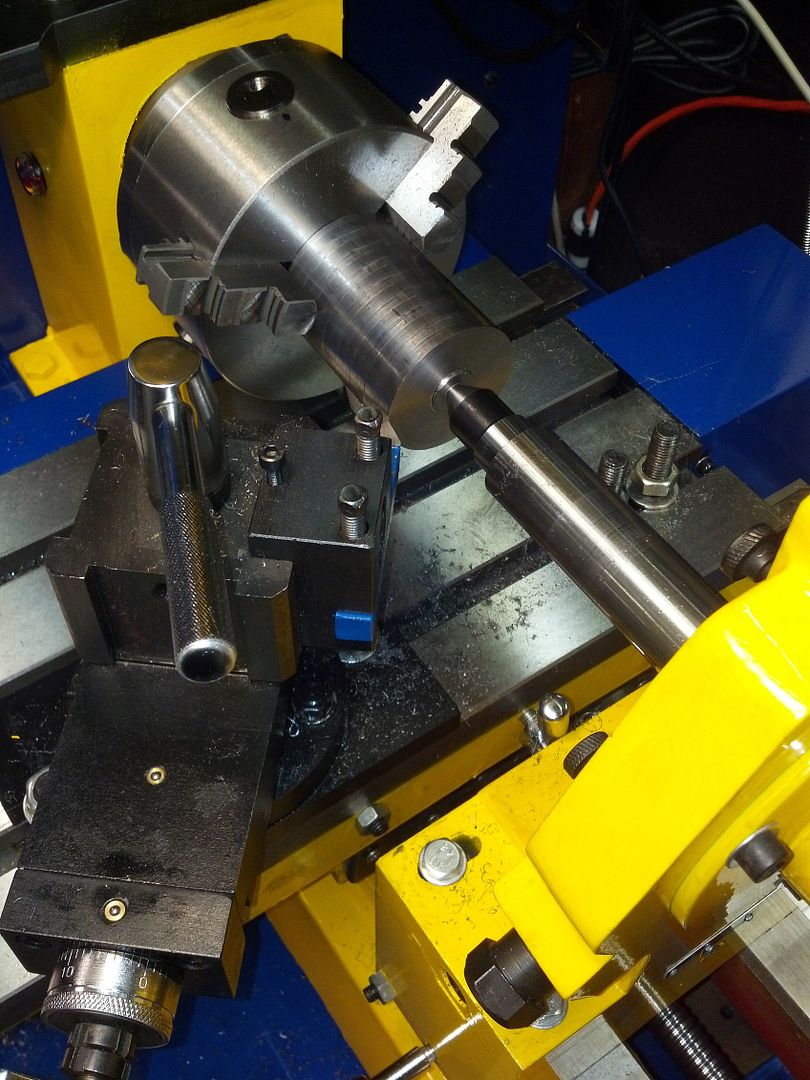
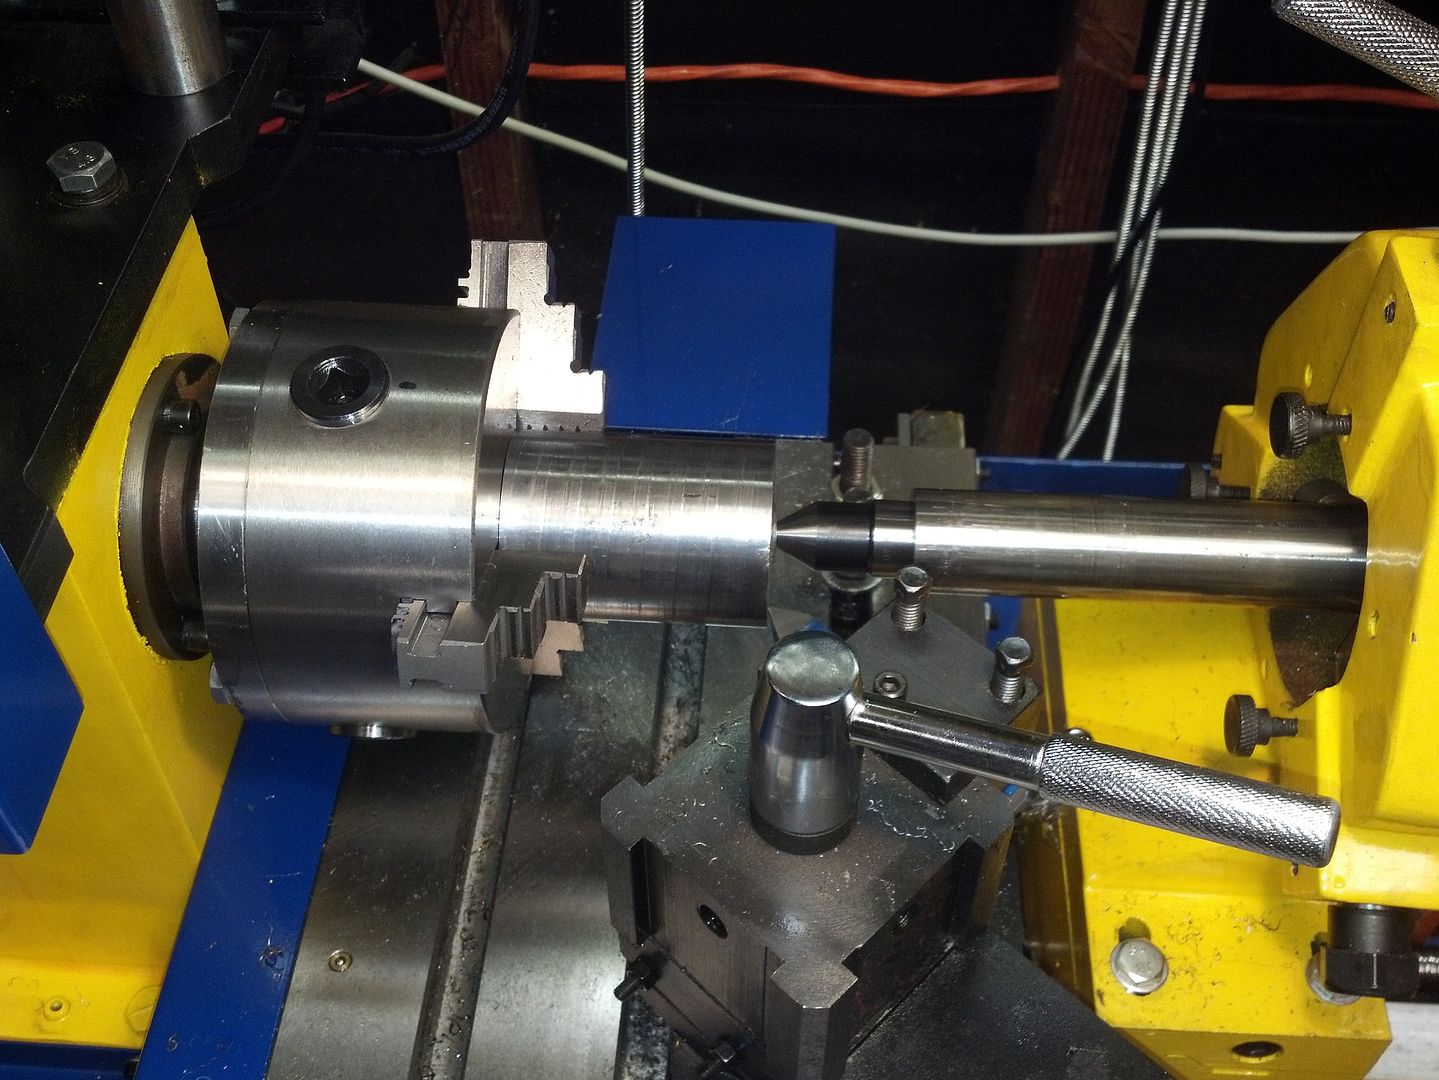
I figured I would post a few pictures of what I finally got to work. It is rickety and was not a nice cut as I was using the toolpost adjustment as my depth control. But it worked, the end is flat/parallel. You can also see that I had to remove and setup the machine in a way that can't be considered a normal workable configuration.
Plus because of the one position I could get the toolpost in the area with I was forced to not use the bit he specifies. I just used a cheap knife one as it was the only one that would cut and not hit the dead center at the angle I was forced into. Not a fun setup for what should be a basic cut.
Worse, the next step calls for reducing the diameter of the last 55mm down to 12mm while held with the dead center. As there is no table movement on that axis there is no way to make the cut set up like it is.
I just emailed JT about the issue and unfortunately didn't see an extension listed in the standard accessories or in the catalog. I assume I am missing something basic as this is a very basic and typical set of cuts and shouldn't require this much kludging around.
-
02-04-2013, 02:28 AM #9
Gold Member
- Join Date
- Jul 2005
- Posts
- 12177
With material that diameter and that short why are you fiddling around using a center; it is completely unnecessary.
An open mind is a virtue...so long as all the common sense has not leaked out.
-
02-04-2013, 04:15 AM #10
Gold Member
- Join Date
- May 2004
- Posts
- 4519
He is trying to follow the lessons given. I do not think he is to the point yet where he can determine when certain methods are needed and when they are not. Originally Posted by Geof

-
02-04-2013, 05:08 AM #11
Gold Member
- Join Date
- Jul 2005
- Posts
- 12177
Probably correct but he will never learn the correct way if the lesson is teaching a pointlessly wrong way. Originally Posted by txcncman
An open mind is a virtue...so long as all the common sense has not leaked out.
-
02-04-2013, 11:19 AM #12
Registered
- Join Date
- Oct 2012
- Posts
- 0
Journey not destination.
I totally get what you are saying but txcncman hit the nail on the head. I have been fabricating race cars and building engines (using a trusted machinist) for thirty years so I can pretty much make anything work if I have to by messing with it for long enough
 .
.
The point with using the Coursework book was to follow his steps as closely as possible. The reason being not because there isn't a better or faster way to do something, he even says there is in the book. But because he wants to teach you how to do certain things and package the different skills together in projects so you learn them as you go.
It's kind of one of those tired cliche's about it being the journey not the destination. I mean this first project is a little surface gauge. I could just buy one that will definitely be better than I am going to make for $15 bucks from Grizzly. The point is me having to learn things like how to take cuts of different depths at different speeds. Or how a different bit or feed speed changes the quality of the finish. He lays out the projects so you have to do a bunch of, for lack of a better term, busy work to make you get that experience.
Remember this is for a total beginner who doesn't have any machine working experience (that would be me)
EDIT: and I haven't even gotten to the CNC stuff yet. Already noticed that when jogging, the physical DRO and the on screen DRO in Mach3 don't move the same distance. I did check the physical one vs a test indicator and it was good so looks like software. I am afraid of even opening that can of worms at this point when I can't even seem to get some basic stuff down. Really hoping I get a good easy answer from JT at Shopmaster tomorrow that points where I am dropping the ball.
-
02-04-2013, 12:01 PM #13
Member
- Join Date
- Sep 2006
- Posts
- 6463
You haven't even got to the CNC stuff yet!!!!!!!!!!I'm going for the smelling salts, I feel an attack of the vapours coming on....LOL.....I thought you were using a manual centre lathe....perhaps you are, if so what is the steady rest doing on the bed in photo #1?
One other point, the centre should be cut away at the front to allow you to get the tool point into the centre of the cut.
BTW, do you think you could take a picture a bit further away and reduce the size a bit....it's highly confusing.
Ian.
-
02-04-2013, 06:45 PM #14
Registered
- Join Date
- Dec 2012
- Posts
- 0
Jaxian, I'll be in the same boat when my machine gets here (April?). I have not been around a machine since high school 30 years ago so I'll be a beginner too. Did a quick search for mt3 to mt3 extension and found Smithy has one for just under $20.00. Think I'll get one to add to the tools.
-
02-04-2013, 07:07 PM #15
Gold Member
- Join Date
- Oct 2003
- Posts
- 927
Simmer down, handlewanker! Originally Posted by handlewanker
These machines combine the tailstock with the steady rest. There are times when the tail stock is removed(three bolts) and the steadyrest is moved between the chuck and the saddle/crosslide.Shoptask rebuild:
http://www.cnczone.com/forums/showthread.php?t=2139
Home built gantry router:
http://www.cnczone.com/forums/showthread.php?t=5049
-
02-04-2013, 08:07 PM #16
Member
- Join Date
- Jan 2007
- Posts
- 1795
if youre not sure you can use smaller passes..
you also can use a hss tool for .. thats a rolled steel dont looks too tough..
if that machinist instructed you for center... he migth not sure about you..this length with this dia, even the other set jaws could hold safely..
theres no written rule but a 4 times the dia use to be can be safely facing..
in worst scenario you can use the steady rest yet.. barely pinching the end of mat..
-
02-05-2013, 04:16 AM #17
Registered
- Join Date
- Oct 2012
- Posts
- 0
Compromises must be made.
Turns out that yeah for 20 bucks you can get a 3" extension MT3 to MT3. I ordered it. He, like a lot of you said you don't need to support a piece that short with a dead center, the book assumes you are using a traditional lathe. So I was following the book for a reason but it appears that's not feasible.
With about a 2" dia piece sticking out 2.25" I am way under the 4:1 ratio someone mentioned so I should be fine. My only worry is that since the jaws are now holding only about 3/4" of the material if this chuck isn't true since I can't use the dead center it is going to wobble around a lot because of the weight of the work piece and yield a really bad quality side cut.
But I have never done it so I am just going to go out and try to do an unsupported 2.25" traverse a bit at a time depth wise and see how it turns out. None of this follows the actual project instructions so not getting the benefits of some of the lesson but on the other hand I am learning my machine more.
I also did a reality check on what a 'no compromise' machine cost in comparison and after looking at the prices on Tormach and Bridgeports website for just mills I think I will continue to just work a bit extra on setup and work arounds. The prices with the same configuration as the Shopmaster were staggering. Even used they were a lot more.
So, a good learning experience so far.
-
02-05-2013, 04:29 AM #18
Gold Member
- Join Date
- Oct 2003
- Posts
- 927
Here's a video you might enjoy...
notice the use of a center for extra support... the workpiece isn't much unlike yours.aside from the material.
Check out his other videos.
[ame=http://www.youtube.com/watch?v=gpXa8DY3QDc]Well Screwed Part Four - YouTube[/ame]Shoptask rebuild:
http://www.cnczone.com/forums/showthread.php?t=2139
Home built gantry router:
http://www.cnczone.com/forums/showthread.php?t=5049
-
02-05-2013, 08:36 AM #19
Member
- Join Date
- Jan 2007
- Posts
- 1795
then just use a simple live center, make first diameters and for last the facing..
dead center used for grinding between centers.. or cutting threads in ole times between centers..
make first the diameters.. even with some excess... make the facing, in a steady rest and finish between centers or chuck and center
anything just some practical thing..
i have only the chinese 7x10 at this time, but even with that it can be faced without center..

 Reply With Quote
Similar Threads
-
How to dead center a cylinder on indepedent 4 jaw chucks
By bebob1 in forum CNC ToolingReplies: 8Last Post: 02-12-2012, 01:48 PM -
Post for Lathe-mill, feedadjust close to center?
By Kai_DK in forum EdgeCamReplies: 0Last Post: 06-09-2011, 06:14 AM -
OSP5000L battery dead on Okuma LR15 Turning Center
By mohammadali in forum OkumaReplies: 13Last Post: 01-20-2010, 03:24 AM -
Fanuc 0 dead screen ... dead control?
By Noss Machine in forum FanucReplies: 4Last Post: 01-24-2009, 04:03 PM -
Gecko - close to computer or close to motor?
By andy_ck87028 in forum Gecko DrivesReplies: 1Last Post: 11-28-2005, 05:39 AM
