


I built my lathe stand out of similar .25 thick square and rectangular tubing. The stand will outlast us all. It never sounds too big when ordering. Wheels are a must.
I do have an issue with your Y axis bellows against the column. Since it is flat, chips will accumulate there without constant attention. Eventually the chips will be so dense the machine will stall. I have seen others install the bellows or sliding plates on the bottom of the Z carriage, instead of the front of the column. This seems to shed chips much better.
Regarding the pan. I would leave that entire inner rectangle (that the mill is mounted to) open so everything could be washed down into the chip drawer. Install the mill upon some spacers/blocks/bars etc. to allow things to be swept under the machine I would have the inner edges of the pan fold over and downward clear of the tubing in the inside. This will minimize any dripping or transfer of fluids to areas it is not desired.
Leave no flats surfaces inside the enclosure and expect a sealant to be the solution. Design any and all panels so there is a lip that covers the intersection of anything lower. Much like shingles and their overlap.
Thread: Andrew's G07040 build
Results 201 to 220 of 241
-
12-13-2015, 08:19 PM #201
 Gold Member

- Join Date
- Nov 2009
- Posts
- 4415
Re: Andrew's G07040 build
A lazy man does it twice.
-
12-13-2015, 08:30 PM #202
Registered
- Join Date
- Mar 2015
- Posts
- 178
Re: Andrew's G07040 build
Lol Ya 10 ga wall would probably have worked, 3/16 would be heavy duty - .25 wall will sink a battleship for sure but better than having something too flimsy!!

-
03-16-2016, 05:08 PM #203
Registered
- Join Date
- Sep 2012
- Posts
- 323
Re: Andrew's G07040 build
So I ordered a "tool setting gauge" from ebay a week or so ago and got it on Monday. I have to say, for under $50 I think I'm going to be happy with it.
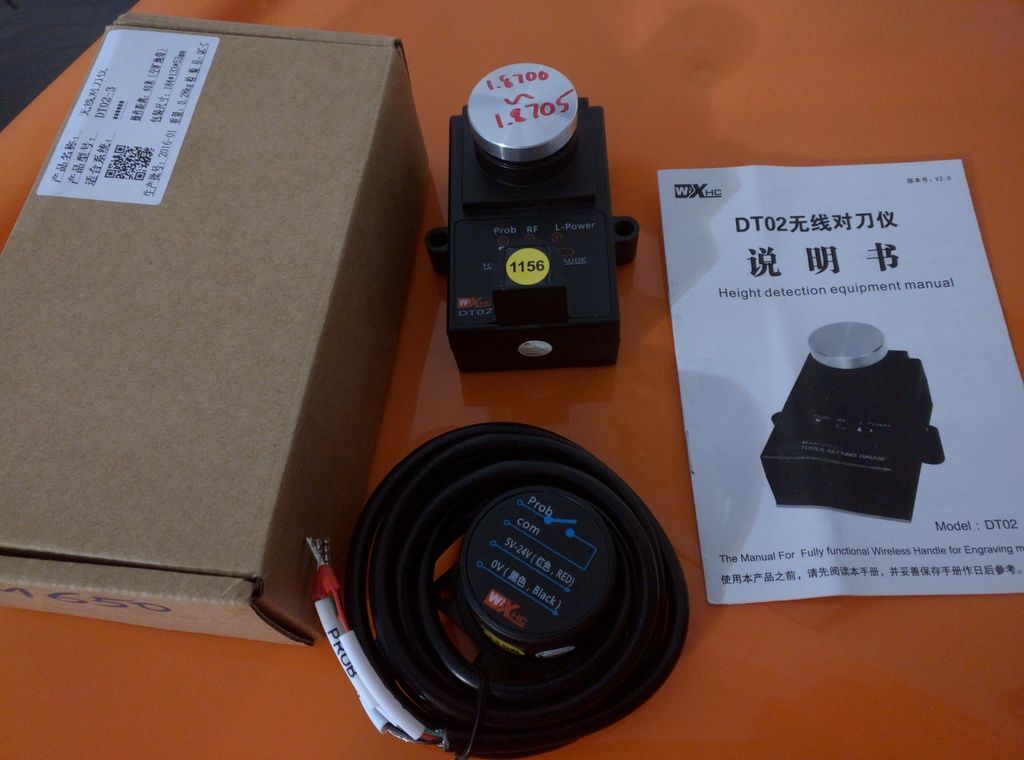
The over all height is 1.897", fully compressed the height is 1.785". The sensor actuates @ 1.8700" to 1.8705", I checked it multiple times throughout the night at work with our nice digital height gauge.
I not convinced that it will withstand a flood coolant setup. The seal on the battery door is a foamy material and the housing is all plastic. So I will be taking it in and out as needed. Given it is wireless, I see no issue with having to do that. Other than maybe loosing the thing!
It has not yet been hooked up to my mach3 machine. I have to do a little more reading on how to setup the auto tool height macro.
Will update with more info when I have it.
Also got my mill trammed, movements dialed in and the backlash comp set. Getting use to Fusion 360 for cam is a little tricky, but I managed to got a 3 tool, two setup program posted and ran it. Program needs a few tweaks for feed\speed and a spring pass at full depth (.125" diameter endmill in a .725" deep hole).
The finish is a little choppy and the deep hole tapers about .0025" per side, but I think a spring pass will help with that.
Andrew
-
03-18-2016, 05:41 AM #204
Registered
- Join Date
- Apr 2004
- Posts
- 475
Re: Andrew's G07040 build
You might want to check how temperature changes effect the plastic in that touch probe, if you are looking for that level of accuracy, it might be an issue.
Sent from my ASUS_Z00TD using Tapatalk
-
03-18-2016, 07:29 AM #205
Registered
- Join Date
- Sep 2012
- Posts
- 323
Re: Andrew's G07040 build
I have no delusions of being able to hold .0005" accuracy on my G0704 conversion! I was just pointing out that it seamed to repeat actuation at the same height every time I checked it. Originally Posted by gfacer

For most anything I'm planning to run, a few thou is good enough. If I ever get a decent cash flow with the stuff I make and need a better machine, I'll upgrade to a Tormach or maybe a used industrial machine. Pipe dreams at this point!
Andrew
-
04-17-2016, 02:59 PM #206
Registered
- Join Date
- Sep 2012
- Posts
- 323
Re: Andrew's G07040 build
I've made some progress with the wireless tool length setter. Had a few head scratching moments on the wiring but figured it out.
I used GURUBREW's (from youtube) macro on the main screen "auto tool zero" button. Again, a few head scratching moments when I
was using a tool that already had a length offset in the tool table. That's when I noticed it was setting the Z fixture offset and not the tool length offset. Changed to a tool number with no offset length and it then did what was expected......... as far as movements go.
Video:
https://www.youtube.com/watch?v=GES0fga5PP8
The blue tool setter shown at the end should be 2.000", but is at 1.999" when set to the masters on either side of the pad.
So now I'm in need of some help! Can some one please point me the direction of a macro that will put the tool length offset into the tool table. I've seen it done with the macro tormach used when it was running mach3.
Here is the current macro I'm using:
CurrentFeed = GetOemDRO(818) 'Get the current feedrate to return to later
CurrentAbsInc = GetOemLED(48) 'Get the current G90/G91 state
CurrentGmode = GetOemDRO(819) 'Get the current G0/G1 state
If GetOemLed (825)=0 Then 'Check to see if the probe is already grounded or faulty
DoOEMButton (1010) 'zero the Z axis so the probe move will start from here
Code "G4 P3" ' this delay gives me time to get from computer to hold probe in place
Code "G90 G31Z-4. F4" 'probing move, can set the feed rate here as well as how far to move
While IsMoving() 'wait while it happens
Wend
ZProbePos = GetVar(2002) 'get the exact point the probe was hit
Code "G0 Z" &ZProbePos 'go back to that point, always a very small amount of overrun
While IsMoving ()
Wend
Call SetDro (2, 1.870) ' change .060 to your plate thickness and then adjust for final accuracy
Sleep 200 'Pause for Dro to update.
Code "G1 Z5. F50" 'put the Z retract height you want here, must be greater than the touch plate thickness
While IsMoving ()
Wend
Code "(Z axis is now zeroed)" 'puts this message in the status bar
Code "F" &CurrentFeed 'Returns to prior feed rate
Else
Code "(Z-Plate is grounded, check connection and try again)" 'this goes in the status bar if applicable
End If
If CurrentAbsInc = 0 Then 'if G91 was in effect before then return to it
Code "G91"
End If
If CurrentGMode = 0 Then 'if G0 was in effect before then return to it
Code "G0"
End If
VB Script is like an alien language to me at this point! Is there a good tutorial out there?
Thanks,
Andrew
-
04-18-2016, 08:55 PM #207
Registered
- Join Date
- Sep 2012
- Posts
- 323
Re: Andrew's G07040 build
I've been doing some internet searching for a better tool length setting macro. Most of what I am finding is basically the same macro I currently have(chair) Originally Posted by Wiggles84
Looking at he macro i have, I think I need to change the line " Call SetDro (2, 1.870) ' change .060 to your plate thickness and then adjust for final accuracy "............ but I don't know what to set it to. Can I just delete this line, then insert the VBscript from the " set tool offset " button from the offest screen? That buttons VBscript listed below?
Tool_Num = GetDRO (24)
If Tool_Num <>0 then
Z_Shift = GetOEMDRO (1002)
Z_Offset = GetOEMDRO ( 49 )
Axis_Pos = GetOEMDRO(85)
Tool_Offset = Axis_Pos - Z_Offset -Z_Shift
Call setOEMDRO(42, Tool_Offset)
End if
If there is a better place to get help with this, please let me know :
:
Thanks,
Andrew
-
04-19-2016, 09:42 PM #208
Registered
- Join Date
- Apr 2015
- Posts
- 72
Re: Andrew's G07040 build
I cant help you out, but subscribing to this thread. It would be great to have a tool length pre-setter and a work offset probe one day!
-
04-19-2016, 09:54 PM #209
Neuer Benutzer
- Join Date
- Jan 2013
- Posts
- 630
Re: Andrew's G07040 build
3 words for you. Mach Standard Mill. Pay the few bucks for the Pro version and be happy.
Calypso Ventures, Inc.
-
04-20-2016, 01:27 PM #210
Gold Member
- Join Date
- Nov 2009
- Posts
- 4415
Re: Andrew's G07040 build
Unfortunately it isnt a one time charge. Great screensets and such but the recurring charge sucks for a hobbyist. Originally Posted by Kenny Duval
A lazy man does it twice.
-
04-20-2016, 01:58 PM #211
Registered
- Join Date
- Sep 2012
- Posts
- 323
Re: Andrew's G07040 build
The site says it is a one time charge.............kinda. After 6 months you'll need to buy some kind of maintenance plan to get more updates. but even when your out of maintenance, it will still run. Originally Posted by Fastest1
I will say this screen set is an option, not sure I want to go that route yet?
Andrew
-
04-20-2016, 02:16 PM #212
Neuer Benutzer
- Join Date
- Jan 2013
- Posts
- 630
Re: Andrew's G07040 build
You only have to update if you have a bug they have released a new version to fix and that covers you for a year of updates. Mine is still running on my original purchase. If I feel I need the latest version it's still a tiny amount of money compared to some other purchases I make for software. Originally Posted by Fastest1
-
04-20-2016, 02:19 PM #213
Neuer Benutzer
- Join Date
- Jan 2013
- Posts
- 630
Re: Andrew's G07040 build
I found it worth the money simply for the probing routines. I do not have the patience to spend weeks working on macros to get probing working under Mach 3 out of the box. Plus as much as I like the program the default Mach 3 interface is horrible thing to look at for more than about 5 minutes. Originally Posted by Wiggles84
-
04-20-2016, 05:57 PM #214
Member
- Join Date
- Dec 2015
- Posts
- 923
Re: Andrew's G07040 build
$70 seems pretty reasonable to me, of course if your hobby is building macro's then by all means go for it. And it's a huge plus that it has much more intuitive feel, which Mach 3 IMO is seriously lacking in. I personally like to run my mill rather than tinker with software.
-
04-21-2016, 12:04 AM #215
Gold Member
- Join Date
- Aug 2010
- Posts
- 630
One word. LinuxCNC Originally Posted by Kenny Duval
Inner Vision Development Corp. - http://www.ivdc.com
Website Design & Development. Shopping Carts, SEO and more!
-
04-21-2016, 12:12 AM #216
Neuer Benutzer
- Join Date
- Jan 2013
- Posts
- 630
Re: Andrew's G07040 build
That right because if he hasn't completely figured out the software and interface with which he is currently working the smart thing to do is recommend a completely different software package.
At least with MSM he already has the underlying bits and bobs figured out.
-
04-21-2016, 04:44 AM #217
Registered
- Join Date
- Sep 2012
- Posts
- 323
Re: Andrew's G07040 build
@ Kenny Duval
It sounds like you have and use this screen set.
Here's what I'm looking for with tool offsets.
- I want to set all my tool lengths off the table while in G59 with no Z offset active (for example)
- One of those tools will be a tormach edge finder that I will use to find my my X, Y and Z zreo in G54
- This should let met pick up a part in a vise or fixture and go.
I did see some of the videos up on the site and don't really want to do the whole master tool thing.
Do you think what I want to do can be done in this screen set without much issue?
Thanks,
Andrew
-
04-21-2016, 02:22 PM #218
Neuer Benutzer
- Join Date
- Jan 2013
- Posts
- 630
Re: Andrew's G07040 build
You don't have to do use a master tool. It is however one of the many options and to me, the one that makes the most sense. Specifically when paired with a touch probe.
The tool change routines are pretty comprehensive. I have asked Dave@Calypso to confirm what I believe to be a yes answer however, so that I don't deliver you bad information. He's always fairly prompt at answering my questions.
-
04-21-2016, 07:04 PM #219
Gold Member
- Join Date
- Nov 2009
- Posts
- 4415
Re: Andrew's G07040 build
Andrew what do you see as a negative in regards to a master tool? There are so many concepts to grasp here, I want to understand others motives.
The advantage I see or seem to understand about a master tool. It gives me a static reference. If I break a tool, I can reset a new one easily enough.
Without it, I believe I would have to remeasure all of my tools. Of course I could be wrong and am pretty often.
Personally I would use the Tormach edge finder (Haimer?) as the master. Or I think I would.A lazy man does it twice.
-
04-21-2016, 07:45 PM #220
Neuer Benutzer
- Join Date
- Jan 2013
- Posts
- 630
Re: Andrew's G07040 build
Dave's response...
Hi,
Here's what I'm looking for with tool offsets.
•I want to set all my tool lengths off the table while in G59
Not sure what this wording is implying... it sounds like maybe there is an (incorrect) assumption that TLO values are dependent on WC system offsets.
Tool table values are stored by Mach in the tool table. There is only one tool table and it's contents are independent of what WC offset is selected. So you can have any "Gxx" WC active when you edit the tool table.
with no Z offset active (for example)
(assuming this means "no Z TLO offset active"): OK, use MDI to do G40 or click the "G49" button on the MSM tooling page.
•One of those tools will be a tormach edge finder that I will use to find my my X, Y and Z zreo in G54
•This should let met pick up a part in a vise or fixture and go.
You may find section 4.3.1.1.3 of the user manual interesting - it shows an example of using a dial gage touch off tool.
I did see some of the videos up on the site and don't really want to do the whole master tool thing.
OK. No need to have to use Master tool mode (taht's why it has an on/off) button
.
Do you think what I want to do can be done in this screen set without much issue?
"can be done"? Sure. MSM wil let you do anything you can do with stock mach3.
"..without much issue?" - I'd say so, but that is not what counts. Issues are often dependent on what the user knows.... which is one reason we offer the free trial period for MSM.
I'd say download and install MSM, and give it a go... worst case is that you'd find you don't like it and end up not wanting an MSM license. No problem. that's what trials are for.
Dave

 Reply With Quote


Similar Threads
-
Andrew's G0704 CNC Conversion
By andrew2085 in forum Benchtop MachinesReplies: 12Last Post: 01-21-2013, 06:04 PM -
Mint's Build Aluminum/Steel Build thread.
By FreshMint in forum Maintenance DIY DiscussionReplies: 0Last Post: 10-31-2011, 04:18 AM -
Newbie - To build or not to build Router/Plasma Table
By dfranks in forum Waterjet General TopicsReplies: 10Last Post: 04-08-2011, 05:16 AM
