


I have started my build in earnest. I am a cnc, woodworking and metalworking novice (but no stranger to common power tools). This is my first cnc build and will likely stay right on target with the plans. Your comments, opinions and expert advice are certainly welcome. Thanks in advance for your help and support
First pic...have all my metal cut to size!
Thread: My MOMUS Chipper Shredder
Results 1 to 20 of 23
-
01-14-2014, 08:08 AM #1
 Registered
- Join Date
- Dec 2013
- Posts
- 29
My MOMUS Chipper Shredder
-
01-15-2014, 01:57 AM #2
Registered
- Join Date
- Mar 2013
- Posts
- 209
You're definitely no novice going through that first step so fast! Very nice.
Wish you good luck with your build and welcome to the club - ask away if you have any questions... :-)
Just wondering, why did you call it "Chipper Shredder", lol?
--
Mac
-
01-15-2014, 04:53 AM #3
Registered
- Join Date
- Dec 2013
- Posts
- 29
Thanks MAC...chipping metal and shredding wood :rainfro:
I'm sure I will have many questions.
A couple of observations early in my build:
The plans are amazing, very detailed with great write ups.
Buying an aluminum blade for your mitre saw is worth every single penny and made cutting all that metal so easy and very precise (after I got my fence adjusted, oops). Cuts like butter with mirror finish ends.
Measuring, drawing, and punching all the hole locations on all those little parts has been less than fun
-
01-15-2014, 05:14 AM #4
Registered
- Join Date
- Mar 2013
- Posts
- 209
I hear you, and can only guess that depends on what you enjoy the most.
Some of us tend to enjoy the road to get the machine working more than actually using it, hehe... :-)
Trust me though, once it's up and running, you'll be into a whole new world of making things.
Happy CNC'ing,
Mac
-
01-17-2014, 03:52 AM #5
Registered
- Join Date
- Jun 2009
- Posts
- 267
Welcome and good luck on your project! It's quite the journey but well worth it I think. If I could stop blowing up break out boards I could post some of my results! Lol
Sent from my iPad using Tapatalk - now Free
-
01-18-2014, 03:38 PM #6
Registered
- Join Date
- Dec 2013
- Posts
- 29
So this is the electronics package I am considering. I've done some research and really looks like a good value. Check out the way he does his wiring harnesses with hot swappable fuses, awesome! Whatcha think?
Gecko G540 Controller (Revision 8 2013 Date Code) Complete DIY Package Gecko G540 Controller Revision 8 2013 Date Code Complete DIY Package | eBay
Nema 23 Stepper Motor, 3.5A 300oz in. 2.4mh Inductance NEMA 23 Stepper Motor 3 5A 300oz in 2 4MH Inductance | eBay
With that package, should it go with the 1, 2, or 4 step acme screw? I will machining mostly wood 2.5 and 3D. I want to eventually dabble with some aluminum but I wouldn't call them "precision parts". I assume it's possible to change the screw out down the road if you want to. Your opinions are most appreciated.
-
01-18-2014, 05:21 PM #7
Registered
- Join Date
- Jun 2009
- Posts
- 267
My MOMUS Chipper Shredder
Only thing I saw was the roller on the switches. You may have to cut those off for proper operation. The way the limit switches work on the momus is by way of a bolt hitting the arm of the switch. The roller could possible interfere with this operation. Maybe not but it's just something to be aware of.
Now get off the computer and get back to work!! Lol
Sent from my iPad using Tapatalk - now Free
-
01-19-2014, 03:23 AM #8
Registered
- Join Date
- Dec 2013
- Posts
- 29
So and advice on what acme screw to get? That seems to be my biggest hangup. I was thinking the 2, but the speed of the 4 is so tempting. What are you guys using?
-
01-19-2014, 03:27 AM #9
Registered
- Join Date
- Mar 2013
- Posts
- 209
Hey, to answer your question about the Z-screw: I can't find it right now in the manual, Bob mentioned that somewhere and that had me wondering for a while too.
You said you want to do some 3D work, so a higher start screw might be a good idea to get better resolution.
I ended up going with a 4 start and so far it's been working out pretty good.
-
01-19-2014, 04:00 AM #10
Registered
- Join Date
- Mar 2013
- Posts
- 209
Sorry, should have probably posted some more info about my build:
The screw itself came from McMasterCarr for $29.90:
99030A303 1018 Carbon Steel Precision Acme Threaded Rod, 3/8"-8 Size, 1/2" Travel/Turn, 3' L, Right-Hand Thread, 4 Starts
Ts
(at that price, it's no big problem to change it later, so don't worry about it too much)
I just don't see the argument to go with a lower start screw at a few inches of Z travel in this machine.
The gain in speed is totally pointless in my opinion...
Anyways, then you have to match your lead nut to the 4 start screw as well as the thread clamps if implementing the thrust bearing upgrade.
You can get the matching anti-backlash lead nut and the thread coupler from Dumpster-CNC. If you're doing the thrust bearing upgrade, you can also get the thread clamp from them.
Here's a drawing of what my setup looks like, hinting where you can get the thrust bearings and washers if you want:
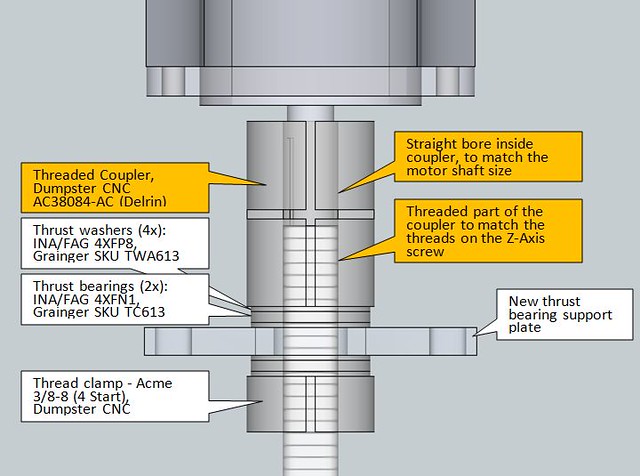
Momus_ThrustBearing_Illustration by mkloberg, on Flickr
I guess the cool thing is that in my case, I put this upper z-axis assembly together almost 10 months ago during the build and never, ever had to go back to adjust anything, it just works without any problems.
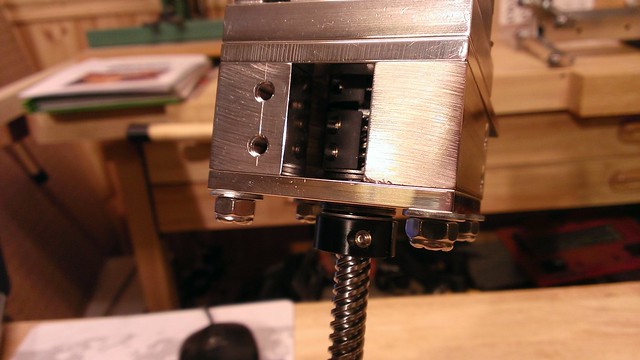
WP_20130418_007 by mkloberg, on Flickr
Hope this helps and good luck,
Mac
-
01-19-2014, 04:18 AM #11
Registered
- Join Date
- Dec 2013
- Posts
- 29
Thanks Mac, very informative. As I understood it from the plans, 1 was the slowest speed with better resolution and 4 was the faster speed with some sacrifice in resolution. My first instinct was to go with the 4. So you would recommend doing the thrust bearing upgrade! I was considering skipping it...
-
01-19-2014, 05:01 AM #12
Registered
- Join Date
- Dec 2012
- Posts
- 38
Mac,
That is a great illustration! What did you use to draw it?If it weren't for the last minute nothing would ever get done.
Jim
-
01-19-2014, 05:16 AM #13
Registered
- Join Date
- Mar 2013
- Posts
- 209
Glad you ask :-) Back then I modeled the entire thing in Sketchup, including all the parts and the motor, so this is just a straight shot out of Sketchup - using parallel projection mode. The notes I put on it afterwards in MS Word and took a screenshot of it all using Greenshot.
Mac
-
01-19-2014, 05:24 AM #14
Registered
- Join Date
- Mar 2013
- Posts
- 209
I'd say do it if you want a reliable machine. If you look around, there's a lot of builders that reported their Z-axis falling down at some point because they didn't tighten up the clamp on the motor enough. For me, the thrust bearing idea just seems more sound to resist the forces up and down while cutting and so far it worked out pretty good, so yes, I do recommend it.
Mac
-
01-19-2014, 01:37 PM #15
Registered
- Join Date
- Jun 2009
- Posts
- 267
My MOMUS Chipper Shredder
Plus 1 on the 4 start screw.
I have plenty of mine left over I would be happy to send you a length of it. 8" I believe is all you need.
Sent from my iPad using Tapatalk - now Free
-
01-19-2014, 03:01 PM #16
Registered
- Join Date
- Dec 2013
- Posts
- 29
Thanks for offering the 4 start screw Jkountz...I will totally take you up on that. This is why I love using forums because people really do help each other out. PM sent

-
02-15-2014, 04:28 PM #17
Registered
- Join Date
- Dec 2013
- Posts
- 29
Small update: build is progressing a bit slower than I thought as I haven't been able to devote the time I want. I have completed all of my metal cuts, filing, and bore holes. I am currently working on all the taps.
A couple of observations, reminders and advice for novices (and even experts) from a novice:
Buy decent drill bits. I tried several types of bits but found the tips would tend to wander even with center punches. The best bits I found to use were the DeWalt titanium nitride bits. They have a smaller pilot bit on the tips which allows the bit to plunge perfectly into the material. I used wd40 as a lubricant to preserve the sharpness. In my opinion, a drill press is also a must for drilling all your holes. Whenever possible, secure your material in a vice. Wear a full face shield because drilling into aluminum causes long thin strands of material to wrap around the bit shaft. This spins wildly like a bar wire tornado. Take care to keep your hands clear.
When drilling the steel, I recommend long sleeves and gloves (I just used nitrile ones). The steel fragments as opposed to the aluminum chip out extremely hot and burn when they hit the skin. Not serious, but an uncomfortable distraction.
Do yourself a favor and buy an aluminum blade for your mitre saw. I got mine on ebay for $25 and it goes through the aluminum like butter. If you do this PLEASE EXERCISE SAFETY PRECAUTIONS! A note on safety: be sure to use a full face shield as the aluminum chips fly everywhere. If your mitre saw has an integrated clamping system to hold the material against the fence, USE IT! Towards the end of my metal cutting I was rushing when cutting an angle on the bar stock for the clamp and didn't have it properly secured. Big mistake. The blade caught an edge on the chunk if aluminum and sent it flying! It hit my finger so hard I thought it was torn off and it was numb for about 30minutes. Thankfully no breaks or anything, but blood flew everywhere and it was dark purple and super sore fir days.. The aluminum chunk then slammed into the saw fence bending it terribly, destroyed my saw blade, and ricocheted off two walls putting holes in both. You can only imagine what could have been if it had kicked out of the machine towards me. I was scared $#!+less and couldn't resume work on the project for three days. I was careless and it almost cost me. I share this so you don't make the same mistake and always have respect for the power of the machines we are operating. No matter how experienced you are, mistakes can happen so be carful out there...
-
02-15-2014, 04:35 PM #18
Registered
- Join Date
- Jun 2009
- Posts
- 267
Some great advice to follow there for sure! Glad to hear you will be okay keep an eye on those digits at all times!
Sent from my iPhone using Tapatalk
-
02-15-2014, 04:39 PM #19
Registered
- Join Date
- Dec 2013
- Posts
- 29
Also a shout out to Jkountz for supplying my build with an acme screw! So great to have support from fellow members! Thanks again!
-
02-15-2014, 05:19 PM #20
Registered
- Join Date
- Jun 2009
- Posts
- 267
Hey no problem glad I could help. Get your butt to work and get that machine built! LOL
Sent from my iPhone using Tapatalk

 Reply With Quote
Similar Threads
-
Momus v, 2.1
By LarryE in forum Momus Design CNC plansReplies: 2Last Post: 06-24-2013, 12:51 AM -
Momus out of 80/20 ?
By fastpcuser in forum Momus Design CNC plansReplies: 1Last Post: 09-22-2012, 05:26 PM -
Best Paint for Momus
By DY123 in forum Momus Design CNC plansReplies: 2Last Post: 08-18-2012, 03:25 AM -
Momus Logo?
By groswald in forum Momus Design CNC plansReplies: 4Last Post: 05-20-2011, 03:29 PM -
a paper shredder motor for spindle motor??
By .xXACEXx. in forum DIY CNC Router Table MachinesReplies: 4Last Post: 06-03-2008, 03:17 AM
