


Hi all,
After much planning and deliberation I have finally place an order for a PRO4848 kit with NEMA 34 electronics. The 80/20 extrusions should be arriving the beginning of next week, and hopefully the remainder of the kit shortly after. I got quite a lot of work ahead of me, and I am really looking forward to getting up and running.
My machine will mainly be used to manufacture an aftermarket stock I designed for the Marauder air rifle. Initially, my plan was to have them produced at a local shop, but finding one capable of doing so for what I felt was a reasonable price turn up empty. I decided to do some research on what personal CNC machines were available and I ultimately decided on a kit from CNC Router Parts. My decision was based on the many good reviews I read, and the large amount of information I found available on their kits.
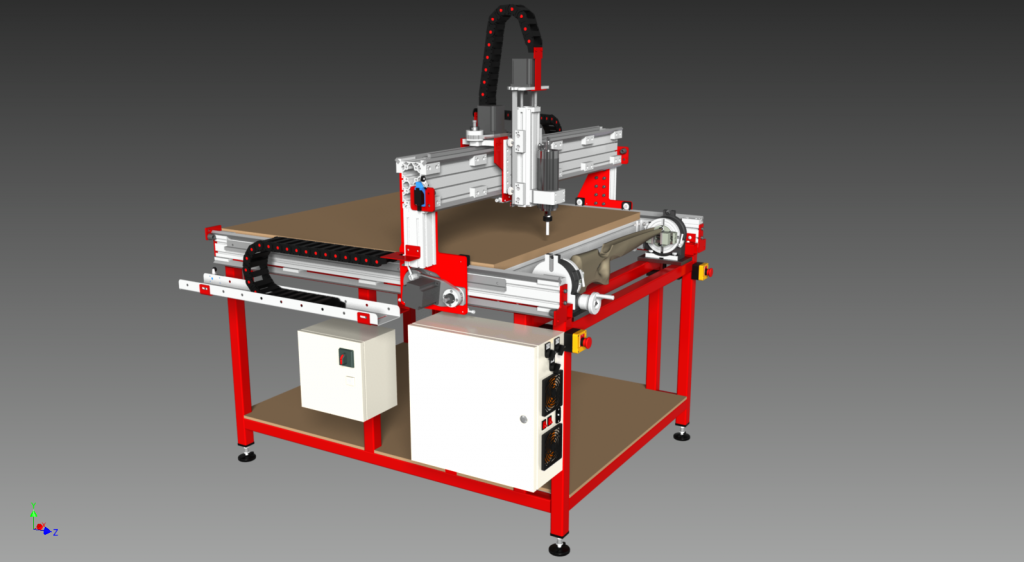
Here are a few renders of my planned table design and stock:
As you can see, I have done quite a lot of planning. Hopefully it leads to me getting up and running without any major problems:cheers:
Thank you for reading! I will post updates and questions as the build progresses.
Erik
Thread: PRO4848 Build
Results 1 to 15 of 15
-
08-09-2014, 08:25 AM #1
 Registered
- Join Date
- Aug 2014
- Posts
- 8
PRO4848 Build
-
08-09-2014, 07:53 PM #2
Registered
- Join Date
- Mar 2011
- Posts
- 61
Re: PRO4848 Build
I'm curious. Your plan clearly shows a 4th axis yet I don't see one offered at the CNCRP site. Did I miss it or have you sourced it elsewhere?
-
08-09-2014, 11:11 PM #3
Registered
- Join Date
- Aug 2014
- Posts
- 8
Re: PRO4848 Build
 Originally Posted by kaetamer

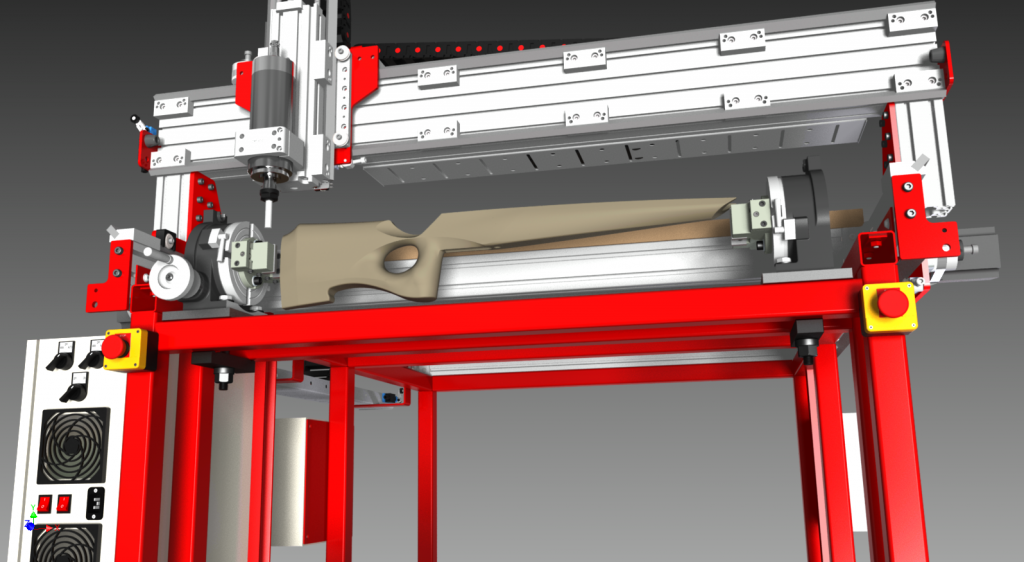
The 4th axis is my own design and is not offered by CNC Router Parts. As mentioned earlier, my main reason for building this machine is to manufacture the stock seen in my original post. I initially planned to do this without a 4th axis by designing a set of fixture plates that would flip and locate the work piece between cutting operations. I ultimately decided that this method would be too time consuming and error prone, so it was back to the drawing board. I began researching various components that I could piece together to build a reasonably accurate, cost effective indexing axis. My final design consists of the following:
6" Rotary tables (The cheep Chinese kind)
Grizzly T10254 self-centering mini vises
Some 1018 cold rolled steel plate
Various mounting hardware

The rotary table at the butt of the stock (left side) will be used to manually index the work piece between cutting operations. The other rotary table will free wheel until the desired index angle is reached. Both tables will be locked in position via their lockouts during cutting operations. Each rotary table is attached to a piece of 5/8" thick 1018 cold rolled steel via their mounting slots. This assembly is then affixed to the router's support table using a large strap clamp, spherical nut+washer, and a central stud that is affixed to the 5/8" plate. The four long 1/4-20 screws seen protruding from the bottom of the 5/8" plate are a concept for fine positioning that I more than likely will not end up using. My plan was to machine some eccentric washers that would be threaded and locked onto these screws. They would be used to fine tune the position of each rotary table while dialing in the 4th axis. It turns out the rotary table, vise, and steel plate should weight enough for me to be able to tap the assembly into final position. I initially though that I might need this eccentric locating system because the weight of the assembly would be too light, thus making its positioning very sensitive (light tap = large displacement).
Erik
-
08-10-2014, 02:50 AM #4
Registered
- Join Date
- Mar 2010
- Posts
- 813
Re: PRO4848 Build
Hey Erik, Really nice and hope to see a video of it making chips. I seen these 4 axis on ebay but the software kept me from considering making the plunge. What cam software you plan on using to write g-code for Mach?
Thanks,
Dan
-
08-10-2014, 06:00 AM #5
Registered
- Join Date
- Aug 2014
- Posts
- 8
Re: PRO4848 Build
Dan, Originally Posted by Dan911
I will definitely post some videos when I get up and running. I plan on using a combination of Meshcam and possibly Cambam for generating g-code. Meshcam will be used for the 3D shaping of the sides and Cambam will be used for the inletting.
Erik
-
08-10-2014, 03:36 PM #6
Registered
- Join Date
- Mar 2010
- Posts
- 813
Re: PRO4848 Build
After taking a better look at your cad drawings and rereading i see your using the rotary table to keep your stock accurately positioned and will be manually turning. Great idea! It will be alot easier than setting up jigs on your table.
If your main reason for machine is to fabricate stocks you might find these of some interest.
3040 CNC L Type 4th Axis Router Rotational Rotary A Axis Tailstock Engraving | eBay
-
08-11-2014, 06:20 AM #7
Company Representative

- Join Date
- Feb 2004
- Posts
- 1086
Re: PRO4848 Build
Hi Erik,
Your machine plan looks great! I'm very interested to see how the rotary setup turns out.
We'll keep you posted as we get your machine kit ready to ship. We have been slammed with orders since May and while we've added people to catch up, ramping up some of our suppliers to keep everything in stock has been difficult. Once your extrusion arrives, you can get started on that hot red frame. Let us know if there's anything else we can do to help you get going on that.
I'm looking forward to seeing this come together!
Best regards,
Ahren
CNCRouterParts
-
08-12-2014, 02:20 AM #8
Registered
- Join Date
- Dec 2013
- Posts
- 41
Re: PRO4848 Build
My question goes along with Dan's, especially since gun stocks are on my short list of things to do on my CNC once I get it fully operational. Why have you chosen to manually index it opposed to adding another stepper? I'm excited to see the results!
-
08-12-2014, 09:42 PM #9
Registered
- Join Date
- Aug 2014
- Posts
- 8
Re: PRO4848 Build
Dan, Originally Posted by Dan911
I have seen those inexpensive 4th axis on ebay before. I never could find any information about them, but they look a bit small for holding something as large as a rifle stock.
Ahren, Originally Posted by ahren
Thank you! I received the 40-8016 gantry extrusion along with two 4080 y-axis extrusions yesterday. The remaining pieces should be arriving sometime today. I am glad you guys have a bunch of orders coming in and are staying busy.
groc426, Originally Posted by groc426
My decision to go with manual indexing as opposed to CNC indexing was mainly influenced by my perceived cost/benefit ratio. The cost of adding another motor, driver, psu, etc. is not very expensive, but the CAM software needed to take full advantage of a controlled 4th axis is. A proper 4th axis offers many advantages over my planned manual method. When used for manufacturing, the reduction of cutting times is probably the single greatest benefit it affords. Cutting times are reduced because the tool can limit its angle to work pieces surfaces, thus eliminating the need for extensive waterline cutting operations. This combine with fewer required instances of interfacing with the machine (changing tools, loading programs, turning dials, etc.) can lead to quicker production times. At this time I do not think I will sell these stocks at a rate that constitutes the need for a proper 4th axis, this may change in the future. With my current planned setup, the down time between cutting operations should not be very long at all. My offset coordinate system will not change because X, Y, and Z zeros will be located on the A axis. I plan to have a fixed auto touch plate for the z-axis, so tool changes should be fairly quick. If I were to give an estimate, my down time between cutting operations to be less than five minutes because there really isn't much to do. Loosen the rotary table lockouts, turn the drive side table dial ~22.5times (90 deg), reengage the lockouts, load the next cutting program, perform a tool change if needed, done!
Erik
-
08-13-2014, 03:18 PM #10
Registered
- Join Date
- Dec 2013
- Posts
- 41
Re: PRO4848 Build
Advance,
Thanks for the explanation. It sounds like you have a well thought out plan. I'm going to keep an eye on this build, it should be an exciting one!
-
08-14-2014, 08:52 AM #11
Registered
- Join Date
- Aug 2011
- Posts
- 21
Re: PRO4848 Build
Very nice design
-
08-17-2014, 02:29 PM #12
Registered
- Join Date
- Mar 2011
- Posts
- 584
Re: PRO4848 Build
You can try out desk proto for free to control your 4th axis. DeskProto >> products >> DP Entry Edition: the lowcost version
That said you could pretty easily hand code the program if your making the same part over and over, just remove the M30 put a rotational move in there and paste in the next g-code.My CRP 48 x 48 build http://www.cnczone.com/forums/open_s...3-crp_4x4.html
-
08-17-2014, 04:44 PM #13
Community Moderator
- Join Date
- Mar 2003
- Posts
- 35538
Re: PRO4848 Build
Or just let MeshCAM rotate it for you, since you'll be using it to create the g-code anyway.
Gerry
UCCNC 2017 Screenset
http://www.thecncwoodworker.com/2017.html
Mach3 2010 Screenset
http://www.thecncwoodworker.com/2010.html
JointCAM - CNC Dovetails & Box Joints
http://www.g-forcecnc.com/jointcam.html
(Note: The opinions expressed in this post are my own and are not necessarily those of CNCzone and its management)
-
08-18-2014, 08:34 PM #14
Registered
- Join Date
- Aug 2014
- Posts
- 8
Re: PRO4848 Build
Thank you Originally Posted by bluesea
Thanks for the heads-up. I plan on playing with the continuous 4th axis feature in Deskproto's trail version. I am interested in just how much quicker the total machining time can be compared to my current planned method. As mentioned earlier, I am open to having a continuous 4th axis if the frequency of sales and overall cost/benefit ratio supports it. Originally Posted by vtx1029
My plan is to do something similar. I plan to have just one complete cutting program, so I wont have to load multiple g-code files into mach3. This saves time and mitigates the chance of loading the wrong file between cutting operations. When its time to index the 4th axis, I will just use a M0 pause and (MSG,) command to tell the user to index the 4th to a particular angle. I don't see how a motorized 4th axis and MeshCAM's indexing feature could greatly improve upon/speed up this process. A motorized 4th is pretty much neutered without the proper CAM software to support it (continuous rotary axis capability). Originally Posted by ger21
Erik
-
11-02-2014, 06:12 AM #15
Registered
- Join Date
- Aug 2014
- Posts
- 8
Re: PRO4848 Build
Update 11/01/14:
It's been a while since I posted about this build, so I thought I would give you all a little update on my progress. My kit arrived from CNCRP mid September, it was ready to ship out at the beginning of the month, but I was leaving town and wouldn't be available to receive it. Arhen was nice enough to hold the packages in his office until I got back home. Thanks again!
I'm starting to transition from the planning/design stages of this build to the construction stages. I finished running my electrical service for the machine last week and I'm currently working on assembling all of the electronics for the build. I had hoped to be further along than I currently am, but researching and piecing together all of the components for this build has been eating up quite a lot of time.
Here are a couple renders of my planned machine as it stands now:
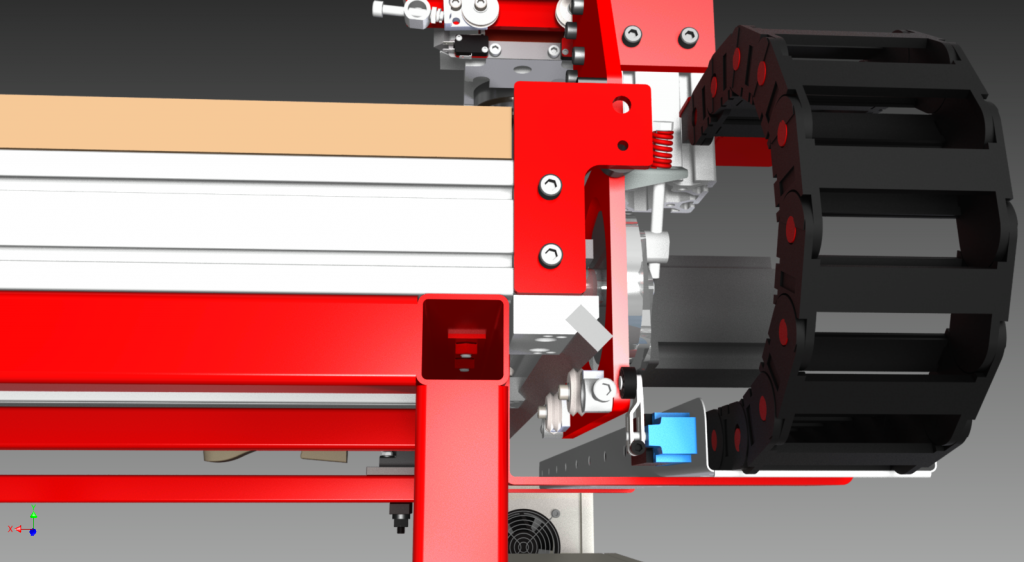
I decided to run some cheap roller limit switches from TEMCO on all axis in conjunction with soft limits. The X and Y axis limits (TEMCO P/N CN0011) integrated into the machine fairly easily without a need for any custom mounting brackets (just drilling and tapping some holes):
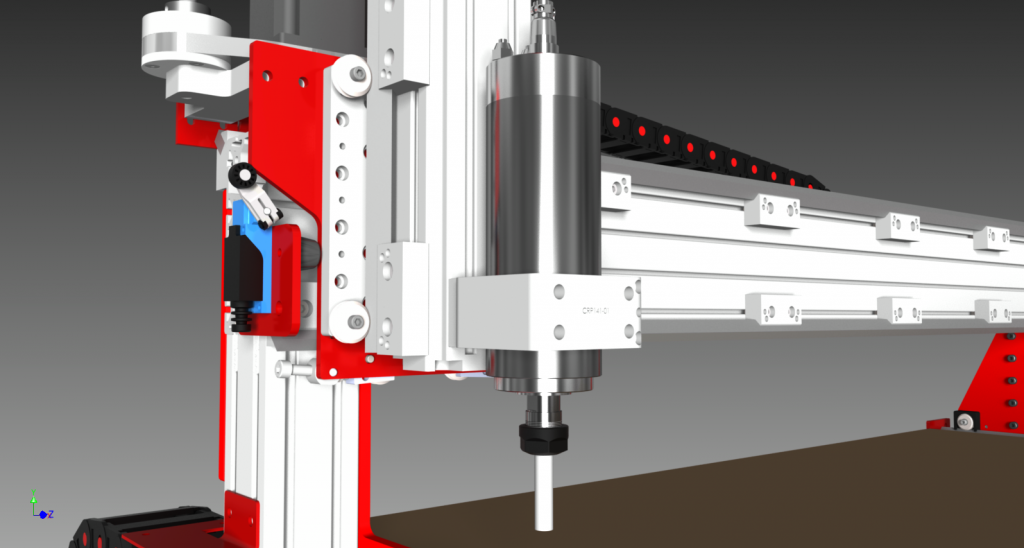
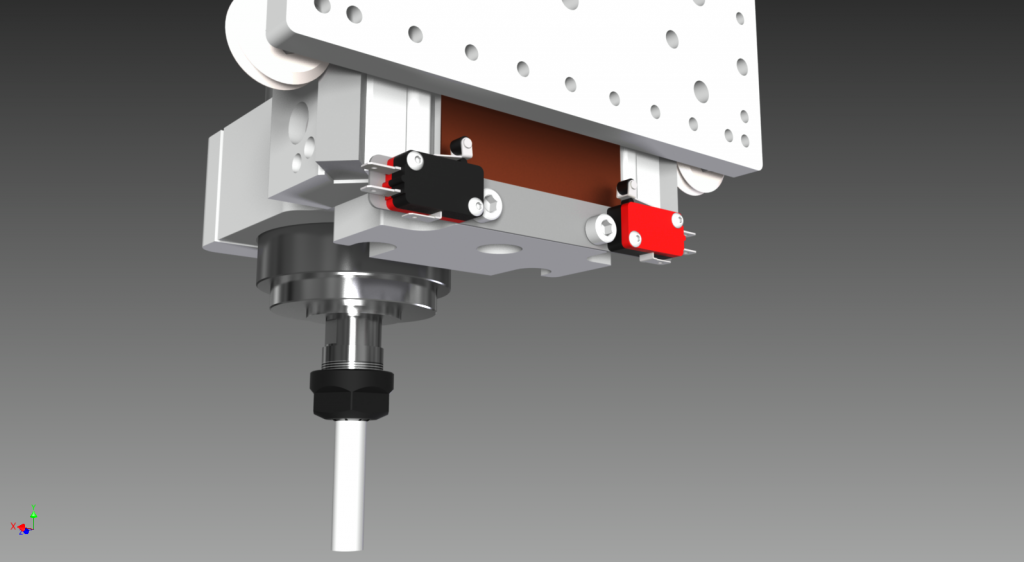
I decided to use two micro roller sensors (TEMCO P/N CN0097) for the Z high physical limit and homing. They attach to a custom bracket that replaces the lower hold down for the Z axis dust cover. I decided to use two sensors instead of one for redundancy during homing/raising the Z:
I plan on using the CNCRP bench top proximity sensor kit for homing the X, X' and Y axis. A mobile and fixed touch plate will take care of setting tool height.
Everything except for how I am going to cool my spindle has been addressed. I am thinking about mounting a fan, radiator, and pump assembly to a custom bracket right above the spindle on the Z axis extrusion. This would stop me from having to run long lines for my coolant, but I am not sure how the fan and pump will do with the movement of the machine.
I will keep you all posted. The next update will definitely be more substantial.
Erik


 Reply With Quote


Similar Threads
-
CRP PRO4848 - Creatively Simple Build
By landarts in forum Avid CNCReplies: 126Last Post: 01-06-2018, 05:10 AM -
PRO4848, NEMA 34 Build, Electronics Help
By CYoung in forum Avid CNCReplies: 8Last Post: 04-27-2015, 05:18 PM -
PRO4848 with MENA34 - Electrical help
By CYoung in forum Avid CNCReplies: 11Last Post: 07-03-2014, 08:36 PM -
pro4848 australian build
By carter j in forum Avid CNCReplies: 3Last Post: 12-04-2013, 03:24 AM -
First PRO4848 is coming to TN!
By vbgraves in forum Avid CNCReplies: 51Last Post: 11-28-2013, 09:18 PM
Tags for this Thread
80/20,
build,
cnc,
cnc machines,
cnc router,
cnc router parts,
decided,
electronics,
ini,
kit,
kits,
machine,
machines,
manufacture,
parts,
post,
price,
pro4848,
router,
shop,
stock,
table,
work
