


Hi Travis,
looks like you're making good progress.
I haven't actually checked your findings, but be aware that there are some "issues" in the original plans.
Bob has collected those and included them in a document found here: momus CNC | benchtop DIY router plans | errata
Perhaps what you've just come across is one of those things...
--
Mac
Results 21 to 40 of 47
-
11-23-2014, 05:29 AM #21
 Registered
- Join Date
- Mar 2013
- Posts
- 209
Re: Travis' Momus (aka the slow long running build)
-
11-23-2014, 05:53 AM #22
Registered
- Join Date
- Dec 2012
- Posts
- 62
Re: Travis' Momus (aka the slow long running build)
Mac,
Thanks for the pointer to the errata. I think Bob has those all corrected in the 2.1 download.
I am planning on adding the thrust bearing mod to my Z-axis as well.
I bought some plate but after comparing it to the carriage actual I realized I couldn't just replace the 3/4" spacers with a solid plate.
That area is where the Y and Z rails pass through the carriage.
I think I could use my Grizzly and mill a plate with the appropriate areas reduced to 1/4" thick but that is a lot of effort I am not prepared to undertake at this time.
I am going to investigate and perhaps cad up a carriage so I can figure out exactly what I need to modify the 2.1 carriage correctly.
Because of that I went ahead and built the carriage per the 2.1 plans.
The one piece that got screwed up was easy to replace and I have been adding bearings everywhere necessary.
One thing I realized is that I accidentally drilled the 1/4" holes in the gantry tube on the wrong side.
No big deal since I'll just have an extra hole or two in the tube that will not be populated. The idler bearing hole and the cable management hole are in the wrong location.
So I drilled a new idler bearing hole and got that mounted. I'll deal with the cable management attachment point later on.
I have the gantry tube ready for the carriage to slide on at this time except the 'modified bolts' need to be modified a bit more and have more shaved off of them.
They are not quite 3/32 thick right now. I was hoping that wouldn't matter but the clearance to the base must be approximately 5/32 and the gantry rubs on the base right now.
-
11-25-2014, 09:41 PM #23
Registered
- Join Date
- Dec 2012
- Posts
- 62
Re: Travis' Momus (aka the slow long running build)
How much resistance to rolling should there be for the X and Y rails?
It seems with some adjustment it is rolling pretty freely but I can tighten down the bearings and then it becomes hard to push.
What is the proper amount of tension to place on the bearings?
-
11-26-2014, 12:01 AM #24
Registered
- Join Date
- Dec 2012
- Posts
- 62
Re: Travis' Momus (aka the slow long running build)
Ok I found the relevant information on page 170 of the 2.1 plans.
Not too tight and not too loose .
.
-
12-02-2014, 02:44 AM #25
Registered

- Join Date
- Aug 2006
- Posts
- 132
Re: Travis' Momus (aka the slow long running build)
Another nice looking build and it looks like you didn't make the mistake I did (reveal in a few lines).
Tip #37 - don't get sidetracked or your Momus will sit alone like mine has...
I got sidetracked trying to get a good finish on the outside of my build and then realized I put the 'rear' bearing adjustment pocket too far forward.
Discovered this mistake after getting the gantry all assembled and test rolling under hand power - yikes!
Will have to cut another with the base already assembled and then probably 'plug' the wrong one... don't see an advantage to having 3 as it would just collect dust/debris.
To be fair, I also took another job in the company last year and have been traveling afar more. (Poor excuse, I know)
-=Doug"IT ≠ IQ " Starwalt 1999
-
12-02-2014, 05:13 AM #26
Registered
- Join Date
- Dec 2012
- Posts
- 62
Re: Travis' Momus (aka the slow long running build)
When you say 'outside of my build' do you mean the enclosure?
I have my gantry rolling on the base now but it seems that the left side is 3/8" farther forward than the right side.
I need to figure out why it is racked or if it is square I suppose I need to reposition the holes in the gantry tube such that I can slide one end or the other forward or backwards along the tube. Hopefully there is enough material there such that will not cause any real problems.
-
12-02-2014, 05:16 AM #27
Registered
- Join Date
- Dec 2012
- Posts
- 62
Re: Travis' Momus (aka the slow long running build)
Couldn't you just cut a piece of wood and glue it in to fill in the extra hole in the base? Originally Posted by vtxstar

Seems like a much easier solution and you don't have to tell anyone you did it
Nevermind I misread that. I thought you meant rebuild the entire base.
-
12-02-2014, 02:57 PM #28
Registered
- Join Date
- Aug 2006
- Posts
- 132
Re: Travis' Momus (aka the slow long running build)
My 'fix' is to take some of the scrap that has the beveled top edge and put it in where i made the mistake.
Fill and sand as needed. Move on with the job.
I cut the pockets on my mill before assembling the main structure but, will have to cut the correct pocket by hand with a router.
Once it is done, like member 'GT' I will employ the Momus in support of my model aviation hobby... already have projects I am hand cutting that could be done quicker with the Momus.
That does not mean making the G-code and computer files is faster than hand cutting a one-off part.
Tip #38 - Do something on the project everyday (shame on me).
-=Doug"IT ≠ IQ " Starwalt 1999
-
12-02-2014, 04:11 PM #29
Registered
- Join Date
- Dec 2012
- Posts
- 62
Re: Travis' Momus (aka the slow long running build)
Here's what my gantry misalignment looks like:
 Left side
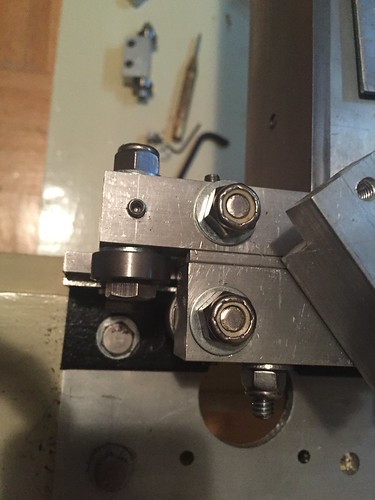 Right side
 Overhead
-
12-02-2014, 04:15 PM #30
Registered
- Join Date
- Dec 2012
- Posts
- 62
Re: Travis' Momus (aka the slow long running build)
Here's what the cover looks like at this time.
I have it all painted up and ready for the windows to be set.
I didn't have time before I had to leave for Thanksgiving but now that is over I plan on setting them in the panels either tonight or tomorrow.
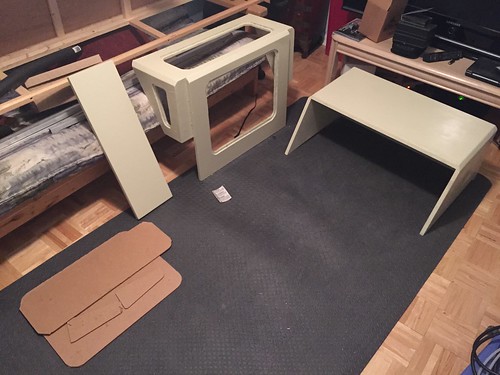 Painted cover with windows in foreground
-
12-03-2014, 05:00 AM #31
Registered
- Join Date
- Dec 2012
- Posts
- 62
Re: Travis' Momus (aka the slow long running build)
I didn't set the windows yet but I did mess with the gantry some more.
It appears that it isn't quite square and I am rubbing on the left side if I square it up.
I am going to have to tweak it some more it appears to make it roll smoothly and be square to the base.
The base itself seems to be out of square by a quarter of an inch which is what I believe is making the gantry sides not line up on the rails at exactly the same point.
Since that area of the base isn't exactly used in the normal operation of the machine I am not going to worry about it very much unless it actually is a problem.
 Riding the rails by travismclane, on Flickr
-
12-08-2014, 07:13 PM #32
Registered
- Join Date
- Dec 2012
- Posts
- 62
Re: Travis' Momus (aka the slow long running build)
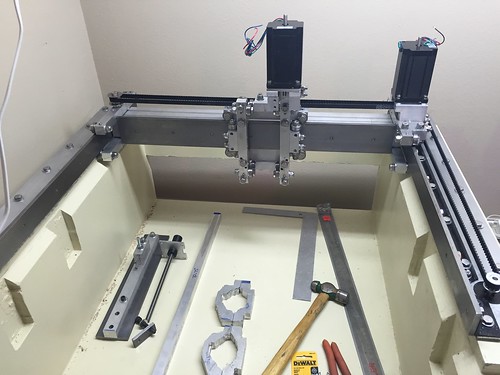
Well I got everything rolling freely and installed the X and Y motors and belts.
Setting the windows is a bit tricky when trying to keep silicon from getting everywhere.
I am doing both of the the Z-Axis mods at the same time.
I have the nut plate made and the rail modifications along with the bearing plate done at this time.
The z-motor spacer will have to wait until tonight or later this week since I am waiting for some additional stock to show up.
 Taking shape
 Z Rail components
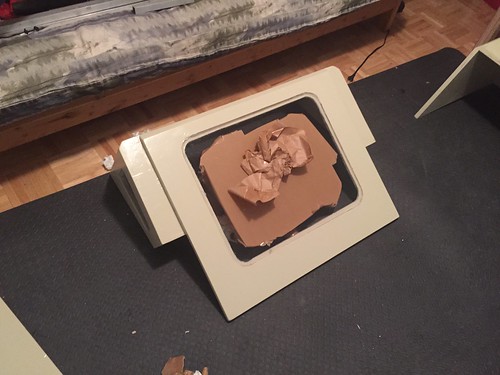 Cover with windows
-
12-09-2014, 05:20 AM #33
Registered
- Join Date
- Dec 2012
- Posts
- 62
Re: Travis' Momus (aka the slow long running build)
Status update:
I completed the Z-axis spacer and did the bearing preload.
I had to stop there for the night since my 10-32 x 2" bolts for the Z-axis are not long enough to reach through the existing components and the new spacer.
 Z-Axis related items
In other news I checked to see if the cover would clear the motor and it doesn't with the spacer added to the Z-axis motor mount. (I know Bob said as much unfortunately I had already cut everything for the enclosure and didn't want to scrap it all)
As an alternate method for creating the clearance necessary:
It appears that cutting off the shaft as close to the housing as possible would provide sufficient clearance below the roof of the cover.
Does anyone know if there would be any harm done to the Z-axis stepper if this was done?
-
12-12-2014, 07:53 PM #34
Registered
- Join Date
- Dec 2012
- Posts
- 62
Re: Travis' Momus (aka the slow long running build)
After putting some padding on the cover it appears that I have the clearance after all without having to modify anything with my particular set of steppers.
I think I have a little over 1/8" clearance or so. I didn't measure exactly just yet.
I am using the 570 oz Nema 23 1/4" dual shaft steppers.
I moved it all around the base by hand with the cover on and it appears that it will not impact anywhere at this time.
Thank goodness!
-
12-18-2014, 01:54 AM #35
Registered
- Join Date
- Dec 2012
- Posts
- 62
Re: Travis' Momus (aka the slow long running build)
So I have a slight problem with my epoxy base pour.
I mixed up the correct 2:1 ratio based on the instructions but unfortunately mixed the bottles up.
The mixture was then a 2:1 ratio of hardener to resin instead of resin to hardener.
It currently is pliable after 48 hours but it doesn't seem to be fully curing.
Is there a way to salvage my epoxy base or do I need to somehow remove it all and reapply?
-
12-18-2014, 08:04 PM #36
Member
- Join Date
- Feb 2005
- Posts
- 829
Re: Travis' Momus (aka the slow long running build)
I think you will have to remove and reapply. But might not hurt to give it a few more days, just in case it hardens.
-
12-18-2014, 08:09 PM #37
Registered
- Join Date
- Dec 2012
- Posts
- 62
Re: Travis' Momus (aka the slow long running build)
Do you think there is any merit to attempting to mix some more resin into the existing layer on the base?
I have 16 ounces left after all and the mixture on the base is still gooey.
-
12-19-2014, 12:21 AM #38
Community Moderator
- Join Date
- Mar 2003
- Posts
- 35538
Re: Travis' Momus (aka the slow long running build)
You'll need to scrape it out, as the gooey stuff will never harden. The only thing that might work is to try to heat the whole thing to over 100° for a few hours, but I doubt it.
Gerry
UCCNC 2017 Screenset
http://www.thecncwoodworker.com/2017.html
Mach3 2010 Screenset
http://www.thecncwoodworker.com/2010.html
JointCAM - CNC Dovetails & Box Joints
http://www.g-forcecnc.com/jointcam.html
(Note: The opinions expressed in this post are my own and are not necessarily those of CNCzone and its management)
-
12-19-2014, 01:05 AM #39
Registered
- Join Date
- Dec 2012
- Posts
- 62
Re: Travis' Momus (aka the slow long running build)
Thanks. that is what I expected to hear actually.
I consider it a life lesson in how to not mix epoxy.
What should I do with the goo?
-
12-22-2014, 02:19 AM #40
Registered
- Join Date
- Aug 2006
- Posts
- 132
Re: Travis' Momus (aka the slow long running build)
How gooey is the goo?
If it is like cold syrup, you could try putting all the scraped out goo into a disposable container, mix in the rest of the 'right' material and salvage the stuff,
You would then have surplus in the container that will harden properly...or close to it.
Maybe you could get enough to react correctly? Regardless, container the goo and mix in the rest of the material and try for a solid mess.
Then toss it.
-=Doug"IT ≠ IQ " Starwalt 1999

 Reply With Quote
Similar Threads
-
New Momus Build
By Jkountz in forum Momus Design CNC plansReplies: 80Last Post: 04-04-2014, 11:24 AM -
404's Momus V2.0 build
By e404_forbidden in forum Momus Design CNC plansReplies: 13Last Post: 09-22-2013, 02:49 PM -
Rob's Momus Build
By rwhittle in forum Momus Design CNC plansReplies: 8Last Post: 04-08-2012, 08:41 PM -
My Momus build
By TeslaFreakshow in forum Momus Design CNC plansReplies: 29Last Post: 12-06-2011, 11:35 PM -
Longest running project
By ger21 in forum WoodWorking TopicsReplies: 31Last Post: 05-29-2011, 09:28 PM
