


The Epoxy Granite experiment has progressed to the mud pie making stage!
I did a bunch of tests mixing sand and gravel and checking the epoxy required with water as a substitute. Based on the experiences from the big CNCZone E/G thread, I was shooting to find a ratio that had me at a little under 15% Epoxy by weight, and 85% the rest of the aggregate. The real pros can get this down to more like 7% epoxy, but I'm not trying to over optimize the problem.
Once I had my proportions figured out (full details on that on my web page: http://www.cnccookbook.com/CCMillEpoxyFill.htm ), it was time to do a trial batch and see how it came out. FWIW, The mixture I arrived at with the water tests wound up using these proportions by weight with epoxy resin:
62% gravel
23% sand
14% epoxy resin
That worked out pretty darned well if I do say so myself. In terms of volumes, this was 1/8+1/4+1/3 cup of gravel, 1/4 cup of sand, and 1 1/2 pumps each of resin and hardener. I wouldn't over analyze any of these numbers, BTW. Here's what you need to mix up this stuff:
The pumps are real nice. They meter out the right proportions of resin and hardener, and the instructions say just leave 'em on the cans when you put them into storage and they'll be fine. Keep in mind, epoxy builds up a stronger and stronger allergic reaction from exposure, so you don't want to get any on your skin! I wore rubber gloves and eye protection and was really really careful with the stuff.
So, after all that, here is what an Epoxy Granite "Mud Pie" test looks like:
Tomorrow I'll see how it has set up. If it looks good, I'll start doing the pour on the machine base using these proportions. If this turns out to be a useful way to improve a machine, it has to be one of the easiest mods I've done in a long time!
I'll keep ya'll posted...
BW
Results 21 to 40 of 107
-
03-04-2008, 04:56 AM #21
 Gold Member
- Join Date
- May 2005
- Posts
- 2502
-
03-04-2008, 06:34 PM #22
Member
- Join Date
- Jun 2005
- Posts
- 260
I just noticed that in Wikipedia, that white vinegar can be be used to clean uncured epoxy from things.
It's also good to wear gloves because some epoxy has a known cancer causing chemical in it.
I am suprised that no one sells the optimal EG recipe of premixed in bags, but that's one for the EG thread, which is hundreds of pages now.
-
03-04-2008, 07:23 PM #23
Gold Member
- Join Date
- May 2005
- Posts
- 2502
Good to know about the white vinegar. Originally Posted by BrendaEM

I argee on the premix. OTOH, the more I look at some of the commercial stuff, the more I wonder "how optimal is optimal"? The procedure to succeed with the optimal E/G mix may also require a lot of other investments in vacuum bagging, vibrating machines, the ability to measure with more precision, and so forth. We're talking about the difference between 14% epoxy and maybe 7% here, and I haven't really tried all that hard to bridge that gap.
If you get 90% of the value really cheaply with gravel and play sand, it's time to rock on and get something done with it.
Speaking of which, I went down to check the test batch this morning and was very pleased:


Some observations:
- The material set up very nicely. The only air bubbles were at the top. The epoxy is clear and I didn't see any embedded with the aggregate. Could be dumb luck, but the West Epoxy seems to wet really well. Vibrating Tables and Vacuum Chambers were not needed here.
- It faithfully reproduces the mold in minute detail. You can see tiny scratches that were in the plastic cup from the sharp gravel edges reproduced in the epoxy. If you have a precision mold, you will get a precision surface back on the epoxy. Imagine making a lathe or mill headstock out of this stuff. Your precision surface is the machined outside cylinder of a cartridge spindle. Just mold it in place and you have a solid epoxy granite headstock that should be pretty darned solid for machine work.
- The finish is very nice where it was in contact with the mold. It looks polished and is definitely clear enough to see inside. I don't know that I'd try to make a window out of it, but it's a nice finish from an aesthetic standpoint. Looking at pix of some finished E/G machines, I'd always wondered how hard it is to get a nice finish. Came for free on this experiment!
I won't have time today to do the base pour, so I'll probably tackle that in the morning.
Runner440 has PM'd me with an important suggestion for others who may be following the same path. To install the IH CNC kit sometimes requires a little grinding on the underside of the casting to clear the ballnut. I understand perhaps 1/8" of material may need to be removed. Once the E/G dams and/or pour are done, you won't have clearance to get an angle grinder in there. You want to make sure you have either done the grinding beforehand, or that you have a way to get in there to do the job with limited clearance.
In my case I will use a long-nosed grinder I have for head porting, or I will put the base up on my other IH mill and mill a little pocket. I can definitely get in there with my 2" face mill to do that if need be.
Another good suggestion I got was to extend the dams so that the base picks up an inch or so of E/G on the bottom. This allows for the addition of considerably more E/G mass, as well as providing an opportunity to tie across the leadscrew cavity more strongly. I'm very tempted to do this, and undecided, but I probably won't go there. It would mean a lot of extra work and delay, and I'm anxious to keep going on this one.
So far, the E/G process has been fun and easy. That probably means a painful screwup is right around the corner. I'll let you know what it is so you can avoid it!
Cheers,
BW
-
03-04-2008, 07:55 PM #24
Registered
- Join Date
- Jun 2005
- Posts
- 1015
Bob,
how did you remove the epoxy from the cup? what was used as a release agent?
-
03-04-2008, 08:42 PM #25
Gold Member
- Join Date
- May 2005
- Posts
- 2502
No release agent was required. For some reason this particular plastic didn't stick to epoxy. It's a paint mixing cup, brand "Encore". Readily available in many places. I bought it on the aisle at West Marine that has the epoxy resin. Perhaps it is treated so epoxy won't stick on purpose. Originally Posted by Runner4404spd
Best,
BW
-
03-05-2008, 03:46 PM #26
Member
- Join Date
- Sep 2005
- Posts
- 164
when you get ready to fill the column you could use foam to keep the clearance in check. when it sets up then crumble out the foam. the foam would cut pretty easily then maybe coat it with something to help it hold shape during the pour.
Danny
-
03-05-2008, 06:01 PM #27
Member
- Join Date
- Jun 2005
- Posts
- 260
Neat experiment!
Looking at your mix, I wonder if you could experiment with a little fine "play sand" as well, which might displace of the expensive epoxy. You seem to have large and medium aggregate down good.
If you had a seal-a-meal type kitchen appliance, you could make some kind of vacuum degassing bucket situation, but you would have to have enough time to use it.
[I would think that laser printer toner powder (lamp black and plasticiser) would make the E/G nice and black, but who cares, where it's going.]
-
03-05-2008, 06:16 PM #28
Member
- Join Date
- Jun 2005
- Posts
- 260
Neat experiment. Perhaps it's the way the light hit it, but it looks like the aggregate compacted, leaving clear epoxy on top.
Keeping it cheap, I wonder if a little fine "play sand" might displace some of the expensive epoxy in the mix. In the 240+ E/G thread they seemed to try to have a range of aggregates from coarse crushed stone, such as you have, to sand such as you have, to a fine powdered sand or silica.
[If you want the EG black for some reason, toner might work, but I would test it first.]
If you could go a little light surface sanding/grinding to make a physical bond, the epoxy might stick better. Even wire-brushing the surface rust off may help.
You can remove the oil with alcohol, or dishwasher detergent (TSP) and water, drying it quickly, or even using a glass cleaner may help, and letting it dry, to allow a chemical bond.
[BTW, I'm really sorry about the gluegun idea. Perhaps the mass was such that the glue cooled too quickly to stick.]
-
03-05-2008, 06:35 PM #29
Gold Member
- Join Date
- May 2005
- Posts
- 2502
There is a thin layer at top. Larry (Igalla) on the big thread had the same suggestion to add sand at top to soak it up. Depending on the application, a precision surface may benefit from a little epoxy at top. You wouldn't want the edges of any of the aggregate poking through.
I wire brushed the casting, and the iron is nice and rough, so it should be a good surface for the epoxy to bond to. Davo727 PM'd me that I could've just used epoxy and sand to fillet the dams in rather than silicone. Epoxy won't react with the silicone (I've read elsewhere), but it also won't bond to it (almost a mold release agent), so Davo has a better mousetrap for future generations to follow there.
No harm, no foul on the hot glue, it was a good idea. I just had gaps that were big enough that the silicone worked better. If your dam is better fitted, you'd be fine with hot glue.
Re the vacuum situation, I had actually prepared for that. I have a Harbor Freight 2 1/2 gallon painter's pressure pot that is a perfect vessel for pumping down a decent sized batch to deair. There's a guy on ebay selling brand new vac pumps cheap too, and I have one. I figure I'll try some vacuum bagging for something or other at some point anyway.
However, looking at the sample. The vacuum just wasn't needed. What few bubbles are all at the top. According to the other thread a heat gun or blow torch (carfully!) played over top will pull those bubbles right out. I'm not going to bother for this application, but for future projects I may look into it.
Now I've got to decide whether to do the big pour today. I am cognizant that once you start pouring you want to finish. You won't get good cross linkages if you pour new epoxy on top of epoxy already cured.
It is therefore Truth or Consequences time for me to decide on two things:
1. Whether to make the dams higher and have the pour extend an inch or so below the current base. This makes much better provision to tie together the two halves of the casting with E/G.
As you can see, there will be a big central gap where the leadscrew goes that is bridged only by cast iron web:

Those three middle bays on the left stay open in the current plan. IH owners will be pleased to note that at least for some RF45 mills, there is no central webbing:

2. What to do about the column? Davo727 engineered in a massive central bolt to further tie down the column. That's his mill pictured above after the fill, BTW. The bolt goes up through a big block of Epoxy Granite in the base all the way up through the Epoxy Granite fill in the bottom of the column, with a nut at the top.
I really like that idea. I think it would add significant rigidity to the machine. So, I need to go find and appropriate bolt and figure out how to anchor it in the E/G.
I'll keep you all posted!
Cheers,
BW
-
03-05-2008, 07:05 PM #30
Member
- Join Date
- Jun 2005
- Posts
- 260
If you bridge the central span, are you going to be able to add remove, adjust parts such as the ballscrews, and ballnuts, and such.
Do you have all your one shot lines run?
Are there any wire runs you want to put it?
Is there any coolant drain issues?
Hold down holes clear?
Is the base flat and level, not under any kind of stress, such as one corner being higher than the other?
Is it warm enough for the pour?
Everything masked off with tape?
Do you have a helper?
Are the pets far away from the delicious resin?
[A cat near our shop died from eating resin : ( ]
Wearing safety goggles, and gloves, old clothes?
-
03-05-2008, 10:18 PM #31
Registered
- Join Date
- Jan 2007
- Posts
- 277
Hi, Grainger has 1 1/4 in threaded rod, 4140 125K psi strength , $19.00 for a 3 ft piece.
http://www.grainger.com/Grainger/items/5NE84
-
03-05-2008, 10:21 PM #32
Registered
- Join Date
- Jan 2007
- Posts
- 277
bottom view
-
03-06-2008, 06:04 PM #33
Registered
- Join Date
- Aug 2006
- Posts
- 97
Bob, while watching your progress I was suddenly overcome with a brain eruption.
Read on at your own peril and feel free to speculate on precisely what substance is in my pipe.
I'll leave the details to you but what if one were to build a form to surround the entire base on your table surface and then cast in situ up to the way surfaces?
Open some windows into the voids, cunningly segregate the areas where moving elements reside and pack away.
As I did on my table, access to the underside and leadscrew et al is through a window with angle welded in to create a dam.
(My table doesn't have a surface per se but the mill is bolted to a rectangle of 3X .25" wall tubing with legs welded to that.)
Seems encapsulation would answer a lot of the niggly/fiddly aspects and would damp 9+ Richter.
Ok, I'll go back to napping.
-
03-06-2008, 06:52 PM #34
Gold Member
- Join Date
- May 2005
- Posts
- 2502
Davo727, thanks for the further inspiration! I'll be running around the local hardware stores to see what sizes of all-thread they have available to suit. I need to think about length, which goes to how I'm filling the column as well. Originally Posted by QSIMDO
All, I filled 2 of the bays yesterday and they came out great. Didn't take a piccy yet, but will as I fill more bays. I stopped at 2 just to make sure there would be no problems. It was very easy to do, and now that I see things are good, I'll continue.
I decided not to try to fill across. I'm already making a lot of improvements to the IH Mill, and there is virtue in getting done, so I decided not to try to do more engineering on that.
Which brings me to Mr QSIMODO: howdy Quas, and welcome! I've followed your many posts with interest.
What you describe is literally stepping outside the box. Let's treat it as an abstract discussion rather than anything I would consider for this go-round.
Some thoughts:
- I can't see doing dovetail ways in E/G. I'm sure you could do it, but it'd be touchy because the mold is so interlocked with the machine being cast. Hence I think it would be hard to literally use the IH Mill base as your male mold, which I think is what you were getting at. Or perhaps you just wanted to embed it in a bigger block of E/G, which would be more doable, but still a major project. I think extending from the bottom as someone else (Runner440? Sorry, can't remember) suggested is a good way to add some mass if you can work out how to access the ballscrew guts. I guess if you were totally hardcore, you could even build the mill stand into the mill base and do it all from E/G. I read somewhere about a German who built a gantry mill that was anchored to his house foundation in somewhat this fashion. I think it would be interesting to see pics of the frame of commercial VMC's without the enclosure so we can see how they're constructed. I want to see the raw castings, if possible.
- If we're going to make a different sort of way than a dovetail, seems like 2 choices would work great with E/G. First, It seems like you could make box ways. You will need some seriously precision molds, but it could be done. I suspect you want to fit Rulon/Turcite to short saddle surface and make sure to have oil passages and grooves, but I bet it would work out nicely and be a very solid machine. Second, you can mount linear rails. This is my preference since I think it is easier to achieve the precision required.
Re achieving precision like that. It is important to remember that the rigidity of the precision stucture can be less before you pour epoxy. So, for the rails, let's say you create a system that has the rails being leveled via their bolt holes, and the supports are threaded and can be raised and lowered by turning. Such a spindly contraption would not serve for machine operation, but it is fine for getting things in alignment before the epoxy is poured. Once poured, the E/G will make it strong enough for actual use.
I also see benefit in using this principle when fabricating. Let's say you wanted to make a precision tombstone for your 4th axs. Start with 4 pieces of 3/4" thick steel or aluminum, 5" wide by 2 feet long. Bevel the edges and Tig weld them together to make box that is 5" x 5" x 24". Now fill that box with epoxy/granite. Now you have a very solid piece of "work stock" that is machinable on the outside faces (I don't want to machine epoxy granite--takes a grinder!). I can fly cut it to precision on my mill, surface grind it for that last little bit if desired, and it seems to me I have a heckuva nice tombstone for my 4th axis.
Anyway, gotta run and pour some more bays in the base then go to the hardware store and get a column rod.
Ciao!
BW
-
03-06-2008, 07:19 PM #35
Registered
- Join Date
- Mar 2006
- Posts
- 113
Hey Bob,
Nice job so far, following this on several boards and your cookbook. Just wondering what kind of heat is given off when the epoxy kicks. From experience (or lack thereof) a cup kicking before use created enough heat to smoke. Then again the epoxy in your case is a smaller percentage of the mass that you are using.
-
03-06-2008, 09:15 PM #36
Registered
- Join Date
- Aug 2006
- Posts
- 97
No, I wasn't suggesting entombing and abandoning the dovetails.
At this stage there's no need to reinvent that wheel.
Just filling up to the ways and encapsulating the mill base, combining internal passageways with an external layer.
There seems to be a struggle with constructing retention dams and I was considering how to avoid that so I thought of combining all in a "monolithic pour" as it were.
For another discussion; the area that truly bugs me is the column base connection.
I still envision a strongback tying the base and column together.
I beam or truss.
Anyway, good luck and don't get any on you!
Len
-
03-06-2008, 10:49 PM #37
Registered
- Join Date
- Jan 2007
- Posts
- 277
When I did mine I used West Marine epoxy with the slow hardener and it barely got warmer than ambient pouring sections 6 inches thick. There is so much mass in the filler rocks and also the base casting to absorb any heat created. Looks like Bob may be using the fast hardener, that might warm things up a little bit more. Originally Posted by greenb_60097
-
03-07-2008, 04:07 AM #38
Gold Member
- Join Date
- May 2005
- Posts
- 2502
I got no appreciable temperature "kick", just barely warm to touch. I know what you mean though. Originally Posted by QSIMDO
Len, I am hoping to significantly improve the column to base rigidity. We will see. I want to conduct some deflection tests since I have two mills. The plan is to completely assemble the CNC to make sure everything is right before tearing down the other mill and swapping places. That will give me a brief time when I can do some back-to-back comparison.
Let's all think of what kinds of back to back tests may make sense.
So today I did go out and procure a big bolt, but I only had about an hour in the shop. SWMBO had some important priorities for me to attend to, which I gladly did (grumble, grumble, mumbling under breath).
Instead of filling all the bays but the column bay, which had been the plan, you'll have to settle for pix and narrative of how I am filling 3 bays so far.
To wit:
You can see two bays that cured overnight. BTW, I couldn't leave 'em alone, and they were pretty darned hard in like 2 hours.
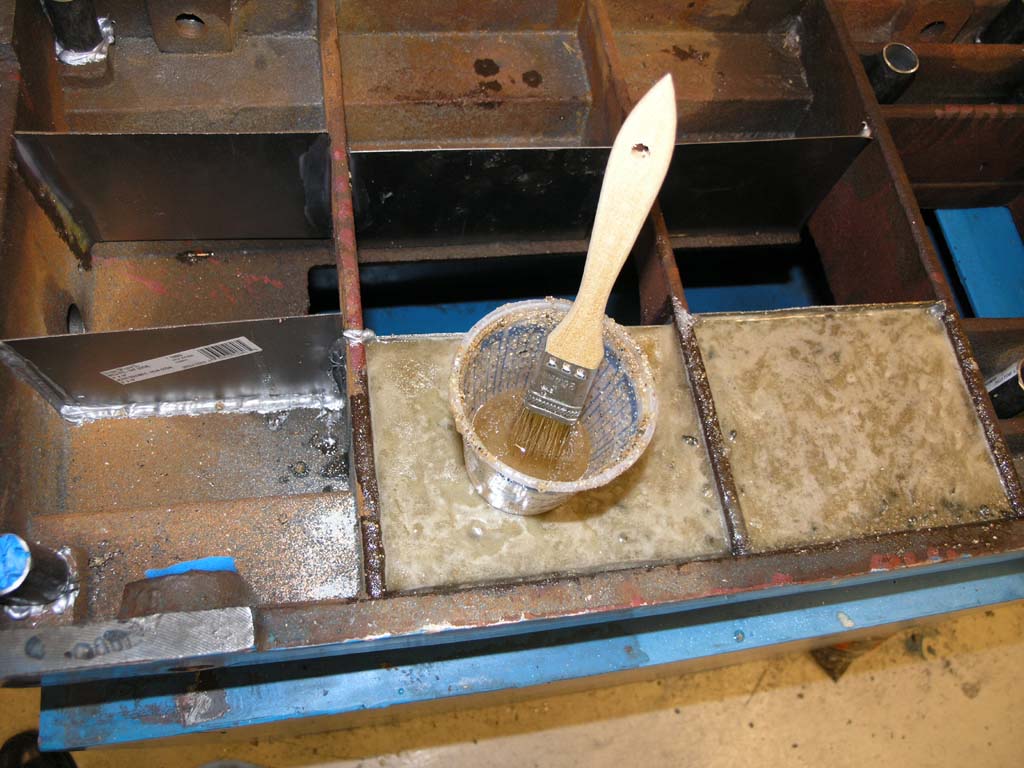
So I start out mixing a little batch of epoxy. Those pumps are so handy! 2 pumps resin, 2 pumps hardener, mix well with the chip brush, and I have some epoxy. I kept doing small batches in these cups.

Next I like to paint the bay in raw epoxy, just to make sure the epoxy ties into the metal really well and then crosslinks to the Epoxy Granite's epoxy. I put it on generously.
Now, sorry, no piccies of me mixing batches, I was juggling rocks, sand, pumping, and moving pretty quickly to avoid any pot life issues. I don't think I even came close, but I like the lowest possible viscosity to ensure good wetting and uniformity.
Basically, before I got any epoxy out, I mixed a big bucket of sand and gravel. Then I would fill a bay in layers. Epoxy layers just fine so long as you don't let it set too hard. West Marine says if you can leave a thumbnail imprint in the lower layer, you are fine and it will all crosslink. I never got close to having to do a thumbnail test, but I was doing a lot of small pours.
Someone else might might the whole big bucket of rocks with epoxy from the get-go, it could heat kick, and you'd be off to the races, LOL!
So I would give it 2 pumps each, stir well in the cup, add aggregate mix, stir to coat, and pour that in the bay. The consistency from the cup was thick slurry--that's too much epoxy. Since I'd worked out my proportions in advance, I would add the remaining dry mix on top, and stir to coat with the chip brush in the bay. This works well and when you have it right, the consistency is like room temperature peanut butter.
Now I tend to the too wet rather than too dry side, so I followed Larry (Igalla's) advice and if I saw much liquid epoxy on top, I added glass bead media to soak it up:

Continued...
-
03-07-2008, 04:11 AM #39
Gold Member
- Join Date
- May 2005
- Posts
- 2502
Basically, I'd put a wet layer, add the remaining dry, repeat both, then stop for about a minute to see how much epoxy rose to the top. And then add glass bead to soak it up.
I stirred the glass bead down into the E/G about an inch. And then things were happy again:

It's good to wait because bubbles rise to the top too! I am told you can ram the mixture with a 2x4, and some talk of vacuum exposure to degass. I don't think either is crucial to this application.
However, there is another shortcut I gleaned from the big Epoxy Granite thread:

That lousy photo is one of those instant on butane torches. You can wave it slowly (but without stopping anywhere!) over the surface and the bubbles go away immediately! I think it both zaps the top of the bubble and the heat lowers viscosity to fill in the crater fast. It really clears things up:

Okay, I'll keep mushing on. Even though I am slow, the work is easy and satisfying. The base already sounds deader when tapped on the fill side versus the open side. Cool!
Cheers,
BW
-
03-10-2008, 07:06 PM #40
Gold Member
- Join Date
- May 2005
- Posts
- 2502
I have made progress on filling my mill base with Epoxy Granite. All the bays except the big hole under the column have been filled:

The two little center bays on the bottom are still wet. I agonized over them. They house the column mounting bolts, which I did not want to foul up with any leaking epoxy. I had some small leaks on 2 of the centering holes. It seems it's very hard to get a perfect seal between the silicone and the casting/pipe even if you use a large fillet and drop straight down with no side to side motion.
The leaks I got were just a few drops, but a few drops of epoxy would foul up the threads on those holes terribly. It would be the end of the world, but drilling them out and tapping would be a painful nuisance.
I decided to insert the bolts just a little to seal the bottom of the hole, and then pour molten candle wax in on top. I used a torch and candle to supply the wax and poured until the was was above the casting/pipe seam.

I'll have to wait until the epoxy dries before I can melt out the wax and see that the hole threads are good to know for sure. Early indications are that it certainly looks good. You can see on the picture at the top of the post the wax (disturbingly the same color as the epoxy, but that is wax!) is fairly pristine. There's a little sand in one hole from when I went along at the end and added some sand to soak up excess epoxy.
Keep fingers crossed for me!
Cheers,
BW
PS Next step is to engineer a big connecting bolt with the column, and then from there to start filling the column. I also need to finish the one shot oiler work. Never enough time in the shop!


 Reply With Quote
Similar Threads
-
bridgeport z axis oiling
By CNCPrototype in forum Bridgeport / Hardinge MillsReplies: 8Last Post: 11-16-2007, 04:21 PM -
Oiling of the ways!!
By chipsahoy in forum FadalReplies: 2Last Post: 09-06-2007, 12:48 PM -
X3: Way oiling? One shot?
By InspirationTool in forum Syil ProductsReplies: 4Last Post: 01-23-2007, 01:18 AM -
Way oiling systems
By Greolt in forum Benchtop MachinesReplies: 15Last Post: 07-26-2006, 04:39 AM -
Z not oiling!!!!
By carbidecraters in forum FadalReplies: 11Last Post: 07-07-2005, 02:26 PM
