


After reading many treads I thought I would start a new tread directly aimed and finding out what modifications and enhancements people have made to their X3 and X4 machines.
I think we would all agree that for the price we paid for a Chinese machine is not too bad, but there are a lot of small things that could be done to improve the machines. Many of these mods can be done ourselves with surprising results, in time hopefully Syil will pick up some of the ideas and implement them themselves in latter releases.
I would encourage you all not to make this a slanging match at Syil, but use it as an opportunity to share mods and fixes with other Syil owners.
Myself I have
Replaces all the grub screws for adjusting the play in the X and Y axis with quality screws total cost about $5 austrailian. I can now actually adjust it so there is no noticeable side play in either.
Results 1 to 20 of 45
-
01-14-2009, 03:04 AM #1
 Registered
- Join Date
- Oct 2008
- Posts
- 9
Syil X3, X4, X4+ enhancements and fixes.
-
01-14-2009, 06:21 AM #2
Registered

- Join Date
- Apr 2006
- Posts
- 844

we will carefully to learn customer advise and improve our machine immediately.
xushuoDirection,Commitment,Follow through
-
01-14-2009, 07:51 AM #3
Registered
- Join Date
- Feb 2008
- Posts
- 154
On my X4+ Put hinges on the rear access panel and fitted a socket and plug on the 4th axis rotary table so it can be removed when not in use.
One thing I will get to one day is to strip off the ripple finish on the motor covers and table. Then repaint them in a smooth finish so it is easier to clean.
Another thing I will have to get to is some sort of spindle lock so I can change tools without having to use the tool on the bottom spindle fitting.
-
01-14-2009, 08:04 AM #4
Registered
- Join Date
- Oct 2008
- Posts
- 9
A spindle lock would be good
-
01-14-2009, 09:56 AM #5
Registered
- Join Date
- Jul 2005
- Posts
- 969
what i mostly plan on doing is to take all of the electronic out of the back of the machine to a seperate cabinet, having the electronic in the back is not the easiest place to access it unless you machine stands in the middle of the room wich is rarely the case with benchtop machine, hence the name benchtop, also i agree about replacing the gibbs screw
i havent had to much problem on my side with the paint finish
i also plan on making a fixed adaptor for the cutting fluid hose the current magnet holder is not strong enough for moving the hose with one hand you always have to use both hands
i also am working on a mod for the tts to prevent it from coming out under pressure when used in combination with long tool and hard material
also i am looking eventualy a way of getting speed range to increase, i can liive with the 200 limit but i would really like the spindle to reach 5000
also i want to take the front panel off the front of the machine and make it hand held, think it would be more ergonomic this wayThe opinions expressed in this post are my own. -Les opinions exprimé dans ce messages sont les mienne
-
01-14-2009, 10:18 AM #6
Registered
- Join Date
- Oct 2007
- Posts
- 166
I think I've done most of what ataxy is planning to do

With a full enclosure the electronics in the back was just a pain so I moved them into an old electrical switch box which is on AV mounts bolted to the stand. I can get into the electronics in the time it takes to undo two screws.
I took out all of the electronics in the head and moved then into a box which is mounted on the outside of the enclosure. Having to stretch over the enclosure door to adjust the speed if I was having to run it in manual mode (due to my many previous references to CNC speed control issues) was inconvenient to say the least. Also now they're not subject to direct cutting vibration. Can only be a good thing!
Also done a spindle lock and two gas strut modification. Oh and a little mechanism to allow me to tram the head quickly.
Thinking about it...it doesn't resemble the mill that came in through the door.
Forgot to mention the Y axis travel mod.
Still working on the electronics switch over. The motor speed controller has morphed into a full 6 axis and BoB design as if we're going to do it then it might as well be useful for some of the other things we plan to do...non-CNC mill related.
-
01-14-2009, 11:26 AM #7
Registered
- Join Date
- Jul 2005
- Posts
- 969
i would like to see some photo of your mod and enclosure with some in depth info on how you did them and how they work? Originally Posted by iGG1e
 The opinions expressed in this post are my own. -Les opinions exprimé dans ce messages sont les mienne
-
01-14-2009, 12:16 PM #8
Registered
- Join Date
- Feb 2008
- Posts
- 154
Photos of all three please Originally Posted by iGG1e
What is this one?? Originally Posted by iGG1e
-
01-14-2009, 04:03 PM #9
Registered
- Join Date
- Apr 2006
- Posts
- 844
here it is some improve of currently delivery syil machines.
1,add quickly connector of 4th axis,and coolant pump.
2,add cover of z axis coloum.to pretect rail.
3,change bearing to reduce high speed temp of spindle.
4,add big stepper motor on 4th axis to reduce backlash.
5,incrase inspection time,from 1 hour to 5 hours high speed run.any elecontrics or procision unstable will be take off,and re-check before loading.
6,make carton stronger to reduce shake or demege on transport.
7,recommend dealer use container to transport reduce delivery demege.
8,working on new manual documents with more necessary info.
we also learn advise from our customers.if any good suggestion was ok,we will carry on it immediately.Direction,Commitment,Follow through
-
01-14-2009, 05:05 PM #10
Registered
- Join Date
- Dec 2007
- Posts
- 413
It looks as though Syil is at least aknowledging the mechanical and electronic issues of the machines. I see some fundamental flaws in their business plan which may prove to be more difficult to solve.
1. They have too many models and designations. This makes the correction of production errors much more difficult to implement. Plus, if any one of the models proves to be highly successful it can spell the doom of the others along with the loss of the development costs. Smithy sufferred the same issue and had to drop about 1/2 of their CNC line.
2. It appears that they have been too aggressive in their expansion of the dealer network, allowing people to get in with minimum orders. Evidenced by the statement about switching to container shipping. For a market the size of the USA, any potential dealer should be capable of ordering in container lots. Having numerous models makes this very difficult, as a dealer early on will not really know which machines will be the best sellers and could end up back ordered on popular units and stuck with the rest in inventory. Plus, stocking of spare parts and record keeping of various upgrades throughout all the various models could quickly require each dealer to add a full time employee just for this non-productive work.
Tormach has sufferred the same sort of Chinese production issues, but their targeting of a specific market with a single product will prove to be a more successful strategy.
-
01-14-2009, 05:52 PM #11
Member
- Join Date
- Jun 2007
- Posts
- 3757
My Mods.
So as not to duplicate too much I will use some links.
1. No Picture, but a piano hinge on the left looking from the back.
2. A plug for the 4th axis. NEEDS A BIG LABEL. Turn off power before changing plug. I must add a switch to disable the drivers, so it can be (un)plugged.
3. Some splash guards visible in grinding videos.
http://www.cnczone.com/forums/showth...134#post486134
4. Z-axis travel enhancements.
http://www.cnczone.com/forums/showthread.php?p=438154#post438154
http://www.cnczone.com/forums/showthread.php?p=397011#post397011
5. Grinding endmills I Must use a tripod and do a retake.
http://www.cnczone.com/forums/showthread.php?p=548461#post548461
Super X3. 3600rpm. Sheridan 6"x24" Lathe + more. Three ways to fix things: The right way, the other way, and maybe your way, which is possibly a faster wrong way.
-
01-14-2009, 06:26 PM #12
Registered
- Join Date
- Jul 2005
- Posts
- 969
sorry for the one liner,wich i replaced by a one liner:withstupi
The opinions expressed in this post are my own. -Les opinions exprimé dans ce messages sont les mienne
-
01-14-2009, 06:56 PM #13
Member
- Join Date
- Jun 2007
- Posts
- 3757
Wiring info 1 liner minus signature.
All screwed connections and crimps need checking. Pull each crimped wire. If it comes out it would have failed.
LEN1042. If you counterbalance, must be from CG of head, but then the head will bounce without much load on the Z screw and you can expect a really poor finish. Don't counterbalance too much, if you must, and do it on the center line.
-
01-14-2009, 10:44 PM #14
Registered
- Join Date
- Apr 2008
- Posts
- 52
wire covers
First off I think the idea for this thread is great.
Just a few items.
1- to retain the flexible plastic wire covers from coming off the limit switches and such I have done 2 things. I wrap the end of the cover and the part the cover attaches to with self vulcanizing tape. This is like electrical tape but there is no adhesive and as you wrap the tape onto it self it bonds and fuses together effectivily sealing and securing the cover. You have to remove the protective liner that prevents the tape from sticking to itself as you wrap. It also helps to pull the tape tightly as you wrap. This actually took longer to explain then to do. The other way i connect the covers if there is an opportunity to screw in an air fitting nipple.is to pull the wires out of the cover, install the nipple, pull the wires thru the nipple and cover and finally push the cover over the nipple and secure it with a hose clamp.
2- I plan to replace the gas strut altogether with a counter balance attached to the head at a central point to eliminate any side loads. This will also help increase the travel and a neat thing about a counter balance is that you get completely linear loading over the entire travel of the head and you can add or remove weights to change the counter balance effect if you add any heavy tooling.
3- It is good to hear that Syil has made some changes. Is it possible that the upgrades can be sent to those of us that already have our machines.
enough for now,
regards, Len
-
01-17-2009, 10:32 AM #15
Registered
- Join Date
- Oct 2007
- Posts
- 166
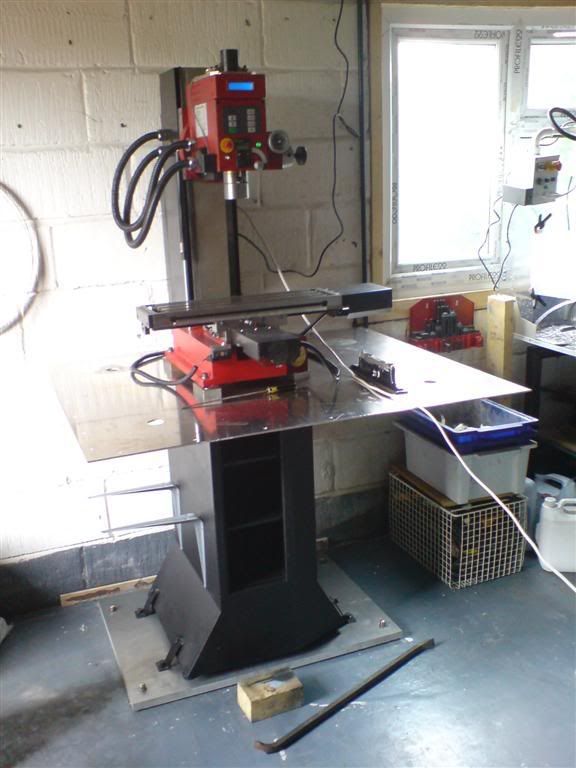
I didn't have as many photo's of doing the various mods as I thought I had. I think you can get a feel for most of them and the fact that where I can I try to use what I've already got for materials.
This shows you the beginning of where it lives and the size of the aluminium plate used for the enclosure base. Both the stand plate and the large enclosure plate were kindly done by a large firm on their water-jet and CNC punch. In a further shot you can see the framing etc added to the enclosure plate.
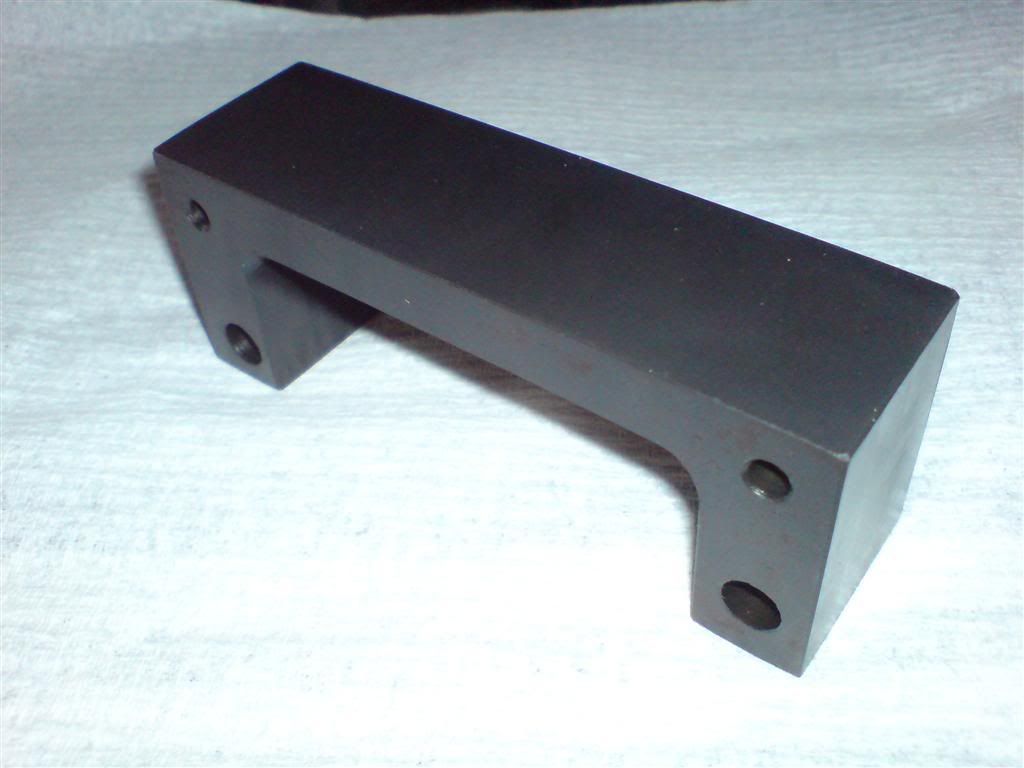
The Y axis mod is basically a spacer block (I used steel) you add between the bearing plate and the slide. This allows you to use the otherwise wasted ballscrew length.
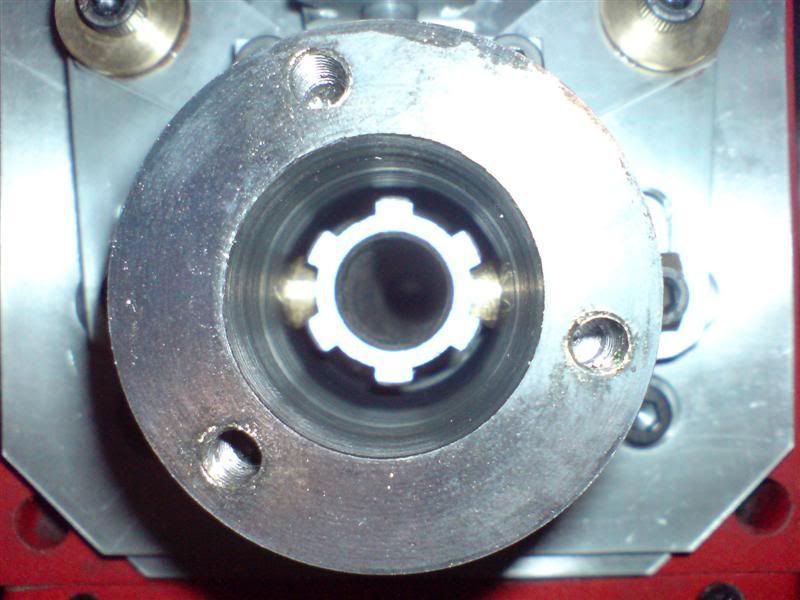
The spindle lock ended up with what some might think is a bit overly complicated but I wanted a single pull with pressure either side. With an extra wedge slide I can lock the pins with extra pressure when tightening a face mill etc. Engagement is good enough to do it without the wedge, but it takes the pressure of the mechanism if I feel the need to give the drawbar an extra crank.
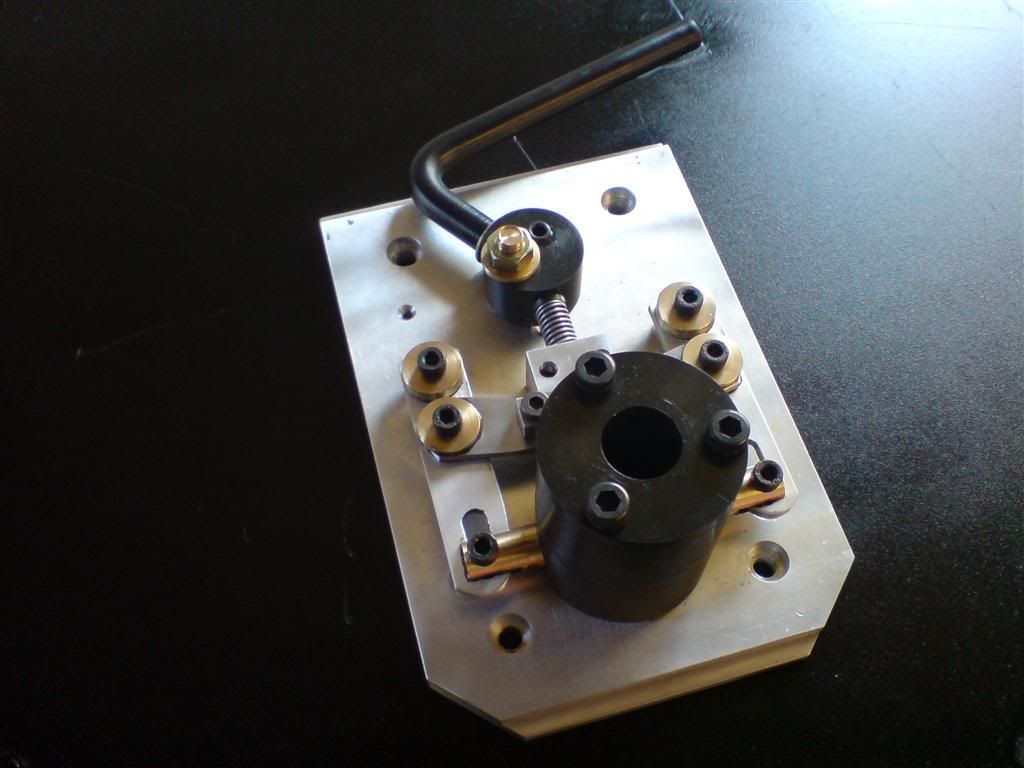
Here's the pins engaged.
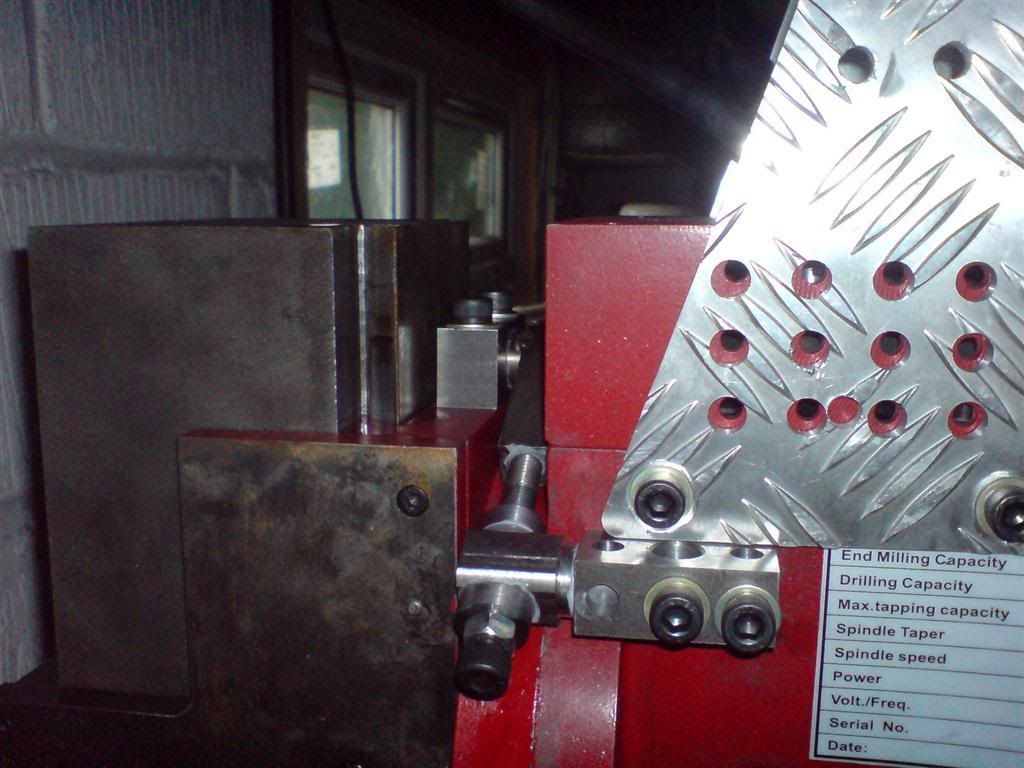
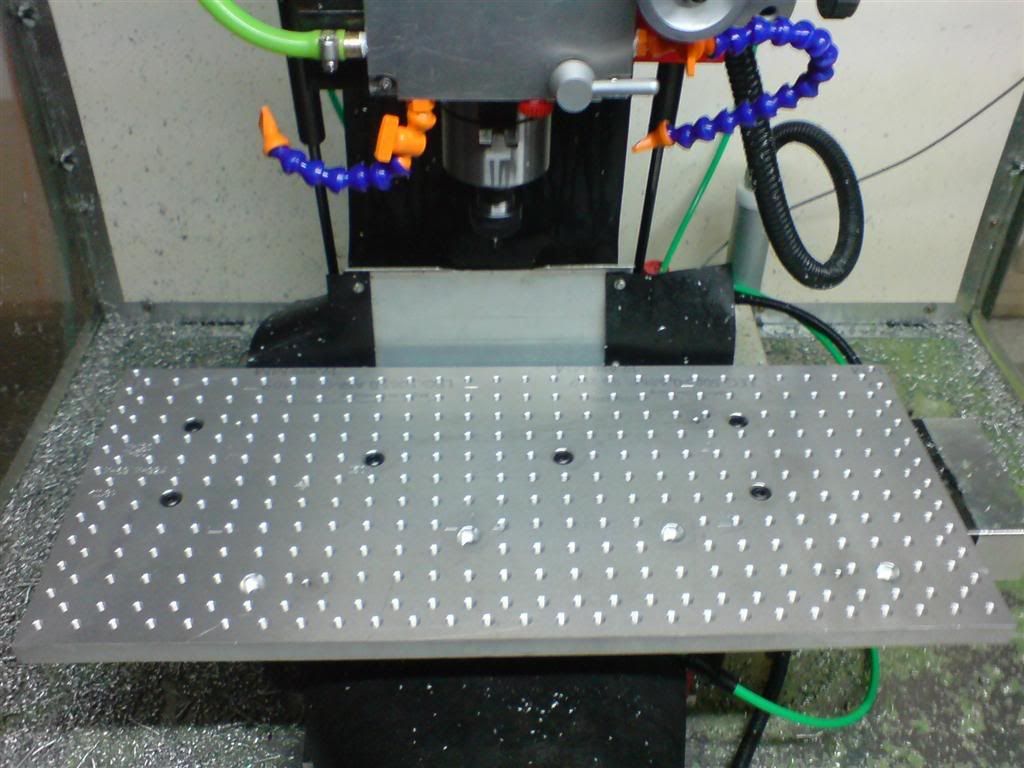
I got two longer gas struts to allow the head to go higher as well as even the lift pressure. In a possible future mod I may get rid of them and go for a counter balance system. Space is a bit tight behind, so it might not happen. The picture also shows the front panel blanked off and I now run the coolant through channels in the front panel which gets rid of the stupid magnetic base that'd moves all over the place when trying to aim the nozzles. You can also see that I moved the motor wiring to come out of the opposite side and that there is only one, not two. The red cap at the back is covering the AMP connector I use for the 4th axis. The other green tubing is for the oiling system I added. Other mods have been done since this picture was taken. Covers etc.
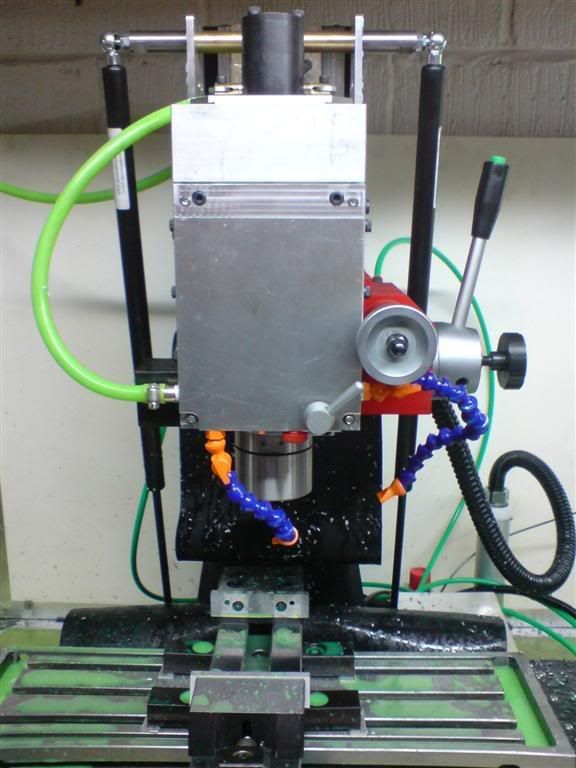
This is the quick tram adjuster and I find it saves a lot of fiddling.
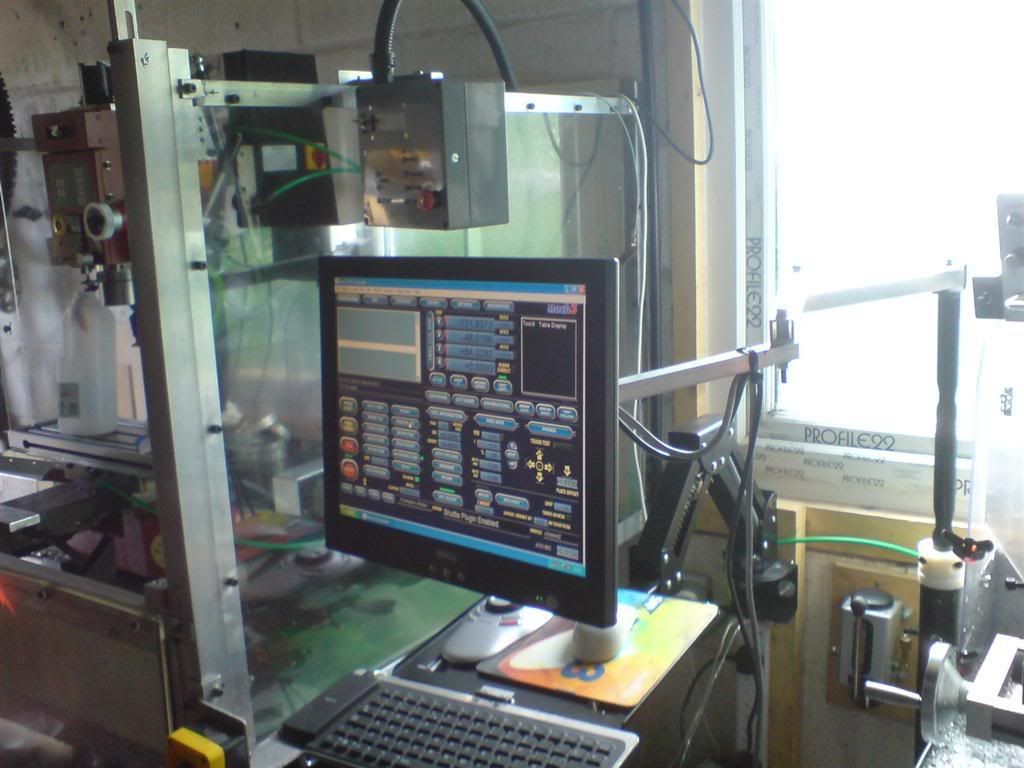
Here's the side with the keyboard and LCD. You can also see the box with the electronics previously mounted in the mill head. Cable routing has since changed to it. Also you can just see bottom left my favourite button...the large emergency stop switch!
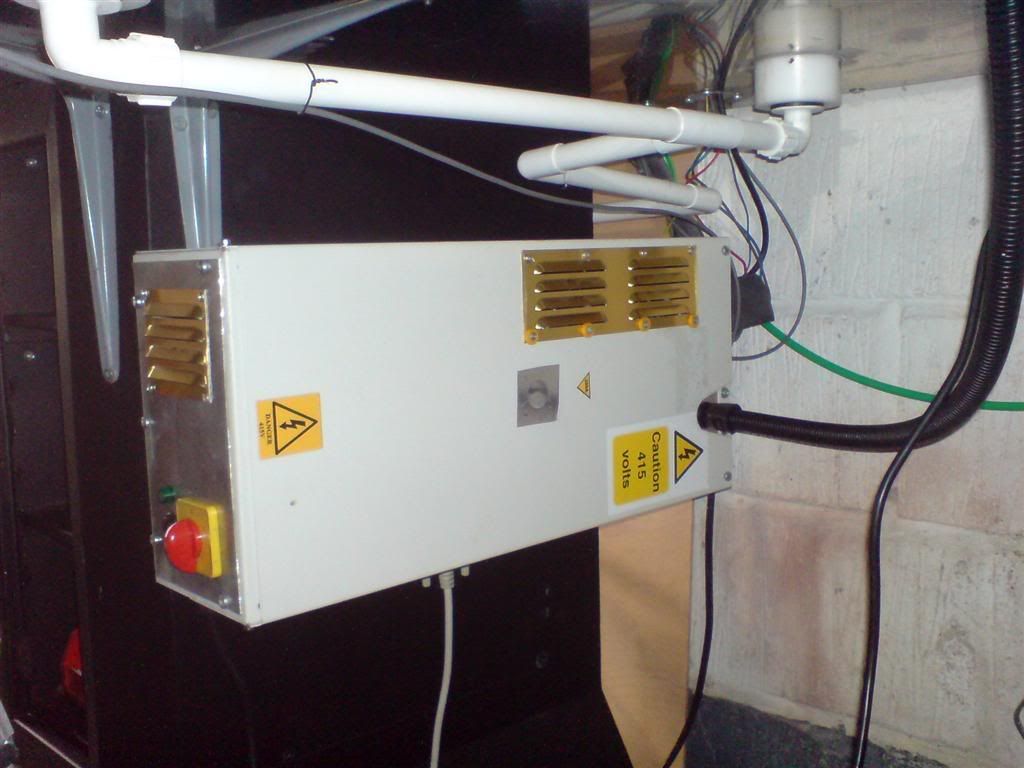
When I took the electronics out of the back I put them in a switch-gear box I'd salvaged. You can also see the drain lines for the coolant system. They're well sealed and under no pressure so I have no fear of leaks.
Just another thing I made to give a bit more flexibility on the mounting of things, a large tooling plate.
She ain't pretty, but she's functional.
Think you can say any warranty left is well shot
-
01-17-2009, 10:45 AM #16
Registered
- Join Date
- Apr 2006
- Posts
- 844
very cool stuff.some it is really very necessary to remove currently design on X4...
hope this thread be hide...hehe.i really hope those message or pic could be private to me or my company..
if possible could make another drawbar or chuck or your spindle lock...we can pay for it,better you have some more design paper...or emails to us ...
xushuo
thank you both...Direction,Commitment,Follow through
-
01-17-2009, 12:02 PM #17
Registered
- Join Date
- Jul 2005
- Posts
- 969
i understand that you would be interested in been the first out of the door with those mod on the machine, but remember xushuo the idea of the thread was to share with other user not with syil in particular, also no pun intended but all of those should be thought of by you engineer most of them are thing that you go ''what the frack that should not be like that'' inside a week of using the machine
The opinions expressed in this post are my own. -Les opinions exprimé dans ce messages sont les mienne
-
01-17-2009, 03:16 PM #18
Registered
- Join Date
- Dec 2007
- Posts
- 413
(nuts) Originally Posted by syil
-
01-17-2009, 10:06 PM #19
Registered
- Join Date
- Feb 2008
- Posts
- 154
Unless of course Syil provide the parts to customers free of charge as a production fix - a bit of goodwill to customers Originally Posted by ataxy
-
01-18-2009, 03:36 AM #20
Registered
- Join Date
- Jul 2005
- Posts
- 969
a bit of wishful thinking...!!!! lol Originally Posted by john_t_h
The opinions expressed in this post are my own. -Les opinions exprimé dans ce messages sont les mienne

 Reply With Quote
Similar Threads
-
ProNest Laser Support Enhancements Resonate with Users
By Hypertherm in forum News AnnouncementsReplies: 0Last Post: 12-15-2008, 04:57 PM -
Bug fixes?
By MrWild in forum Dolphin CAD/CAMReplies: 0Last Post: 06-11-2008, 05:40 AM -
Alarms and fixes
By HAILINHAAS in forum Haas MillsReplies: 7Last Post: 11-14-2007, 04:29 AM -
Enhancements To BobCADCAM...
By jonbanquer in forum BobCad-CamReplies: 0Last Post: 01-01-2006, 09:45 PM -
CAD Enhancements / Fixs
By jonbanquer in forum BobCad-CamReplies: 0Last Post: 12-26-2005, 10:36 PM
