


Not the greatest video but you get the idea.
Results 41 to 60 of 62
-
02-25-2010, 09:44 PM #41
 Registered
- Join Date
- Nov 2009
- Posts
- 106
-
02-26-2010, 01:34 AM #42
Registered
- Join Date
- Oct 2009
- Posts
- 272
 Now showing at Cannes Film Festival
Thanks, :wave:I appreciate the effort.
You may even win a cinematic award, perhaps "Best Animated CNC" Oscar. I didn't even see any noticable deflection. lol
Randy,I may not be good....
But I am S L O W!!
-
03-01-2010, 07:51 PM #43
Registered
- Join Date
- Nov 2009
- Posts
- 106
I got my belts from polytech today. I think that pretty much does it for the parts I needed to order for the machine itself. I still need to pick up the little things like wiring, hardware, etc.
rcbamm, The belts mate up with the pulleys just fine, I don't believe there will be any noticeable backlash, and from my calculations the 12T pulleys wont have any problems handling the loads. I don't know what you're expecting out of your router but it looks like its going to work good enough for me.
Here is my stash so far. Hopefully this weekend it will start to look like a CNC machine and not just a heap of parts.

-
03-01-2010, 11:43 PM #44
Registered
- Join Date
- Mar 2009
- Posts
- 624
Nice Stash, at first i was trying to figure where the bearings near the pulleys fit into the equation then it dawned on me!!. . . . . For pulley shafts. . . Yes.?
Cant see any Caps or BR for PS or do you still need source them.?
I use a long belt to turn twin screws and dont get any backlash that i can detect, so long as belts are tensioned correct then you wont have probs.
I,m just about to make a very similar but smaller machine as yours for my son and dont have any quarms over using belts, infact i would take a bet that it,s just as good as my ballscrew'd machine.?
-
03-02-2010, 01:09 AM #45
Registered

- Join Date
- Feb 2010
- Posts
- 331
hay stangtjk. i am looking pretty hard at the im804 that i found on e bay. ( i think it was you who recommended it.) i am still a couple weeks out, so i would really like to hear how these work for you. (since they are basically the same thing, the 804 is just higher power.)
also i may be needing your help when it comes time to set up the software and get them all wired up.
ps. i could help you with your solidworks simulations. (if you care, prolly doesn't even matter at this point.) but if you just want to understand it better, let me know.
heres the vid i made last semester (final). im in the advanced class this semester.
-
03-02-2010, 01:42 AM #46
Registered
- Join Date
- Nov 2009
- Posts
- 106
Yep, the bearings are for the pulley shafts. I need 2 more, I'll probably just get another pack of 10 off ebay, They were only $12 and some change for a pack of 10 shipped but the same seller charges like $4 a piece for them separately.Nice Stash, at first i was trying to figure where the bearings near the pulleys fit into the equation then it dawned on me!!. . . . . For pulley shafts. . . Yes.?
The large pcb in the center of the photo has 4 IM483H drives and a bridge rectifier attached to the bottom of it and there are 10 caps in parallel on top so all it needs is to be hooked up to the transformer. The three smaller pcbs are the IM805H drives. I'd need caps and a BR for those but I don't have plans for them yet. One of them will eventually make its way to a 4th axis.Cant see any Caps or BR for PS or do you still need source them.?
For a wood router where tolerance's aren't as critical its probably just as good. I intend to find out shortly.I,m just about to make a very similar but smaller machine as yours for my son and dont have any quarms over using belts, infact i would take a bet that it,s just as good as my ballscrew'd machine.?
There is really nothing to it to get them working. I hooked mine up just to test them out and I had them working with mach3 in under 10 minutes. All the drives I have are the H series so hooking them up is a little different but they are basically the same drives in a smaller form in order to be mounted to a pcb.also i may be needing your help when it comes time to set up the software and get them all wired up.
Here is what they look like.

-
03-02-2010, 01:47 AM #47
Registered
- Join Date
- Feb 2010
- Posts
- 331
i am going to be using emc2 at least to start with, might be alittle more to hooking them up. the only thing i am unsure about is the timings for everything in the im804's thats all i really need to know and ill be set. Originally Posted by stangtjk

-
03-02-2010, 01:47 AM #48
Registered
- Join Date
- Nov 2009
- Posts
- 106
That video is pretty cool. I wish my college offered courses in SolidWorks, the only progams they used were ANSYS, ProE, and AutoCAD. The first time I tried SolidWorks it was enough for me to abandon all the others but I'm still not familiar with all the features.
-
03-02-2010, 01:53 AM #49
Registered
- Join Date
- Nov 2009
- Posts
- 106
I haven't looked into emc2, The only thing I had to setup in mach3 to get them running was the port and pin #s for step and direction. I remember seeing a chart of drives and their timings on a linux forum I'll see if i can find it again. Originally Posted by Zygoat
Edit: Here is that chart, doesn't have the IM804 but the IM483 is there, not sure if the timings would be the same or not.
-
03-02-2010, 05:37 AM #50
Registered
- Join Date
- Feb 2010
- Posts
- 331
thanks bud, something to start from at least. Originally Posted by stangtjk
-
03-05-2010, 10:24 PM #51
Registered
- Join Date
- Nov 2009
- Posts
- 106
I picked up the M8 bolts I needed for the rail today from fastenal. They only had 100pc bags so I ended up getting 2x more than I need but that's alright. I've been thinking of how I'm going to drill out the 35mm holes for the bearings. I'm planning on using some locktite to hold them in place so the tolerance for the hole isn't extremely critical. I know there are some huge drill bits down at the shop but I'm not sure if I have one the right size. I was also thinking of using a hole saw, I've used them quite a bit on thinner metal but never attempted it in 1/4". I'll figure something out when I get to the shop. May not be the "right" way but sometimes you gotta make due with what you've got. Starting construction tomorrow, I've got all day Saturday and half of Sunday to work on it. Hopefully I get it all done, at least the stuff I need the shop for.
-
03-06-2010, 04:03 AM #52
Registered
- Join Date
- Feb 2010
- Posts
- 331
i have used a hole saw to cut through 1/4" steel (1.5in dia. hole). it works fairly well. i only had a hand drill, a drill press would have made a big difference. use oil if you have any, and remember how slow the spindle speed needs to be for such a large hole. i assume you have a machinist handbook, or some other way of calculating the rpm.
-
03-06-2010, 04:46 AM #53
Registered
- Join Date
- Nov 2009
- Posts
- 106
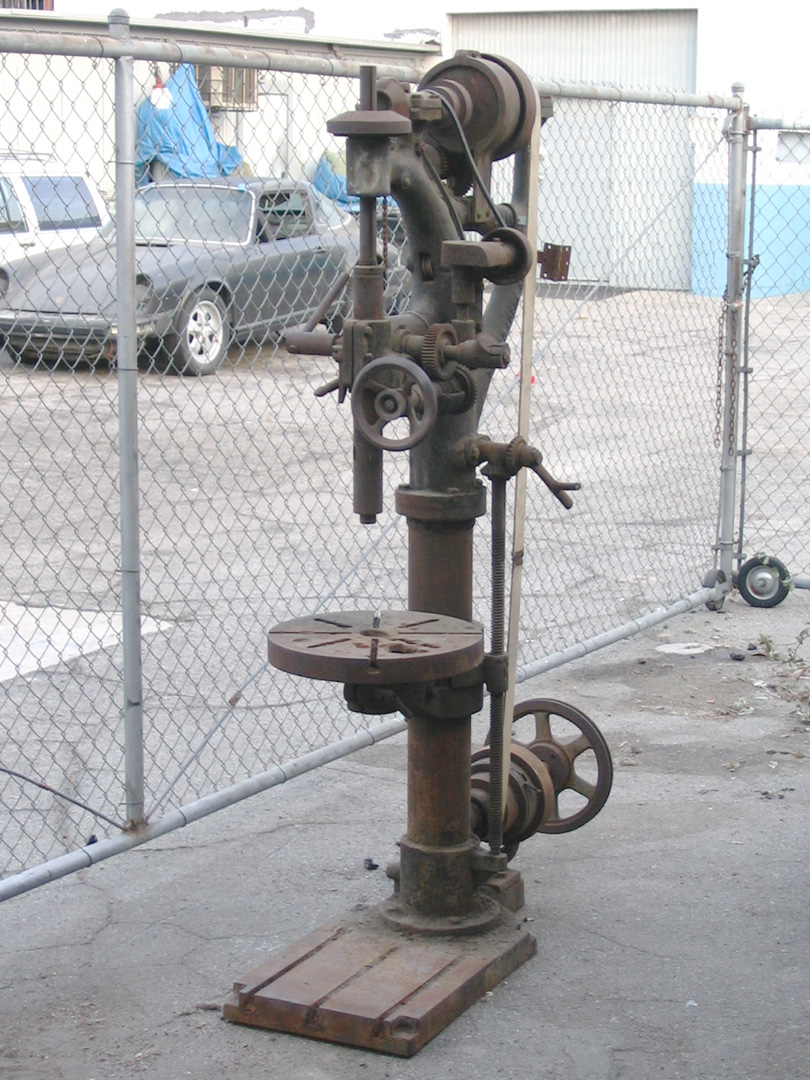
Nope no handbook. Quick online search yielded 250 RPM. The drill press at the shop is an old school flat belt driven type, something like this. I'm not even sure what the rpm is for each step of the belt. I'll just use the lowest setting. I've also got one of those small cheapo 8" drill presses, I think the lowest rpm for it is somewhere around 600.
-
03-06-2010, 05:14 AM #54
Registered
- Join Date
- Feb 2010
- Posts
- 331
i ran the numbers really quick. (your drilling aluminum correct?) i got 600-800 rpm depending on the type of aluminum. alum. is still pretty soft so you can get away with more speed.
-
03-06-2010, 10:08 AM #55
Registered
- Join Date
- Nov 2009
- Posts
- 106
No its going to be steel, I was going to use aluminum for the sides of the gantry but I think I'll end up using steel for that as well. I was using this chart for the rpm http://www.magbit.com/xref_hole_speed_rpm.php
-
03-07-2010, 05:37 AM #56
Registered
- Join Date
- Feb 2010
- Posts
- 331
well, first day down. how'd it go?
-
03-07-2010, 06:13 AM #57
Registered
- Join Date
- Nov 2009
- Posts
- 106
I just got in. Spent the past 12 hours in the shop. The gantry is pretty much done I just need to drill a few more holes and weld on the motor/bearing mounts. I ended up going with 1/4" steel plate and 3/16" 1.5"x1.5" angle for the gantry uprights. The rails for the y-axis are mounted and I made the bracket for z-axis and mounted it as well. I don't have any pictures to post but I'll have some for tomorrow.
Tomorrow I'm going to try to get the base of the machine done. I'm going to get all the materials cut and do all the welding. I can finish the rest back at home if I run out of time.
I wish I would have gotten more done today but I ended up making a few things twice and spent 2 hours fixing the band saw. Hopefully things go smoother tomorrow.
-
03-07-2010, 07:24 AM #58
Registered
- Join Date
- Feb 2010
- Posts
- 331
hay, thats how it always goes. sounds like you made good progress tho. Originally Posted by stangtjk
-
03-07-2010, 09:31 AM #59
Registered
- Join Date
- Jan 2007
- Posts
- 68

Nicely concepted standjk....
http://cadcam.e-monsite.com/
-
03-07-2010, 12:28 PM #60
Member
- Join Date
- Apr 2007
- Posts
- 8082
That looks like quality old school ironworks. There should be a large industrial machine tool museum for stuff like that. It's an art form in itself. Originally Posted by stangtjk
You gonna CNC it?
CarveOneCarveOne
http://www.carveonecncwoodcraft.com

 Reply With Quote
Similar Threads
-
Design advice series offers technical insights
By igus in forum News AnnouncementsReplies: 0Last Post: 05-22-2009, 06:58 PM -
Design Advice Needed
By JeLC in forum DIY CNC Router Table MachinesReplies: 3Last Post: 03-03-2009, 05:39 AM -
Need advice with Z axis design
By isvflorin in forum DIY CNC Router Table MachinesReplies: 3Last Post: 01-09-2009, 01:47 PM -
Semi-newbie looking for some design advice
By galacticroot in forum DIY CNC Router Table MachinesReplies: 15Last Post: 08-24-2006, 12:49 PM -
design advice for a new builder
By deft in forum DIY CNC Router Table MachinesReplies: 9Last Post: 05-09-2003, 01:03 AM
