

Hi
I'm looking to make an edge-lit acrylic sign.
I've got hold of some 10mm cast acrylic and am wondering how deep to engrave on the back face?
I'd planned on using a 30 degree engraving bit and some of the lines may be a few mm wide so I'd imagine I'd need to stop the depth.
Thanks
Thread: Edge-lit sign
Results 1 to 20 of 28
-
12-20-2011, 01:55 AM #1
 Registered
- Join Date
- Nov 2011
- Posts
- 19
Edge-lit sign
-
12-20-2011, 09:33 AM #2
Registered
- Join Date
- Dec 2005
- Posts
- 238
I use 4.5mm cast acrylic for mine and cut 2mm deep.
I'm not sure what maximum depth you would need to use with 10mm but I would have thought 2 to 3mm would be about right but it is a guess on my behalf.
Here is a video I made of the process if you are interested.
It is basically an edgelit sign with a clock in it.
[ame=http://www.youtube.com/watch?v=0Uo6C9TW0_8]Edgelit Clock.avi - YouTube[/ame]
Cheers
PeterThe ingenuity of idiots is unlimited.
http://www.youtube.com/user/cncnutz
-
12-20-2011, 04:01 PM #3
Registered
- Join Date
- Jan 2006
- Posts
- 66
You will find that a 30 degree bit will cut quite deep in order to get any sort of width from a line. Unless you only want a very fine line, it may be ok, but you may find that a 90 degree bit will work best for most engraving.
Any depth at all will easily pick up the light, although the deeper you cut the more light gets attracted since there is more surface area on the side edges of the cut. If you stay with approximately 1/2 the thickness as a general max. depth you should be fine.
-
12-20-2011, 04:42 PM #4
Registered
- Join Date
- Nov 2011
- Posts
- 19
Thanks guys. Looks like it's time for a bit of experimentation!
-
12-20-2011, 07:15 PM #5
Registered
- Join Date
- Dec 2005
- Posts
- 80
Hello Dave
I will add a couple of things .... in UK signs for pub food were (50 years ago) just written on Perspex sheet so any depth ... or none at all might do? Later I tried to cut perspex with a cobalt tool and assumed it would need a slow cut ..... first it cut a swirl of swarf which then melted, then a ball of melted resin appeared and then the tool burnt out! Practise on scrap to check the speed you intend to use cuts and moves on before melting, this stuff is abrasive ... or seems to be.
Regards
Richard
-
12-20-2011, 10:11 PM #6
Member
- Join Date
- Dec 2007
- Posts
- 2133
You need to just keep a fair spindle and travel speed up when cutting or engraving perspex/plexiglass. Too slow feed and you rapidly heat up the plastic which makes a real mess of it, too fast feed and you can leave ridge marks from the cutter along the sides. I treat it just like cutting mdf, around 20k rpm spindle speed, and about 1m/min to 1.8m/min feed rate.
Perspex is an absolute treat to cut I find, once you get the speed up to what it needs at the very least, it cuts brilliantly and cleanly, and plain old HSS cutters will last forever with it!
cheers,
IanIt's rumoured that everytime someone buys a TB6560 based board, an engineer cries!
-
12-20-2011, 10:21 PM #7
Registered
- Join Date
- Dec 2005
- Posts
- 769
Edge Lit Signs
Here are a few Edge Lit Signs I have made.
John2007 HAAS TM-1P OneCNC XR5 Mill Pro. Shopbot PRT running Mach3 2010 Screen Set, Super PID and PMDX Electronics.Check out my Gallery on: http://[email protected]
-
12-20-2011, 10:46 PM #8
Registered
- Join Date
- Oct 2008
- Posts
- 406
Very nice. Where did you get the light units? Originally Posted by HelicopterJohn
 Bob
Bob
"Bad decisions make good stories."
-
12-20-2011, 11:41 PM #9
Registered
- Join Date
- Dec 2005
- Posts
- 769
Led Lighting units
Hi Bob,
I got them here: Custom Lumenedge Edge Lighting Strips - Single Color
They will make them to custom lengths. I order mine with the extended front edge that tends to hide the individual LED Lights. You have to tell them that when you order you lights. They also have the necessary 12 volt transformers and the cords and can be ordered in specified lengths. Red, Green and Blue LEDs seem to work the best for me. I think they also offer some more expensive RGB alternating lights that would be cool. I think you can program them to do different patterns????? They are very easy to deal with.
Hope that helps.
John2007 HAAS TM-1P OneCNC XR5 Mill Pro. Shopbot PRT running Mach3 2010 Screen Set, Super PID and PMDX Electronics.Check out my Gallery on: http://[email protected]
-
12-20-2011, 11:53 PM #10
Gold Member
- Join Date
- Jul 2005
- Posts
- 12177
You really don't need any depth at all, the surface just has to be roughened so the light is scattered out of the sheet not reflected internally.
An open mind is a virtue...so long as all the common sense has not leaked out.
-
12-21-2011, 05:23 AM #11
Registered
- Join Date
- Dec 2005
- Posts
- 769
Here is one that was bead blasted
Hi Geof,
You are correct. Here is one that I did by cutting a vinyl stencil and weeding out the letters and lightly bead blasting the letters. Only took a few seconds to blast it. When you rub you fingers across the surface you can hardly feel any roughness.
John2007 HAAS TM-1P OneCNC XR5 Mill Pro. Shopbot PRT running Mach3 2010 Screen Set, Super PID and PMDX Electronics.Check out my Gallery on: http://[email protected]
-
12-21-2011, 07:07 PM #12
Registered
- Join Date
- Apr 2010
- Posts
- 0
Edge Lighting
I have a Laser Engraver, 80 Watts, that cuts and engraves acrylic very nicely. Where can I buy the edge lighting units and are they battery or 110volt adapter powered. I use One Touch software for converting photos and the result is remarkable, I would very much like to see how they would look with the edge lighting.
Kirk
-
12-21-2011, 07:37 PM #13
Registered
- Join Date
- Dec 2005
- Posts
- 769
LED Units
Hi Kirk,
Please see post #9 in this thread for a link to the supplier I use for the LED Units.
The Wall Wart units for the LED Lights are 110 Volt to 12 Volt DC.
You can also get an adapter at Radio Shack and power them from a 9 Volt Transistor battery. They may not be quite a bright but are easily visible using the 9 Volt Transistor Battery. I don't know what the battery life on the 9 Volt Transistor Battery would be.
John2007 HAAS TM-1P OneCNC XR5 Mill Pro. Shopbot PRT running Mach3 2010 Screen Set, Super PID and PMDX Electronics.Check out my Gallery on: http://[email protected]
-
12-21-2011, 08:06 PM #14
Registered
- Join Date
- Oct 2008
- Posts
- 406
John, thanks for the link for Lumenedge.
Bob
"Bad decisions make good stories."
-
12-21-2011, 08:15 PM #15
Registered
- Join Date
- Apr 2010
- Posts
- 0
Re LED Units
Thanks John,
Don't know how I missed that.
Kirk
-
12-21-2011, 08:28 PM #16
Registered
- Join Date
- Dec 2005
- Posts
- 769
Information
Hi Guys,
No problem on supplying the informaton.
I have received a lot of valuable information here on the Zone and I am always glad to share any knowledge that I may have. Kind of a little pay back deal
Kirk, I would love to see one of your laser cut LED Signs should you decide to do one.
John2007 HAAS TM-1P OneCNC XR5 Mill Pro. Shopbot PRT running Mach3 2010 Screen Set, Super PID and PMDX Electronics.Check out my Gallery on: http://[email protected]
-
12-23-2011, 02:44 AM #17
Registered
- Join Date
- May 2006
- Posts
- 202
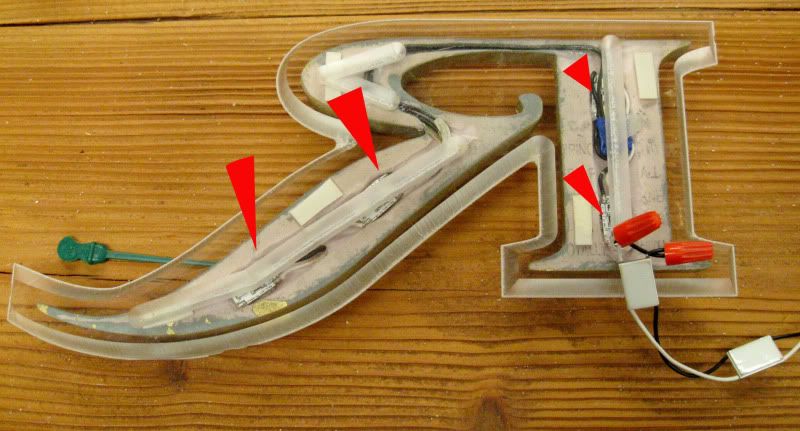
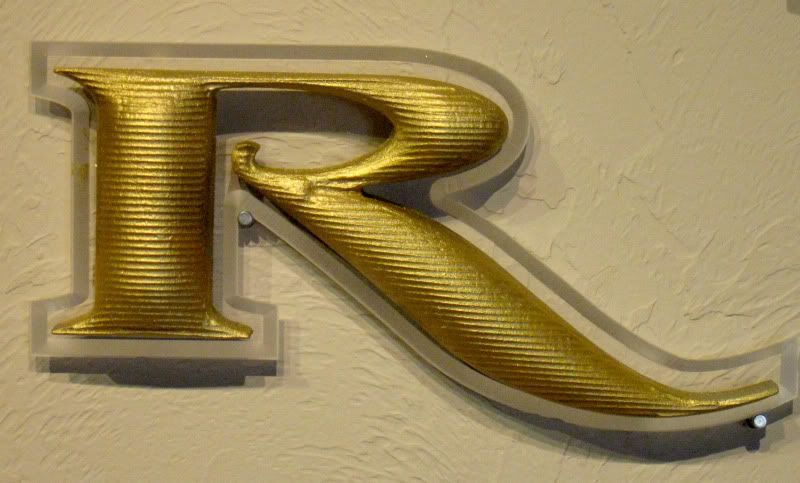
One of our clients wanted letters with backlighting. The idea was to have the lights wash on the background. The problem was a background of medium dark rock. The solution was beveled 1/2” plex with LEDs placed in groves down in the plex
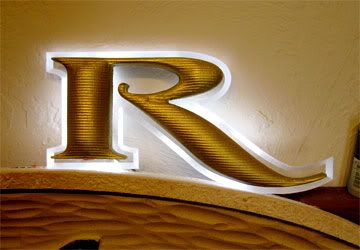

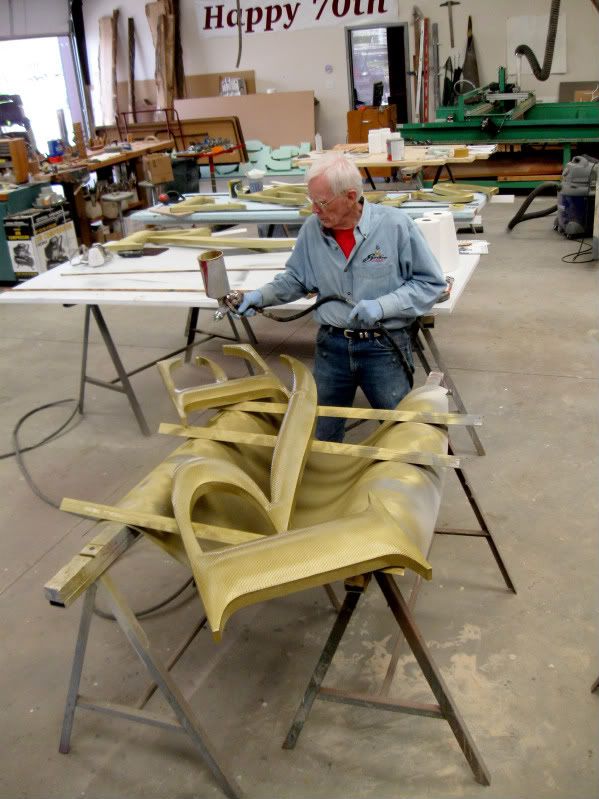
This was a fun project with my assistant, Ron Mitchell.
Joe Crumley
www.normansignco.com
-
12-23-2011, 05:47 AM #18
Registered
- Join Date
- Dec 2005
- Posts
- 238
All I can say Joe is WOW!
Cheers
PeterThe ingenuity of idiots is unlimited.
http://www.youtube.com/user/cncnutz
-
12-28-2011, 05:30 AM #19
Registered
- Join Date
- May 2006
- Posts
- 202
Thanks for the complement.
One note about the ribbed texture. That was an easy technique. I used the max step-over using a 1/4" ball nose bit. There are lots of creative looks which can be made using other bits.
Joe Crumley
Norman Sign Company, Norman, Oklahoma, SandBlasted Signs, Sign Painter, Redwood Signs
-
03-01-2012, 12:51 AM #20
Registered
- Join Date
- Sep 2010
- Posts
- 532
Joe, Originally Posted by Joe Crumley
I have a customer that wants a similar sign, where did you get the leds for the back lighting?
James

 Reply With Quote
Similar Threads
-
One sign on the go!
By cncadmin in forum EnRouteReplies: 0Last Post: 12-06-2011, 09:10 AM -
Simple sign...
By kiwichris in forum Portfolio BoardReplies: 0Last Post: 10-27-2011, 10:22 AM -
Edge Lit Sign Base
By Pysiek in forum Laser Engraving / Cutting Machine General TopicsReplies: 9Last Post: 07-15-2011, 04:03 PM -
sign
By Edwardo in forum DynaTorchReplies: 11Last Post: 09-03-2008, 02:56 AM
