


Hi all,
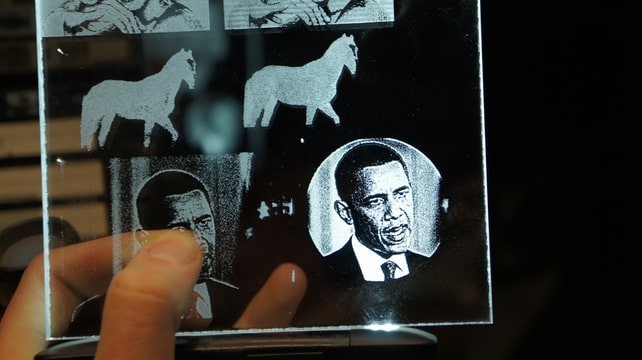
I have seen so many nice engravings/cutouts so i started testing it myself.
just haven't found out the right setting and dithering.
i have a 40w co2 laser and just can't get it as nice as the pictures i have found on some websites so i was asking myself is it possible with my machine ?
these are on glass/mirrors
and this is on acrylic
if someone has done it on acrylic or glass can you maybe send me your image so i can see if it works on mine also
not real nice results till now
thnx
Thread: good dithered image
Results 1 to 20 of 31
-
02-15-2011, 03:46 PM #1
 Registered
- Join Date
- Jan 2011
- Posts
- 41
good dithered image
-
02-15-2011, 11:00 PM #2
Registered
- Join Date
- Dec 2008
- Posts
- 1258
The 'trick' is matching image resolution with your machine settings, and also getting the correct power for the material.
What software are you using - PhotoGrav can produce good results without too much effort, but you can get the same effect with Photoshop, GIMP etc.
Zax.
-
02-16-2011, 12:19 AM #3
Registered
- Join Date
- Jan 2011
- Posts
- 41
ok thanks zax,
will give it a few more go's then
i found and done the steps like described on the FSE forum about image dithering and it gave a image but not as nice with the shadows like the images i posted.
using acrylics and glass most of the time will post some results im hoping to make
-
02-16-2011, 09:04 AM #4
Registered
- Join Date
- Jul 2008
- Posts
- 776
Agree with zax15uk concerning PhotoGrave - not necessary invent bycicle or spent time with PS, buy Photograve and enjoy:cheers:
-
02-16-2011, 01:52 PM #5
Registered
- Join Date
- Jan 2011
- Posts
- 41
i am using corel draw right now but will download the photograv demo to test

thanks
-
02-16-2011, 10:15 PM #6
Registered
- Join Date
- Oct 2010
- Posts
- 0
I have photoshop I just need to find a decent plug-in for it. I tried one but the image went from nice and detailed to big and blocky. Anyone here use a good photoshop plug-in? I saw one that advertises it's as good/or better than photograv. But they want just as much for it. If I'm going to pay that much I'd rather just buy photograv.
-
02-16-2011, 11:52 PM #7
Registered
- Join Date
- Oct 2010
- Posts
- 0
How do you know what your machine's resolution is?
-
02-17-2011, 01:31 AM #8
Registered
- Join Date
- Dec 2008
- Posts
- 1258
It is the DPI or LPI used when you output files to the laser.
Zax.
-
02-17-2011, 03:05 AM #9
Registered
- Join Date
- Feb 2005
- Posts
- 469
In LaserCut software it's called Scan Gap and I think a setting of .086 equals 300 DPI if I remember correctly. When you choose Engrave you should see the Scan Gap input area. Not sure how it's set in Newly Draw. Originally Posted by bpoulin

-
02-17-2011, 06:19 AM #10
Registered
- Join Date
- Oct 2010
- Posts
- 0
I do see the scan gap input area, and I played with it a little bit, But I have no idea what I'm doing lol. Is there a way to calculate what dpi=scan gap. Originally Posted by SkipW
-
02-17-2011, 08:00 AM #11
Registered
- Join Date
- Jun 2008
- Posts
- 69
bpoulin, Originally Posted by bpoulin
Here is the table of scan gap settings. For example from the table; 100dpi is 0,254 - 300dpi is 0,085 - etc...
Regards,
Hannu
-
02-17-2011, 01:51 PM #12
Registered
- Join Date
- Jun 2006
- Posts
- 43
Photoshop Plugin
I have used this with great success. Originally Posted by bpoulin
Laser Goodies
And it is FREE!
-
02-17-2011, 02:08 PM #13
Junior Member

- Join Date
- Aug 2003
- Posts
- 494
If you make a solid black square and engrave it at, say, 200 dpi then you should get thin lines between the engraved lines. You then raise the setting to ,say, 250 dpi then engrave the solid block again and check to see if those lines are still there (only thinner this time)
Keep adjusting the setting until those thin lines disappear. The final setting will be your dpi for your laser.
Use a small black square about 20mm in size and look at the engraving with a magnifying glass to make it easier to see.
With a 50mm lens and really good focus my machine gets rid of the lines at 340dpi.
This is what I engrave at with Photograv and get pretty good results.
Not as good as the ones in the above pictures but I reckon they would be about 600 dpi or above due to the detail.
To get more detail you need a smaller focal length lens like a 1" one that gives a smaller spot size but much longer engraving times.
Rich..
Rich.I am not completely useless.......I can always serve as a BAD example.
-
02-17-2011, 04:09 PM #14
Registered
- Join Date
- Oct 2010
- Posts
- 0
So now how do you save this to a 1 or 2 bit image? Photoshop has an option to save as 1 bit, but I can't get it to allow me to select it? I can save as 4 bit, but Lasercut won't read it unless it's 2 bit.
-
02-18-2011, 03:26 PM #15
Junior Member
- Join Date
- Aug 2003
- Posts
- 494
You change the picture to a Gray scale in Image/Mode/Gray scale then convert that to Image/Mode/Bitmap and select your resolution in the pop up requester and also Diffusion Dithering.
Save to your normal path.
This should get you up to speed.
Let us know how you get on.
Rich.I am not completely useless.......I can always serve as a BAD example.
-
02-22-2011, 03:47 AM #16
Registered
- Join Date
- Oct 2010
- Posts
- 0
I tried it, and I have to say... WOW that turned out like carp... LOL is it better to start out with a high res image or low res image. I did a quick search for my favorite image ever (Ansel Adams Rose on driftwood) I found a hi-res of the image and attempted to etch it. And the driftwood looks amazing, almost like a 3d burn. But the flower is just a white blob. Here's a link to the image I used, if you think you can get a good dither image out of it, I'd love to see it. Also what DPI do you select, I selected 500, and 1000, and neither had decent resolution in my opinion. P.S. I was burning on to .5" MDF
-
02-22-2011, 04:35 PM #17
Registered
- Join Date
- Jun 2006
- Posts
- 43
Dithered Image
Here is what I got using the GoldMethod I referred to earlier. I did it at 300 DPI. (Note, depending on your machine, that may not be the correct resolution. If a chinese import, it may need 254 to get correct proportions and no banding. I just wanted to show you the quality of dithering that is available for free - if you already own Photoshop.) Originally Posted by bpoulin
System won't let me upload the file - looks to be within the requirements, but not working. I will PM you with the file. Maybe you can get it posted for everyone.
-
12-21-2011, 10:33 PM #18
Registered
- Join Date
- Jan 2011
- Posts
- 41
Well thanks for all the replies offcourse.
been a while that i have tried this again.
got my mind on other things lately but now i have some spare time again and want to get this right.
i also opened a topic on FSE forum thats where my laser is from btw.
they are giving tips but it is still not working for me.
ill just copy and paste what i have done.
tomorrow ill give it some more tries to see if i get it then because this is something i really would like to make.
=================================================
What i have used is Extruded acrylic as wel Casted acrylic because casted should be better ive read somewere for the details.
Here is the movie that i really like to do myself.
[ame=http://www.youtube.com/watch?v=9d5_Pd2RQXY]Photo Engraving on Acrylic - YouTube[/ame]
I know its all about the image dithering but i have found someone posting pics that were made with a epilog laser and the software on acrylics,
those looked pretty good and i have not got even close to that.
here are some pics what i have made, the problem i face is everytime i only get a melten piece of acrylic what speed i put it on.
if i put it higher it melts trough it, if i put it lower i see something faint what i lasered but i just do not get it like that movie.
on the first part you see there using painted acrylic, the second one is clear material and it shows right away the image.
i do not get even close to that , what i get it also not really high quality i mean you can see lines in it and no nice images ( my lens/mirrors not alaigned enough ? )

looks terrible

with some light source on the back

little bit closer.
So as you can read/see i have no idea what do do, is it even possible with this laser system ?
starting to think its not.
going to do some tests with the air assist i hooked up my atlas copco compressor that can produce 10 bar/145 psi hope this helps.
anyone has succes like that movie with the details and on clear acrylic or also the same probs as i have had in the last couple of weeks
thanks
They i have tried with 1 touch laserphoto and also with photograv.
even with the dithering software that FSE gives, that is pretty good btw and looks nice.
Here the following post with more tests.
============================================
1000x1000DPI
5Ma
100% speed


without black background it also doesnt show much, you need to look a certain angle otherwise you do not see the image good.


as you can see on the bull image its just ugly, also no nice frosting effect all fine lines.
isnt this possible to get it different ?

this is a test with a image i got from googleimage
250x250dpi
100% speed
5Ma

looks a bit better and you can see it better but withouth light in the sides it is also almost not visible.

here you see its a woman but not really great, the next picture you see it better but you have to keep it into the light on a certain angle otherwise you do not see it.
difficult to capture with a camera but here it shows

on wood it does look pretty good most images i made but acrylics it just is not as nice as the chinese video on youtube (link in first post)
Someone has a nice picture that's engraved on on glas/acrylics or someyting and would like to share/post it so i can check if i could get those same results ?
So anyone that has good results, please share some info with me/us or good tip.
On the other hand i tried to cut some 10mm thick acrylics and it looks good in 1 pass.


[ame=http://www.youtube.com/watch?v=rZeHuV5O1y4]Co2 laser cutter 10mm thick acrylics 1 pass - lasersnijden acrylaat/plexiglas 10mm dik - YouTube[/ame]
=============================================
the other post is not readable has to be accepted first will post this tomorrow.
tomorrow morning i will give it a few more go's then with un/de focussing and with the square test like described above.
on different materials its not really a problem like cardboard or wood but with glass/acrylic it just does not seem to be my thing :boxing:
hope its not to messy what ive wrote and understandable
thanks
-
12-22-2011, 10:45 AM #19
Registered
- Join Date
- Jan 2011
- Posts
- 41
sorry for the next reply on my own thread but for some reason the edit button is gone ?
also can not change the first post, would like to change topic title into engraving acrylics and glass but how ?
anyway here is my other post.
well i have been testing for about 4,5 hours again and really drives me crazy.
I use Casted acrylics, have trown about 55 € of material away by testing testing testing and some more.
here some pics ive made.


nothing


also not noticable by the camera , faint by the eye

here it showed a little bit more but still not really great


so here you go with the engraving of acrylics.
makes me insane when i look at several results on youtube with acrylics.
on cardboard its not really a problem

also written how much Ma ive used.
So who knows what i am doing wrong, please answer.
i'd be even glad to pay money if thats needed i really like to make nice LED signs and photogravs on acrylic and glass.
[ame=http://www.youtube.com/watch?v=mOEroET5K8Q]Glass Engraving - High Resolution - YouTube[/ame] glass
look at this frosted look, seems so smooth and nice ( acrylics)
[ame="http://www.youtube.com/watch?v=jpXgCRo4QNM"]Make money laser cutting edge lights - YouTube[/ame]
==============================================
if i put the power to high, the piece melts.
to low . i can see something faint on the glass but thats about it.
use air assist pushing 8 bar out and it gets a little better, atleast looks like it but still no frosted effect.
ive read allot of topics here about the engraving and saw some topics were Tweakie posted a nice image of an owl.
even that i do not get out of my machine.
I am off to the ikea now to buy some mirrors to make some laser signs on and then i will give it another go :stickpoke
-
12-23-2011, 08:14 PM #20
Registered
- Join Date
- Jan 2011
- Posts
- 41
well i have got it.
and because i am not the worst person on the planet i have made a test sample with the amount of DPI and Power ( in Ma)
i have to add the wire to make it digital but i finally got it working so i am not changing it now.

http://www.mijnalbum.nl/GroteFoto-E6D6GJDW.jpg

http://www.mijnalbum.nl/GroteFoto-MMS8VRE3.jpg

http://www.mijnalbum.nl/GroteFoto-47OJLLJM.jpg

http://www.mijnalbum.nl/GroteFoto-CGATYWUX.jpg

http://www.mijnalbum.nl/GroteFoto-4BC3WQIY.jpg

http://www.mijnalbum.nl/GroteFoto-BW8HTO4L.jpg

http://www.mijnalbum.nl/GroteFoto-OVSEMLNE.jpg


This is what ive got , the mirror is only visible when i keep it in a angle into the light have to work on that but i am so happy
hope ppl have something with these results , will tell more but have to run


 Reply With Quote
Similar Threads
-
BobArt - No Image after "Load Image"
By TAProwler in forum BobCad-CamReplies: 2Last Post: 12-24-2010, 06:05 PM -
Live Image
By redsid66 in forum Haas LathesReplies: 1Last Post: 04-05-2010, 05:02 PM -
First Try From Image
By 5artist5 in forum Taig Mills / LathesReplies: 25Last Post: 05-24-2009, 05:30 PM -
DXF or Image to Drill map
By highwaymancnc in forum Uncategorised CAM DiscussionReplies: 0Last Post: 06-12-2008, 09:49 PM
