

Its about that time
Making A 671 Rotor Build Thread
Day 1
For anyone that doesn't know me or reading one of my threads for the first time you can check out the build thread of the 671 Blower housing here @
http://www.cnczone.com/forums/i_c_en...ercharger.html
and you can also keep up-to-date info on our builds and what we are doing, or just show your support for an American manufacturing company by liking us on Facebook @
https://www.facebook.com/DiamondPRacing
Check out all our latest videos @
dzuari's Channel - YouTube
Making A 671 Blower
[ame=http://www.youtube.com/watch?v=zU34no3VLHI]Making A 671 Blower Part 1 - YouTube[/ame]
-----------------------------------------------------------------
O and if anyone is wondering, our machines are still tied up doing some jobs so we are still on hold for creating the fixtures for the blower housing.
-----------------------------------------------------------------
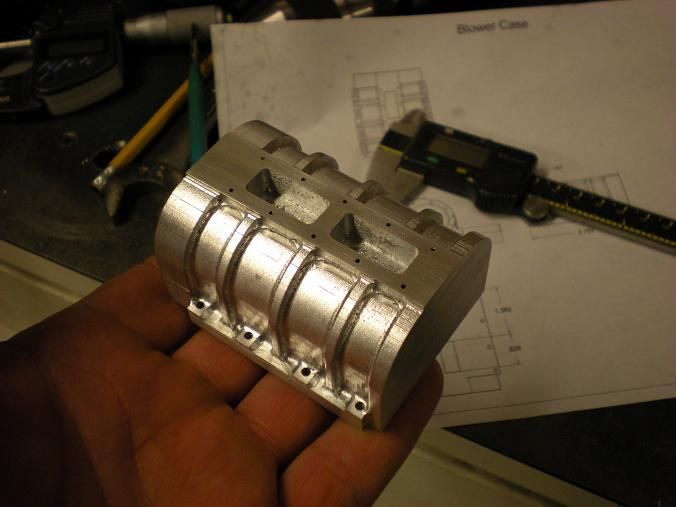
Ok, so just started drawing of the rotors today, this is what i've got so far, 3 lobe 60° helix. Now these drawings are currently of the casting, not the finished machined rotor.
You can see in this photo the coring and hollowing out of the rotors, now when the pattern is made, i will be designing this to accept different size cores, that way we can have different coreboxes that will all fit the same pattern, this way we can create different internal designs for strength and weight to test which works best.
-------------------------------------------------------------------------
Looking down the barrel
I've designed this rotor so that i can just change around a few things and create different helix rotation degrees or bore sizes.
--------------------------------------------------------------------
Cross section of one lobe
--------------------------------------------------------------------
Thats it for now, need to do some other stuff for the day. I will have some more photos up tomorrow and if people badger me enough i might post a video or two of the designing of the rotor.
If you have questions, feel free to ask.
Thread: Making A 671 Rotor
Results 1 to 20 of 44
-
12-27-2011, 10:21 PM #1
 Registered
- Join Date
- Oct 2011
- Posts
- 104
Making A 671 Rotor
-
12-27-2011, 10:37 PM #2
Registered
- Join Date
- Dec 2006
- Posts
- 603
I would like to see a video of the machining process. I need to make a pair or two of those rotors for myself. Will be watching with great interest.
-
12-28-2011, 12:33 AM #3
Registered
- Join Date
- Mar 2006
- Posts
- 2712
Keep on keepin' on guys.
I remember some years ago a guy made a roots blower for a two cycle Rotax rotary valve snowmobile dragster. Very interesting!!!!!!!
Dick ZDZASTR
-
12-28-2011, 03:38 PM #4
Registered
- Join Date
- Oct 2011
- Posts
- 104
Day 2:
Just doing some final checking on the design. Going to be heading over to my Uncle's to discuss with him the best approach to making the cores and pattern for this thing, we have a few different ideas on the best way to do this.
--------------------------------------------------------------------------

--------------------------------------------------------------------------
Clearance checking and motion simulation to make sure everything fits right, this is for a 5.8" bored case. These rotors are machine cut to 0.025" from the case walls right now but that is all variable and can be changed when machining is done, really im just making sure everything fits right, these are just the preliminary designs and are not the actual finished machined designs.


--------------------------------------------------------------------------
And just to see what it looks like, i threw in a 120° helix variant

-
12-28-2011, 10:06 PM #5
Registered
- Join Date
- Oct 2011
- Posts
- 104
Day 2.1:
Here is one corebox design, 3 pieces that pull away from each other, this way the core will be all made in one piece, no gluing together. This way we dont have to worry about core shift as much.

---------------------------------------------------------------------------
Here are the draft analysis of the coreboxes, everything that is red is negative draft, this is the complications you get into with a helical core, but i can fix it.


------------------------------------------------------------------------
360° helix this wouldn't hold compression though, unless i move and changed the inlet and outlet ports, would look a lot like a twin screw .

-
12-30-2011, 05:07 PM #6
Registered
- Join Date
- Oct 2011
- Posts
- 104
Day 4:
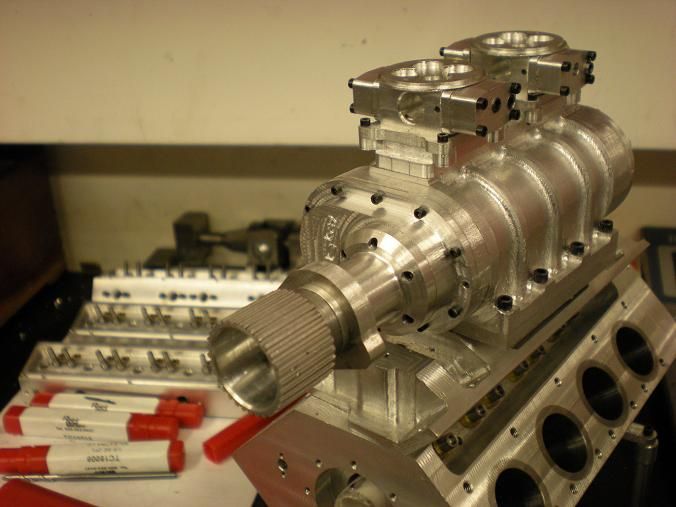
K, im been up for 27hrs now working on this, sry if i miss some stuff but here is a fully Assembled blower, The case is still just casting though, i haven't cut the machine stock to fit with the plates.

The gears and rotors are all clocked and in line with each other, this however is just a scaled version of the blower, i will be printing all this out on our 3D printer and using some 1inch bearing to slip into the plates, ill hook a electric motor up to it just to see it run.(i know the rotors don't have the top ridge cut in them)
------------------------------------------------------------------------
For Anyone looking to get something made
Now, something very interesting that i know a lot of you will like. A lot of you have messaged me over getting a quote or idea on how to get your idea into a casting or machine part. Usually i give you an idea of what it would take and the cost, but, we have been discussing getting into investment castings and this is going to open up a whole new area of work for us and drop the price way down for anyone looking for one or two off castings.
What this means for anyone looking to get something made, all you need is a CAD file(model), you can send it to use, we can send that straight to our 3D printers, then take that printed part and dip it in the investment slurry and pour you a casting.
Now currently we just have just have our 1 printer and the material for it is somewhat expensive and if i get 200 emails from people wanting stuff made then its going to be ridiculously costly and a long wait period, so for now hold you emails. but, i am currently working on building another 3D printer, once i get it lined out and running the cost will drastically drop because the material is very cheap, im guessing less than $100 to print out a v8 head(1 bank) but dont hold me to that.
Once i have the one printer running, i will be able to print the majority of parts needed to create another printer, its designed to self-replicate, and of course i will document and video it all, that way anyone that wants to can make there own then just send us ur models and we will cast them.
--------------------------------------------------------------------
Here are some pictures of our fixtures being set up on our 2 pallet brothers, this is a high speed vertical, 16,000rpm spindle. We cut these pulls in 12mins 100% finished.
The orange clamps are actually 3D printed


k, no im going to bed
-
12-31-2011, 08:55 PM #7
Registered
- Join Date
- Oct 2011
- Posts
- 104
Day 5: Sat. 12/31/11 Feels great to sleep for 18hrs
Came in today to check on the 3D printer, here it is printing a 1/2 scale blower, the gears and couplings are not what we will actually be making, i just changed them so i can slip different 3D printed couplings on and off that will be attached to a small electric motor. The photo is a bit blurry because i took it through a plastic window, the plastic is actually extremely detailed. I make a video of it once i have it put together and running.

------------------------------------------------------------------------
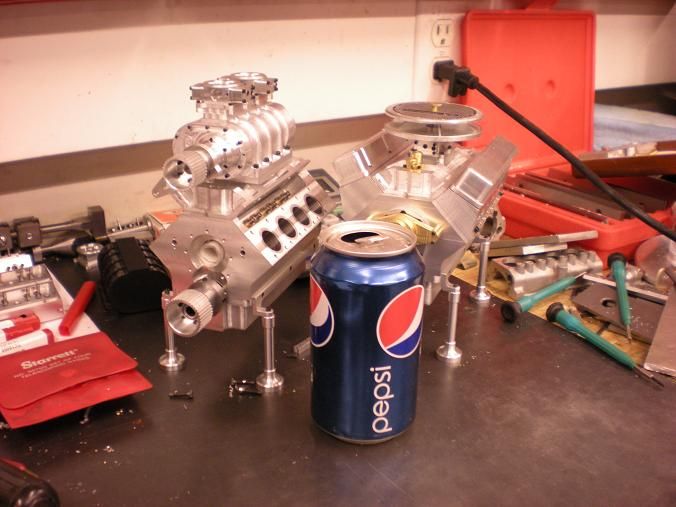
Here is what the final half scale will look like. Also, the case is actually what our full scale cast cases will look like, (no more giant ears off the sides), they will be machined to fit exactly in line with our plates.


-----------------------------------------------------------------------
P.S. I can print out and sell 1/4 scales if anyone is interested in buying a plastic blower something cool to sit on your desk. If anyone interested just say so on the thread. Ill figure out how much one would cost if anyone is.
-
01-01-2012, 08:26 PM #8
Registered
- Join Date
- Oct 2011
- Posts
- 104
Day 6: Sunday 1/1/2012 "The Power Surge"
--------------------------------------------------------------------------
Mini Blower Info:
Just to let everyone know that is interested in buying a mini blower, just want to make sure that you know that it will be printed out of ABS plastic and not be metal, so i Do Not recommend you hook it up to anything and actually try to run boost off of it(like a race lawmower for whoever said that ). So, i highly advise against any such actions, but, in the event that you disregard my warnings, please upload a video of what you did because i would love to see it.
this week i will scale it down to what i think would be a reasonable price for one, this material for this printer isn't cheap though so we will see.
Also all the mini blowers that we do print will be this color orange, we use orange mostly because its easy to fill in and sand and see any defects when we print parts or tooling from it, and it also its reminds me of my duster. I will however put a bit of clearance on everything, that way if you want, you can paint the blower to what ever color you want. I've actually seen some 3D printed stuff that looks like the real thing if you paint it right.
Now onto the cool stuff.
------------------------------------------------------------------------
First pallet of 2 done printing.... well half of it is done, something happened and threw off the printers coordinate system, you can see that the blower housing and the gear with the shaft running off of it has shifted to the right about half way up. A power surge probably caused this, the printer screws up every time we have one, i need to buy a battery for it.

----------------------------------------------------------------------
Parts broken off the pallet, the black is just support material, it will dissolve in a cleaning solution you're about to see in the next picture. Everything that is printed is an exact scale of the models directly used in all of our patterns and production machining. To be exact, they are 51.5% of the full size versions,( i had to match the bearing bores to some bearings i bought online).

--------------------------------------------------------------------------
Here is the solution, its really just water with some industrial strength oxy-clean.

-------------------------------------------------------------------------
I am starting the printer up now to print the rotors, rear plate and cover now, ill have to print the tall gear and housing again also, but that will be on pallet 3. Once i get the thing put together and turning ill make a video and upload it and have a price for some Mini's.
--------------------------------------------------------------------------
DIY 3D PRINTER
Also, if anyone has been read about my post of making my own 3D printer or seen my video over everything that i am doing on my youtube channel here
http://www.youtube.com/embed/cJ20Yoq5LNY
i have ordered it, it just shipped out of Canada yesterday and should be to the shop by this week. I will be video everything i do to create this printer and how anyone else can to, mechanics, electronics, software and programming behind it all.
The reason im doing this though is because one, we can use it at the shop, but two, it will give me the knowledge and experience i need to build my own CNC machine and Wire EDM machine, all of which i will be videoing too.
If you want to read more and learn about the 3D printer i will be building you can check out its website @
http://reprap.org/wiki/RepRap
RepRap
I will be building the Prusa Mendel version, it is the cheapest and easiest/newest to build. you can google or youtube videos on the printers and find tons of info on them. The idea behind this particular printer though, is it is all freeware. people that build, designing, and modify stuff from these printers all share their creations on websites for free, all you have to do is download the model and print it.
-
01-01-2012, 09:04 PM #9
Registered
- Join Date
- Oct 2011
- Posts
- 104
Also, if anyone is interested in making their own 3D printer, i bought mine from this website,
Prusa Mendel Full Kit (Excluding Printed Plastic Parts)
This was the cheapest i could find on the net, and the kit comes with everything you need to build one, Except for the 3D printed parts. If you read a bit about the repraps, you know that they are designed to print a majority of their own parts, they self replicate. You will also need to buy the 3D printed parts along with this kit.
I will just be printing the parts out of our 3D printer here at the shop, i can see how much it would cost to print the parts and sell them to anyone that wants them, but it will probably be cheaper for anyone else to just buy them on a dedicated reprap vendor site.
-
01-02-2012, 09:15 PM #10
Registered
- Join Date
- Oct 2011
- Posts
- 104
Day 7: Monday 01/02/2012 "the Honeycomb"
3D printer is half way done with the rotors, im crossing my fingers that we dont get a power surge or anything to screw it up. We had today off for work, i just came in to check on the printer and get some pictures, tomorrow i will start scaling down the blower and see how much a 1/8 and 1/4 scale will cost.

-------------------------------------------------------------------------
The parts that were printed on pallet two, all the support is dissolved out of them and now just have to wash them in the sink and wait for them to dry.

------------------------------------------------------------------------
Here you can see how the printer screwed up and shifted everything

------------------------------------------------------------------------
And since the printer screwed up i had to stop it so you can actually see what it looks like inside a 3D printed part. It is actually a honeycomb inside and i can control how thick the outside walls are, i can also print in full solid but heat and warpage can become a problem in larger parts. Printing honeycomb saves a lot of weight and material(cost) but it means that the plastic becomes porous and will retain liquid, not a big did for just prototyping and checking things.

-
01-02-2012, 11:12 PM #11
Registered
- Join Date
- Dec 2006
- Posts
- 603
Sorry to see the shifted parts. Hope the second batch works out better.
How close to size will the finished parts be. I hear some of those printers only miss by a .001 or two.
-
01-03-2012, 12:02 AM #12
Registered
- Join Date
- Oct 2011
- Posts
- 104
Very close, i believe our printer is +-0.002, size of the part will affect that too. Its accurate enough for what im doing, i can always measure and check them on our CMM machine if needed to. it does need to be taken into consideration though when i design tooling to be printed from it. Originally Posted by stevehuckss396

Im not sure how accurate im going to get this mendel printer down to but i plan on buying and using the same nozzles that this printer uses, which have a 0.010 nozzle hole, i think the nozzle that come with the Mendel are a bit bigger than that.
-
01-04-2012, 01:50 PM #13
Registered
- Join Date
- Oct 2011
- Posts
- 104
Day 9: Wednesday 1/04/2012
3D printer is done with the rotors, rear plate and cover, now just need to reprint the housing and long gear that it screwed up earlier.


------------------------------------------------------------------------
Here is our latest work on our pulleys, Turned on our mazak lathe, holes and teeth machined on our highspeed brothers and back to our lathe for some final polishing, here is the finished product.
You can check out a few more photos or possible buy one...(we'd really appreciate that) @
8MM X 53 TOOTH POLISHED DRIVE BELT PULLEY

-------------------------------------------------------------------------
Mini Blower Update
For anyone interested in one, i have the design done on an 1/8 scale version of our 671, calculated our cost and am discussing a price right now, my guess is that some of you wont be to happy on the cost though :/.
Added helical gears though, hopefully should help be a bit more quiet

-
01-04-2012, 03:37 PM #14
Registered
- Join Date
- Oct 2011
- Posts
- 104
Did some graphic rendering of the full assembly, took my computer 5 mins to generate each of these photos and for those of you who want to know, im running an i7 quad 8G DDR5 with a geforce GTX 560M 2G DDR5.
Also these photos are of the 1/8 scale, not full 671, thats why the coupling looks wonky
Chrome

---------------------------------------------------------------------------
Polished, not much difference

------------------------------------------------------------------------
Couldn't get this one to turn out quite right, shouldnt' be so dark, the top face should be machined finish and the bolt holes should have been machined spotface

-
01-04-2012, 05:00 PM #15
Registered
- Join Date
- Oct 2011
- Posts
- 104
here is some renderings without the case

Factory floor

-
01-05-2012, 03:50 PM #16
Gold Member
- Join Date
- Jul 2007
- Posts
- 1602
Looking at your results makes me want to build one of these. What filament and nozzle sizes are you using? Originally Posted by Dzuari
bob
-
01-05-2012, 09:51 PM #17
Registered
- Join Date
- Oct 2011
- Posts
- 104
This printer is very accurate, within one or two thousands. Originally Posted by stevehuckss396
-
01-05-2012, 10:07 PM #18
Registered
- Join Date
- Oct 2011
- Posts
- 104
Im not sure what the standard nozzle that comes with it but ill be running 3mm filament, once i get everything working right and i understand it im going to take one of our nozzles from our 3D printer that we currently have and retrofit it to the reprap, which is a 0.001 nozzle. Originally Posted by rowbare
-
01-06-2012, 01:55 PM #19
Registered
- Join Date
- Nov 2004
- Posts
- 85
Been folowing all your work.
Great stuff.
Keep the vids comming.
Are you planing on using the plastic printer to make molds or is it more proof of concept?
-
01-06-2012, 09:49 PM #20
Registered
- Join Date
- Oct 2011
- Posts
- 104
we use the 3D printer to create small patterns and molds but the bigger stuff is all CNC cut. Originally Posted by sdeering
This print is just a proof of concept and it will be really cool to have a half scale blower made from a 3D printer.


 Reply With Quote
Similar Threads
-
Twin screw rotor machining
By surfit in forum Uncategorised MetalWorking MachinesReplies: 1Last Post: 03-11-2010, 12:12 AM -
Boring out ac motor rotor?
By DennisCNC in forum CNC Machine Related ElectronicsReplies: 4Last Post: 04-01-2008, 12:41 PM -
Anyone make their own rotor blades?
By CNCRob in forum Hobby DiscussionReplies: 2Last Post: 11-08-2005, 03:33 AM -
RFQ for simple brake rotor modification
By gmader in forum Employment OpportunityReplies: 0Last Post: 08-18-2005, 06:00 PM
