


Hey there every one! I'm new around here but I thought I would share some info about my first CNC router build. I have learned a lot from reading posts here so hopefully I can contribute in some small way.
I'm not an engineer from a background standpoint, I'm actually a finance manager at a car dealership. On my days off however I LOVE to tinker in the garage. I have a small milling machine and a mini lathe from harbor freight that are well loved and well used, but after seeing my cousins CNC router he built from scavenged parts I decided I HAD to have one, so here I am!
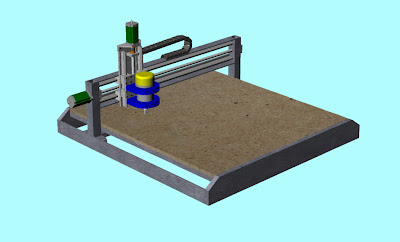
This router is designed from the ground up by myself and will be built mostly from steel, with a little aluminum and wood thrown in for the Z axis and the cutting table surface. Here is a picture of the CAD drawing I made for the machine:
As you can see I am using thompson style bearings and shafts and 16mm ballscrews for linear motion. The motors and drivers are the "green monster" from Probotix and the spindle will be a 2hp Dewalt router.
In the above image you can see my Z axis finished. The rails and bearings are 16mm and I'm using a Lovejoy coupler to connect the 1/4" motor shaft to the 1/2" shaft on the ballscrew. (I turned the ends of the ballscrews down from 16mm to half an inch on my mini lathe. Note to self - turning hardend steel ballscrews on a mini lathe is a major pain in the butt!)
Here is the big pile of steel that will make up the bulk of the router! Most of it is 1/4" and 1/8" thick wall tubing and angle iron depending on where its going and what it is doing.
Here you can see my Gantry done! The project really is moving right along. The long rails are also 16mm in diameter just like on the Z axis. There will be 33" of effective cutting area on this machine.
Here you can see how the ballnut connects the the Z axis to move it side to side. All these parts where cut free hand on my milling machine and bandsaw. I can't wait to be able to use the router on stuff like this!
That is as far as I have gotten, next up is building the base and the CNC controller box!
-Jerome
Thread: My first CNC machine - Build
Results 1 to 18 of 18
-
02-01-2010, 07:44 PM #1
 Registered
- Join Date
- Oct 2009
- Posts
- 51
My first CNC machine - Build
-
02-02-2010, 02:54 AM #2
Registered


- Join Date
- Aug 2009
- Posts
- 392
That's looking fantastic so far! What are you planning on cutting with it? Those rails aren't overly thick, so if you're cutting hard materials, with that type of length you might get a bit more deflection than would be ideal. If you're just sticking to wood and plastic it should be fine, however. Just letting you know.

-
02-02-2010, 08:15 PM #3
Registered
- Join Date
- Oct 2009
- Posts
- 51
Thank you! I'm mostly going to be cutting wood and lexan with it, but i'm planning on some aluminum as well. Each rail is supported fairly well by the 2" wide, 1/4" thick steel angle iron that makes up the length of the gantry. A picture is worth a thousand words so here you go:

The whole assembly feels VERY rigid (if a little heavy) so hopefully it will not flex to much =) the rails that the gantry will rid on are not shown yet, and they are 20mm in diameter to help keep them from flexing. After gettting all the rails in the mail I wish I would have gotten 20mm for everything but since I already have these I hope they will work! =)
-Jerome
-
02-03-2010, 12:20 AM #4
Registered
- Join Date
- Aug 2009
- Posts
- 392
Oh, those are supported rails. Those small images were a bit hard for my eyes to see that. Should work fine then
-
02-03-2010, 05:27 AM #5
Registered
- Join Date
- Oct 2005
- Posts
- 2392
Looks pretty good so far!
Just a tip with turning the ends of the ballscrews, if you grind them with an angle grinder you can chew through the hardened outer layer in a few seconds, then your mini lathe will have an easy job with the soft core.
I clamped the angle grinder in a vice, then held the ballscrews in hand and rotated them as the grinder took off the outer "screw" part, about 5/8 inch on each end. It was easy and neat, well neat enough.
-
02-03-2010, 05:56 AM #6
Registered
- Join Date
- Oct 2009
- Posts
- 51
You know, I have both a bench grinder and a 12" disc sander that probably would have worked great for doing that! Getting through the threaded part of the ballswcrew was the hardest part, once I had that turned down is was smooth sailing from there on out! I only have one ballscrew left to do but I may try that to save some of my lathe cutter inserts from the garbage can!
Tommorow is my day off so another long build day on the router awaits!
-Jerome
-
02-04-2010, 12:03 PM #7
Registered
- Join Date
- Oct 2005
- Posts
- 2392
Angle grinder will be quicker, unless your bench grinder is a big one. Looking forward to seeing more build pictures.
-
02-04-2010, 05:55 PM #8
Registered
- Join Date
- Oct 2009
- Posts
- 51
I think just about anything would be faster than taking the threads off with the lathe!
On another note I worked for several hours yesterday on the machine. First thing I had to do was make an area for the completed machine since I didn't have a work bench big enough to hold it! The picture below shows the addition to my work bench.

After I got my work bench modified I started to cut the steel that will make up the base of the machine. The rails running from front to back are 1/4" thick by 3" wide angle iron (HEAVY stuff!) the the front and back rails are 3" x 1" x .125" wall steel tubing (Pretty heavy, but not as heavy as the angle!) In the picture below you can also see I placed the Gantry in the frame to make sure everything is coming out correctly. You can also see the a can of Mt Dew (The official drink of my garage!) in the front corner to show scale. Its funny how much bigger stuff feels in real life compared to on a computer screen in my Cad program! More to come.

-
02-05-2010, 12:50 AM #9
Registered
- Join Date
- Aug 2009
- Posts
- 392
Looks good. Finally starting to take shape!
-
02-05-2010, 03:51 AM #10
Registered
- Join Date
- Apr 2007
- Posts
- 47
Man that machine is looking nice!
Where did you get your supported rails? I just ordered 6 supported SBR16 rails from this ebay store > http://stores.ebay.com/linearmotionbearings. I got two 1400mm, two 880mm, and two 380mm SBR16 rails with 12 bearing blocks for $326 shipped. Looks like your 16mm rails are the same thing I ordered. I'm building a CNC machine to cut mostly foam, and wood. Although I came to a thought the other day, "you know, it might be nice to cut aluminum too!" so I'm still trying to figure out what I'm gonna do to connect the x,y,z axis to the steppers. I ordered the probotix probostep 3 axis kit for the drive setup, but I'm trying to choose if I need ballscrews, or if belts will do just fine for the kind of cutting I will be doing.
-
02-05-2010, 04:50 AM #11
Registered
- Join Date
- Oct 2009
- Posts
- 51
That is the same ebay store I got my stuff from, I was very impressed with their service and the bearings and ballscrews are great for the price! I got both 16mm and 20mm rails from them and 16mm ballscrews. (Which have
VERY little, if any backlash)
The Green Monster Probotix set up I got seems top notch, I even got the relay board so I can turn my spindle and dust managment system on and off with my G-code =)
I would go for a machine that can cut as many things as possible, then you won't have to build another one for a while!
-Jerome
-
02-05-2010, 05:28 AM #12
Registered
- Join Date
- Apr 2007
- Posts
- 47
So I guess when one of Chai's ebay listing say "end machinings" on the ballscrews that means the ends of the ballscrews are machined to fit the bearing block? (reading that you machined your ends) I wanted to get a whole package of SBR16 rails and ballscrews but I'm lost as to what to buy from him. His desctription of the ballscrews is to vague, and I tried asking if if he knew what I could possibley use for my CNC table and he said he didn't know.
Probably for around the price as buying 3 ballscrews for my x,y,z axis plus shipping, I can get enough timing belt and pulleys to drive both right and left slides of my x axis and all the other slides. I think I'm still gonna go with belts..
-
02-05-2010, 05:55 AM #13
Registered

- Join Date
- Dec 2007
- Posts
- 362
Endmachining is to your own specification i.e. just provide a diagram with measurements. Example attached.
Chai is pretty good at providing whatever you ask for, even if it's not listed in his eBay store. I doubt he has the information (or time) to advise just what parts you'll need for your build.
If you outline here what you want to build then I'm sure they'll be any number of helpful responses.Regards
Geoff
-
02-22-2010, 07:02 PM #14
Registered
- Join Date
- Oct 2009
- Posts
- 51
Router Mounted!
My CNC router is coming along! I spent some time building the mounts to mount the Dewalt router to my Z axis. I made them from UHMW on my cousins CNC router. Seeing his machine carve out these mounts in no time really got me motivated to finish mine! Here are some pictures of the proccess.


I have also spent a lot of time getting the electronics package put together to run the machine. As I have said before I am using the "Green Monster" package from Probotix. I sprang the extra money for the isolated breakout board and the Relay controller to run my spindle and dust sucker system. Below are some pictures of the box I made, I kept it clear so I can watch the status LEDs on the driver boards in real time.


You may notice the speed controller mounted to the lid of the box and the white household plug. I have it set up so each of the two plugs is independently controlled from the probotic relay board, and one of them is run through the speed controller. This makes it so I can just plug my spindle and shop vac into these two plugs and the G-Code will tell the vac and spindle what to do!
-
03-06-2010, 05:35 PM #15
Registered
- Join Date
- Oct 2009
- Posts
- 51
Almost done!
My machine is almost done! I painted it a nice shade of blue to match the router mounts. I am currently wiring it up as we speak! Fingers crossed but it should be cutting stuff out by tonight.

-Jerome
-
07-26-2014, 01:19 PM #16
Registered
- Join Date
- Oct 2007
- Posts
- 40
Re: My first CNC machine - Build
Jerome, I am considering a similar machine with the SBR and ballscrew from ebay components. Is your machine still working well?
ElSeed
-
07-26-2014, 02:37 PM #17
Registered
- Join Date
- Oct 2009
- Posts
- 51
Re: My first CNC machine - Build
Yes, this machine is still going strong. I have since built four more machines just like it for others using the same screws and rails.
A few tips. The rails are rock solid. I have never even lubed them and they work great! I feel grease would make saw dust want to stick in them so I have never greased them and they have never jammed.
The ballscrews swill need lube. I would recommend using the grease zerk fittings that each ballnut comes with to screw in a small pneumatic fitting that you can connect a poly tube to. Run these tubes to a manifold and install a one shot oil pump. Lubing the machine like this will force crap out of the ballscrew as you pump oil through the ball nuts.
-
07-26-2014, 08:42 PM #18
Registered
- Join Date
- Oct 2007
- Posts
- 40
Re: My first CNC machine - Build
Thanks for the quick reply. I really like your build, it looks solid but not overly complex. If you don't mind, cann you post a few more pix of your axes and how you mounted your rails?
ElSeed


 Reply With Quote
Similar Threads
-
Need some direction to build a small machine to allow me to build a larger one
By Dman65 in forum DIY CNC Router Table MachinesReplies: 3Last Post: 01-05-2013, 05:24 AM -
New machine build
By Laserman FLE in forum Laser Engraving / Cutting Machine General TopicsReplies: 8Last Post: 02-04-2011, 12:57 AM
