

Excellent, Arie. Should make many many tie wraps. How long did such a small end mill take to cut that out?
Results 221 to 240 of 438
-
12-01-2007, 12:07 AM #221
 Gold Member
- Join Date
- Jun 2004
- Posts
- 6618
Lee
-
12-01-2007, 12:20 AM #222
Member
- Join Date
- Jan 2007
- Posts
- 356
the same basic rules apply for these endmills.. cutting depth is ¼D, i.e. 0.1 mm, feed 50mm/min, which looks quit fast for such a tool... total machining time was just under 1 hour
i think i'm going to buy some 0.3 and 0.2 mm endmills as wel..
some guy once said that i was overdoing things with ball rails and ball screws... this kind of work proved him wrong.. very wrong... (nuts)
-
12-01-2007, 01:17 AM #223
Registered
- Join Date
- Aug 2005
- Posts
- 96
Arie,
Excellent job!
You are an inspiration to many of us out there. :-)
Regards
Sandi
-
12-01-2007, 05:24 AM #224
Junior Member
- Join Date
- Nov 2004
- Posts
- 436
Arie,
That motorcycle model is awesome!
I am a big fan of Hub Centre Steering. Please post images of the hub when you complete it. I am trying to make hub centre wheel for one of my projects now.
Rob
-
12-01-2007, 12:52 PM #225
Gold Member
- Join Date
- Jun 2004
- Posts
- 6618
It didn't really occur to me that the same principles apply to such small end mills. Makes perfect sense to me. That time isn't bad at all. Nice detail in it.
I know you had some questions during this build about the X table configuration. I have built my mill (if I can mention it in the same thread) with the X rails traveling on the blocks. That sure does take up the space. I was trying some other material for the saddle too. A type of fiberglass plate. I will be redoing the saddle and table to the configuration you have chosen. It looks like a smaller footprint and better weight distribution. My machine is aluminum and cast iron. Not nearly as sturdy as yours. I do like it though so far. I bought 1" Mic 6 cast plate for the saddle and table. I will make shallow pockets for the blocks, rails and screws similar to what you have done.
Thanks enlightening and inspiring in this thread. I know you are proud of your machine and should be. I hope you will continue to post it's accomplishments and projects. Thanks!Lee
-
12-01-2007, 01:16 PM #226
Member
- Join Date
- Jan 2007
- Posts
- 356
i sure will keep posting the things i make.. since, at the moment i'm building the Tamiya 1:12 scale Bimota Tesi kit, and i do have a CNC, you can imagine what will happen next?..
i'm planning on developing a 1:9 scale kit of this bike, i have some other kits lying around, from which i can copy and alter some parts to get an engine, the wheels, and numerous other parts...
-
12-05-2007, 07:19 PM #227
S.N.A.F.U.

- Join Date
- Jan 2005
- Posts
- 1880
This is true provided you can spin that little bugger fast enough! Originally Posted by arie kabaalstra

What was your RPM?
And are those chips in the bottom of the finished mold or is the metal that porous?
I wish my Home made machine was up to this!
I still need to find another way to remove backlash, as my initial attempt was poor and needs another going over.thanks
Michael T.
"If you don't stand for something, chances are, you'll fall for anything!"
-
12-05-2007, 07:46 PM #228
Member
- Join Date
- Jan 2007
- Posts
- 356
the endmill runs @35000 RPM.. so still a healthy cuttingspeed of 44 m/min
Yes.. those are chips.. that is... any other person would call it "Dust"..
-
12-23-2007, 02:06 AM #229
Registered
- Join Date
- Oct 2005
- Posts
- 162
u r an inspiration to all of us! ive been away for a while working and havent been able to read your thread. i loved the cable tie mould. out of curiosity, what does a 0.4mm cutter cost? keep up the good work and keep up the videos.
On the other hand, You have different fingers.
-
12-23-2007, 10:49 AM #230
Member
- Join Date
- Jan 2007
- Posts
- 356
More news to come in the near future, driver update and new control software
i'm gonna use USB CNC ( www.usbcnc.com ) with a new CPU, and a higher possible step frequency.
0,4 mm endmills cost € 16.20 a piece.. quite a price huh?.. well they do a great job, and i'm really pleased with them..
this is where i got em:
http://www.kafra.nl/lookdetailsprodu...2&ProductID=65
today's plans: machine a PCB for my new powersupply.. i'm a newbie at electronics, but i'm gonna have to start somewhere.. if i do it right, my machine wil improve a great deal.. how's that for motivation...
-
12-23-2007, 12:35 PM #231
Member
- Join Date
- Jan 2007
- Posts
- 356
and, by the way..
a friend of mine is, besides a skilled CNC operator, also a bit of a musician..
Enjoy, and MERRY CHRISTMAS!
[ame]http://www.youtube.com/watch?v=vOTrZqfEJEI[/ame]
-
12-23-2007, 05:23 PM #232
Registered
- Join Date
- Mar 2004
- Posts
- 1306
Way cool. I showed my wife - she said I was sick
Regards,
Mark
-
12-23-2007, 09:00 PM #233
Member
- Join Date
- Jan 2007
- Posts
- 356
Ok.. my very fist venture into electronics... making a Power Supply Unit (PSU)
machining a Circuitboard, and soldering the components onto it..
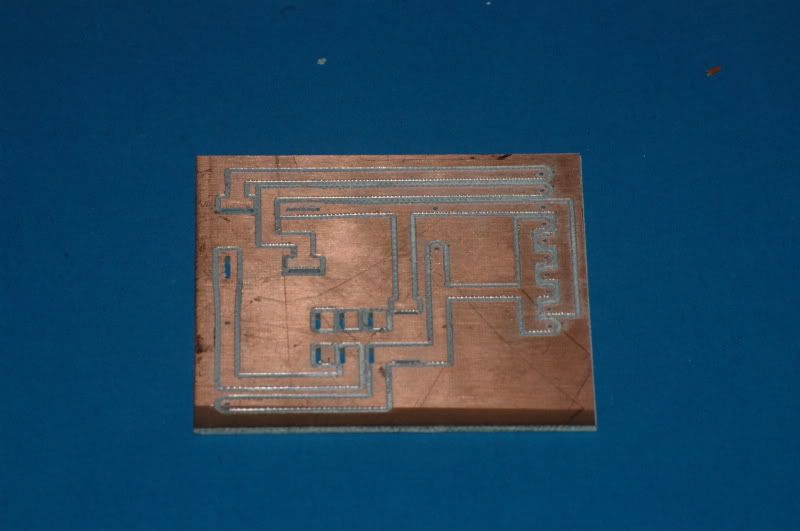
First, cutting the "trails" slots and holes for conducting the current, and placing the components
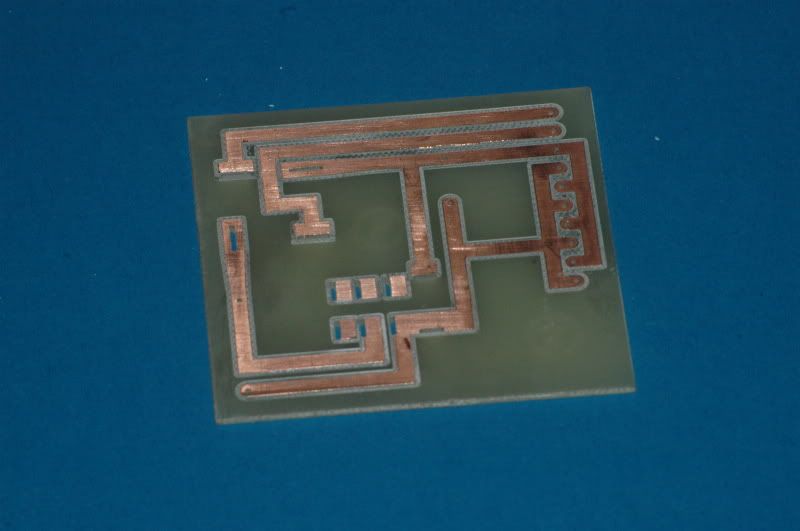
Then.. i noticed that the excess copper could easily be pulled of.. Ok.. here we go..
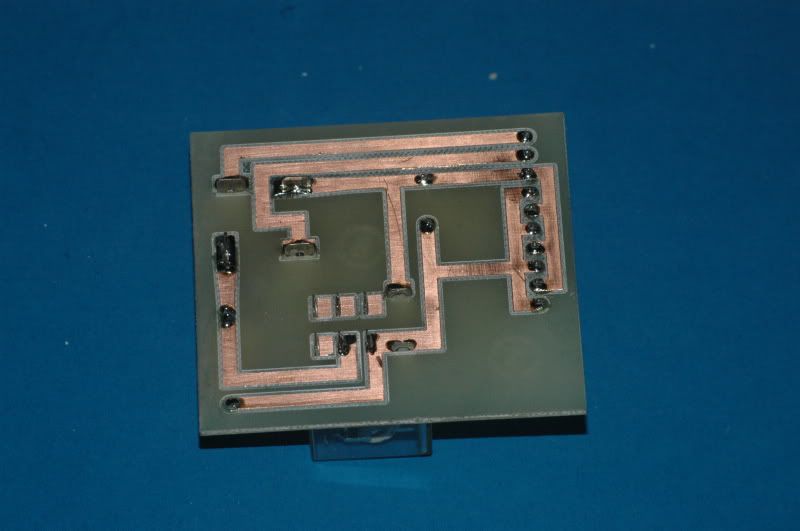
after having done that.. i "fired-up" my soldering iron and soldered all components..
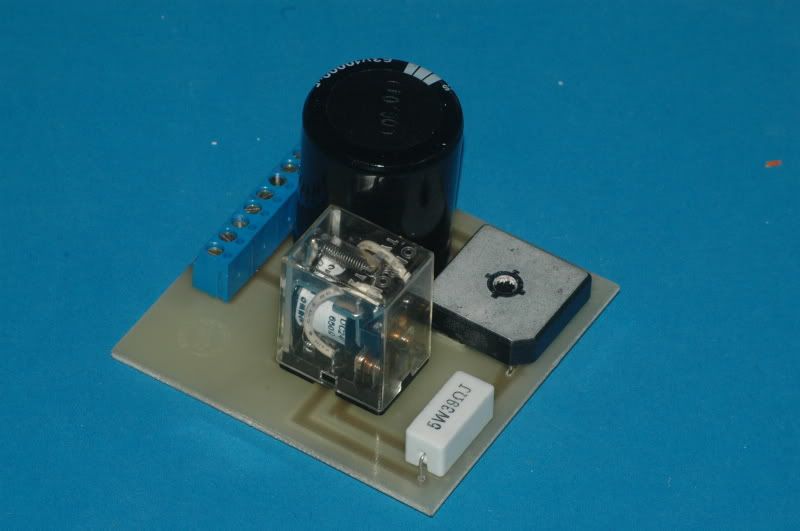
and this...this is what it finally looks like..
AC current 27 Volts is fed into the "ac/dc converting thingamajigg" in the upper right, the 36 V DC goes through a resistor into the large capacitor, to reduce the "start-rush current", as soon as it reaches 24 V the relay switches and bypasses the resistor..
-
12-26-2007, 05:34 PM #234
Registered
- Join Date
- Dec 2004
- Posts
- 1137
"ac/dc converting thingamajigg" = Bridge rectifier
I'm curious how you peeled the un-needed copper...how easy was it?
Jay
-
12-26-2007, 11:11 PM #235
Member
- Join Date
- Jan 2007
- Posts
- 356
"Bridge rectifier".. yeah.. of course.. but i liked "thingamajigg" better... we don't have many words like that in dutch.. "dinges" is most common..
peeling the copper was quite easy.. took me only 5 minutes..
-
01-01-2008, 05:02 PM #236
Registered

- Join Date
- Jul 2005
- Posts
- 340
arie, could you show some photos or better videos how you make use of your touch probe ? what do you think about your home made touch probe ?
-
01-01-2008, 05:21 PM #237
Member
- Join Date
- Jan 2007
- Posts
- 356
Will do that in a couple of weeks.. i'm now in the "round-up Fase" of working on CNC control software.. ( i did mention i didn't like Mach) Originally Posted by pit202
i've sort of teamed-up with another CNC hobbyist here in Holland, and we've been working on the GUI of his USBCNC ( www.usbcnc.com )

the entire program is operable without use of a mouse, most functions work by means of the F-keys..
the probe can easily be connected to the CPU board of USB CNC, and it's easy to program the probe..
USBCNC comes with a CPU board with connectors for the stepperdrivers, and also external Start & Pause buttons, E stop, home switches, Electronic handwheel, and probe, as wel as a signal to start external devices, such as the spindle motor..
this week i hope i get my 10 wire flatcable and connectors to assemble the new USBCNC controls, the PC will be mounted in a drawer along with the drivers and powersupply unit, handwheel, keyboard and screen wil be mounted in a sliding door of the machine enclosure, which i will probably make of glassfibre ( maybe even with some Carbonfibre as well..)
-
01-01-2008, 07:02 PM #238
Registered
- Join Date
- Jul 2005
- Posts
- 340
nice, you are right , the controll must be controlled without a mouse , i liked mach as long as I have used them, now I have a "HAAS" machines and controlls , I can do anything without a mouse
( can`t imagine to have one ( centroid ?? ) ) still waiting for more pics
-
01-01-2008, 07:15 PM #239
Member
- Join Date
- Jan 2007
- Posts
- 356
we're in the test fase right now, and everything seems to work just fine..
now for some probing functions and routines to dream up.. how'bout a circle-center probing cycle?.. probe 4 points on a circle and let the control calculate center coordinates..
i have a gut feeling we're on the right track...
since i sort of designed the screen layout, based upon control i've worked with, i'm already familiar with it, but even my father seems to understand it, and he's far from a CNC machinist..
-
01-16-2008, 02:51 PM #240
Registered
- Join Date
- Jan 2008
- Posts
- 1
 Motor and linear motion specs
I'm new to this type of project and I'm blown away by the quality of machine you've created.
Would you mind posting Model No's etc for the Motors, ballscrews and linear guides. There is such a range of screws, nut etc, so that I could get an idea about which are suitable for a project like this?

 Reply With Quote
Similar Threads
-
more progress..
By adam_m in forum DIY CNC Router Table MachinesReplies: 0Last Post: 11-26-2013, 03:56 AM -
Design In Progress
By JoeDawg in forum Uncategorised MetalWorking MachinesReplies: 1Last Post: 10-07-2008, 07:48 PM -
My First Router Design & Progress
By watsonstudios in forum CNC Wood Router Project LogReplies: 40Last Post: 07-22-2007, 09:19 AM -
Looking into buidling an Auto-start RPC
By Wendell in forum Phase ConvertersReplies: 2Last Post: 10-12-2006, 03:03 AM -
Alibre design in progress
By xyzcnc in forum Uncategorised CAD DiscussionReplies: 10Last Post: 06-07-2005, 06:49 AM
