


Roman Black, the guy who designed the brilliant Linistepper controller has come out with a new design for a higher current, ultra simple, minimal component count, chopper type stepper controller. And of course, we have a very nice kit available, which has to be the simplest, quickest kit for a micro-stepping controller ever.
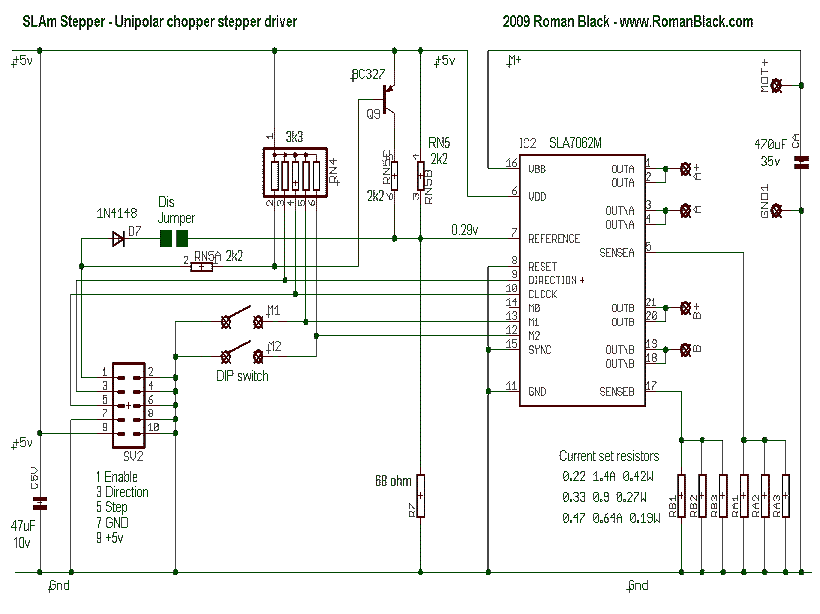
The SLAm Stepper, based on the Allegro SLA7062M, is a very quick and easy to build, 3 amp 40 volt per phase, chopper, unipolar stepper motor controller. With only 15 components, and a very frendly PCB, you can have your motors spinning quicker with this design than just about any other.
Here is the design:
PCB LAYOUT? We don't have a board layout yet that would be good for hobby / home etching; the board in the kit is double sided with a lot of vias. Hopefully someone will come up with a good version soon which we will be happy to post on the site.
CONTEST! Just to help get that started: The first person who comes up with a workable single sided layout, I'll send a free kit of parts for one SLAm driver (good for a single axis) and a break out board (good for 4 axis) with cables to get you hooked up and running.
Features
- Simple. Easiest to build (and most compact) SLA7062 driver design ever!
- PMinMO.com^ standard^ 2x5 control connector for mix and match with other open source break out boards and drivers.
- 1A to 3A unipolar motor capability
- Mode switches On-board
- Low power "hold" feature in all microstep modes
- Modes:
- Half-step,
- 4th,
- 8th and
- 16th microstepping
(low power hold in any mode)
KIT: The kit includes all the components and a professional double sided PCB with top silkscreen, thru plated holes and lead free construction. (RoHS compliant). You add your power supply, motor, heatsink, and standard step and direction signals from Mach 3, TurboCNC or other CNC software.
- Professional PCB with wide current paths, ground planes, etc...
- Real SLA7062M from Allegro (not a cheap knockoff like some other hobby cnc kits we know... )
- Stainless terminal screwdown connectors.
- Your heatsink mounts easily at the edge (since it's a chopper driver, only a small heatsink is needed)
Quantity breaks available
Like any chopper type of driver, the SLAm is not as smooth as our other, Linistepper, linear driver and you may need to add external, mechanical resonance damping in extreem cases. The SLAm is more powerful, and will run cool, but your motors may get a bit hot, so make sure they have some air.
Results 1 to 20 of 51
-
01-22-2010, 10:25 PM #1
 Registered
- Join Date
- May 2005
- Posts
- 1397
New SLA7062M 3 amp driver from Linistepper designer
-
01-23-2010, 04:24 PM #2
Registered
- Join Date
- Jan 2007
- Posts
- 97
good one.
i will prefer 7078.these sanken chips are amazing piece of drivers.highly robust and efficient.i have used several of these.
we are even trying to use 2 chips in parallel to get higher current.(nuts)
-
02-15-2010, 10:06 PM #3
Registered
- Join Date
- Dec 2006
- Posts
- 118
Just curious. I don't see any mounting holes. How is this board intended to be mounted? I'm guessing, mount to the heatsink and hang the board off the chip? (Is there a mounting hole hiding in the corner behind the header connector?)
Gary
-
02-15-2010, 10:19 PM #4
Registered
- Join Date
- Dec 2006
- Posts
- 118
 Originally Posted by student1616

And how has that worked out? What was needed? I'm guessing at least a small R on each output to balance the currents?
Gary
-
02-16-2010, 12:26 AM #5
Registered
- Join Date
- May 2005
- Posts
- 1397
In most cases, the mounting you suggest should be fine. Originally Posted by gacrwell
There is a mounting hole in the corner between the PMinMO connector and the motor/power connector, and there are no traces in the corners near the SLA so you can drill your own mounting holes as you like in that area.
-
02-16-2010, 11:47 AM #6
Registered
- Join Date
- Oct 2005
- Posts
- 2392
The board is very compact and lightweight, and quite well supported at one end by the SLA chip itself. At the other end there is a PCB hole in the corner between the 2 connectors (as James said). Those 3 points total give plenty of support.
Re the 7078, I prefer the 7062, it still has 16th microsteps but the current is set by external resistors (not a little trimpot). The current does not need to be adjusted it should just be set at the proper value for the motor when the driver is built, and removing the trimpot from the design removed another cause of user error and failures from incorrect adjustment. It also eliminates a very common form of electrical failure as trimpots are one of the most likely failure components especially in a high vibration environment.
The SLAmStepper was designed to be small, very fast to build, and offer excellent performance and reliability. They are small enough to be built INTO the machine itself, or housed near the stepper motor even on small machines. My machine has the 3 SLAmSteppers in a little box behind the gantry.
-
02-18-2010, 09:21 PM #7
Registered
- Join Date
- Oct 2005
- Posts
- 2392
If anyone wants to see SLAmSteppers installed on a small router with 300 oz-in steppers, I have posted some pictures in this build thread;
http://www.cnczone.com/forums/showthread.php?t=99557
-
04-01-2010, 09:59 AM #8
Registered
- Join Date
- Feb 2009
- Posts
- 40
Is the contest still on?CONTEST! Just to help get that started: The first person who comes up with a workable single sided layout, I'll send a free kit of parts for one SLAm driver (good for a single axis) and a break out board (good for 4 axis) with cables to get you hooked up and running.
I just tried my hand at single sided layout for this schematic.
Attaching the board image and eagle files.
-
04-01-2010, 11:52 AM #9
Registered
- Join Date
- Feb 2009
- Posts
- 40
Looking at the pics of Roman's board, I think I might have got the chip
backwards (heat sink side facing the inner side of the board).
I flipped it and redid the board, with a few other minor tweaks.
It's probably quite clear to all that I am an eagle newbie.
Please help fix any issues, so we have a usable board. TIA!
-
04-01-2010, 04:54 PM #10
Registered
- Join Date
- Feb 2009
- Posts
- 40
Some more layout tweaks -
-
04-01-2010, 06:34 PM #11
Registered
- Join Date
- May 2005
- Posts
- 1397
I've asked Roman to look over your layout and see if it's workable, and if so, I'll send out the kits. India huh? I should have specified that the postage is not included, but I'll go ahead and pay it this time. Originally Posted by quadtech
-
04-01-2010, 07:44 PM #12
Registered
- Join Date
- Oct 2005
- Posts
- 2392
Hi Quadtech and James, I haven't checked all the wires are connected to the right spots, but there are a few layout issues I noticed straight off.
The 2 wires from the chip back to the current feedback resistors carry full motor current so they should be the same larger size as the 4 motor tracks. Getting the resistors closer to the chip so the current paths are smaller would be good. I know it's hard to get a single sided layout to perform really well, but nobody will really be expecting a single sided SMPS driver to perform as well as a proper plated through hole PCB so you probably just need to improve it to a reasonable level.
If you can, make the length of the tracks the same from the chip to each set of the current sense resistors. That includes the 2 tracks from the ground side of the resistors back to the main cap.
If possible the chip, sense resistors and main cap should be close together with short direct tracks. The other parts can be further away.
The 5v cap should also be closer to the chip which should be easy enough.
The other layout problem is the placing of some of the solder pads, especially the ones on the wire jumpers. If possible for a good single sided design the places where the user has to solder should be well spaced away from any other tracks, to reduce the chance of shorts and make soldering easier and more reliable. Also the size of the solder pads should be larger if possible to make for easier drilling and soldering when people make their own PCBs. Those tiny square pads on the wire jumpers are not good.
-
04-01-2010, 08:06 PM #13
Registered
- Join Date
- Feb 2009
- Posts
- 40
Roman, thanks for the review and comments.
I'll rework the layout to see how best to fix the issues.
BTW, I had your page on the Bresenham time keeping trick and the tiny SMPS
bookmarked for years now, after I came across them some years back on the NEONIXIE list.
-
04-01-2010, 10:17 PM #14
Registered
- Join Date
- Feb 2009
- Posts
- 40
Roman,
I think I was able to address all your suggestions.
Let me know your feedback.
If possible, also a quick review of the connections - I did check that
quite carefully against the schematic posted by James.
TIA!
Prasad
-
04-02-2010, 06:19 AM #15
Registered
- Join Date
- Feb 2009
- Posts
- 40
Dang! This PCB thing is addictive :-)
Moved some parts around to get better track clearance, and
reduce the board size too.
-
04-02-2010, 04:38 PM #16
Registered
- Join Date
- May 2005
- Posts
- 1397
LOL. I'm glad I'm not the only one. Don't tell anybody, but if I could, I would layout PCBs for free just because it's like playing a game to me... There should be a video game based on PCB layout. Originally Posted by quadtech
-
04-02-2010, 08:22 PM #17
Registered

- Join Date
- Sep 2006
- Posts
- 218
 Your board still has design flows: Originally Posted by quadtech
- gnd pin is 11 not 15 (so resistors should go straight to pin 11, wire to pin 11should be thicker and should come right from connector)- jumper from sense resistor to gnd track is a big mistake
- capacitor C1 is too close to sense resistors (it will dry and loose capacity); the same with C2
- bottom-right mounting hole is too close to the board outline
- I see no 100nF ceramic capacitor for filtering power supply
- some tracks are way smaller than realizable home-made (0.3mm is not acceptable)
- it’s a bad idea to put in the same hole of the connector the common point from stepper AND "+" wire from power supply
-there is about 20%unused space on the PCB
I hope my comments are not too hard, but scope is purely constructive! Keep working!
-
04-02-2010, 08:47 PM #18
Registered
- Join Date
- Feb 2009
- Posts
- 40
Absolutely taken in the right spirit. For me, this is all about learningI hope my comments are not too hard, but scope is purely constructive! Keep working!
to do it right and contribute something useful to all.
Why is the jumper to the gnd track bad? If it's thick
enough to carry the current, I thought it would be fine.
100nf cap - not in the original schematic, but I can put it in.
About sharing the motor common with the supply + wire, again it's
the connector format as in Roman's board, though I see the point you
made.
http://www.piclist.com/techref/io/st...m/SLAm_bld.htm
-
04-02-2010, 08:54 PM #19
Registered
- Join Date
- Sep 2006
- Posts
- 218
from SLA datasheet: Originally Posted by quadtech
Current sensing. To minimize inaccuracies caused by
ground-trace IR drops in sensing the output current level,
the current-sense resistors, RS, should have an independent
ground return to the star ground of the device. This path
should be as short as possible. For low-value sense
resistors, the IR drops in the printed wiring board sense
resistor’s traces can be significant and should be taken into
account. The use of sockets should be avoided as they can
introduce variation in RS due to their contact resistance.
I will post in about half hour (if I will have network then, if not, tomorrow) a schematic and pcb based on your pcb (it will not be perfect, but a bit better)
-
04-02-2010, 10:10 PM #20
Registered
- Join Date
- Feb 2009
- Posts
- 40
I updated the layout with my understanding of the sense resistor tracks, Originally Posted by eSilviu
and some of your suggestions.
Please make your changes to the attached one. Thanks! :-)


 Reply With Quote
Similar Threads
-
Linistepper - cheap unipolar microstepping driver
By lietuvys in forum Open Source Controller BoardsReplies: 47Last Post: 10-04-2014, 08:13 PM -
Linistepper (unipolar driver) with aligned transistors! Eagle files
By patriciooholegu in forum Open Source Controller BoardsReplies: 2Last Post: 08-28-2009, 04:38 PM -
Sla7062m
By shahidmk in forum Open Source Controller BoardsReplies: 7Last Post: 08-02-2009, 12:18 PM -
A circuit board for the SLA7062M microstepping driver
By Edison4 in forum News AnnouncementsReplies: 5Last Post: 05-04-2008, 09:59 PM -
Where can I find some SLA7062M driver chips?
By radicooldude in forum CNC Machine Related ElectronicsReplies: 7Last Post: 08-01-2006, 02:15 AM
