


Hi Everyone,
With this being my first post on here and also my first cnc mill I am jumping into it head first.
I have purchased a NM-145 mill from OverRev (Bobby D.) here on CNC Zone. He has made me completely aware of what needs fixed on it and I am ready to get it back up and running. I have purchased the AC spindle motor upgrade kit from Charlie @ Shadow Spawn LLC for it. The only difference that I wanted to accomplish was I am wanting to hook it up to 220V instead of the 110V. Charlie went out of his way and reasearched what I needed for a new motor and VFD for the kit. So as for him doing this I am now capable of putting a 2HP motor on instead of the 1 1/2hp motor. I have ordered in the new break out board online from novakon about 3 weeks ago. Hopefully it will arrive soon. I also talked to John on the phone a while back of what I was planning on doing. John said he would send me a replacement panel for the 220V style and all the leads for the BOB.
Now if UP Freight would get their heads out of their butts and figure out how to pick it up and get it up here to me that would be wonderful..
I am very excited to take on this project and get this back up and operational again. I will let everyone know how it progresses.
Mike H.
Thread: NM-145 purchased
Results 1 to 20 of 36
-
01-28-2013, 04:13 PM #1
 Registered
- Join Date
- Jul 2010
- Posts
- 41
 NM-145 purchased
-
01-28-2013, 04:29 PM #2
Registered
- Join Date
- Mar 2008
- Posts
- 3655
Hi Mike. It's about time you posted something. Just kidding.
Welcome to the Zone and congrats on your purchase. How about some pics please?
CR.http://crevicereamer.com
Too many PMs. Email me to my name plus At A O L dot com.
-
01-28-2013, 04:41 PM #3
Registered
- Join Date
- Jul 2010
- Posts
- 41
I will definitely post pics when the mill gets here and I start working on it.
-
01-28-2013, 05:31 PM #4
Registered
- Join Date
- Jul 2007
- Posts
- 675
Nice! Welcome to the addiction.
-
01-29-2013, 05:03 AM #5
Registered
- Join Date
- Feb 2010
- Posts
- 371
Hi Mike,
Let us know if you have any questions. I tore mine completely apart after I got it to perform a build to spec so I know it down to the bolt.
Eric
-
02-08-2013, 09:36 PM #6
Registered
- Join Date
- Jul 2010
- Posts
- 41
nm145 rebuild pics
This is where I am at. After talking with Charlie at Shadowspawn. He felt using sheetmetal instead of the plastic backing boards for the electrical components would help with the electrical noise. So after getting all the burnt components out and taking measurements for a new panel this is what I came up with. Some before and after pics.
The NM-145 mill in the beginning LOL.
http://farm9.staticflickr.com/8370/8...11b6668744.jpg
Break out board fire origination point.
http://farm9.staticflickr.com/8522/8...675ba27f24.jpg
Over heated spindle control board
http://farm9.staticflickr.com/8382/8...866546dc3c.jpg
It got pretty hot.
http://farm9.staticflickr.com/8243/8...25518f8182.jpg
The charcoal remains of the mother board.
http://farm9.staticflickr.com/8103/8...8425742d57.jpg
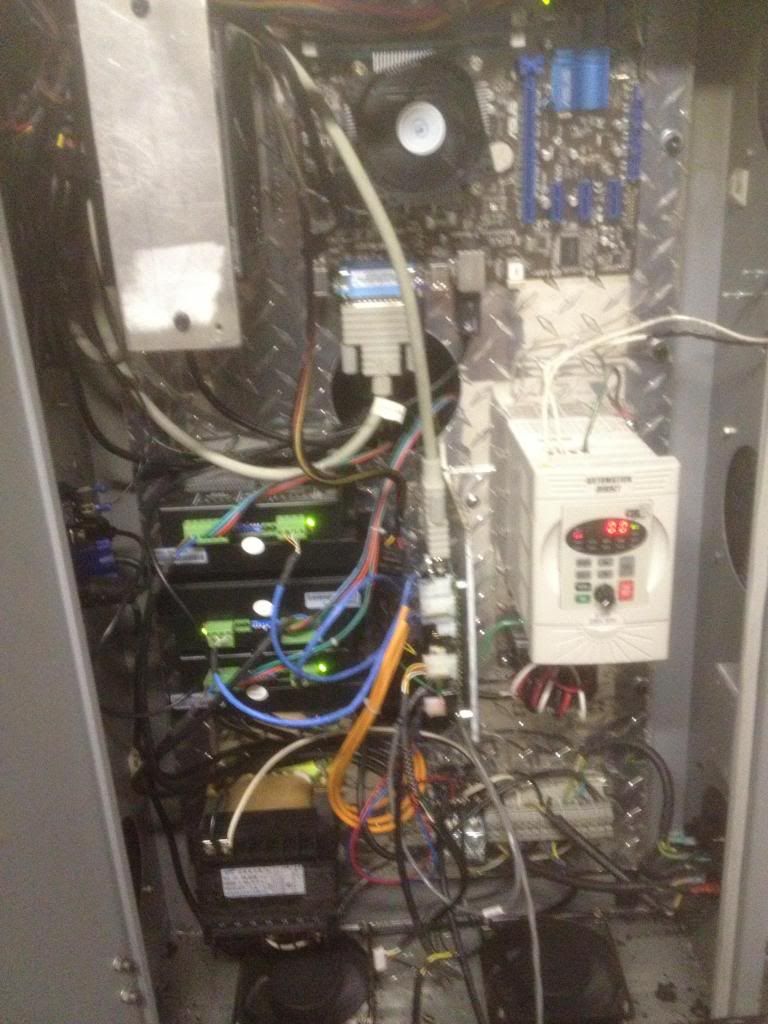
After removal of all bad components and alot of measuring and replacement of parts. New VFD mounted and new side mount plate for new break out board that should be showing up in a few days. This is the after effect of the madness from the last couple long nights of working on it. I now have the new mother board mounted in the top right corner also after I took this pic.
http://farm9.staticflickr.com/8519/8...f432d35437.jpg
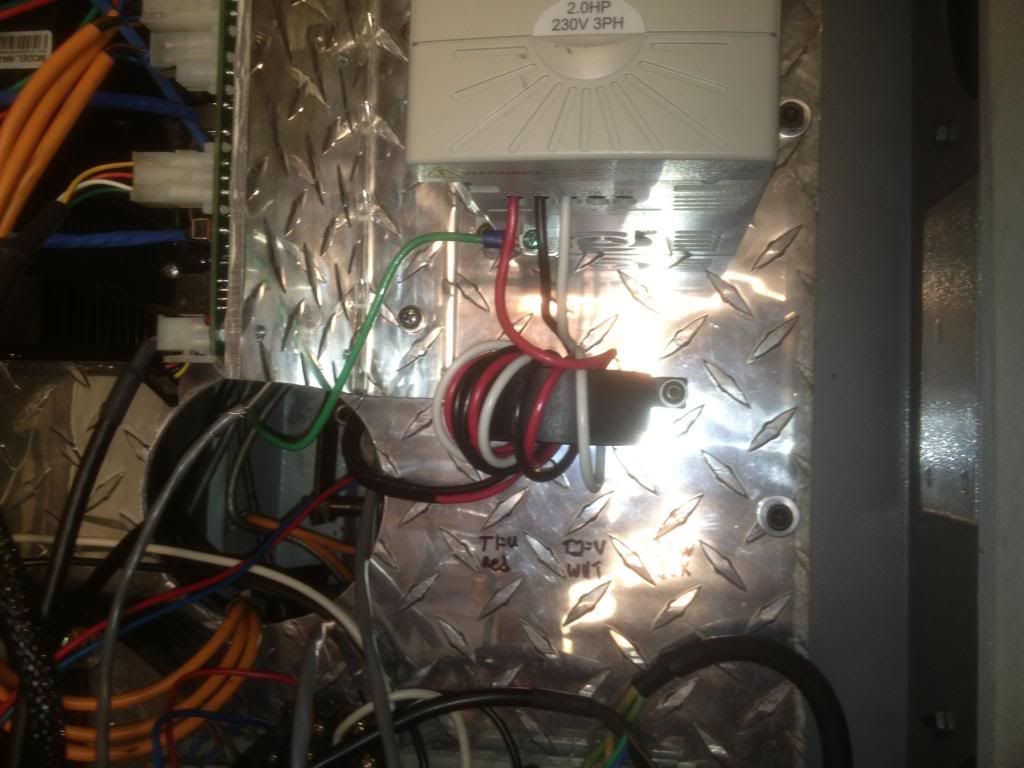
Now I am working on the AC spindle motor upgrade. Only difference is I am hooking the VFD up as 220V single phase instead of the typical 110V. Charlie has been very helpful on this for me. I have the newest head casting so Charlies Adapter mount doesn't line up so I am making an adaptor plate to mount his adaptor plate to. Yes that is some funny stuff right there LOL.
I also am putting a 2hp motor on istead of the 1 1/2hp motor also. Go big or go home I always say. I will keep everyone posted on how the spindle motor kit works out.
-
02-08-2013, 09:40 PM #7
Registered
- Join Date
- Jul 2010
- Posts
- 41
That didn't work very well on the pics.
-
02-11-2013, 04:29 PM #8
Registered
- Join Date
- Jul 2010
- Posts
- 41
power
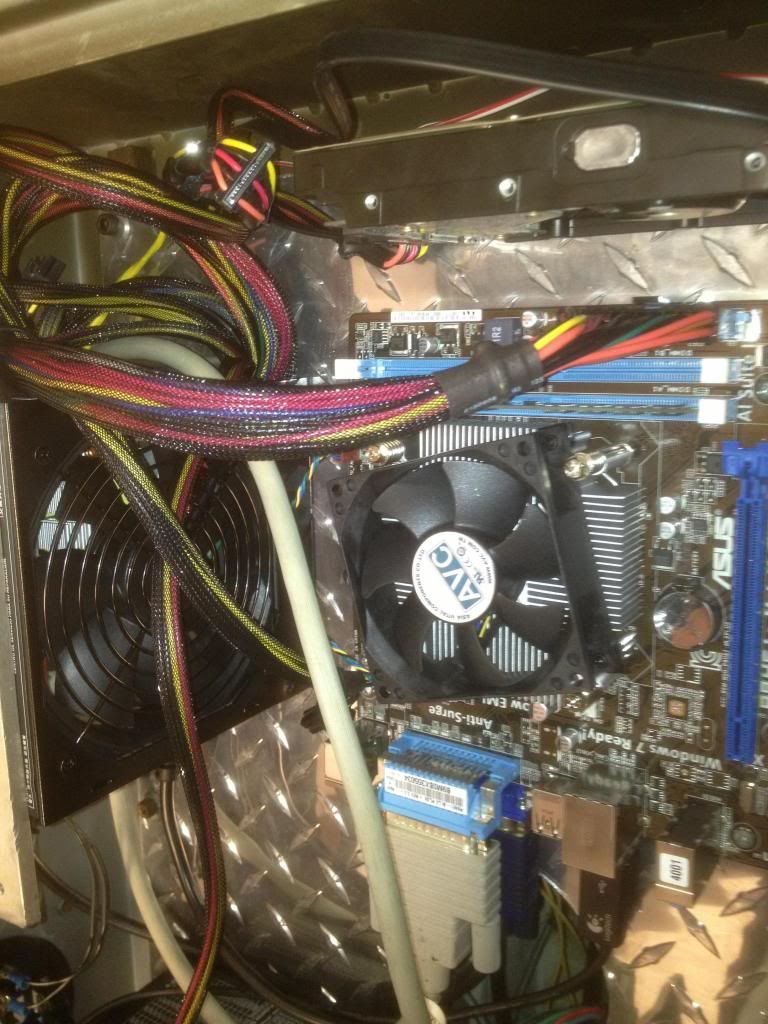
Well I got the new AC spindle motor kit mounted, new E-stop button relocated, Computer is back up and running. The new BOB from Novakon is suppose to arrive today from UPS. Since this NM-145 was setup for 110V only, I was going to have an issue with the new AC spindle motor. I did not want to run the mill on 110V only because I was afraid of it drawing to many amps and frying something again. After talking with John at Novakon he said it would be alot of part changing to switch the entire thing over to 220V single phase. I did some brain storming and came up with an idea. All the new VFD is looking for is signals from the BOB to run it. When I purchased everything I purchased the 220V single phase VFD and 2hp 3 phase 220v motor. I then went up and purchased some 12-3 SO cord, switch housing box and cover, and a 2 pole single throw 220v switch. I mounted the switch on the side of the cabinet closest to the VFD and wired everything up. It might not be full 220V but this should work on power draw alot better. So my 110V line in is powering the computer and power supply, transformer, BOB, and drivers for X,Y,Z. 220V powers VFD and AC spindle motor. I programmed the VFD to what Charlie had for on his spec sheet. left the p3 and p4 program codes alone for testing before hooking up to BOB. Off of the display on the VFD with it maxed out on the dial. The rpm read right under 6500 rpm. I won't know for sure until I get everything else connected up to the BOB but it definitely hauls butt after the reprogramming from initial install at 3450 rpm. I will try and post more pics of it if I can figure out how to actually post it correctly.
-
02-12-2013, 10:27 PM #9
Registered
- Join Date
- Jan 2012
- Posts
- 469
For posting the pictures - right above where you type yours posts, there is a yellow button that looks like a postcard with some mountains.. Click that and type (or paste..) the link to your photo - that'll make the picture show up in the thread!
Good luck with the rebuild!
-
02-13-2013, 04:00 PM #10
Registered
- Join Date
- Jan 2011
- Posts
- 63
The mounting holes on the AC Induction Motor adapter have been a problem on many NM-145s not just the ones with the newest castings. It seems the factory mounting holes were being put in place at the workers preference no by template, making upper casting non interchangeable with any other machine. Instead of making another adapter plate you can drill / tap new holes in to the head casting to align with the motor adapter. Also the height of the spindle pulley varies. Sometimes enough that it contacts the inside top surface of the motor adapter. A quick solution is to put a spacer in place under the adapter, 4 or 8 washers is a easy fix. Also watch that the top of the casting is flat, one machine had a ridge the twisted the new motor adapter when tightened. Originally Posted by mhopkins74

Charlie.Visit http://www.shadowspawnllc.com to see what enhancements I have available for the NM-145.
-
02-13-2013, 04:50 PM #11
Registered
- Join Date
- Jul 2010
- Posts
- 41
setback
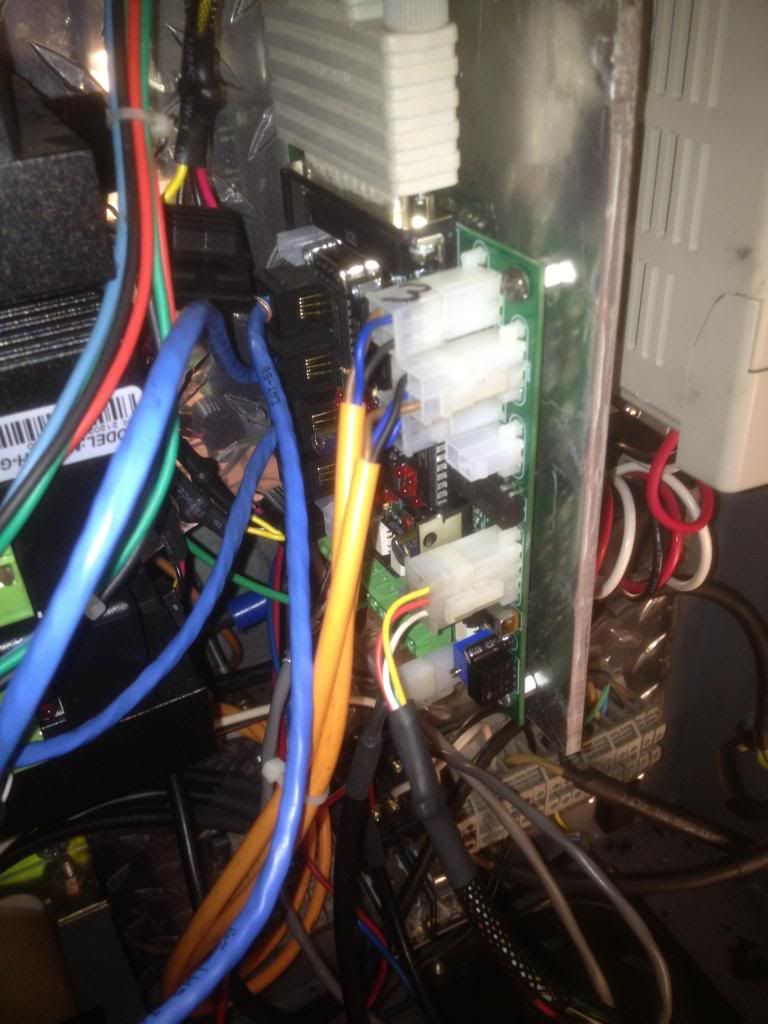
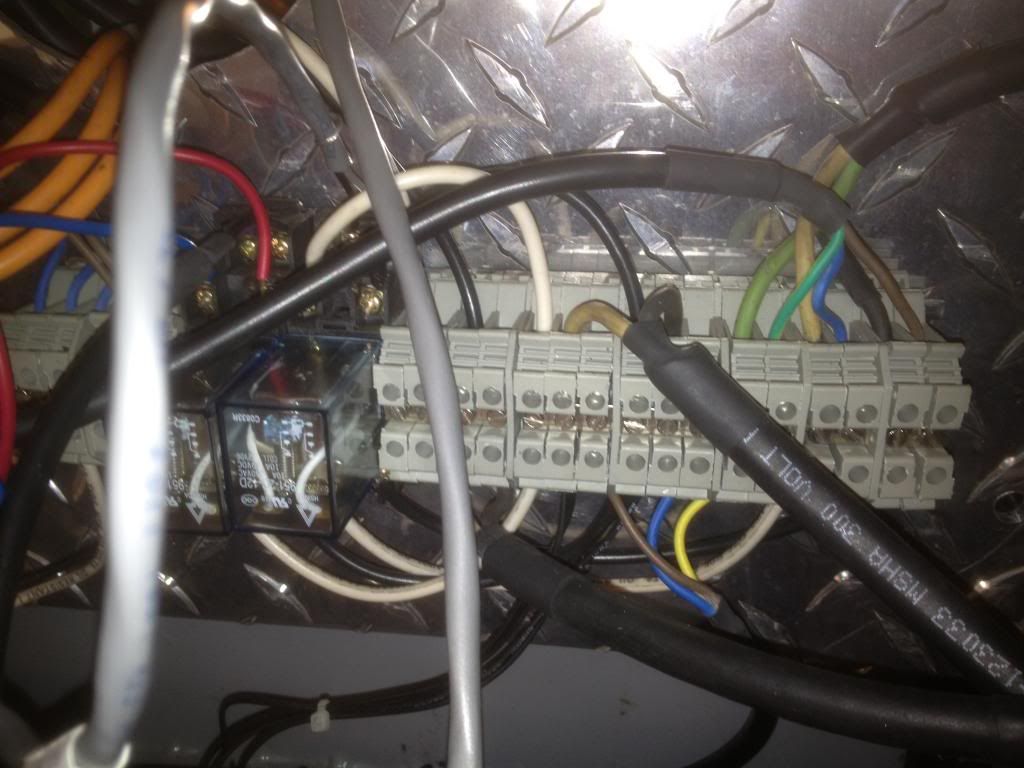
Well I had a minor setback last night. More like an epic fail at the moment. I got the new breakout board in from novakon and hooked everything up. Only difference was the new board was a rev2 board that had additional plugins that the old BOB didn't. I was unable to power the drivers and cooling fans up do to the additional plugins. I emailed John at Novakon and he helped me bypass the additional plugins by using the terminal strip on the side of the board. After bypassing certain things I was then able to power everything up Yaaay! Not...... After about 10seconds or so smoke started rolling out in the same exact spot as where the original BOB caught everything on fire. I didn't waste any time of ripping the power cord out. Since it was in the same exact spot as the old board. I called John and he said I might have something shorting in the coolant pump relay. He said if I unplugged the coolant pump relay it should run fine then. So I tried it. Again after about 5-10 seconds it started smoking again.
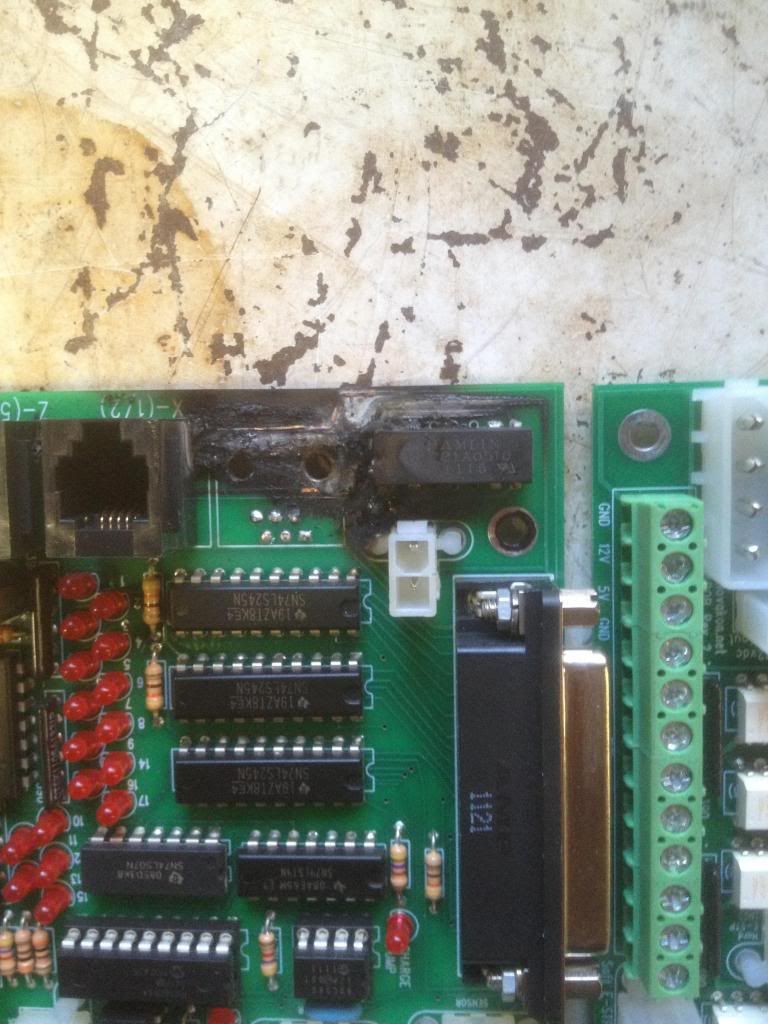
I then decided to start from square one and start plugging each plug and wire in one at a time and powering up the computer and then shutting down after the computer after each one so there was a short or misscommunication. going on a hunch I plugged every one of them in except for the Y axis plug coming from the servor drive. I really don't want to plug it back in because I think I narrowed it down and need to figure out what is wrong with the Y axis first. I called John back and he wanted detailed pics so he knew exactly what I was doing. So I have taken pics for him and emailed them off. I will share them here also as maybe someone on here might shed some light on the problem.
[IMG]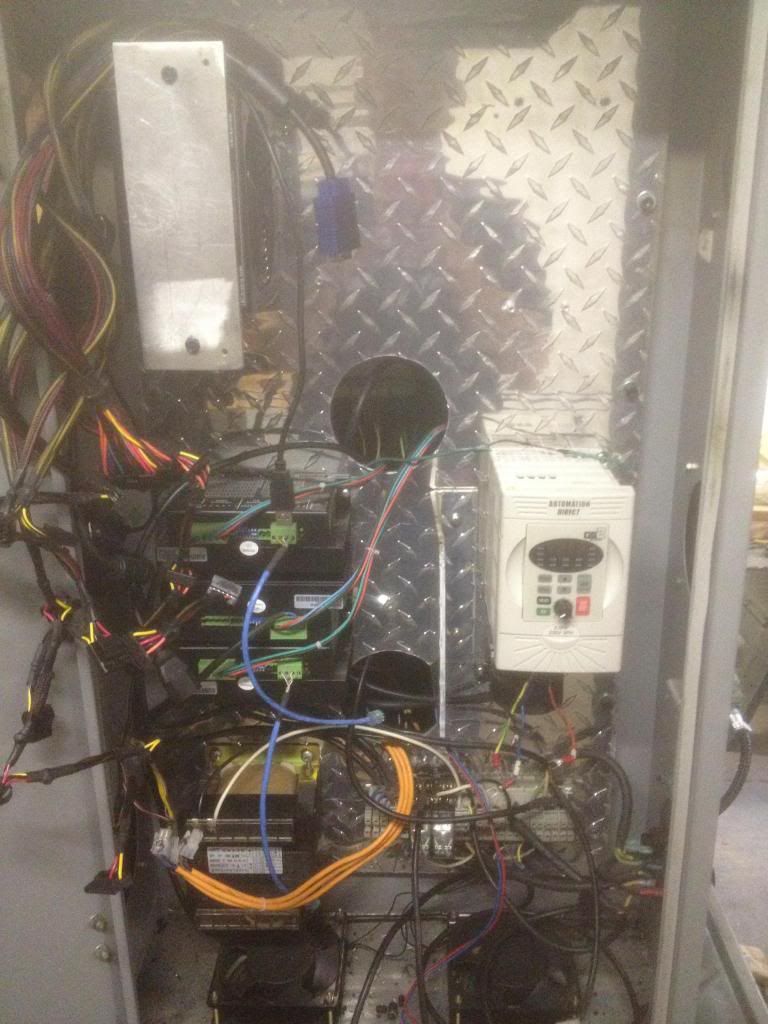 [/IMG]


-
02-13-2013, 04:57 PM #12
Registered
- Join Date
- Jul 2010
- Posts
- 41
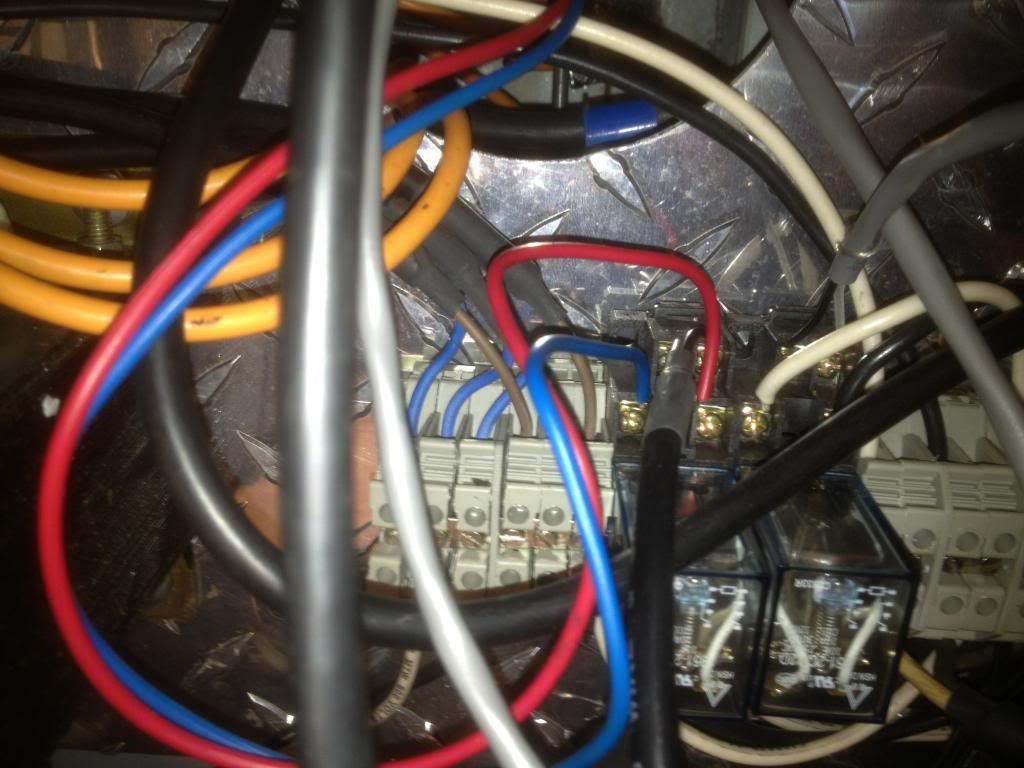
more pics
here is the rest.


If anybody could help me out on what specificly is the cause I would appreciate it. I am thinking it is either the stepper drive or the stepper motor for the Y axis.
-
02-13-2013, 05:10 PM #13
Registered
- Join Date
- Jul 2010
- Posts
- 41
I didn't like the thought of chips or anything getting into the top of the casting by using washers Charlie. So I made a steel adaptor plate and mounted inbetween the head casting and your adaptor plate. Everything is good to go with the ac spindle motor. Just have to figure out BOB burning up problem. I havn't ordered the CNC4PC BOB yet as I had already paid for the other from Novakon. Any help you could give me would be greatly appreciated. I am thinking of buying a new servo motor for the Y axis but not sure which one to get to replace it I know it is a nema 34 640oz but but are they all the same or should I put a 1200+ one on instead they have some on ebay but I am trying to find one that I can get by the weekend and not have to wait for the slow boat from china to get here with it. Also thinking of getting a new servo drive also. They have some package deals on ebay for the same driver plus a bob for a 3-4-5 axis that I could buy and have spares. Originally Posted by cteufert
-
02-13-2013, 05:57 PM #14
Gold Member
- Join Date
- Feb 2006
- Posts
- 7063
None of the chips on that board are capable of driving enough current to do that much damage, and the damage appears to be on the ground (shield) terminals of the connector, not the signal terminals. That all points strongly to a fault in the motor driver on that connector. I'd be willing to bet that driver is blown, and needs to be replaced. The bad news is, it may well have blown the BOB as well, though it *might* still be OK, once the connector is replaced.
Regards,
Ray L.
-
02-13-2013, 06:01 PM #15
Registered
- Join Date
- Jul 2010
- Posts
- 41
Could you explain a little bit more Ray. Remember I'm a newbie to all of this. do I need a new driver and BOB only or something else? Originally Posted by HimyKabibble
-
02-13-2013, 06:10 PM #16
Gold Member
- Join Date
- Feb 2006
- Posts
- 7063
Like I said, I'd be willing to bet the motor driver is toast. Have you opened the motor driver up and had a look inside? You'll like see some damage in there as well. If you leave the cable to the BOB disconnected, and power the driver, with the motor connected, is there any smoke? Does the motor lock up? If the motor does not lock up when the driver is powered (make sure it's enable pin, if any, is pulled high or low as required to enable the driver), the the driver is almost certainly blown.
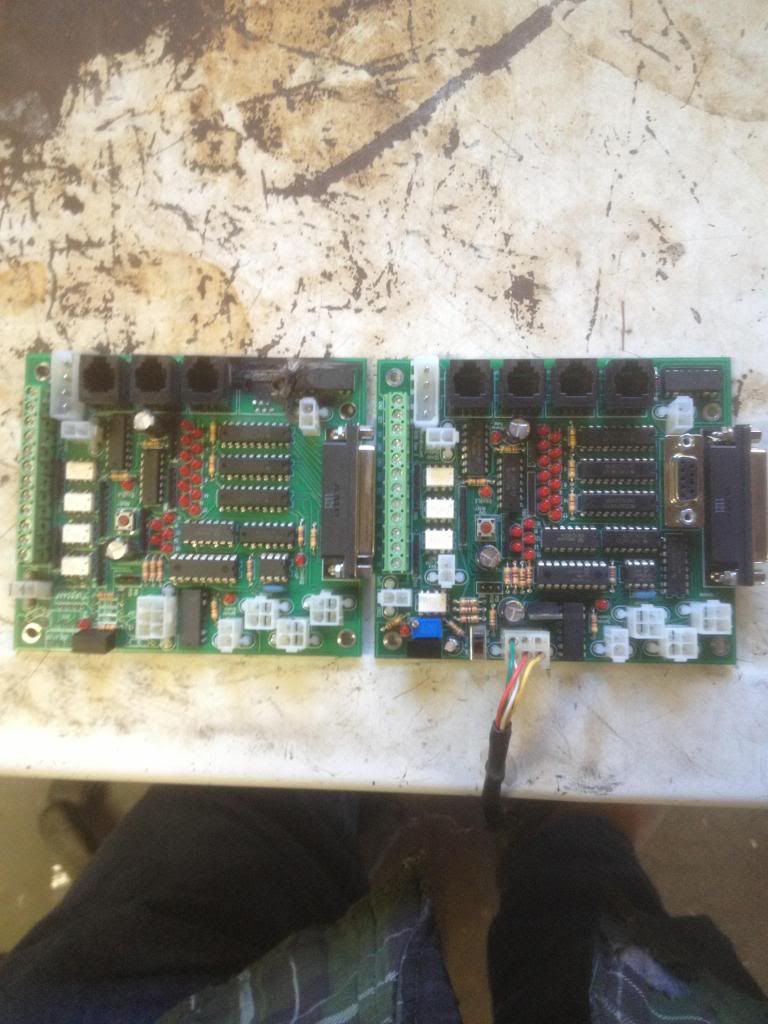
The BOB may, or may not be damaged, beyond the obvious. I would solder wires onto the connector pads on the BOB, and see if the signals are still working. You can do this by changing your Mach3 configuration to define those pins as just regular outputs, and toggle them, then look at them with a voltmeter. Perhaps the easiest way to do this is to disable the pins as Y axis Step/Dir outputs, and re-define them, one at a time, as perhaps a coolant output, so you can easily toggle them with G-codes. If you can't get them to toggle like that, then the BOB is blown. It *may* be repairable, but may not be worth the bother. If you can post close-up photos of BOTH sides of the BOB we might be able to guess whether it's seriously damaged or not. If there are no obviously burned traces beyond those ground connections, the BOB should be repairable, as all the chips are common TTL parts.
Regards,
Ray L.
-
02-13-2013, 07:15 PM #17
Registered
- Join Date
- Jul 2010
- Posts
- 41
Could you tell me how to run the Yaxis motor through that driver Ray without it being hooked up.
-
02-13-2013, 08:13 PM #18
Gold Member
- Join Date
- Feb 2006
- Posts
- 7063
The motor should be connected to the driver, but the driver should be disconnected from the BOB. Make sure the driver is enabled (there is usually an "Enable" pin that needs to be pulled high to enable the driver), the turn on the power. If the driver is working, the motor should now be very difficult to turn. If it turns easily, then either the driver is not properly enabled, or the driver is toast. If the driver appears to be OK, you *might* want to try connecting it to another port on the BOB, to see if it actually responds properly to Step/Dir pulses. There is still some chance of this step blowing another port on the BOB, but if the first test passes, I would think the odds of doing further damage are low. You should first power up the driver, and check the voltage on the Step/Dir pins on the driver, with the driver disconnected from the BOB, and make sure they are between 0 and 5V, more or less. If so, then there's very little chance of hurting the BOB.
Regards,
Ray L.
-
02-14-2013, 12:00 AM #19
Registered
- Join Date
- Jul 2010
- Posts
- 41
Well thinking of the worst. Will one of these drivers work as a direct replacement for the ma860H driver I currently have.
?US SHIP Free SHIP?4Axis Stepper Motor Driver 7 8A 256MIC 24 80VDC for Nema34 | eBay
STP-DRV-6575 | Stepper Drive: microstepping, 7.5A per phase, 2-phase bipolar
-
02-14-2013, 01:24 AM #20
Gold Member
- Join Date
- Feb 2006
- Posts
- 7063
It should be possible to make almost any stepper driver that supports the voltage and current work in that machine.
Regards,
Ray L.

 Reply With Quote
Similar Threads
-
Has anyone purchased a NM-200 S3?
By MRM RCModels in forum NovakonReplies: 8Last Post: 02-29-2012, 02:01 PM -
just purchased 325
By chineshop_guy in forum TreeReplies: 1Last Post: 03-21-2011, 03:40 AM -
Just purchased a copy of XR3 MP.
By l u k e in forum OneCNCReplies: 6Last Post: 11-27-2008, 07:56 PM -
What have I purchased?
By vacpress in forum Phase ConvertersReplies: 8Last Post: 05-26-2006, 06:33 PM -
just purchased new tl-3
By qualitytool in forum Haas MillsReplies: 8Last Post: 03-30-2006, 08:01 PM
