


I was browsing the TORMACH website and spied the 'Projects Library'.
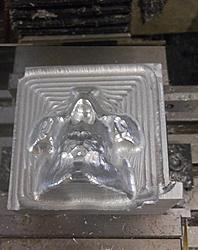
The 3D Skull in wood looked really cool, so why not in Aluminum?
I had to Change the RPM's and feedrates.
RPM was originally 10,000, so I dropped the RPM down to 6500, to gain a little torque.
And the feed was 90 IPM, 3/8 deep in wood. I dropped that to 20 IPM, and it squealed & chattered so bad with the 3/8" deep pass, that I had to slide that down to 25% (5 IPM)
*Gulp*
I got about halfway through the roughing, when it plunged in a new location and snapped off my endmill. Damn...
I'll reset it tomorrow and pick-up where I left-off.
This is my progress so far:
Results 1 to 20 of 23
Hybrid View
-
07-28-2017, 06:14 AM #1
 Member
- Join Date
- Nov 2013
- Posts
- 402
I'm attempting the 3D Skull project in Aluminum.
-
07-28-2017, 05:15 PM #2
Registered
- Join Date
- Nov 2005
- Posts
- 201
Re: I'm attempting the 3D Skull project in Aluminum.
Pretty cool!
-
07-29-2017, 12:30 AM #3
Member
- Join Date
- Nov 2013
- Posts
- 402
Re: I'm attempting the 3D Skull project in Aluminum.
Success!!
It only took about 5 hours to run. Would've been shorter if I hadn't broken an endmill.
-
07-29-2017, 01:43 AM #4
Registered
- Join Date
- Nov 2005
- Posts
- 201
 Originally Posted by RussMachine

Scary lol
-
07-29-2017, 01:39 PM #5
Registered
- Join Date
- Aug 2013
- Posts
- 980
Cool Originally Posted by RussMachine
-
07-30-2017, 02:43 PM #6
Registered
- Join Date
- Nov 2007
- Posts
- 2151
Re: I'm attempting the 3D Skull project in Aluminum.
Nice, was looking at first picture few days ago and wondered what I was looking at "the chin" lol
How do you guys replace cutters and continue the same part? If I dont use the top of the vice jaw or bottom of material on parallels as a the z offset when setting the part up for cam ops. I can never find the z again.
-
07-30-2017, 02:54 PM #7
Gold Member
- Join Date
- Feb 2006
- Posts
- 7063
Re: I'm attempting the 3D Skull project in Aluminum.
Are you NOT using tool length offsets? If you do, changing tools in the middle of a job is no problem at all. Originally Posted by mountaindew
Regards,
Ray L.
-
07-30-2017, 03:52 PM #8
Registered
- Join Date
- Nov 2007
- Posts
- 2151
Re: I'm attempting the 3D Skull project in Aluminum.
Duh! forgot pp re-homes accurately enough to stop program and replace tool and re enter new tool offset height. was not thinking. Not enough coffee this morning Originally Posted by SCzEngrgGroup
-
07-30-2017, 04:46 PM #9
Junior Member
- Join Date
- Apr 2013
- Posts
- 1788
Re: I'm attempting the 3D Skull project in Aluminum.
To replace a tool I don't think that you need to (or even want to!) rehome. I just stop the run, measure the replacement tool, update the tool table and then restart at an appropriate place.
-
07-31-2017, 03:05 PM #10
Registered
- Join Date
- Aug 2009
- Posts
- 294
Re: I'm attempting the 3D Skull project in Aluminum.
I do the same. Break a tool, reset offset of new tool and restart PathPilot where it left off. Just did it yesterday in fact although I don't break tooling too often. Originally Posted by kstrauss
-
07-31-2017, 04:05 PM #11
Gold Member
- Join Date
- Feb 2006
- Posts
- 7063
Re: I'm attempting the 3D Skull project in Aluminum.
There are only two times I can think of where re-homing is required: Originally Posted by kstrauss
1) After power-up
2) After a crash
A broken tool should not require a re-home, unless it was the result of a hard crash, or the tool was large enough that the force required to break the tool is enough to cause the machine to lose position.
That said, re-homing should be accurate enough that doing an unnecessary re-home should have no measurable consequences. If it's not, then you really need to get better home switches.
Regards,
Ray L.
-
07-30-2017, 04:37 PM #12
Member
- Join Date
- Nov 2013
- Posts
- 402
Re: I'm attempting the 3D Skull project in Aluminum.
I was using the top of the material as Z home, so I just touched off on top of the 'chin' again and then backed off a little. I eyeballed the difference at about .05 to .075 (The chin was actually .050 below the surface of the material). When the program started running again (Cutting air, slightly above the part) I hit Feed-hold, then manually jogged down in .001 until it kissed the part. I noted the Z difference and edited my tool offset accordingly.How do you guys replace cutters and continue the same part? If I dont use the top of the vice jaw or bottom of material on parallels as a the z offset when setting the part up for cam ops. I can never find the z again.
More importantly, was writing down which line I was on when the tool broke.
This program had about 200,000 lines in it, and I would've been completely screwed if I hadn't had enough common sense to note the line number where it crashed.
I deleted everything above that line, and started the program from that point.
Something was weird about the numbering in the program too.
I don't know if it was the Fusion360 numbering the lines, or PathPilot. But it numbered the lines by 10's instead of by 1's.
So, it only numbered up to 99,990 (by tens) and then started numbering again from 10. GGGRRRR!!!
So there were 20 different sections in the program of lines #10 - #99,990 .
That was pretty annoying when doing the edits and trying to search for stuff.
Numbering the program #1 - #200,000 (by 1's) would've been alot more helpful.
-
08-01-2017, 02:08 AM #13
Registered
- Join Date
- Jun 2017
- Posts
- 14
Re: I'm attempting the 3D Skull project in Aluminum.
What kind of CNC router you are using? An Aluminum engraving machine requires rigid and heavy duty machine body to reduce virbration and ensure machine moving smoothly.
-
08-01-2017, 03:41 AM #14
Registered
- Join Date
- Nov 2005
- Posts
- 201
I work off of the top of the table
-
08-01-2017, 04:50 PM #15
Registered
- Join Date
- May 2016
- Posts
- 138
Re: I'm attempting the 3D Skull project in Aluminum.
There is a stop button in Pathpilot. I'll hit that, G30, change tool, change offset, then restart the program where it makes sense.
EDIT:
You are thinking about the Estop, I dont hit that unless I cant get to anything else. If a tool breaks or there is a crash, I'll hit space on the keyboard to pause the program/feed. Then depending on whats going on (spindle is still spinning) ill hit the stop button in Pathpilot which stops the spindle/coolant and stops the program or the ESC key which just stops the spindle
-
08-02-2017, 06:22 AM #16
Member
- Join Date
- Nov 2013
- Posts
- 402
Re: I'm attempting the 3D Skull project in Aluminum.
Don't hit the big red button unless it's an EMERGENCY.How can I stop machine and perform all those tasks unless I hit the big red button
When my endmill snapped, I just cussed and hit the spacebar (feedhold). Then turned off the spindle.
I noted the line I was on, and jogged Z up before doing anything else.
-
08-02-2017, 04:11 PM #17
Registered
- Join Date
- Nov 2007
- Posts
- 2151
Re: I'm attempting the 3D Skull project in Aluminum.
Thanks for all the information. I have very very few problems with broken tools. Drill bits that stick in cheap chucks that is about all the drama I have. And yes I only push the big red button at the end of the day
 So I have little experience with machine operation interruption. Will try this next time I see a problem. Most the time my parts are so small if I have any problems the part is trash and flying across the room. I need an enclosure not for coolant and swarf, but for safety .Like a few others around here a days work fits in your hand
Again thanks for info. I set and do the same things that work and never understood or tried this. Would be handy when a small drill bit slips in the chuck and the part is still ok.

 Reply With Quote
Similar Threads
-
Steele and aluminum first project
By Coogrrr in forum Open Source CNC Machine DesignsReplies: 173Last Post: 08-04-2011, 10:49 PM -
Who can help me with a aluminum milling project?
By GrievousAngel in forum Uncategorised MetalWorking MachinesReplies: 4Last Post: 10-23-2010, 03:05 PM -
First Post - Aluminum Project
By s.c.d.c. in forum MetalWork DiscussionReplies: 2Last Post: 03-09-2010, 09:53 PM -
new aluminum project
By Tadas25 in forum DIY CNC Router Table MachinesReplies: 3Last Post: 07-28-2009, 11:20 PM -
aluminum project
By cncsdr in forum Employment OpportunityReplies: 2Last Post: 05-23-2007, 12:06 PM
