


Hey guys I am looking forward to buy a cheap 3D printer but I want to use it also as a laser engraver, my basic idea is to get a cheap 3D printer and a 40$ laser, make some holder for the laser and make it easy to change, not sure if its possible, and not sure how much laser power I need to engrave OR cut wood which might be a option too to implement. I did not buy anything yet I am just planing. so the question is, what kind of problems could i encounter. laser output power needed to engrave to wood or cut wood: is it possible to get a 1W laser power it with half power to engrave and maybe full power to cut wood ? any other printer/laser that are better for this project?
laser probably:
REAL 2000mw/2w 445 445nm 450nm blue Focusable Stage Light RGB Laser Module diode High Power laser cutter/Compact Design/TT L-in Laser Equipment Parts from Industry & Business on Aliexpress.com | Alibaba Group
3d printer probably:
2015 Upgraded Quality High Precision Reprap Prusa i3 DIY 3d Printer kit with 2 Rolls Filament 8GB SD card and LCD for Free-in 3D Printers from Computer & Office on Aliexpress.com | Alibaba Group
Results 1 to 7 of 7
Hybrid View
-
10-18-2015, 11:10 AM #1
 Registered
- Join Date
- Aug 2015
- Posts
- 4
 3D printer remake to Laser engraver
-
10-19-2015, 02:24 AM #2
Registered
- Join Date
- Jun 2015
- Posts
- 8
Re: 3D printer remake to Laser engraver
I realize that with my post count this is going to seem like a spam post, but I assure you it isn't.
I recently designed and built a laser engraver so I can give you a little feedback on the power needed to engrave things. I'm using a 300mW rated ( I don't know the actual power output) 445nm laser diode (link) and I can engrave wood very well at 1000mm/min. I can cut paper, cardstock, and cardboard, but I can't even begin to CUT wood, only engrave it. Don't plan on being able to cut any wood except the thinnest balsa wood with a diode laser.
If you are going to be mainly engraving, as I am, the only benefit you will get from a more powerful laser is faster engraving/less time to engrave a given area vs a lower powered laser. Stick with 445/450nm laser diodes, they can be focused to very small points, 0.1mm or less.
Here is a great place to purchase laser diodes, housings, and drivers.
I take it from the prices of the items you linked to that you don't want to spend too much money. However, if you would like a somewhat "turn-key" solution to adding a laser to a 3d printer, this site has kits designed to do exactly that. they even tell you how to attach and wire it up to various printers.
All that advise was probably all over the place; it's late, and I'm tired and hungry. If something didn't make sense, you need more or different info, or anything else, just ask. I'll be glad to help out.
-
10-19-2015, 11:52 AM #3
Registered
- Join Date
- Aug 2015
- Posts
- 4
Re: 3D printer remake to Laser engraver
thanks for the info, I am looking at the 2w 445nm laser, which should be 7x stronger than the laser you use. I think cutting wood could be possible with some super slim balsa wood but ofc I cant find any information about it. The last link with the laser upgrade is just out of my money range as I want to use it only as hobby.
also could you post some pictures of your machine and some engraved wood? would really make me happy thanks for the help
-
10-19-2015, 01:33 PM #4
Registered
- Join Date
- Jun 2015
- Posts
- 8
Re: 3D printer remake to Laser engraver
Here is my engraver as it is now, in its (hopefully) final form:


The engraver has evolved through quite a number of stages to get to where it is now. It started out as one of these.

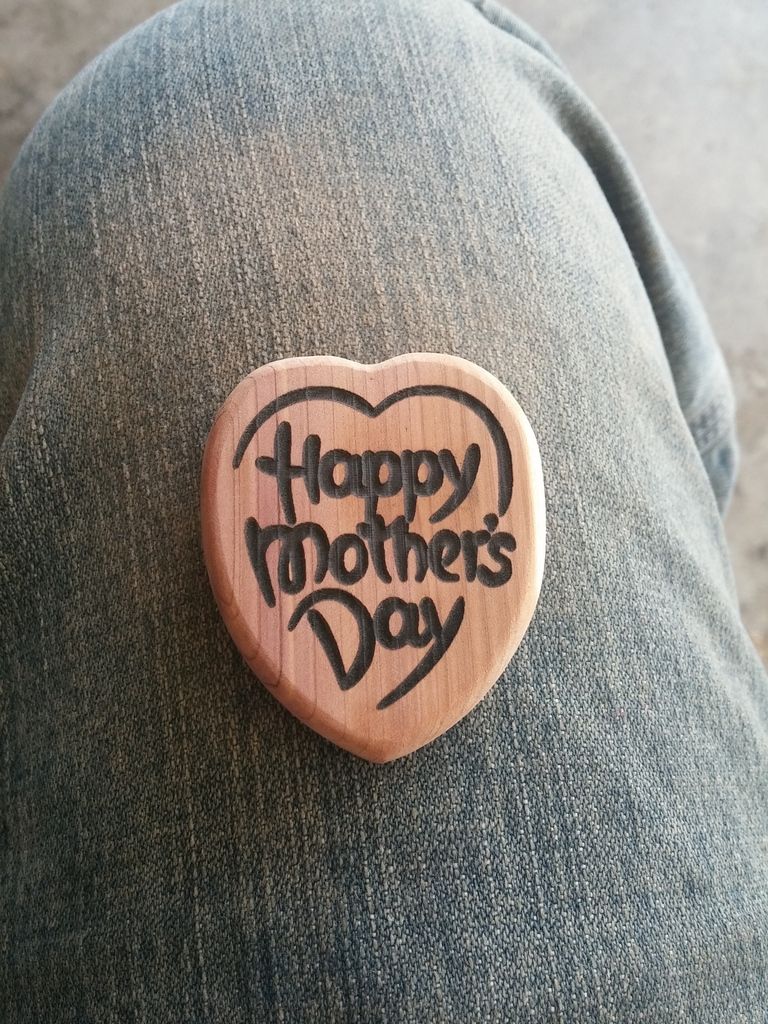
The print area was a next-to-useless 39mm2. The electronics it used were a knock-off arduino pro mini with grbl 0.8g, 2x easy drivers, and a darlington transistor array used to switch the laser on and off. It worked ok, and I was able to make a neat present for my mother with it:
However I quickly got annoyed by the limited work area. I saw that the same site that I bought the above mentioned engraver from also had an engraver with a much larger work area. I didn't want to spend another $200 on another machine since I just bought one for $100 and I already had the laser and electronics. I looked at the pictures of the machine and decided I could use it as a template for making my own engraver with an even larger print area. I have a 3d printer so I knew I could design and print the parts to hold everything together. I would still have to buy the stepper motors, ball bearings, belts, etc.
After getting all the parts together and designing the pieces to hold them together, I came up with this:
It worked for the most part. However, there was one major problem, it wouldn't engrave a straight line. I eventually narrowed down the problem to two things. 1. The carriage on the x-axis rocks back and forth in the grooves of the aluminum extrusion, moving the laser's path considerably. 2. The printed bearing extenders (the black pieces of plastic surrounding the ball bearings) caused bumps in linear movement.
I tore down that machine and built one that used bearings that fit into the grooves in the aluminum extrusion, albeit barely. That machine worked better, the bumps caused by the printed bearing extenders were gone, but the rocking back and forth was even worse and I noticed that there was a difference in where the laser started engraving between one line and another. I don't have a picture of the machine at this stage, but here is a picture of the machine's output with the problems I listed:
The one on the left is (obviously) the one with the not-straight lines

And here is a picture showing the difference in where the laser started engraving:

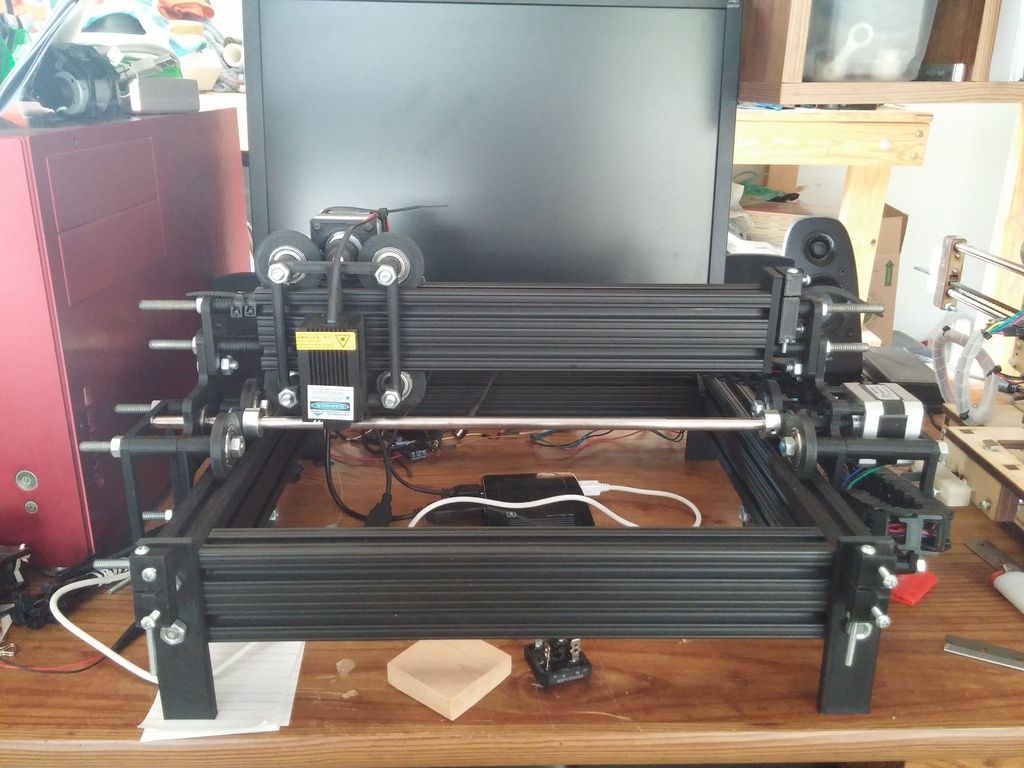
Yet again, I tore down my machine and started designing pieces to hold linear rods to guide motion instead of bearings in channels. After spending more than I care to say on another set of parts needed to finish the machine, I built the machine I first posted pictures of. It has a work area of ~197mm x ~200mm. I still have the problem of the laser not starting engraving in the exact same position as the previous line, but you need to use a magnifying glass to see it. The only thing I could think of that would completely eliminate that would be to use leadscrews instead of belts to move the axes, but I couldn't afford that.
I also used different electronics than the other builds. I used a genuine arduino uno loaded with jtech grbl with a cnc shield with 2x a4988 stepper motor drivers and an analog laser diode driver. Before I was using a rather ugly perfboard controller I made:

And now the part you have probably been waiting for. Here are a couple pics of things I have engraved with the most recent incarnation of my machine (sorry I don't have more, both of these took <5 hours to finish and it's hard to find a solid 5 hour block of time you can sit next to a machine to make sure it doesn't set something on fire):

Here is the finest/highest resolution image I've engraved:

I got the laser to focus at <0.0625mm for that engraving. The original image was 1900 x 838. I could have increased the resolution even further, but then it would have taken around 7 hours to engrave.
As you can tell, I don't really do much vector engraving, just raster stuff. The software toolchain I use is: (image) -> Gimp for photo editing, scaling, and resizing -> PicLaser Lite JT for gcode creation -> 3dpBurner Sender to stream gcode to arduino.
-
10-19-2015, 02:48 PM #5
Registered
- Join Date
- Aug 2015
- Posts
- 4
Re: 3D printer remake to Laser engraver
thanks. the information is priceless, on the last picture on the wood I can see some problems in the right bottom corner where the lines are clearly visible I am not sure if my engraver will have similar problems. I did not even think of the led driver or any other electronics, I suppose the led driver sets the power of the laser which I wont find in my 3D printer kit and will need to buy. everything else should be good (correct me if wrong), the printer uses a MKS Gen-2Z v1.1 board but from the schematic and the information online I cant find that it have any analog I/O or where would I connect the laser driver at all. And where did you get the glasses I found online some for cheap bucks but I dont want to buy some crappy ones and realize they are bad when its too late. I am still just learning in this field and have low knowledge so if something seems just wrong point it out please. thanks for your reply
-
10-19-2015, 03:13 PM #6
Registered
- Join Date
- Jun 2015
- Posts
- 8
Re: 3D printer remake to Laser engraver
For that board, I would use the fan output to control the laser via PWM. My 3d printer is a Printrbot Jr v1 (laser cut wood) and uses a Printrboard. This page shows how to connect a laser to be controlled via PWM on the fan connector on the Printrboard. Since the board you linked to has a fan connector that looks to be controlled with a mosfet, it is a good bet that the board will be able to control a laser.
The lines on the last engraved picture are from two different sources; the horizontal lines are from not engraving at the full resolution the machine is capable of. The amount the y axis moves up each line is greater than the size on the focal point of the laser, hence there are white horizontal lines between every engraved line. The vertical lines are from the microstepping of the stepper motors. For an engraved line from a laser to be perfectly consistent, the laser needs to move at a constant rate. Stepper motors don't move at a constant rate, they step. Even though I am using 1/16 microstepping, there are visible artifacts. The faster the laser engraves, the further apart the lines will be, but they will still be there. I do have two DRV 8825 stepper motor drivers that can go up to 1/32 microstepping, but I have yet to try them out on the engraver.
Of course, the wood you are engraving on (if you are engraving on wood) will have grain that will show up as light/dark lines as well.
-
10-19-2015, 04:54 PM #7
Registered
- Join Date
- Aug 2015
- Posts
- 4
Re: 3D printer remake to Laser engraver
yes that power fan option could work or in the worst case I can use a arduino as AD converter. thanks for your comment, I will buy the printer soon

 Reply With Quote
Similar Threads
-
40W co2 laser engraving cutting machine engraver cutter cnc CO2 Laser Engraver Cutter
By ecpur in forum Laser Engraving / Cutting Machine General TopicsReplies: 0Last Post: 01-27-2015, 08:23 AM -
OKUMA Remake Software
By kurmay in forum OkumaReplies: 4Last Post: 04-12-2012, 06:41 AM -
Converting a laser printer into a 3d laser printer
By João Carimo in forum Uncategorised MetalWorking MachinesReplies: 22Last Post: 04-30-2011, 09:56 PM -
Converting a cheap printer to a laser engraver for wood
By thistleguy in forum Laser Engraving / Cutting Machine General TopicsReplies: 1Last Post: 02-22-2009, 12:46 PM -
Does anyone here want solvent printer,engraver,or cutting plotter?
By lolyjet in forum News AnnouncementsReplies: 0Last Post: 12-20-2006, 10:05 AM
