


Iiitt'sss Allliiivvvveeeeeeee.... HAA Haa Haaaaaaaa......
I called it FrankenCNC because it is a bit of a Frankenstein at the moment... and at least a few more.
Doh, I just did a search and someone already used FrankenCNC. lol Oh well...
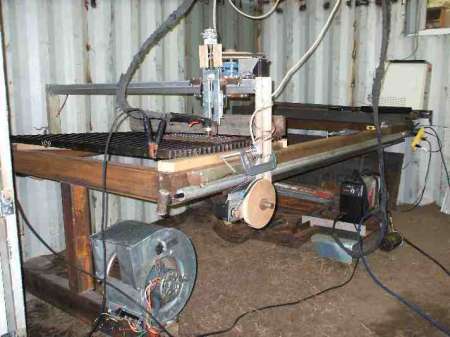
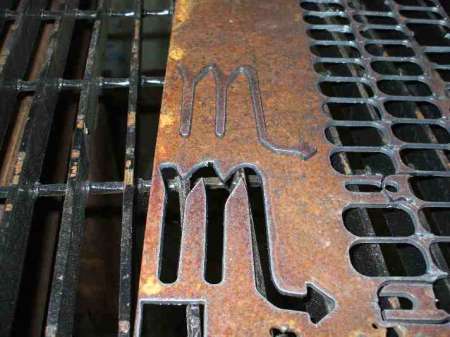
Today it made its first cuts.
At its heart beats a Hypertherm Powermax 45, a Gecko G540 connected to Keling 387OzInch motors, and twin 40 volt 6 amp linear power supplies Which are putting about 36V out under load, I have plans to convert 4 PC PSUs to be a 48 volt 13 amp supply. The G540 and power supplies, relays etc. are mounted in an old PC case that is a twin for my Controller PC. which is why I'm thinking the PSU conversion should fit nice.
Yesterday I got it moving under its own power as it were. Experimented with an old laptop and EMC2 as the controller as its easier to move around than the desktop, and it can actually put out a decent pulse train under Linux.
I didn't try to max out the x-axis but I got the y-axis up to 1700IPM.
Under Mach3 at the base Freq. I should get 800IPM, As that old PC wont go any faster. At 800IPM i can put a lot of lean into the gantry before it will stall, and it will Accelerate in excess of 150 inches per second per second.... Shakes the table like crazy, but the gantry is temporary at the moment. I want to add a second hex tube so it will support a router, and a heavier Z axis.
My next goal is to breadboard some comparators and try to get THC working through Mach3. I might program a pic for the task, but we will see.
I posted a bunch of pictures in the gallery of it. http://www.cnczone.com/gallery/showg...rname=pandinus
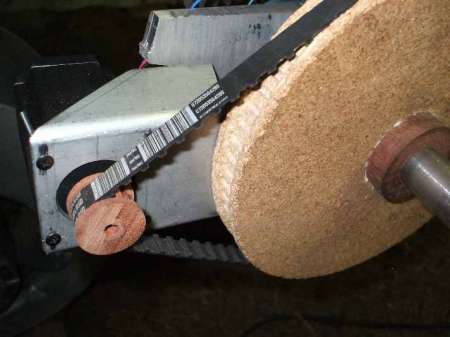
The pulleys were cut on a small router (Automill) That I got for free from the company I used to work for. They used to manufacture them many years ago, and it was used for hand placement of surface mount parts... there was a nice wide single objective lens microscope attached to the Z-axis as well.
To cut the timing pulleys took a couple attempts at trigonometry, until I figured out how to calculate the root angle of a chord. Now I can change one parameter and cut any size I want. All the math is done in G-Code. you should see all the variables... I might post it after I clean It up and improve the safety checks for starting dimensions.
When I'm sure of my final gearing, I'll try cutting one out of aluminum.... we will see. To make it easier to mount the large ones on the 1inch drive shaft, I cut 2inch hubs from hardwood(old steel shipping pallets from another old job.)
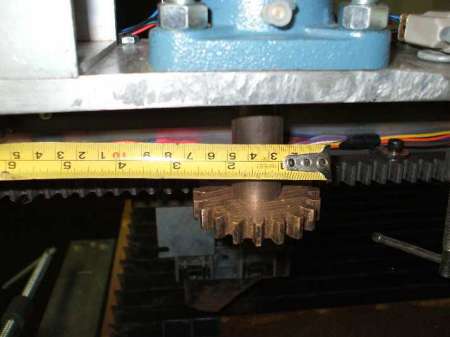
The Rack and pinion came from a local scrap yard at $2 a Lb, only catch was its 8pitch the 19 tooth pinion is about 7.46 inches in Pitch diameter, thus the large pulley, the drive is 9tooth and final is 70 tooth , at ten microsteps I only have about 1918.6 steps per inch. The table will currently move 50inches by 96 inches, but I bought enough rack to go probably 8 by 12 feet if I wanted to build bigger. Seeing as I'm thinking of turning it into a small business, that might happen down the road.
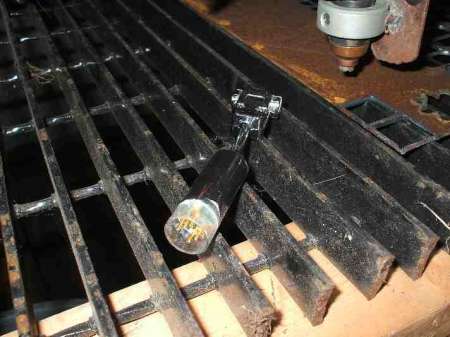
The Torch is connected by my home brew Machine connector. again, supplies from where I used to work. The pins were from Amphenol military grade connectors, but we didn't have the right one, so i drilled some PCB fiberglass scrap and inserted the pins through it into the 45s socket. then lo and behold, we used glass beads from the dollar store of all places to support resistors and other components for wave soldering, and the tube they come in fit perfectly into the socket, a little RTV to seal the pins in place ( already soldered to wires,) and pour in the 2 part epoxy potting compound. Then I put a DB9 on it so I can use some old DB9 extension cables with it.
Then I did something we aren't supposed to do, defeated the machine torch safety lockout with one tiny wire... Sorry JimBest of all it requires no soldering or opening the case or torch in any way.... Well it did to trace the appropriate connection, but not to mod the unit.
Hey, if the machine torch was cheaper, I'd buy one in a second.... Let me rephrase that. IF I COULD GET A QUOTE EVEN... Seems the price is so high for an add on machine torch, no one local will even bother to give me the price. It appears to cost almost as much as a complete PMax 45 unit, and why bother selling just the torch if you can sell the whole package???
[Rant over]
So how bout it Jim, A special price and direct delivery from Hypertherm to CNCZone members for the machine torch and maybe include the rear connector for those that need it. It would help keep us from defeating the safety features that were added in the first place. I had to ask
You make a great contribution here and at weldingweb.. Thanks.
Well so far all the wiring to the motors is temporary to get the thing moving and see what changes are needed before I commit the cabling I also got from work for free to this thing...
LOL did I mention they had two storage areas with old stock that needed cleaning up when they downsized, so they had couple of "auction" days numbers were drawn from a hat and we got to browse in order of our number drawn, at first it was monitored so the first come didn't take all... but after all of us had a look, then it was a free for all. I got a boatload of stuff...lol the power supplies were also from them. They are IP406s http://www.imshome.com/products/ipseries.html
The only thing i really paid for new was the Plasma unit and the Gecko and 3 motors and bolts and the skate bearings. The top frame steel, four pieces came from a local supplier as offcuts in their yard at scrap price, and the aluminum for the gantry was from the scrap yard at scrap prices. So in total I think I have less that a grand into the whole thing.
I got the G540 during the customer appreciation sale last fall. That helped a lot too... Thanks Mariss. Did I mention I love it.
Well that's a heck of a first post on this creature. So I'll say good night for now.... and just maybe I'll have some updates down the road
Results 1 to 9 of 9
-
02-17-2010, 09:40 AM #1
 Registered
- Join Date
- Dec 2008
- Posts
- 226
 Well It's oficial FrankenCNC Lives...
-
02-17-2010, 03:29 PM #2
Registered
- Join Date
- Oct 2005
- Posts
- 1238
 Congrats
Congratulations on the first cuts with the new machine!
With the speeds obtained you should be able to cut razor blades.:devious:
Keep having fun.
-
02-17-2010, 04:10 PM #3
Registered
- Join Date
- Jan 2008
- Posts
- 2247
Pandinus,
Cool looking machine! Get that motion tweaked and you love the cut quality from the Powermax45.
I guess I don't remember you asking specifically for pricing on machine torches...I will supply list prices for Hypertherm equipment anytime.....but there is no selling direct.....we depend on local welding supply stores and OEM machine builders to sell, service and support our products worldwide....so selling direct would not make them want to continue.
Powermax 45 system with 20' hand torch......088016....$2030
Powermax45 system with 25' machine torch...088022...$2499
Powermax45 20' hand torch assembly...088008...$428
Powermax45 25' machine torch assembly...088010...$705
I keep hearing that the machine torch systems are "double" the price of a hand torch system.....the above are suggested list prices, however our distributors can charge whatever price they want. I have seen the hand torch systems online at around $1600. Often, our larger distributors will make large purchases of hand held systems and offer a deal......you don't see that as often with machine systems....as the volumes are much lower.
Best regards, Jim Colt
[QUOTE=Pandinus;735238]Iiitt'sss Allliiivvvveeeeeeee.... HAA Haa Haaaaaaaa......
At its heart beats a Hypertherm Powermax 45,
Then I did something we aren't supposed to do, defeated the machine torch safety lockout with one tiny wire... Sorry Jim Best of all it requires no soldering or opening the case or torch in any way.... Well it did to trace the appropriate connection, but not to mod the unit.
Hey, if the machine torch was cheaper, I'd buy one in a second.... Let me rephrase that. IF I COULD GET A QUOTE EVEN... Seems the price is so high for an add on machine torch, no one local will even bother to give me the price. It appears to cost almost as much as a complete PMax 45 unit, and why bother selling just the torch if you can sell the whole package???
[Rant over]
So how bout it Jim, A special price and direct delivery from Hypertherm to CNCZone members for the machine torch and maybe include the rear connector for those that need it. It would help keep us from defeating the safety features that were added in the first place. I had to ask
You make a great contribution here and at weldingweb.. Thanks.
-
02-17-2010, 04:31 PM #4
Registered
- Join Date
- Jan 2008
- Posts
- 77
BRILLIANT! The wood gears are the best.
-
02-17-2010, 08:22 PM #5
Registered
- Join Date
- Dec 2008
- Posts
- 226
W.T. thanks, I know Ive read a lot of your posts... might have even got a few ideas there...
Jim, sorry.. no I was asking the local dealer that I bought the machine from for the machine torch...
I got a real good price from them on the 45. They said they were promoting this new machine from a company I hadn't hear of before hand "Hypertherm" I looked it up online and It wasn't long before there was a box in the back of my truck. They didn't charge me much more than a previous quote on the Blue coloured 375x, I also think they gave me an extra break as this is, or was, basically a hobby for me. I'm sure their supplier bought a bunch of units, and the machine torch is a special order. First Its gotta be Imported to Canada... Exchange accounted for at the time they bought the stock... Etc.
Pofo... thanks .. lol
I when I found the rack and pinion, I was elated... it wasn't until later and I found the prices of the timing pulleys that I choked... Its not that bad but I wasn't sure which size I needed. so changing gears would add up fast. In typical fashion I thought heck I can make em...lol. Originally I was going to try and drill them like I have seen before, then I started to think I could rig up a stepper as a 4th axis and cut a small gear at least. well I made a 10 tooth from K3 right on the stepper shaft, then a 35 I think. the 35 I drilled out and put on the 1 inch shaft you see in the drive assemblies. I then had enough gear reduction and cut a 65 tooth, but it was hard to drill a tight fit on the shaft and the gear "wobbled." lol , so I used that gear, and cut some hubs to fit my 2" hole saw cut blanks(slightly oversize). Then cut 3 8s, 3 9s 3 10s, 3 12s and finally 3 70s.
It took the first 4 gears Compensating for errors in size to figure out the trig. properly so I could cut the rest with out adjustments to the code.
-
02-18-2010, 09:06 AM #6
Registered
- Join Date
- Dec 2008
- Posts
- 226
I just thought Id add a couple more pictures... just to figure out how the attachments work.
This puppy was the inspiration and the heart of the CNC table.
For those of you that don't know It has a real convenient feature in that the torch cable unplugs in 1 second and there are optional machine torches and different cable lengths available. So disconnect the machine torch .. quick cut by plugging in the hand torch.. and back to CNC before you can blink....
-
02-20-2010, 10:28 PM #7
Registered
- Join Date
- Dec 2008
- Posts
- 226
Just a quick update.....
I do have a working THC circuit for my Powermax 45, It just needs some dialing in on resistor values and i need to stop both outputs being able to go high at the same time. Might be a noise thing, but mach overrides up when both are on so no real worries.
It is one OP-AMP for input impedance and signal inversion, a quad comparator , quad and-gate, and transistor output... resistors and a tun of jumpers all over my breadboard....LOL.
Oh and It currently requires a negative supply voltage for the OP-AMP because the rails only go to 2 volts from supply and the cutting range input is lower than that (not to mention a negative voltage from the work clamp which when attached to the table is at a ground level.) And yes although you could get away with calling it a ground clamp on a negative current source, but it isn't actually attached to ground internally so really the clamp and torch both float until connected to something.
Just like when you get a power supply and it has a "+V" and "-V" output... If you connect the +V output to ground, you have a negative voltage supply/source
When I have it all worked out I'll post some info.... and router up a pcb for it
-
03-26-2010, 11:34 AM #8
Gold Member


- Join Date
- Feb 2007
- Posts
- 4553

Pandinus,
You have definitely inspired me with your ingenuity.
Very kewl, being frugal is smart.
Keep up the awesome work,
Jeff...Patience and perseverance have a magical effect before which difficulties disappear and obstacles vanish.
-
03-26-2010, 09:52 PM #9
Member
- Join Date
- Feb 2006
- Posts
- 1260
Keep the progress updates coming. I love the fact you have made parts of "FRANKEN" I'd never dreamed of doing. Great job on the belt drives, Not so sure on the choice of material but hey, if it works, don't fix it.
If it works.....Don't fix it!


 Reply With Quote
Similar Threads
-
It lives!
By andypugh in forum Vertical Mill, Lathe Project LogReplies: 2Last Post: 05-02-2009, 10:53 PM -
"She lives again"
By sixpence in forum CNC Wood Router Project LogReplies: 7Last Post: 07-08-2005, 05:58 AM -
She Lives
By sixpence in forum CNC Wood Router Project LogReplies: 62Last Post: 07-05-2005, 08:47 PM -
I'm looking for someone who lives in Nigeria
By cncadmin in forum Community Club HouseReplies: 10Last Post: 01-04-2005, 12:27 AM -
It Lives!!!
By yukonho in forum DIY CNC Router Table MachinesReplies: 8Last Post: 01-20-2004, 06:51 PM
