

Hello Zone!
I figure it's time to start a thread of my 4x8' CNC router. This has been a work in progress for more months than I care to count, but mostly due to my off & on nature (aka ADDHD). Thankfully it's pretty far along at this time and I plan to fill in the background in following posts.
First off I need to thank some folks for their posts & products. With out them I would have never tackled a project this large and complex.
** General CNC router design: Jsantos and his "Yet Another 8020 CNC Build" thread. His design and details are simply what moved me to finally leap head first into such an (epic) project.
** CNC Bits: Ahren of CNC Router Parts. All experiences with CNCRP have been excellent for me. As you will see, his parts are very well thought out, simple and fairly priced.
** General parts: 8020 Inc I have made at least 4 orders, most of them quite large (package wise). Product, price and shipping have always been impressive.
That said, let's talk about the robot. For the most part it's quite similar to jsantos's machine at this point.
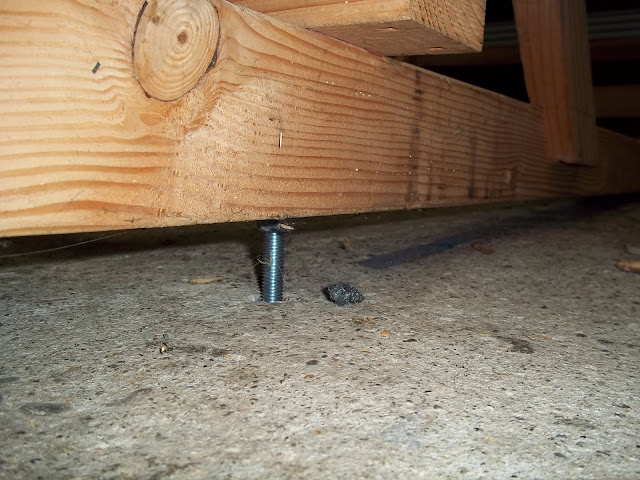
I spent a fair amount of trial & error and time before I built the current base. I suffer from a shop with a floor that's by no means smooth or level. So I resorted to sinking 4 1/2" all-threads into the floor and secured with epoxy. This allowed me to level the 4x4" posts running the length of the base. The 4'x4' upright boxes were left over from my first base frame attempt.
From Seth-bot
From Seth-bot
OK that's a start. Maybe it will pique someones interest. Feel free to ask questions. There are so many details and photos I can/will add. I just don't know what to cover next (at this moment). :cheers:
Thread: 4x8 8020 R&P + CNCRP build log
Results 1 to 20 of 92
-
04-13-2011, 08:08 AM #1
 Registered
- Join Date
- Feb 2010
- Posts
- 0
4x8 8020 R&P + CNCRP build log
-
04-13-2011, 08:27 AM #2
Registered
- Join Date
- Feb 2010
- Posts
- 0
Seth-bot biography continued
Current status:
- Router base frame of 15s 3030's assembled and squared (good enough for testing)
- CRS rails drilled, painted & attached. This was much easier than expected. Once again, it's worth the time to build a proper jig. Once I figured that out, it was a little production line and drilled 98 holes in the 1/4" CRS in one evening. (Pictures will follow when I find them)
- Racks cut, prepped and attached. Moore Gear supplied the racks. I opted for 4x 6' racks vs. 2x 8' and a 4', this saved over $100 and looks like it will work great. Ahren's rack clamps are a god send.
- 4 extended carriages attached and cross connected with some 1530 for testing.
- 1 R&P drive assembly attached for fitting.
From Seth-bot
- Old 2U rack mount server case gutted and converted to hold 48v PSU, G540 and other bits. Existing 12v server PSU kept to power case fans. Old 60mm case fans were on last legs and replaced with (3) new temp sensing fans. Hacked together some sheet aluminum to hold switches and G540.
I'm quite happy everything fit so well in the server case. I have had this server collecting dust for over 5 years. Yay for being a pack-rat!! =)
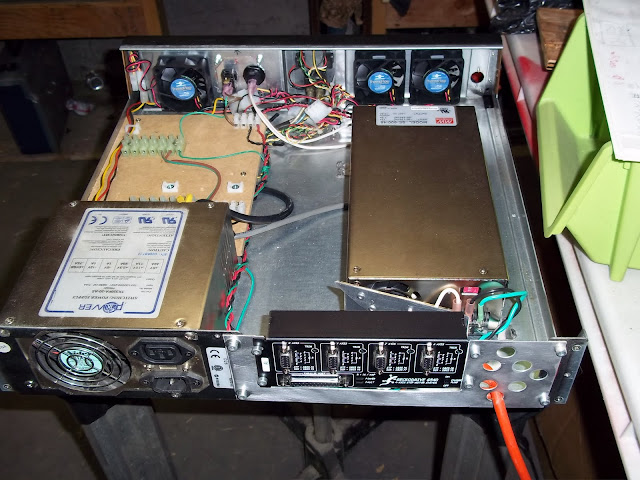
From Seth-bot

From Seth-bot
-
04-13-2011, 08:58 AM #3
Registered
- Join Date
- Feb 2010
- Posts
- 0
More parts for the Seth-bot
Yesterday I received the Igus e-chain I bought on e-bay. 80"x 2 3/8". I think it cost just over $60 after shipping. Came in 2 40" chunks. Will use ~2/3rds if it for the long x axis. The rest for the y axis.
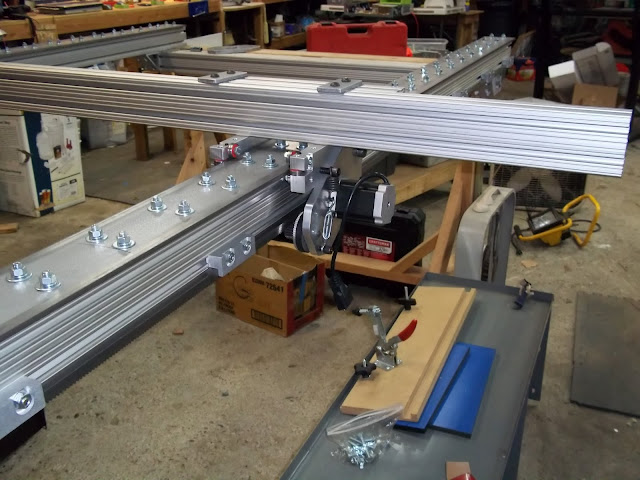
Tonight I came home to another large package. 4x 72" bright yellow 1515's and a 28" 3060 with 45deg cuts and a nice black anodized finish. Yeah, I know, goofy colors but the price was right. The yellow painted 1515s will support the base or spoil board and stiffen the frame so they won't be too visible.

From Seth-bot
OK I think that's enough posting for tonight. More to follow. Next tasks are to assemble the gantry, source the bearing rail / plate. Hopefully the local water-jet folks won't be too expensive. I really don't want to have to drill out the 7" x 50" CRS on my drill press (too wide I think). If I remember I'll give them a call tomorrow and get a quote, have CAD file ready.
Also working on a cart for the stepper controls box, computer, LCD, VFD (future), etc.
:cheers: - Seth
-
04-13-2011, 11:29 PM #4
Registered
- Join Date
- Feb 2010
- Posts
- 0
Y axis bearing plate update.
As I alluded to in a previous post I wanted to look into having the 7"x50" bearing plate water-jet cut. While the drilling of my 2 4"x8' CRS bearing plates for the X axis was easier than expected, I was not looking forward to drilling such a wide plate on my drill press if I didn't have to. Also the CRS rails were not very straight out of the box. (I've muscled the rails on and they seem to be straight enough for now.)
Well I spoke with a sales guy today at IRC Waterjet who was very helpful and gave me a quote with just some rough figures over the phone: 7x50x0.25", ~50x 5/16" holes. Much to my surprise I can have the plate waterjet cut at their 'A-class' tolerances for well less than $200! To me this is well worth it. Dimensional tolerances +/-.005" and edge tolerances .010". As I recall.
My only (small) concern is that due to the way a waterjet cuts, the outside edges will not be perfectly perpendicular to the face but within 0.010". This seems pretty trivial. After consulting with a friend who knows a ton about steel, he noted that since this is stainless .vs CRS the wear can actually harden the steel. So ideally the slightly uneven edge will not be a problem.
Anyone have any thought / objections to going this route? I don't think the stainless steel will make much of a difference along with the waterjet tolerances. But I have yet to see anyone who has done something similar....
I tried to get a pretty rendering of the gantry plate but since it's not much to look at I quickly gave up. (Really I should be working not updating my build log at work) =)
-
04-14-2011, 12:50 AM #5
Registered
- Join Date
- Feb 2006
- Posts
- 202
Looking good so far. I actually like the yellow, lol
I think you are the only other Seth I've ever talked to, aside from the muttering I do with myself, lol
-Seth
-
04-14-2011, 01:19 AM #6
Registered
- Join Date
- Feb 2010
- Posts
- 0
Hey Seth,
Thanks for the kind comments. Actually all my friends have noted they like the yellow as well. I realized that the yellow finish will be a nice touch as I think I will have them extend out from the frame on one side for e-chain support. Hopefully that will keep folks from bumping into them.
Ha! Yeah I don't run into too many Seths either, but they are out there.
-
04-14-2011, 03:02 AM #7
Registered
- Join Date
- Feb 2010
- Posts
- 0
Mach3 quick setup guide?
It's a little off-topic but I was wondering if anyone can point me to a 'getting started' guide for Mach3? I've poked around a little and haven't found much yet. At the moment I don't even have mach3 installed but now that I have all the parts ready I would really like to see something MOVE =)
I'm also quite adept with Linux so maybe I'll start with EMC2 as the only free PC with a parallel port is already installed with Ubuntu Linux.
/me wonders do I even have a parallel printer cable anymore....hmmm
Update: Doh! I should have tried at least one more search before I posted. I found this and after a quick skim it appears to be just what I was looking for. Mach3 Tutorial
-
04-14-2011, 06:25 PM #8
Registered
- Join Date
- May 2009
- Posts
- 435
Looks like an interesting build, the colors are icing on the cake.
-
04-17-2011, 06:53 AM #9
Registered
- Join Date
- Feb 2010
- Posts
- 0
Quick update: Cutting 3060
Time for a quick update of recent progress:
The chunk of black anodized 3060 needed to be cut to size. This will be used to attach the 4 extended CNCRP bearing blocks to both X axis rails. I got the block for a good price from 8020's E-bay store. It was pre-cut with 45deg miter cuts on each end AND it was a niffty black. 28" on the long side. Perfect for my needs.
For those who have wondered what's the best way to evenly cut through t-slot aluminum, look no further than your common table saw / chop saw. My RIDGID 12" miter saw w/ 60 tooth blade had no problems. One tip, watch how deep you cut, earlier this week I went to deep on a thick cut and destroyed my laser edge guide. *sigh* Oh well it's mostly a gimmick and I never really used it.
First I cut the block in (nearly) identical halves. With the sharp 45deg ends planed to be faced out I pondered how much I could chop off and still have enough room to bolt everything too. 2 beers later and some careful eye-balling, I decided that cutting off the tips up to the center of the block would be the best route. Thankfully this came out great and I saved a bunch of time not drafting it out. Looks great as well! To do this I just flipped the blocks and mated up the 45deg angles, clamped it up and put some extra tape to keep the waste bits from rattling up against the blade and causing a nasty kick back.
Pictures tell it best: (trying the recommended method for attaching images =)
-
04-17-2011, 11:08 AM #10
Registered
- Join Date
- Feb 2010
- Posts
- 0
Gantry mock up
Gantry setup is going pretty well. Considering I'm doing most of the design in my head I've impressed myself thus far. But still I'm just waiting to find a major flaw. =)
Looks like I'm going to need to place another order for 8 hole gussets and t-slot bolts. Oh well I might as over do the bracing if I can. Looks like it will take 16 gussets to attach the gantry + uprights + bearing block "chunks". Just a few short of gussets but even more short of bolts. Since I've used the 8020 bolt kits on all the gussets thus far, I will continue to use them vs some 5/16" bolts from Home Depot. So much for glamor.
I'm starting to wonder if my gantry is a bit tall. Also the bearing support blocks are pushed in quite a bit, eliminating some clearance on the outside edge near the rails. But considering I only plan to use the full 4' width for plywood / foam sheets that are less than 2" thick, I think I will be fine with this configuration for now.
Suggestions and experiences welcomed.
Cheers,
Seth
-
04-25-2011, 02:56 AM #11
Registered
- Join Date
- Feb 2010
- Posts
- 0
Quick update:
I've been working on a machine console for the Seth-bot. Recently slapped some paint on, installed rack mount rails, more paint....
Then I decided I needed better network access to the shop. Since the rain let up I figured it'd be a good work-out to dig a trench from the shop to run some conduit & Cat5E.
Stripped the 4U server case for the CNC PC.
Purchased a new Motherboard + CPU + RAM + CPU cooler from NewEgg. Will upgrade current desktop PC with the new bits and transfer existing PC guts to the 4U server case.
(Pictures later)
-
04-25-2011, 05:55 AM #12
Registered
- Join Date
- Feb 2010
- Posts
- 0
One of several weekend projects - PC case hacking
How about a picture update? We all love pics.
Here's a short photo montage of one of my weekend projects for the CNC robot.
The stripping and modifying of an old 4U rack mount server case:
#1 Pre-stripping
#2 Gutted!
#3 Spare parts(?)
#4 Half way through hacking open the case face for better air flow.
#5 Finished hacking a hole in the case with the trusty Dremel tool. 120mm fan dangling in the background. - Air flow should be much improved. Plan to place some filter material in front of the fan to keep some dust out.
-
04-25-2011, 08:01 AM #13
Registered
- Join Date
- Jan 2011
- Posts
- 0
Scotch Brite pads make a pretty good filter
-
04-25-2011, 08:14 AM #14
Registered
- Join Date
- Feb 2010
- Posts
- 0
Scotch-bright:
Agreed. Luckily I have a wee bit better option. I have some carbon / charcoal HVAC vent filters I picked up long ago. If those turn out to be too restrictive I'll try some loose Scotch-bright type pads.
120mm fans don't have much suction pressure so ideally I can find something that keeps dust to a minimum and still allows enough air flow. Worst case I'll run it naked and just make sure to clean it out every month when I change the dust filters in my whole shop air cleaner system.
-
04-25-2011, 09:52 AM #15
Registered
- Join Date
- Feb 2010
- Posts
- 0
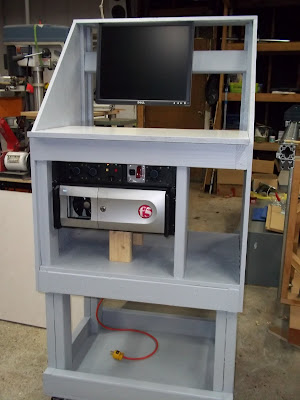
Robot console update
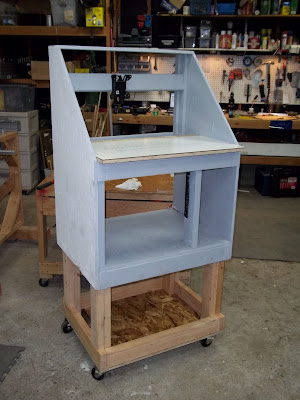
Here's another Easter weekend project I've been working on: Command and Control console for the 'bot.
Since I went the route of packaging the bulk of my electronics in old rack mount server chassis I needed a place to mount them. Since I needed to build a rack for the cases I combined the need for a workstation all into one. Yes I know it's not pretty but most of my projects seem to have that problem =)
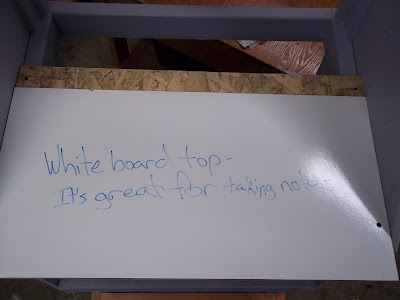
Below are some pics of the assembly. It looks pretty short right now but the next step is to build a base with some casters I found in my parts bin. I figure I need to raise it up 8-12". Maybe I'll work in a storage drawer into the base as well. Who doesn't love more storage?!
Either way, it's a work in progress. I tried to plan for future upgrades.
Stay tuned for more!! :cheers:
-
05-03-2011, 03:50 AM #16
Registered
- Join Date
- Feb 2010
- Posts
- 0
Getting closer
It's been a while, time for some updates and pictures. As always I've been working on a few things in parallel. Command Console, PC conversion / upgrade, rail cleaning, etc.
Console: It's nothing fancy and built with what was cheap (found) and plentiful. It's almost done. Last bit will be a cable carrier between the 'bot and console and a power strip or 2 mounted on the back.
Chipset fan replacement. Yet another freebie. Found a better one on the old P3 chip (on right)
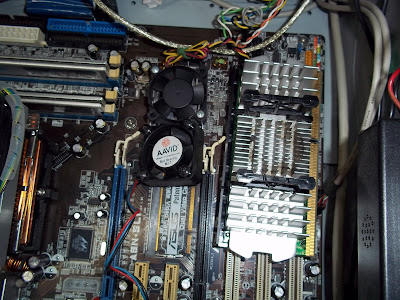
And my old workstation guts successfully transplanted. Had to get out the welder to hack the case to hold 3 hard drives as I didn't want to loose or transfer 500+GB of files. It worked out great after much deliberation on the best place to stick the drives, in a serviceable spot that didn't restrict cooling.


Console assembly.


Looking good I would say. Just need to slap a bit more Gripper Grey paint on.


-
05-04-2011, 07:13 AM #17
Registered
- Join Date
- Feb 2010
- Posts
- 0
DIY 8020 brackets
So I decided to try being a frugal DIY'er and roll my own 8020 brackets. To secure some 1515 stock to the bottom of the X axis (3030), I needed some 3030 to 1515 90deg brackets. Purchasing pre-drilled brackets was going to add up fast. So I figured I would see if my drill press was worth it's space and ordered 48" of some 3"x1.5"x.25" 'Angle' stock P/N 8231. For less than $20 I could drill out a number of sturdy brackets.
Well at this point I'm glad I went DIY and glad I took the time to build a modular / t-slot base for my drill press.
I just formed a slot for the angle stock, chopped off 6" worth and used a pre-rolled bracket to make measure marks. After running one piece through [12x 21/64" holes] I checked it against a piece of 3030 and was happy to see it mated up perfectly.
Pictures tell it best:
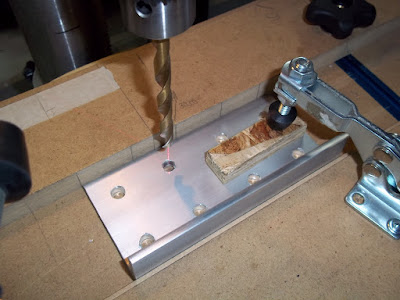

Taking the time to set up a jig with cam-clamps really made this such an easy job. Hopefully they will bolt on as planned. Eye-ball estimates indicate the jig and holes are spot on.
Average time to process one 6" chunk: ~10min This includes fussing around with the shop vac and cleaning out the work space.
-
05-07-2011, 04:36 AM #18
Registered
- Join Date
- Feb 2010
- Posts
- 0
Cost break-down of rolling your own 8020 brackets
Here's the breakdown of the saving from rolling my own 90° 1515 x 3030 brackets.
What I wanted to use. Aluminum Corner Gusset 15 S 4334 = $4.99 ea
Sure those are a bit more 'sturdy' but in the sake of comparison we should consider the similar 8020 part. Aluminum Corner Bracket 15 S 4375 N = $6.45 ea (wait the 'simple' ones cost more??)
I needed x10 to x20 of these brackets to attach the 1515 braces to the underside of my frame for spoil board support. The ready made gussets were going to get expensive fast.
So I went with this: Aluminum Angle 1.5 x 3 x .25 x 48 8231 N for $16.35.
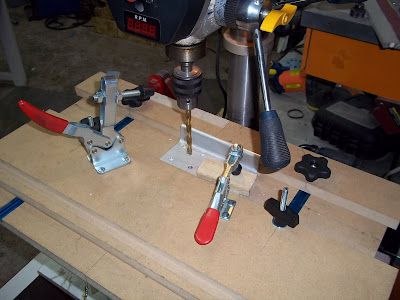
In 2 short evenings I've already made 10 of the brackets. As noted in the previous post I used a simple jig on the drill press and cranked out 6" chunks (2 gussets) in about 10 minutes each. Due to the nature of the jig I have to make some mods to move between the 3030 side and the 1515 side (hence you will notice 2 incomplete gussets in the picture)
After (mostly) drilling out 5x 6" chunks in an evening I still have enough stock for 6 more brackets.
So excluding time a $16.35 piece of raw stock can be turned into 16 x $6.45 = $103.20 savings = $86.85
* don't forget to factor in the cost of your time and beer. If you don't have a good jig, drill (press), etc. Your savings may quickly evaporate.

** Note the 6" chunks have yet to be cut in half to get them to the gusset size needed/quoted.
-
05-28-2011, 04:04 AM #19
Company Representative

- Join Date
- Feb 2004
- Posts
- 1086
Nice work on the brackets, Seth. Long weekend ahead...more machine pictures coming soon? Looks like you're close to getting this puppy moving!
Ahren
CNCRouterParts
-
05-29-2011, 10:30 PM #20
Registered
- Join Date
- Feb 2010
- Posts
- 0
Hey Ahren,
Thanks for the kind words. You should have another order from me in a few days!
Sorry folks for the lack of updates. I am a man of too many projects (and ADD). Past few weeks I've been distracted with converting my fishing boat to 100% electric by removing an old 40hp Merc to be replaced with a 10hp 48v electric outboard. I'll share some photos when finished.
Cheers,
Seth


 Reply With Quote
Similar Threads
-
8020 BBR Router Build
By ddbuster in forum DIY CNC Router Table MachinesReplies: 8Last Post: 10-15-2017, 12:16 AM -
Yet Another 8020 CNC Build
By jsantos in forum Open Source CNC Machine DesignsReplies: 203Last Post: 04-29-2012, 10:14 PM -
8020 CNC Build
By beamsjr in forum DIY CNC Router Table MachinesReplies: 60Last Post: 02-25-2011, 11:10 PM -
8020 build 3x5
By sieg01 in forum CNC Wood Router Project LogReplies: 30Last Post: 03-17-2009, 10:08 PM -
Another 8020 build
By Micky15044 in forum Open Source CNC Machine DesignsReplies: 7Last Post: 08-17-2008, 03:45 AM
